
1. 系统整体设置
在https://wandb.ai/settings中可以设置什么时候以邮件或slack(我没下,所以我全用邮件了)提醒:
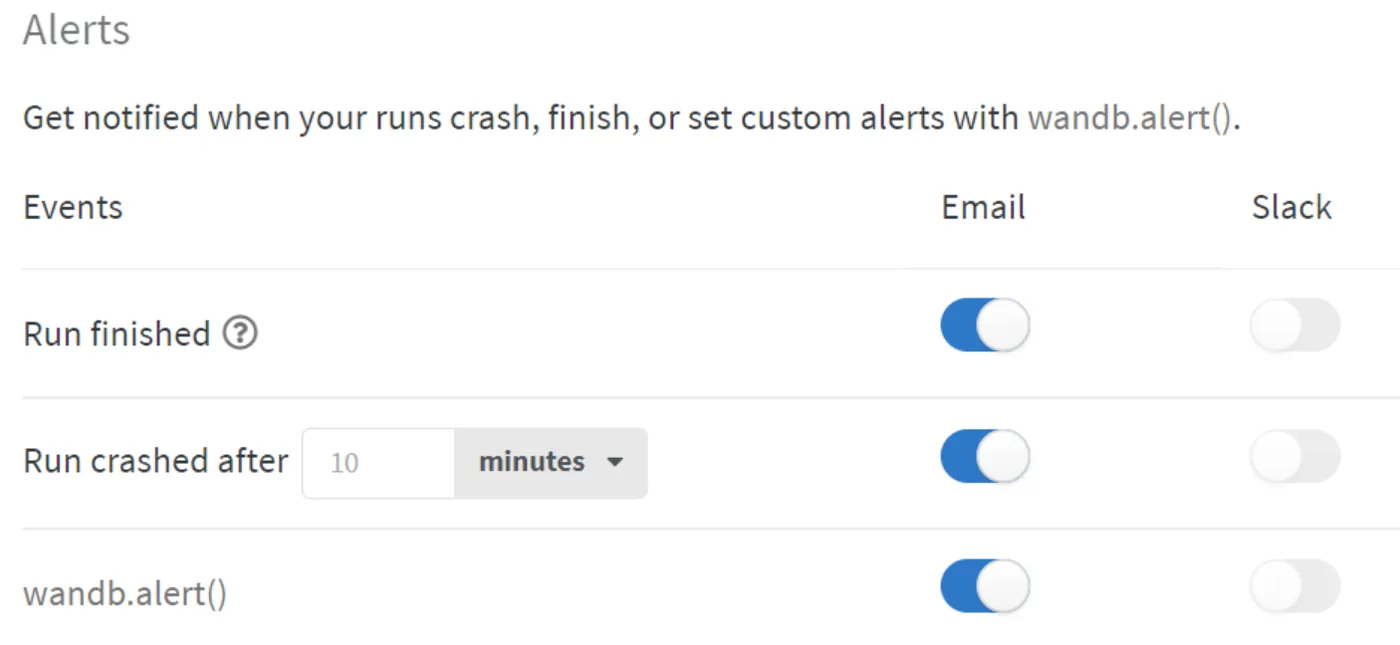
其中run finished在使用jupyter notebook环境时不会起效,以防每个cell运行结束后都提醒一次。如果用jupyter notebook的话,需要用wandb.alert()来触发提醒。
此外还可以关联GitHub以迅速提交benchmark runs(这个我还没试过,所以还没有关联):
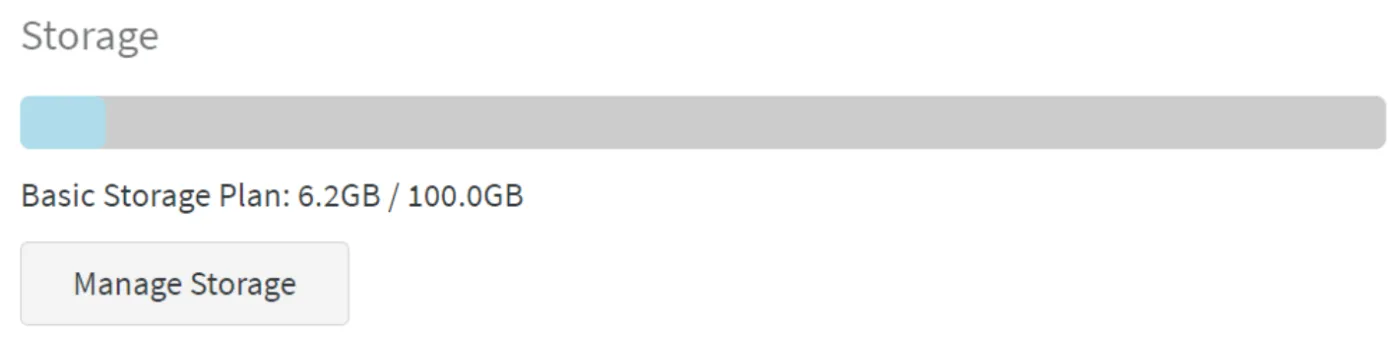
储存空间可以进行管理,免费的有100个G,点击“manage storage”可以直接删不需要的文件:
2. 学术
2.1 免费学术小组
这个我还没试过,意思应该是学校或科研机构之类的可以免费建小组。如果有需要可以使用:https://wandb.ai/site/academic
2.2 在论文中引用wandb的方式
来自https://wandb.ai/site/academic:
@misc{wandb,
title = {Experiment Tracking with Weights and Biases},
year = {2020},
note = {Software available from wandb.com},
url={https://www.wandb.com/},
author = {Biewald, Lukas},
}
2.3 wandb白皮书
3. wandb文档
Weights & Biases - Documentation
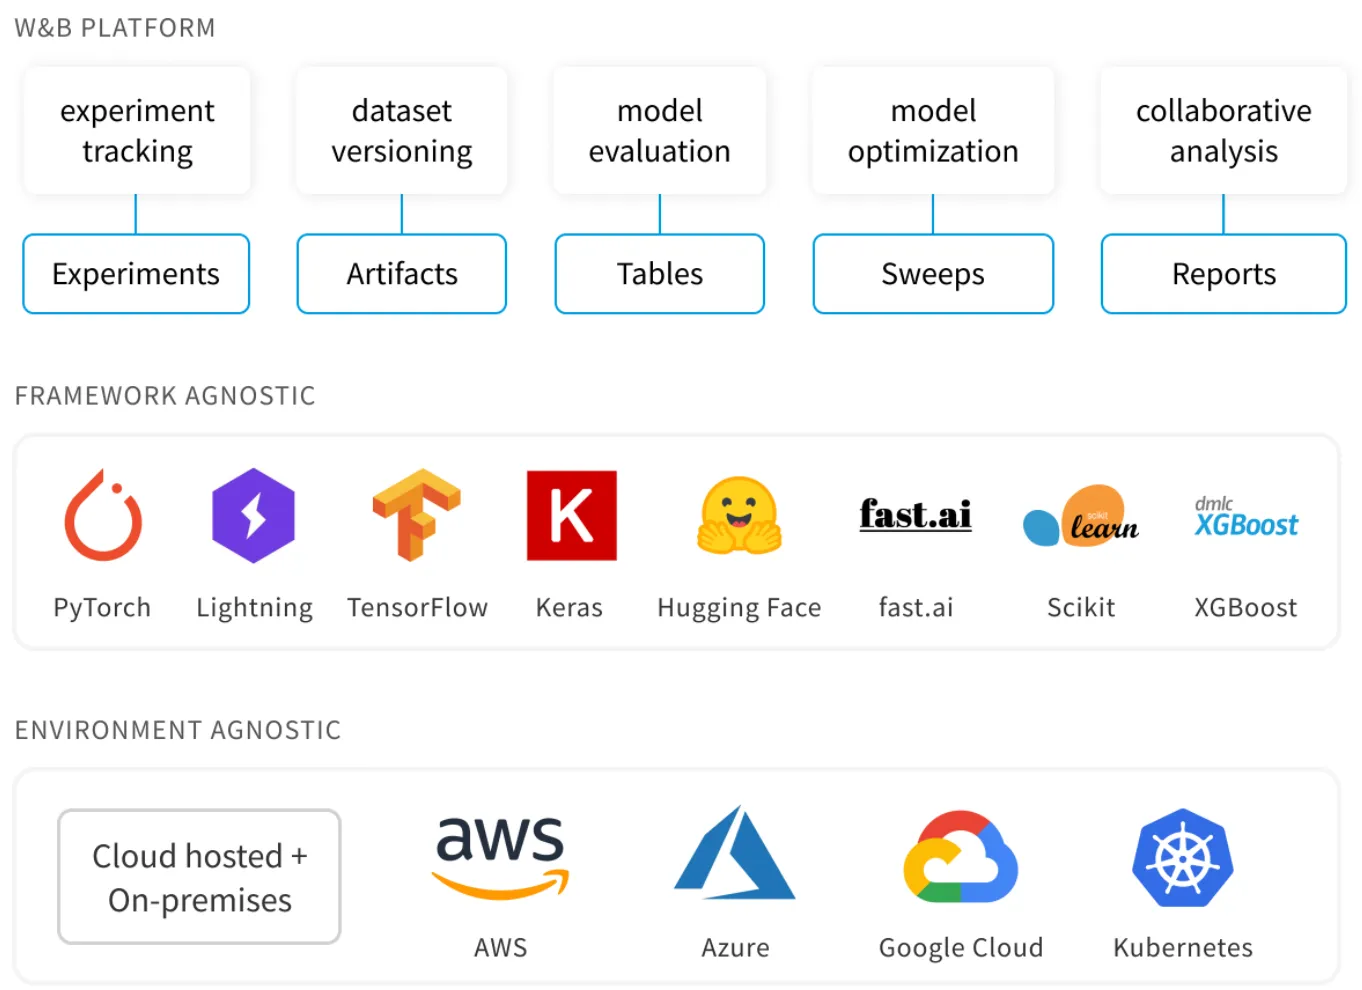
wandb支持多平台、多框架。
3.1 wandb quickstart
Quickstart - Documentation
Jupyter Notebook代码实践:Intro_to_Weights_&_Biases.ipynb - Colaboratory
3.1.1 set up
命令行:
pip install wandb
wandb login
(如果代码中有用到wandb,其实会自动要求登录,但是如果用nohup挂起脚本的话就无法实现,所以还是建议提前登录好)
API key的位置在:https://wandb.ai/authorize
(值得注意的是,这个配置应该是全局的,虽然我在一个虚拟环境下登录了我的账号,但是在别的虚拟环境下重新安装wandb还是可以直接通用。我估计是因为缓存在了本地)
用wandb login --relogin强制重新登录。
用jupyter notebook则为:
!pip install wandb
wandb.login()
3.1.2 开启新项目,跟踪指标、超参,添加报警信息
感觉就是init新项目,然后指标用log(在下面例子里可以看到,可以分组(如分为train/val)),超参用config,需要报警的内容就添加alert,结果添加到summary,最后finish就行,比较好用。
init文档:Launch Experiments with wandb.init - Documentation
对dashboard整体布局(run page)的介绍:Run Page - Documentation
数据可视化/跟踪指标:Data Visualization - Documentation
跟踪超参:Configure Experiments with wandb.config - Documentation
警告部分文档:Send Alerts with wandb.alert - Documentation
在测试代码时如临时不想与wandb同步,需设置环境变量,使wandb模式变成离线: WANDB_MODE=offline(具体做法是在运行Python代码的命令行中,在python前面加上这句命令)
文档中给出的核心代码:
import wandb
wandb.init(project="my-awesome-project")  #其他入参:name(见下例),config(见下)
wandb.log({'accuracy': train_acc, 'loss': train_loss})
wandb.config.dropout = 0.2
wandb.alert(
    title="Low accuracy",
    text=f"Accuracy {acc} is below the acceptable threshold {thresh}"
)
在jupyter notebook上,用一个假示例来模拟:
import random
# Launch 5 simulated experiments
total_runs = 5
for run in range(total_runs):
  # 🐝 1️⃣ Start a new run to track this script
  wandb.init(
      # Set the project where this run will be logged
      project="wandbexample1",
      # We pass a run name (otherwise it’ll be randomly assigned, like sunshine-lollypop-10)
      name=f"experiment_{run}",
      # Track hyperparameters and run metadata
      config={
      "learning_rate": 0.02,
      "architecture": "CNN",
      "dataset": "CIFAR-100",
      "epochs": 10,
      })
  # This simple block simulates a training loop logging metrics
  epochs = 10
  offset = random.random() / 5
  for epoch in range(2, epochs):
      acc = 1 - 2 ** -epoch - random.random() / epoch - offset
      loss = 2 ** -epoch + random.random() / epoch + offset
      # 🐝 2️⃣ Log metrics from your script to W&B
      wandb.log({"acc": acc, "loss": loss})
  # Mark the run as finished
  wandb.finish()
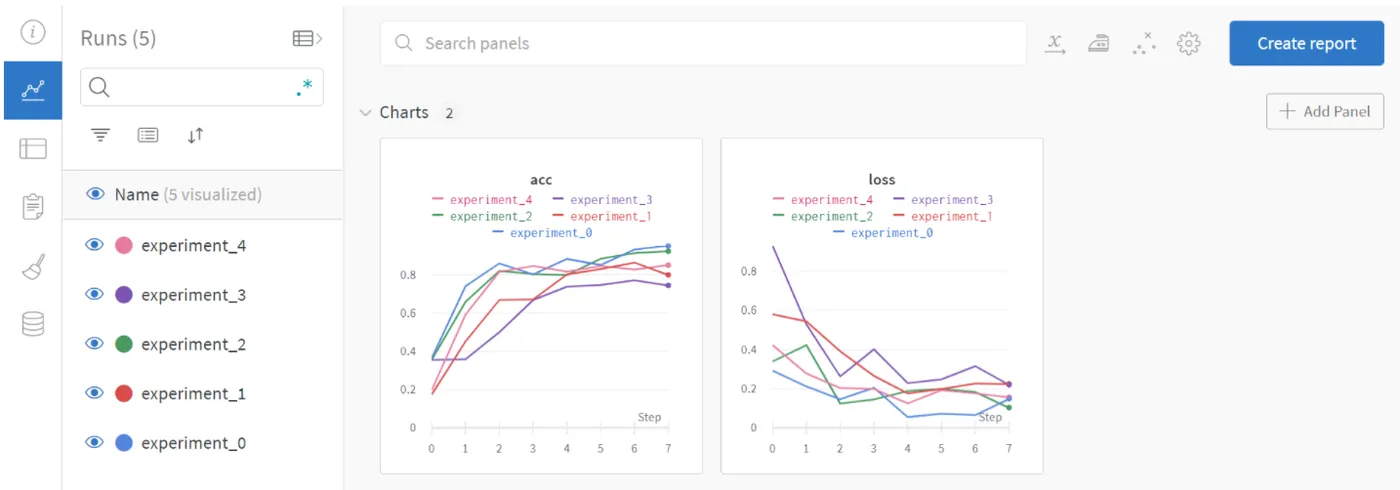
在输出中会给出wandb项目链接,在浏览器中打开即可。
记录的内容:
输出的内容:
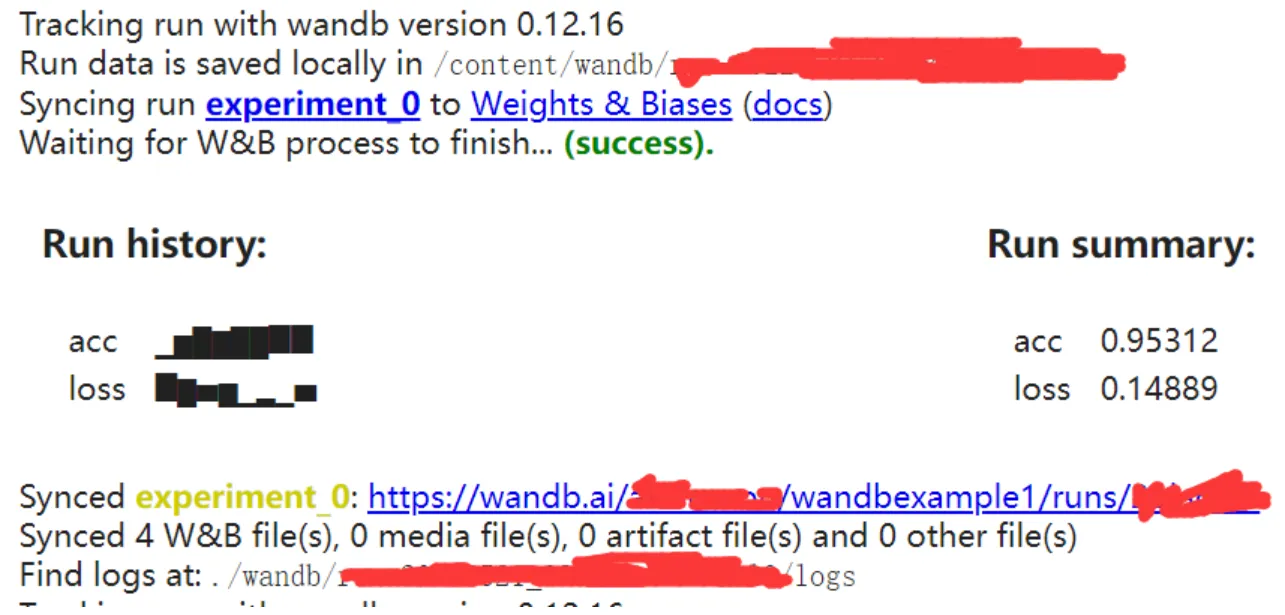
可以看出运行数据保存在了本地的wandb文件夹,额外的信息都没有上传到wandb上。
3.1.3 上一节的PyTorch例子
jupyter notebook上:MNIST分类器
#@title
import wandb
import math
import random
import torch, torchvision
import torch.nn as nn
import torchvision.transforms as T
from tqdm.notebook import tqdm
device = "cuda:0" if torch.cuda.is_available() else "cpu"
def get_dataloader(is_train, batch_size, slice=5):
    "Get a training dataloader"
    full_dataset = torchvision.datasets.MNIST(root=".", train=is_train, transform=T.ToTensor(), download=True)
    sub_dataset = torch.utils.data.Subset(full_dataset, indices=range(0, len(full_dataset), slice))
    loader = torch.utils.data.DataLoader(dataset=sub_dataset,
                                         batch_size=batch_size,
                                         shuffle=True if is_train else False,
                                         pin_memory=True, num_workers=2)
    return loader
def get_model(dropout):
    "A simple model"
    model = nn.Sequential(nn.Flatten(),
                         nn.Linear(28*28, 256),
                         nn.BatchNorm1d(256),
                         nn.ReLU(),
                         nn.Dropout(dropout),
                         nn.Linear(256,10)).to(device)
    return model
def validate_model(model, valid_dl, loss_func, log_images=False, batch_idx=0):
    "Compute performance of the model on the validation dataset and log a wandb.Table"
    model.eval()
    val_loss = 0.
    with torch.inference_mode():
        correct = 0
        for i, (images, labels) in tqdm(enumerate(valid_dl), leave=False):
            images, labels = images.to(device), labels.to(device)
            # Forward pass ➡
            outputs = model(images)
            val_loss += loss_func(outputs, labels)*labels.size(0)
            # Compute accuracy and accumulate
            _, predicted = torch.max(outputs.data, 1)
            correct += (predicted == labels).sum().item()
            # Log one batch of images to the dashboard, always same batch_idx.
            if i==batch_idx and log_images:
                log_image_table(images, predicted, labels, outputs.softmax(dim=1))
    return val_loss / len(valid_dl.dataset), correct / len(valid_dl.dataset)
def log_image_table(images, predicted, labels, probs):
    "Log a wandb.Table with (img, pred, target, scores)"
    # 🐝 Create a wandb Table to log images, labels and predictions to
    table = wandb.Table(columns=["image", "pred", "target"]+[f"score_{i}" for i in range(10)])
    for img, pred, targ, prob in zip(images.to("cpu"), predicted.to("cpu"), labels.to("cpu"), probs.to("cpu")):
        table.add_data(wandb.Image(img[0].numpy()*255), pred, targ, *prob.numpy())
    wandb.log({"predictions_table":table}, commit=False)
训练:
# Launch 5 experiments, trying different dropout rates
for i in range(5):
    # 🐝 initialise a wandb run
    wandb.init(
        project="wandbexample1",
        name="pytorch_example"+str(i),
        config={
            "epochs": 10,
            "batch_size": 128,
            "lr": 1e-3,
            "dropout": random.uniform(0.01, 0.80),
            })
    # Copy your config
    config = wandb.config
    # Get the data
    train_dl = get_dataloader(is_train=True, batch_size=config.batch_size)
    valid_dl = get_dataloader(is_train=False, batch_size=2*config.batch_size)
    n_steps_per_epoch = math.ceil(len(train_dl.dataset) / config.batch_size)
    # A simple MLP model
    model = get_model(config.dropout)
    # Make the loss and optimizer
    loss_func = nn.CrossEntropyLoss()
    optimizer = torch.optim.Adam(model.parameters(), lr=config.lr)
   # Training
    example_ct = 0
    step_ct = 0
    for epoch in tqdm(range(config.epochs)):
        model.train()
        for step, (images, labels) in enumerate(tqdm(train_dl, leave=False)):
            images, labels = images.to(device), labels.to(device)
            outputs = model(images)
            train_loss = loss_func(outputs, labels)
            optimizer.zero_grad()
            train_loss.backward()
            optimizer.step()
            example_ct += len(images)
            metrics = {"train/train_loss": train_loss,
                       "train/epoch": (step + 1 + (n_steps_per_epoch * epoch)) / n_steps_per_epoch,
                       "train/example_ct": example_ct}
            if step + 1 < n_steps_per_epoch:
                # 🐝 Log train metrics to wandb
                wandb.log(metrics)
            step_ct += 1
        val_loss, accuracy = validate_model(model, valid_dl, loss_func, log_images=(epoch==(config.epochs-1)))
        # 🐝 Log train and validation metrics to wandb
        val_metrics = {"val/val_loss": val_loss,
                       "val/val_accuracy": accuracy}
        wandb.log({**metrics, **val_metrics})
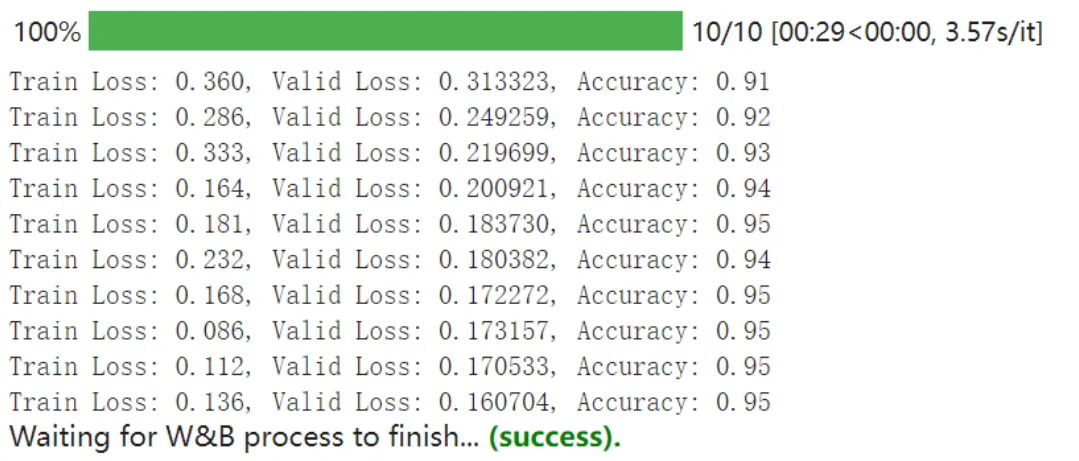
        print(f"Train Loss: {train_loss:.3f}, Valid Loss: {val_loss:3f}, Accuracy: {accuracy:.2f}")
    # If you had a test set, this is how you could log it as a Summary metric
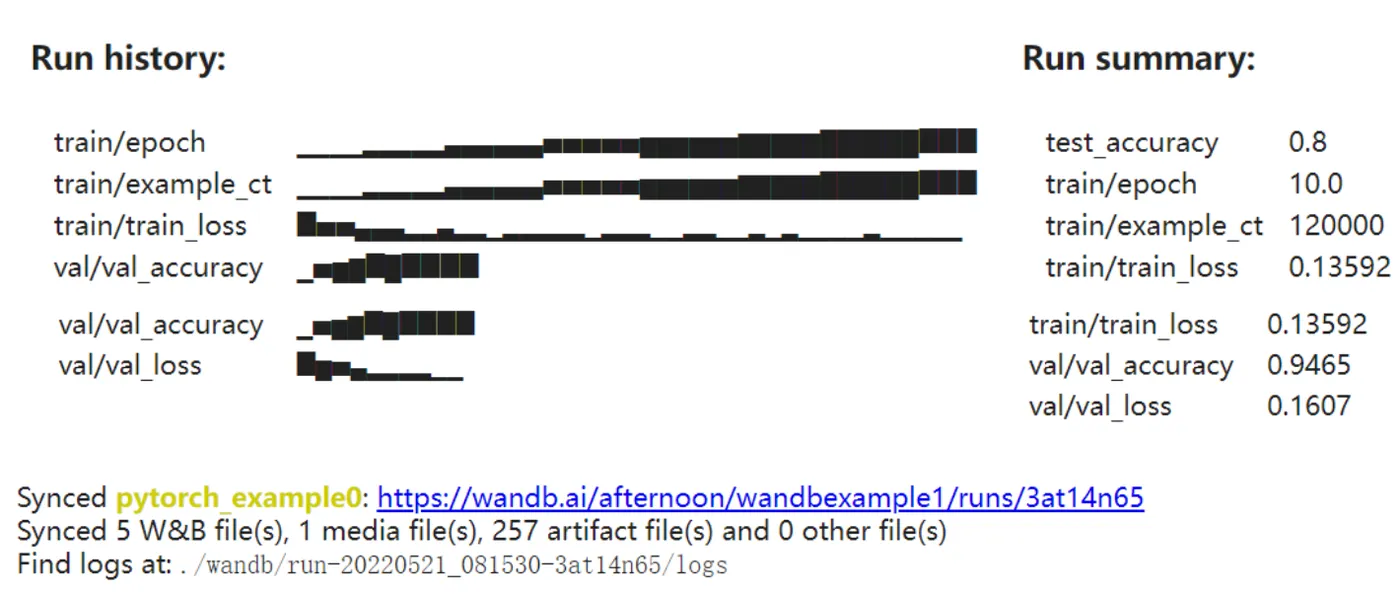
    wandb.summary['test_accuracy'] = 0.8
    # 🐝 Close your wandb run
    wandb.finish()
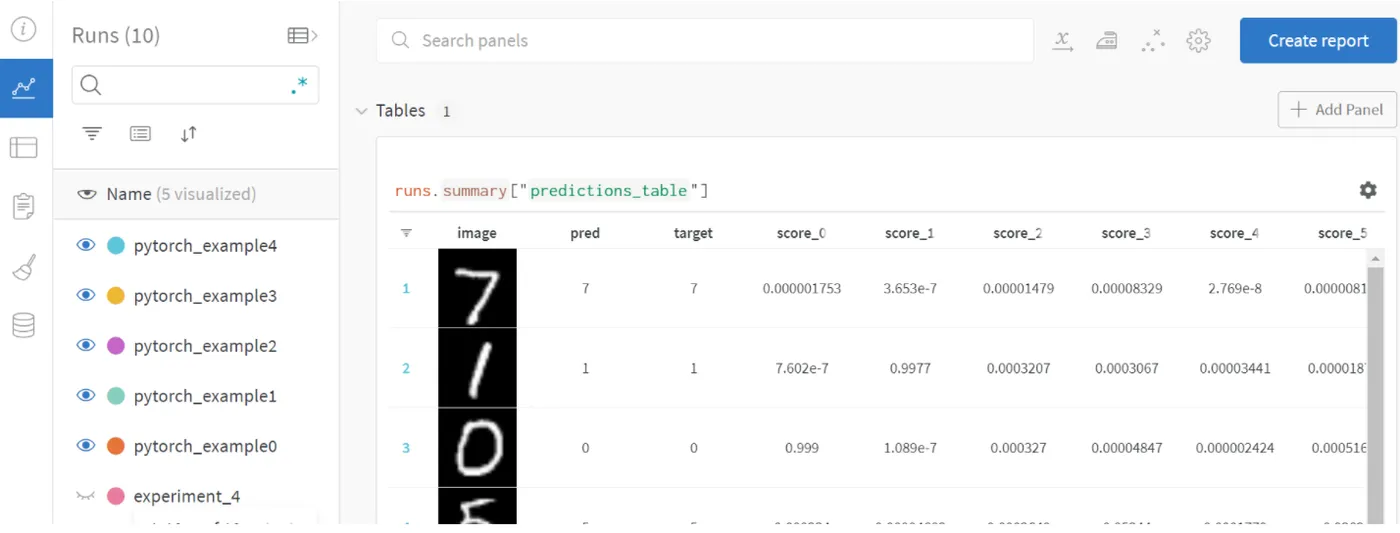
wandb网页首页:
点进一个run内:
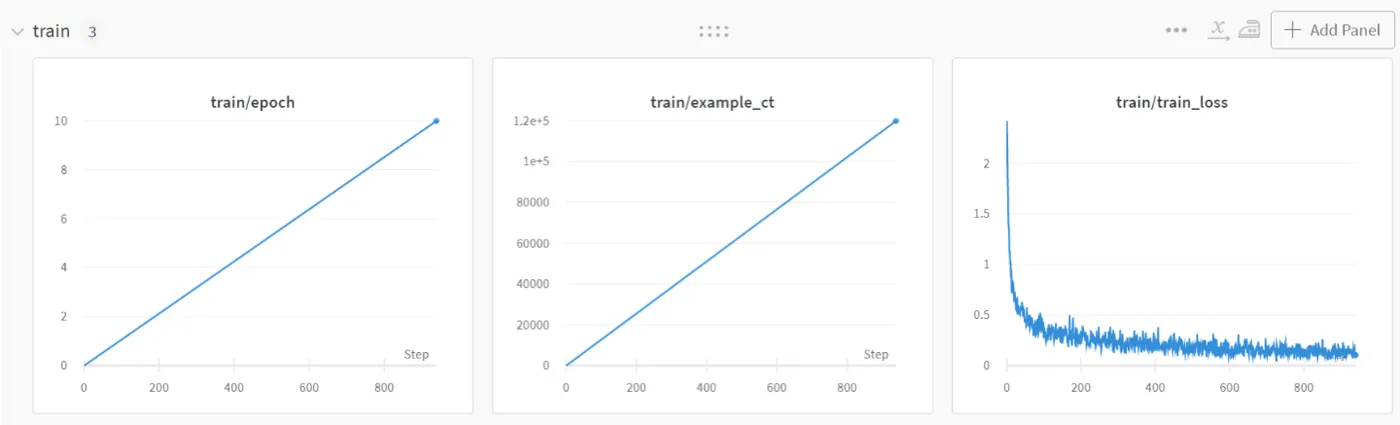
输出:
3.1.4 jupyter notebook wandb警告示例
# Start a wandb run
wandb.init(project="wandbexample1")
# Simulating a model training loop
acc_threshold = 0.3
for training_step in range(1000):
    # Generate a random number for accuracy
    accuracy = round(random.random() + random.random(), 3)
    print(f'Accuracy is: {accuracy}, {acc_threshold}')
    # 🐝 Log accuracy to wandb
    wandb.log({"Accuracy": accuracy})
    # 🔔 If the accuracy is below the threshold, fire a W&B Alert and stop the run
    if accuracy <= acc_threshold:
        # 🐝 Send the wandb Alert
        wandb.alert(
            title='Low Accuracy',
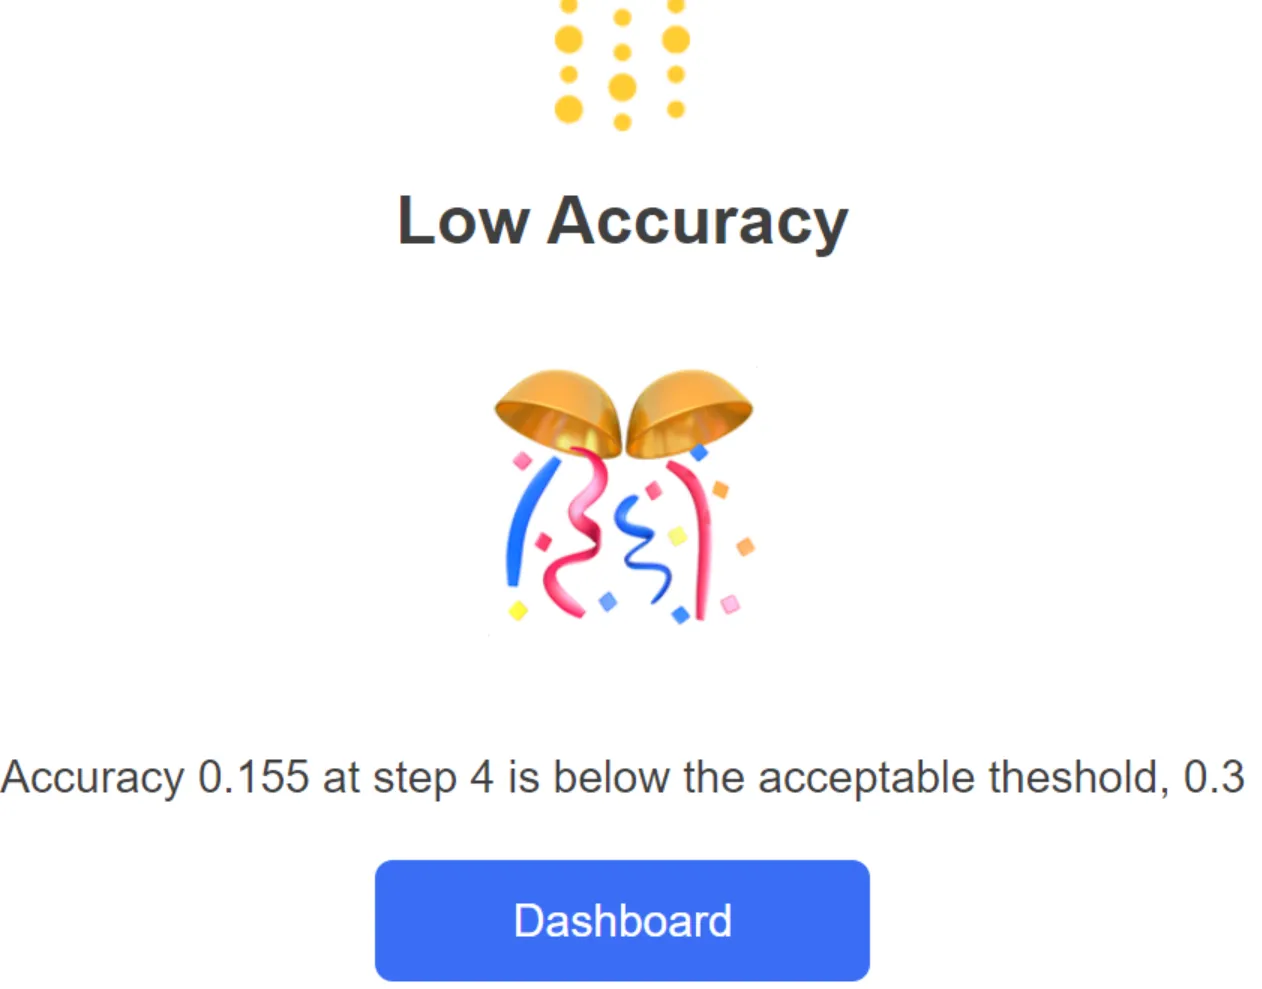
            text=f'Accuracy {accuracy} at step {training_step} is below the acceptable theshold, {acc_threshold}',
        )
        print('Alert triggered')
        break
# Mark the run as finished (useful in Jupyter notebooks)
wandb.finish()
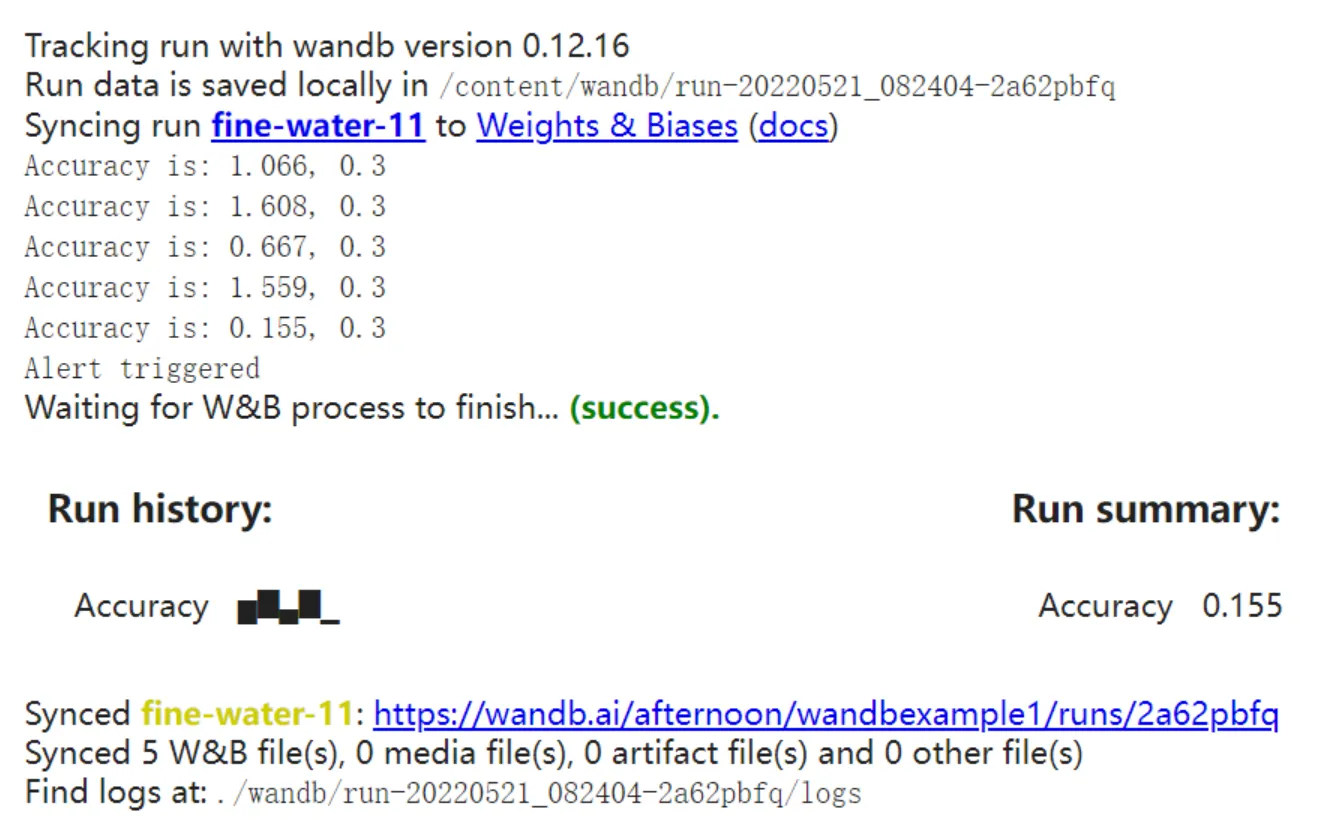
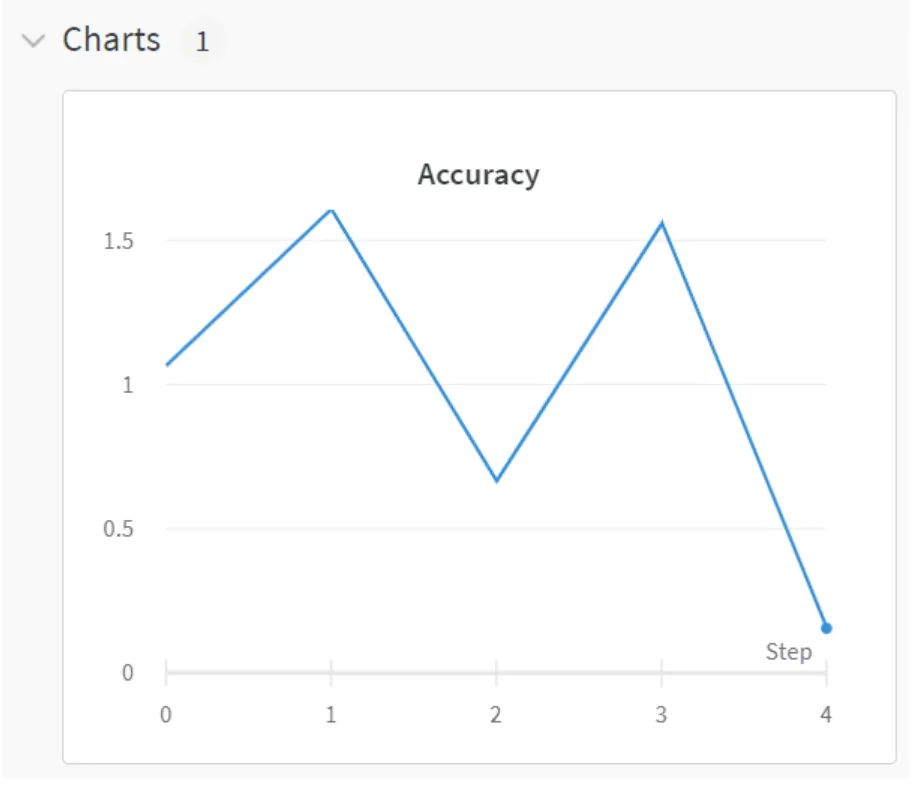
acc变成0.155,小于阈值0.3,所以报了警告。因为我没有slack所以是给发到邮件上:
项目的dashboard:
3.2 调参
Hyperparameter Tuning - Documentation
Organizing_Hyperparameter_Sweeps_in_PyTorch_with_W&B.ipynb
3.3 合作报告
Collaborative Reports - Documentation
3.4 跟踪pipeline的数据和模型版本
Data + Model Versioning - Documentation
3.5 数据可视化/跟踪指标日志
Data Visualization - Documentation
3.6 自动化深度学习平台的配置文件
Environment Variables - Documentation
3.7 本地化的解决方案
这个我暂时用不到,但是也列在这里以便备用:
Private Hosting - Documentation
3.8 示例
Examples - Documentation
示例的dashboard:wandb_example Workspace – Weights & Biases
3.9 Interagations
Integrations - Documentation
3.10 输入输出储存到wandb上的数据
Import & Export Data - Documentation
4. 常见问题
4.1 wandb.errors.UsageError: Error communicating with wandb process
参考https://docs.wandb.ai/library/init#init-start-error:在wandb.init()中添加入参settings=wandb.Settings(start_method="fork")即可解决问题。
4.2 本地储存空间不够→删除本地缓存
在 wandb.log() 处报错。
报错信息:
Thread SenderThread:
OSError: [Errno 28] No space left on device
During handling of the above exception, another exception occurred:
Traceback (most recent call last):
  File "env_path/lib/python3.8/site-packages/wandb/sdk/internal/internal_util.py", line 51, in run
    self._run()
  File "env_path/lib/python3.8/site-packages/wandb/sdk/internal/internal_util.py", line 102, in _run
    self._process(record)
  File "env_path/lib/python3.8/site-packages/wandb/sdk/internal/internal.py", line 310, in _process
    self._sm.send(record)
  File "env_path/lib/python3.8/site-packages/wandb/sdk/internal/sender.py", line 304, in send
    send_handler(record)
  File "env_path/lib/python3.8/site-packages/wandb/sdk/internal/sender.py", line 931, in send_summary
    self._update_summary()
  File "env_path/lib/python3.8/site-packages/wandb/sdk/internal/sender.py", line 944, in _update_summary
    f.write(json_summary)
OSError: [Errno 28] No space left on device
wandb: ERROR Internal wandb error: file data was not synced
Traceback (most recent call last):
  File "c49.py", line 293, in <module>
    wandb.log({'valid_law_acc':law_accuracy,'valid_charge_acc':charge_accuracy,
  File "env_path/lib/python3.8/site-packages/wandb/sdk/wandb_run.py", line 289, in wrapper
    return func(self, *args, **kwargs)
  File "env_path/lib/python3.8/site-packages/wandb/sdk/wandb_run.py", line 255, in wrapper
    return func(self, *args, **kwargs)
  File "env_path/lib/python3.8/site-packages/wandb/sdk/wandb_run.py", line 1591, in log
    self._log(data=data, step=step, commit=commit)
  File "env_path/lib/python3.8/site-packages/wandb/sdk/wandb_run.py", line 1375, in _log
    self._partial_history_callback(data, step, commit)
  File "env_path/lib/python3.8/site-packages/wandb/sdk/wandb_run.py", line 1259, in _partial_history_callback
    self._backend.interface.publish_partial_history(
  File "env_path/lib/python3.8/site-packages/wandb/sdk/interface/interface.py", line 553, in publish_partial_history
    self._publish_partial_history(partial_history)
  File "env_path/lib/python3.8/site-packages/wandb/sdk/interface/interface_shared.py", line 67, in _publish_partial_history
    self._publish(rec)
  File "env_path/lib/python3.8/site-packages/wandb/sdk/interface/interface_sock.py", line 51, in _publish
    self._sock_client.send_record_publish(record)
  File "env_path/lib/python3.8/site-packages/wandb/sdk/lib/sock_client.py", line 150, in send_record_publish
    self.send_server_request(server_req)
  File "env_path/lib/python3.8/site-packages/wandb/sdk/lib/sock_client.py", line 84, in send_server_request
    self._send_message(msg)
  File "env_path/lib/python3.8/site-packages/wandb/sdk/lib/sock_client.py", line 81, in _send_message
    self._sendall_with_error_handle(header + data)
  File "env_path/lib/python3.8/site-packages/wandb/sdk/lib/sock_client.py", line 61, in _sendall_with_error_handle
    sent = self._sock.send(data[total_sent:])
BrokenPipeError: [Errno 32] Broken pipe
Error in atexit._run_exitfuncs:
Traceback (most recent call last):
  File "env_path/lib/python3.8/site-packages/wandb/sdk/lib/sock_client.py", line 81, in _send_message
    self._sendall_with_error_handle(header + data)
  File "env_path/lib/python3.8/site-packages/wandb/sdk/lib/sock_client.py", line 61, in _sendall_with_error_handle
    sent = self._sock.send(data[total_sent:])
BrokenPipeError: [Errno 32] Broken pipe

![wandb.errors.UsageError: api_key not configured (no-tty). call wandb.login(key=[your_api_key])](https://ucc.alicdn.com/pic/developer-ecology/b15c3ff4b2804f4aaa55b4681d955fbd.png?x-oss-process=image/format,webp/resize,h_160,m_lfit)