一、简介
1、Amoeba简介
Amoeba(变形虫)项目,该开源框架于2008年开始发布一款 Amoeba for Mysql软件。这个软件致力于MySQL的分布式数据库前端代理层,它主要在应用层访问MySQL的 时候充当SQL路由功能,专注于分布式数据库代理层(Database Proxy)开发。座落与 Client、DB Server(s)之间,对客户端透明。具有负载均衡、高可用性、SQL 过滤、读写分离、可路由相关的到目标数据库、可并发请求多台数据库合并结果。 通过Amoeba你能够完成多数据源的高可用、负载均衡、数据切片的功能,目前Amoeba已在很多企业的生产线上面使用
2、Amoeba的优缺点
优点:
(1)降低费用,简单易用
(2)提高系统整体可用性
(3)易于扩展处理能力与系统规模
(4)可以直接实现读写分离及负载均衡效果,而不用修改代码
缺点:
(1)不支持事务与存储过程
(2)暂不支持分库分表,amoeba目前只做到分数据库实例
(3)不适合从amoeba导数据的场景或者对大数据量查询的query并不合适(比如一次请求返回10w以上甚至更多数据的场合)
3、什么是读写分离
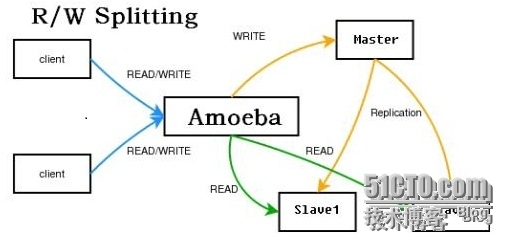
读写分离(Read/Write Splitting),基本的原理是让主数据库处理事务性增、改、删操作(INSERT、UPDATE、DELETE),而从数据库处理SELECT查询操作。
数据库复制被用来把事务性操作导致的变更同步到集群中的从数据库。
4、实现读写分离的方法
(1)程序修改mysql操作类
可以参考PHP实现的Mysql读写分离,阿权开始的本项目,以php程序解决此需求。
优点:直接和数据库通信,简单快捷的读写分离和随机的方式实现的负载均衡,权限独立分配
缺点:自己维护更新,增减服务器在代码处理
(2)Mysql-Proxy
参考 mysql-proxy。
优点:直接实现读写分离和负载均衡,不用修改代码,master和slave用一样的帐号
缺点:字符集问题,lua语言编程,还只是alpha版本,时间消耗有点高
(3)Amoeba#阿里巴巴的开源产品,充分证明它的稳定性不容置疑。
参考官网:http://amoeba.meidusa.com/
优点:直接实现读写分离和负载均衡,不用修改代码,有很灵活的数据解决方案
缺点:自己分配账户,和后端数据库权限管理独立,权限处理不够灵活
二、拓扑架构
|
1
2
3
4
|
主机地址分配:
Master主机地址:192.168.0.149
Slave1主机地址:192.168.0.150
Slave2主机地址:192.168.0.135
|
三、源码编译Mysql
1、编译Mysql的依赖包
|
1
|
yum -y
install
gcc gcc-c++ ncurses-devel openssl-devel bison
|
2、创建mysql用户
|
1
2
|
groupadd -r mysql
useradd
-g mysql -r -d
/mydata/data
mysql
|
3、创建数据文件存储目录并赋予mysql权限
|
1
2
|
mkdir
/mydata/data
chown
-R mysql.mysql
/mydata/data
|
4、安装cmake
|
1
2
3
4
5
|
tar
xf cmake-2.8.11.2.
tar
.gz
cd
cmake-2.8.11.2
.
/configure
make
&&
make
install
cd
..
|
5、源码编译Mysql
|
1
2
3
4
5
6
7
8
9
10
11
12
13
14
15
16
17
18
19
20
|
tar
xf mysql-5.6.12.
tar
.gz
cd
mysql-5.6.12
cmake . \
-DCMAKE_INSTALL_PREFIX=
/usr/local/mysql
\
-DMYSQL_DATADIR=
/mydata/data
\
-DSYSCONFDIR=
/etc
\
-DWITH_INNOBASE_STORAGE_ENGINE=1 \
-DWITH_MYISAM_STORAGE_ENGINE=1 \
-DWITH_ARCHIVE_STORAGE_ENGINE=1 \
-DWITH_BLACKHOLE_STORAGE_ENGINE=1 \
-DWITH_MEMORY_STORAGE_ENGINE=1 \
-DWITH_READLINE=1 \
-DWITH_SSL=system \
-DWITH_ZLIB=system \
-DWITH_LIBWRAP=0 \
-DENABLED_LOCAL_INFILE=1 \
-DMYSQL_UNIX_ADDR=
/tmp/mysql
.sock \
-DDEFAULT_CHARSET=utf8 \
-DDEFAULT_COLLATION=utf8_general_ci
make
&&
make
install
|
6、更改mysql的主目录为mysql组
|
1
|
chown
-R :mysql
/usr/local/mysql/
|
7、初始化mysql数据库
|
1
2
|
cd
/usr/local/mysql/
.
/scripts/mysql_install_db
--datadir=
/mydata/data/
--basedir=
/usr/local/mysql/
--user=mysql
|
8、拷贝mysql脚本文件
|
1
2
3
|
cp
support-files
/mysql
.server
/etc/init
.d
/mysqld
chmod
+x
/etc/init
.d
/mysqld
chkconfig --add mysqld
|
9、提供mysql配置文件
|
1
2
3
4
5
6
7
8
9
10
11
12
13
14
15
16
17
18
19
20
21
22
23
24
25
26
27
28
29
30
31
32
33
34
35
36
37
38
39
40
41
42
43
44
45
46
47
48
49
50
51
52
53
|
cat
>
/etc/my
.cnf << EOF
[client]
port = 3306
socket =
/tmp/mysql
.sock
[mysqld]
port = 3306
socket =
/tmp/mysql
.sock
skip-external-locking
key_buffer_size = 256M
max_allowed_packet = 16M
table_open_cache = 256
sort_buffer_size = 1M
read_buffer_size = 1M
read_rnd_buffer_size = 4M
myisam_sort_buffer_size = 64M
thread_cache_size = 8
query_cache_size= 16M
thread_concurrency = 8
binlog-
format
=ROW
log-slave-updates=
true
gtid-mode=on
enforce-gtid-consistency=
true
master-info-repository=TABLE
relay-log-info-repository=TABLE
sync
-master-info=1
slave-parallel-workers=2
binlog-checksum=CRC32
master-verify-checksum=1
slave-sql-verify-checksum=1
binlog-rows-query-log_events=1
report-port=3306
datadir=
/mydata/data
report-host=master.allentuns.com
log-bin=mysql-bin
server-
id
= 10
[mysqldump]
quick
max_allowed_packet = 16M
[mysql]
no-auto-rehash
[myisamchk]
key_buffer_size = 128M
sort_buffer_size = 128M
read_buffer = 2M
write_buffer = 2M
[mysqlhotcopy]
interactive-timeout
EOF
|
10、配置mysql环境变量
|
1
2
|
echo
"export PATH=\$PATH:/usr/local/mysql/bin"
>
/etc/profile
.d
/mysql
.sh
source
/etc/profile
.d
/mysql
.sh
|
11、链接mysql库文件和头文件
|
1
2
3
|
ln
-sv
/usr/local/mysql/include
/usr/include/mysql
echo
"/usr/local/mysql/lib"
>
/etc/ld
.so.conf.d
/mysql
.conf
ldconfig -
v
|
12、启动mysql服务
|
1
|
service mysqld start
|
13、删除匿名用户
|
1
2
3
4
|
# mysql
mysql> drop user
""
@
"localhost"
;
mysql> drop user
""
@
"master.com"
;
mysql> drop user
"root"
@
"::1"
;
|
14、修改用户root密码
|
1
2
|
mysql> update user
set
password=password(
"123456"
) where user=
"root"
;
mysql> flush privileges;
|
15、本地免密码登陆Mysql
|
1
2
3
4
5
6
7
8
9
10
11
12
13
14
15
16
17
18
|
# mysql
ERROR 1045 (28000): Access denied
for
user
'root'
@
'localhost'
(using password: NO)
# cat > ~/.my.cnf << EOF
> [client]
> user =
"root"
> password =
"123456"
> host =
"127.0.0.1"
> EOF
# mysql
mysql> show databases;
+--------------------+
| Database |
+--------------------+
| information_schema |
| mysql |
| performance_schema |
|
test
|
+--------------------+
|
-------------------------------------------------------------------------------------------
开始配置主从异步同步
1、修改my.cnf配置文件
|
1
2
3
4
5
6
7
8
9
10
11
12
13
|
Master主机:
server-
id
= 1
log-bin = mysql-bin
Slave1主机
server-
id
= 10
relay-log = relay-log
read
-only = on
Slave2主机
server-
id
= 20
relay-log = relay-log
read
-only = on
|
2、三台主机修改配置文件后并重启Mysql服务
|
1
|
/etc/init
.d
/mysqld
restart
|
3、Master主机添加授权用户并查看pos偏移位
|
1
2
3
4
5
6
7
8
9
|
mysql> grant replication slave,replication client on *.* to
"slave"
@
"192.168.1.%"
identified by
"slavepass"
;
mysql> flush privileges;
mysql> show master status;
mysql> show master status;
+------------------+----------+--------------+------------------+------------------------------------------+
| File | Position | Binlog_Do_DB | Binlog_Ignore_DB | Executed_Gtid_Set |
+------------------+----------+--------------+------------------+------------------------------------------+
| mysql-bin.000002 | 595 | | | 381c5272-73b6-11e4-baba-000c29267a8d:1-7 |
+------------------+----------+--------------+------------------+------------------------------------------+
|
4、Slave的两台主机添加Master主机
|
1
2
3
4
5
6
7
8
9
10
11
12
13
14
15
16
17
18
19
20
21
22
23
24
25
26
27
28
29
30
31
32
33
34
35
36
37
38
39
40
41
42
43
44
45
46
47
48
49
50
51
52
53
54
55
56
57
58
59
60
61
62
63
64
65
66
|
mysql> help change master to;
mysql> CHANGE MASTER TO
MASTER_HOST=
'192.168.1.150'
,
MASTER_USER=
'slave'
,
MASTER_PASSWORD=
'slavepass'
,
MASTER_PORT=3306,
MASTER_LOG_FILE=
'mysql-bin.000003'
,
MASTER_LOG_POS=191
mysql> start slave;
mysql> show slave status\G
*************************** 1. row ***************************
Slave_IO_State: Waiting
for
master to send event
Master_Host: 192.168.1.150
Master_User: slave
Master_Port: 3306
Connect_Retry: 60
Master_Log_File: mysql-bin.000003
Read_Master_Log_Pos: 191
Relay_Log_File: slave-relay-bin.000002
Relay_Log_Pos: 314
Relay_Master_Log_File: mysql-bin.000003
Slave_IO_Running: Yes
Slave_SQL_Running: Yes
Replicate_Do_DB:
Replicate_Ignore_DB:
Replicate_Do_Table:
Replicate_Ignore_Table:
Replicate_Wild_Do_Table:
Replicate_Wild_Ignore_Table:
Last_Errno: 0
Last_Error:
Skip_Counter: 0
Exec_Master_Log_Pos: 191
Relay_Log_Space: 518
Until_Condition: None
Until_Log_File:
Until_Log_Pos: 0
Master_SSL_Allowed: No
Master_SSL_CA_File:
Master_SSL_CA_Path:
Master_SSL_Cert:
Master_SSL_Cipher:
Master_SSL_Key:
Seconds_Behind_Master: 0
Master_SSL_Verify_Server_Cert: No
Last_IO_Errno: 0
Last_IO_Error:
Last_SQL_Errno: 0
Last_SQL_Error:
Replicate_Ignore_Server_Ids:
Master_Server_Id: 1
Master_UUID: 381c5272-73b6-11e4-baba-000c29267a8d
Master_Info_File: mysql.slave_master_info
SQL_Delay: 0
SQL_Remaining_Delay: NULL
Slave_SQL_Running_State: Slave has
read
all relay log; waiting
for
the slave I
/O
thread to update it
Master_Retry_Count: 86400
Master_Bind:
Last_IO_Error_Timestamp:
Last_SQL_Error_Timestamp:
Master_SSL_Crl:
Master_SSL_Crlpath:
Retrieved_Gtid_Set:
Executed_Gtid_Set: 397e7449-73b6-11e4-baba-000c29ccc719:1-5
Auto_Position: 0
1 row
in
set
(0.00 sec)
|
5、主从复制测试
|
1
2
3
4
5
6
7
8
9
10
11
12
13
14
15
16
17
18
19
20
21
22
23
24
25
26
|
#首先在Master主机上创建mydbtest数据库
[root@master ~]
# mysqladmin create mydbtest;
[root@master ~]
# mysql -e "show databases;"
+--------------------+
| Database |
+--------------------+
| information_schema |
| mydbtest |
| mysql |
| performance_schema |
|
test
|
+--------------------+
#其次在Slave1和Slave2上分别查看是否有数据库同步
[root@slave ~]
# mysql -e "show databases;"
+--------------------+
| Database |
+--------------------+
| information_schema |
| mydbtest |
| mysql |
| performance_schema |
|
test
|
+--------------------+
haha,数据库mydbtest同步成功
|
四、安装Amoeba
因为Amoeba是Java程序开发的,所以要安装JDK
1、安装JDK
|
1
2
3
4
5
6
7
8
9
|
tar
xf jdk-7u60-bin-linux-x64-16.
tar
.gz -C
/usr/local/
cat
>
/etc/profile
.d
/jdk
.sh << EOF
JAVA_HOME=
/usr/local/jdk1
.7.0_60
PATH=\$JAVA_HOME
/bin
:\$PATH
CLASSPATH=.:\$JAVA_HOME
/lib/dt
.jar:\$JAVA_HOME
/lib/tools
.jar
export
JAVA_HOME PATH CLASSPATH
EOF
source
/etc/profile
java -version
|
2、安装Amoeba
|
1
2
3
4
5
6
7
8
|
# mkdir /usr/local/amoeba
# tar xf amoeba-mysql-binary-2.2.0.tar.gz -C /usr/local/amoeba/
# cat > /etc/profile.d/amoeba.sh << EOF
>
export
AMOEBA_HOME=
/usr/local/amoeba
>
export
PATH=\$AMOEBA_HOME
/bin
:\$PATH
> EOF
# source /etc/profile.d/amoeba.sh
# amoeba
|
|
1
2
3
4
5
6
7
8
9
10
|
**********************************
启动amoeba报错
The stack size specified is too small, Specify at least 228k
Error: Could not create the Java Virtual Machine.
Error: A fatal exception has occurred. Program will
exit
.
**********************************
解决办法
将一下行的128修改成大于228K
#DEFAULT_OPTS="-server -Xms256m -Xmx256m -Xss128k"
DEFAULT_OPTS=
"-server -Xms256m -Xmx256m -Xss256k"
|
3、启动amoeba的方法
|
1
2
3
4
5
6
7
8
9
|
# amoeba
amoeba start|stop
# amoeba start
log4j:WARN log4j config load completed from
file
:
/usr/local/amoeba/conf/log4j
.xml
2014-11-23 23:41:37,528 INFO context.MysqlRuntimeContext - Amoeba
for
Mysql current versoin=5.1.45-mysql-amoeba-proxy-2.2.0
log4j:WARN ip access config load completed from
file
:
/usr/local/amoeba/conf/access_list
.conf
2014-11-23 23:41:38,016 INFO net.ServerableConnectionManager - Amoeba
for
Mysql listening on 0.0.0.0
/0
.0.0.0:8066.
2014-11-23 23:41:38,047 INFO net.ServerableConnectionManager - Amoeba Monitor Server listening on
/127
.0.0.1:37103.
|
4、查看Amoeba配置文件
|
1
2
3
|
# cd /usr/local/amoeba/conf/
amoeba.xml
#定义数据库读写分离及节点管理信息等
dbServers.xml
#定义连接后端Mysql服务器信息
|
|
1
2
3
4
5
6
7
8
9
10
11
12
13
14
15
16
17
18
19
20
21
22
23
24
25
26
27
28
29
30
31
32
33
34
35
36
37
38
39
40
41
42
43
44
45
46
47
48
49
50
51
52
53
54
55
56
57
58
59
60
61
62
63
64
65
66
67
68
69
70
71
72
73
74
75
76
77
78
|
[root@Amoeba conf]
# cat dbServers.xml
<?xml version=
"1.0"
encoding=
"gbk"
?>
<!DOCTYPE amoeba:dbServers SYSTEM
"dbserver.dtd"
>
<amoeba:dbServers xmlns:amoeba=
"http://amoeba.meidusa.com/"
>
<!--
Each dbServer needs to be configured into a Pool,
If you need to configure multiple dbServer with load balancing that can be simplified by the following configuration:
add attribute with name virtual =
"true"
in
dbServer, but the configuration does not allow the element with name factoryConfig
such as
'multiPool'
dbServer
-->
<dbServer name=
"abstractServer"
abstractive=
"true"
>
<factoryConfig class=
"com.meidusa.amoeba.mysql.net.MysqlServerConnectionFactory"
>
<property name=
"manager"
>${defaultManager}<
/property
>
<property name=
"sendBufferSize"
>64<
/property
>
<property name=
"receiveBufferSize"
>128<
/property
>
#定义连接后端集群mysql的端口
<!-- mysql port -->
<property name=
"port"
>3306<
/property
>
#连接的默认数据库
<!-- mysql schema -->
<property name=
"schema"
>
test
<
/property
>
<!-- mysql user -->
#连接后端数据库的用户名和密码,需要后端数据库授权
<property name=
"user"
>amoeba<
/property
>
<property name=
"password"
>111111<
/property
>
<!-- mysql password
<property name=
"password"
>password<
/property
>
-->
<
/factoryConfig
>
<poolConfig class=
"com.meidusa.amoeba.net.poolable.PoolableObjectPool"
>
<property name=
"maxActive"
>500<
/property
>
<property name=
"maxIdle"
>500<
/property
>
<property name=
"minIdle"
>10<
/property
>
<property name=
"minEvictableIdleTimeMillis"
>600000<
/property
>
<property name=
"timeBetweenEvictionRunsMillis"
>600000<
/property
>
<property name=
"testOnBorrow"
>
true
<
/property
>
<property name=
"testOnReturn"
>
true
<
/property
>
<property name=
"testWhileIdle"
>
true
<
/property
>
<
/poolConfig
>
<
/dbServer
>
#定义"master"数据库节点,"name"名称可以自定义
<dbServer name=
"master"
parent=
"abstractServer"
>
<factoryConfig>
<!-- mysql ip -->
<property name=
"ipAddress"
>192.168.1.150<
/property
>
<
/factoryConfig
>
<
/dbServer
>
#定义"slave1"数据库节点
<dbServer name=
"slave1"
parent=
"abstractServer"
>
<factoryConfig>
<!-- mysql ip -->
<property name=
"ipAddress"
>192.168.1.151<
/property
>
<
/factoryConfig
>
<
/dbServer
>
#定义"slave2"数据库节点
<dbServer name=
"slave2"
parent=
"abstractServer"
>
<factoryConfig>
<!-- mysql ip -->
<property name=
"ipAddress"
>192.168.1.135<
/property
>
<
/factoryConfig
>
<
/dbServer
>
<dbServer name=
"multiPool"
virtual=
"true"
>
<poolConfig class=
"com.meidusa.amoeba.server.MultipleServerPool"
>
<!-- Load balancing strategy: 1=ROUNDROBIN , 2=WEIGHTBASED , 3=HA-->
#定义选择哪一种算法进行负载均衡调度
<property name=
"loadbalance"
>1<
/property
>
<!-- Separated by commas,such as: server1,server2,server1 -->
<property name=
"poolNames"
>slave1,slave2<
/property
>
#定义数据库池,用于实现负载均衡."slave"为上面定义的从数据库节点,可以写多个用","分隔;
<
/poolConfig
>
<
/dbServer
>
<
/amoeba
:dbServers>
|
-------------------------------------------------------------------------------------------
|
1
2
3
4
5
6
7
8
9
10
11
12
13
14
15
16
17
18
19
20
21
22
23
24
25
26
27
28
29
30
31
32
33
34
35
36
37
38
39
40
41
42
43
44
45
46
47
48
49
50
51
52
53
54
55
56
57
58
59
60
61
62
63
64
65
66
67
68
69
70
71
72
73
74
75
76
77
78
79
80
81
82
83
84
85
86
87
88
89
90
91
92
93
94
95
96
97
98
99
100
101
102
103
104
105
106
107
108
109
110
111
112
113
114
115
116
117
118
119
120
121
122
123
124
125
126
127
128
|
[root@Amoeba conf]
# cat amoeba.xml
<?xml version=
"1.0"
encoding=
"gbk"
?>
<!DOCTYPE amoeba:configuration SYSTEM
"amoeba.dtd"
>
<amoeba:configuration xmlns:amoeba=
"http://amoeba.meidusa.com/"
>
<proxy>
<!-- service class must implements com.meidusa.amoeba.service.Service -->
<service name=
"Amoeba for Mysql"
class=
"com.meidusa.amoeba.net.ServerableConnectionManager"
>
<!-- port -->
#定义amoeba代理服务器的对外连接监听端口
<property name=
"port"
>3306<
/property
>
<!-- bind ipAddress -->
<!--
<property name=
"ipAddress"
>127.0.0.1<
/property
>
-->
#定义amoeba代理服务器对外连接的监听IP
<property name=
"ipAddress"
>0.0.0.0<
/property
>
<property name=
"manager"
>${clientConnectioneManager}<
/property
>
<property name=
"connectionFactory"
>
<bean class=
"com.meidusa.amoeba.mysql.net.MysqlClientConnectionFactory"
>
<property name=
"sendBufferSize"
>128<
/property
>
<property name=
"receiveBufferSize"
>64<
/property
>
<
/bean
>
<
/property
>
<property name=
"authenticator"
>
<bean class=
"com.meidusa.amoeba.mysql.server.MysqlClientAuthenticator"
>
#定义amoeba连接用户名和密码,客户端或程序只需要使用此用户名和密码连接即可
<property name=
"user"
>root<
/property
>
<property name=
"password"
>222222<
/property
>
<property name=
"filter"
>
<bean class=
"com.meidusa.amoeba.server.IPAccessController"
>
<property name=
"ipFile"
>${amoeba.home}
/conf/access_list
.conf<
/property
>
<
/bean
>
<
/property
>
<
/bean
>
<
/property
>
<
/service
>
<!-- server class must implements com.meidusa.amoeba.service.Service -->
<service name=
"Amoeba Monitor Server"
class=
"com.meidusa.amoeba.monitor.MonitorServer"
>
<!-- port -->
<!-- default value: random number
<property name=
"port"
>9066<
/property
>
-->
<!-- bind ipAddress -->
<property name=
"ipAddress"
>127.0.0.1<
/property
>
<property name=
"daemon"
>
true
<
/property
>
<property name=
"manager"
>${clientConnectioneManager}<
/property
>
<property name=
"connectionFactory"
>
<bean class=
"com.meidusa.amoeba.monitor.net.MonitorClientConnectionFactory"
><
/bean
>
<
/property
>
<
/service
>
<runtime class=
"com.meidusa.amoeba.mysql.context.MysqlRuntimeContext"
>
<!-- proxy server net IO Read thread size -->
<property name=
"readThreadPoolSize"
>20<
/property
>
<!-- proxy server client process thread size -->
<property name=
"clientSideThreadPoolSize"
>30<
/property
>
<!-- mysql server data packet process thread size -->
<property name=
"serverSideThreadPoolSize"
>30<
/property
>
<!-- per connection cache prepared statement size -->
<property name=
"statementCacheSize"
>500<
/property
>
<!-- query timeout( default: 60 second , TimeUnit:second) -->
<property name=
"queryTimeout"
>60<
/property
>
<
/runtime
>
<
/proxy
>
<!--
Each ConnectionManager will start as thread
manager responsible
for
the Connection IO
read
, Death Detection
-->
<connectionManagerList>
<connectionManager name=
"clientConnectioneManager"
class=
"com.meidusa.amoeba.net.MultiConnectionManagerWrapper"
>
<property name=
"subManagerClassName"
>com.meidusa.amoeba.net.ConnectionManager<
/property
>
<!--
default value is avaliable Processors
<property name=
"processors"
>5<
/property
>
-->
<
/connectionManager
>
<connectionManager name=
"defaultManager"
class=
"com.meidusa.amoeba.net.MultiConnectionManagerWrapper"
>
<property name=
"subManagerClassName"
>com.meidusa.amoeba.net.AuthingableConnectionManager<
/property
>
<!--
default value is avaliable Processors
<property name=
"processors"
>5<
/property
>
-->
<
/connectionManager
>
<
/connectionManagerList
>
<!-- default using
file
loader -->
<dbServerLoader class=
"com.meidusa.amoeba.context.DBServerConfigFileLoader"
>
<property name=
"configFile"
>${amoeba.home}
/conf/dbServers
.xml<
/property
>
<
/dbServerLoader
>
<queryRouter class=
"com.meidusa.amoeba.mysql.parser.MysqlQueryRouter"
>
<property name=
"ruleLoader"
>
<bean class=
"com.meidusa.amoeba.route.TableRuleFileLoader"
>
<property name=
"ruleFile"
>${amoeba.home}
/conf/rule
.xml<
/property
>
<property name=
"functionFile"
>${amoeba.home}
/conf/ruleFunctionMap
.xml<
/property
>
<
/bean
>
<
/property
>
<property name=
"sqlFunctionFile"
>${amoeba.home}
/conf/functionMap
.xml<
/property
>
<property name=
"LRUMapSize"
>1500<
/property
>
#定义默认池,一些sql语句默认会在此定义的服务器上执行
<property name=
"defaultPool"
>master<
/property
>
#定义只写数据库
<property name=
"writePool"
>master<
/property
>
#定义只读数据库,此处定义的是在"dbServer.xml"文件中定义的后端服务器名称,也可以定义数据库池的名称,实现负载均衡
<property name=
"readPool"
>multiPool<
/property
>
<property name=
"needParse"
>
true
<
/property
>
<
/queryRouter
>
<
/amoeba
:configuration>
|
5、测试Amoeba读写分离
测试方法:通过tcpdump在本地网卡抓包来分析执行的命令
|
1
2
3
4
5
6
7
8
9
10
11
12
13
14
|
yum -y
install
tcpdump
tcpdump -i eth1 -s0 -nn -A tcp dst port 3306 and ip dst host 192.168.1.150
-i 表示监听那一个网卡 any代表所有
-s0 表示截取数据,s0抓整个包
-n 表示数字显示主机名
-nn 表示数字显示主机名跟端口号
-X 表示以ASCII码显示内容
-XX 表示以ASCII及16进制码显示内容
-A 表示显示原内容
-w 表示将抓取的内容保存到某个位置
-r 表示导入某
src 源端口、地址
dst 目标端口、地址
|
首先,我们来查看默认情况下终端是如下所示:

我们通过Amoeba代理的方式登录mysql
|
1
2
3
4
5
6
7
8
9
10
11
12
13
14
15
16
17
18
19
20
21
22
23
24
25
26
27
|
[root@Amoeba ~]
# mysql -uroot -p222222 -h192.168.1.149
mysql> use mydbtest;
mysql> show tables;
Empty
set
(0.01 sec)
mysql> create table tab(
id
int,name char(20));
Query OK, 0 rows affected (0.04 sec)
mysql>
select
* from tab;
Empty
set
(0.01 sec)
mysql> insert into tab values(1,
'jerry'
);
Query OK, 1 row affected (0.01 sec)
mysql> insert into tab values(2,
'scott'
);
Query OK, 1 row affected (0.09 sec)
mysql>
select
* from tab;
+------+-------+
|
id
| name |
+------+-------+
| 1 | jerry |
| 2 | scott |
+------+-------+
2 rows
in
set
(0.00 sec)
|


如果大家想跟深入的了解Amoeba可以参考这个文档:
http://docs.hexnova.com/amoeba/rw-splitting.html
好了,今天就到这里了;后续会继续补充一些细节知识点。
本文转自zys467754239 51CTO博客,原文链接:http://blog.51cto.com/467754239/1581954,如需转载请自行联系原作者