1、联通ColaB


目前方向:图像拼接融合、图像识别 联系方式:jsxyhelu@foxmail.com
2、运行最基础mnist例子,并且打印图表结果
# https://pypi.python.org/pypi/pydot
#!apt-get -qq install -y graphviz && pip install -q pydot
#import pydot
from __future__
import print_function
import keras
from keras.datasets
import mnist
from keras.models
import Sequential
from keras.layers
import Dense, Dropout, Flatten
from keras.layers
import Conv2D, MaxPooling2D
from keras
import backend as K
from keras.utils
import plot_model
import matplotlib.pyplot as plt
batch_size
=
128
num_classes
=
10
epochs
=
12
#epochs = 2
# input image dimensions
img_rows, img_cols
=
28,
28
# the data, shuffled and split between train and test sets
(x_train, y_train), (x_test, y_test)
= mnist.load_data()
if K.image_data_format()
==
'channels_first'
:
x_train
= x_train.reshape(x_train.shape[
0],
1, img_rows, img_cols)
x_test
= x_test.reshape(x_test.shape[
0],
1, img_rows, img_cols)
input_shape
= (
1, img_rows, img_cols)
else
:
x_train
= x_train.reshape(x_train.shape[
0], img_rows, img_cols,
1)
x_test
= x_test.reshape(x_test.shape[
0], img_rows, img_cols,
1)
input_shape
= (img_rows, img_cols,
1)
x_train
= x_train.astype(
'float32')
x_test
= x_test.astype(
'float32')
x_train
/=
255
x_test
/=
255
print(
'x_train shape:', x_train.shape)
print(x_train.shape[
0],
'train samples')
print(x_test.shape[
0],
'test samples')
# convert class vectors to binary class matrices
y_train
= keras.utils.to_categorical(y_train, num_classes)
y_test
= keras.utils.to_categorical(y_test, num_classes)
model
= Sequential()
model.add(Conv2D(
32, kernel_size
=(
3,
3),
activation
=
'relu',
input_shape
=input_shape))
model.add(Conv2D(
64, (
3,
3), activation
=
'relu'))
model.add(MaxPooling2D(pool_size
=(
2,
2)))
model.add(Dropout(
0.
25))
model.add(Flatten())
model.add(Dense(
128, activation
=
'relu'))
model.add(Dropout(
0.
5))
model.add(Dense(num_classes, activation
=
'softmax'))
model.
compile(loss
=keras.losses.categorical_crossentropy,
optimizer
=keras.optimizers.Adadelta(),
metrics
=[
'accuracy'])
#log = model.fit(X_train, Y_train,
# batch_size=batch_size, nb_epoch=num_epochs,
# verbose=1, validation_split=0.1)
log
= model.fit(x_train, y_train,
batch_size
=batch_size,
epochs
=epochs,
verbose
=
1,
validation_data
=(x_test, y_test))
score
= model.evaluate(x_test, y_test, verbose
=
0)
print(
'Test loss:', score[
0])
print(
'Test accuracy:', score[
1])
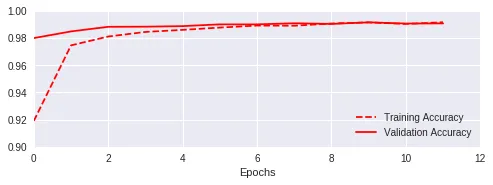
plt.figure(
'acc')
plt.subplot(
2,
1,
1)
plt.plot(log.history[
'acc'],
'r--',label
=
'Training Accuracy')
plt.plot(log.history[
'val_acc'],
'r-',label
=
'Validation Accuracy')
plt.legend(loc
=
'best')
plt.xlabel(
'Epochs')
plt.axis([
0, epochs,
0.
9,
1])
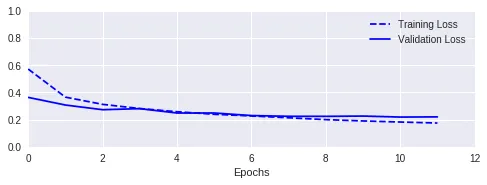
plt.figure(
'loss')
plt.subplot(
2,
1,
2)
plt.plot(log.history[
'loss'],
'b--',label
=
'Training Loss')
plt.plot(log.history[
'val_loss'],
'b-',label
=
'Validation Loss')
plt.legend(loc
=
'best')
plt.xlabel(
'Epochs')
plt.axis([
0, epochs,
0,
1])
plt.show()
3、两句修改成fasion模式
      # https://pypi.python.org/pypi/pydot


      #!apt-get -qq install -y graphviz && pip install -q pydot


      #import pydot


      from __future__
      import print_function


      import keras


      from keras.datasets
      import fashion_mnist


      from keras.models
      import Sequential


      from keras.layers
      import Dense, Dropout, Flatten


      from keras.layers
      import Conv2D, MaxPooling2D


      from keras
      import backend as K


      from keras.utils
      import plot_model


      import matplotlib.pyplot as plt


batch_size
      =
      128

num_classes
      =
      10

epochs
      =
      12


      #epochs = 2


      # input image dimensions

img_rows, img_cols
      =
      28,
      28


      # the data, shuffled and split between train and test sets

(x_train, y_train), (x_test, y_test)
      = fashion_mnist.load_data()


      if K.image_data_format()
      ==
      'channels_first'
      :

    x_train
      = x_train.reshape(x_train.shape[
      0],
      1, img_rows, img_cols)

    x_test
      = x_test.reshape(x_test.shape[
      0],
      1, img_rows, img_cols)

    input_shape
      = (
      1, img_rows, img_cols)


      else
      :

    x_train
      = x_train.reshape(x_train.shape[
      0], img_rows, img_cols,
      1)

    x_test
      = x_test.reshape(x_test.shape[
      0], img_rows, img_cols,
      1)

    input_shape
      = (img_rows, img_cols,
      1)


x_train
      = x_train.astype(
      'float32')

x_test
      = x_test.astype(
      'float32')

x_train
      /=
      255

x_test
      /=
      255


      print(
      'x_train shape:', x_train.shape)


      print(x_train.shape[
      0],
      'train samples')


      print(x_test.shape[
      0],
      'test samples')


      # convert class vectors to binary class matrices

y_train
      = keras.utils.to_categorical(y_train, num_classes)

y_test
      = keras.utils.to_categorical(y_test, num_classes)


model
      = Sequential()

model.add(Conv2D(
      32, kernel_size
      =(
      3,
      3),

                 activation
      =
      'relu',

                 input_shape
      =input_shape))

model.add(Conv2D(
      64, (
      3,
      3), activation
      =
      'relu'))

model.add(MaxPooling2D(pool_size
      =(
      2,
      2)))

model.add(Dropout(
      0.
      25))

model.add(Flatten())

model.add(Dense(
      128, activation
      =
      'relu'))

model.add(Dropout(
      0.
      5))

model.add(Dense(num_classes, activation
      =
      'softmax'))


model.
      compile(loss
      =keras.losses.categorical_crossentropy,

              optimizer
      =keras.optimizers.Adadelta(),

              metrics
      =[
      'accuracy'])


      #log = model.fit(X_train, Y_train,


      #          batch_size=batch_size, nb_epoch=num_epochs,


      #          verbose=1, validation_split=0.1)


log
      = model.fit(x_train, y_train,

          batch_size
      =batch_size,

          epochs
      =epochs,

          verbose
      =
      1,

          validation_data
      =(x_test, y_test))

score
      = model.evaluate(x_test, y_test, verbose
      =
      0)


      print(
      'Test loss:', score[
      0])


      print(
      'Test accuracy:', score[
      1])


plt.figure(
      'acc')

plt.subplot(
      2,
      1,
      1)

plt.plot(log.history[
      'acc'],
      'r--',label
      =
      'Training Accuracy')

plt.plot(log.history[
      'val_acc'],
      'r-',label
      =
      'Validation Accuracy')

plt.legend(loc
      =
      'best')

plt.xlabel(
      'Epochs')

plt.axis([
      0, epochs,
      0.
      9,
      1])

plt.figure(
      'loss')

plt.subplot(
      2,
      1,
      2)

plt.plot(log.history[
      'loss'],
      'b--',label
      =
      'Training Loss')

plt.plot(log.history[
      'val_loss'],
      'b-',label
      =
      'Validation Loss')

plt.legend(loc
      =
      'best')

plt.xlabel(
      'Epochs')

plt.axis([
      0, epochs,
      0,
      1])

plt.show()
4、VGG16&Mnist
5、VGG16迁移学习
目前方向:图像拼接融合、图像识别 联系方式:jsxyhelu@foxmail.com