SpringSecurity – 安全认证
AuthenticationManager)
在spring-security官网中认证是由AuthenticationManager接口来进行负责的,定义为
public interface AuthenticationManager {
    Authentication authenticate(Authentication authentication) throws AuthenticationException;
}
官方文档解释 :
尝试对传递 Authentication 的对象进行身份验证,如果成功,则返回完全填充 Authentication 的对象(包括授予的权限)。
必须 AuthenticationManager 履行以下有关例外情况的合同:
如果帐户被禁用AuthenticationManager,则必须抛出 ,DisabledException并且可以测试此状态。
如果帐户被锁定AuthenticationManager,则必须抛出 aLockedException,并且可以测试帐户锁定。
如果提供不正确的凭据,则必须抛出 。 BadCredentialsException 虽然上述例外是可选AuthenticationManager 但必须 始终 测试凭据。
应测试异常,如果适用,应按上述顺序抛出(即,如果帐户被禁用或锁定,则身份验证请求将立即被拒绝,并且不执行凭据测试过程)。这可以防止针对已禁用或锁定的帐户测试凭据。
形参:
身份验证 – 身份验证请求对象
返回值:
经过完全身份验证的对象,包括凭据
抛出:
AuthenticationException – 如果身份验证失败
从官方文档我们就可以了解出: 如果
- 返回 Authentication 表示认证成功
- 返回 抛出AuthenticationException 异常,表示认证失败。
AuthenticationManager 的主要实现类为 ProviderManager
在 ProviderManager 中管理了众多 AuthenticationProvider 实例。在一次完整的认证流程中,Spring Security 允许存在多个 AuthenticationProvider ,用来实现多种认证方式,这些 AuthenticationProvider 都是由 ProviderManager 进行统一管理的
Authentication —认证信息标记者
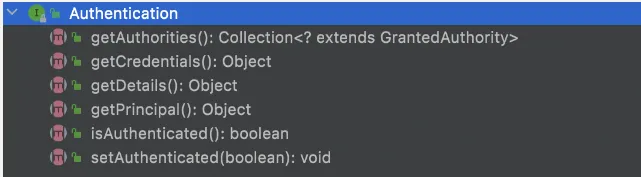
认证以及认证成功的信息主要是由 Authentication 的实现类进行保存的,其接口定义为:
public interface Authentication extends Principal, Serializable {
  Collection<? extends GrantedAuthority> getAuthorities();
  Object getCredentials();
  Object getDetails();
  Object getPrincipal();
  boolean isAuthenticated();
  void setAuthenticated(boolean isAuthenticated) throws IllegalArgumentException;
}
- getAuthorities 获取用户权限信息
- getCredentials 获取用户凭证信息,一般指密码
- getDetails 获取用户详细信息
- getPrincipal 获取用户身份信息,用户名、用户对象等
- isAuthenticated 用户是否认证成功
它通过实现类封装了我们需要的用户的信息,我们则是通过
Authentication authentication = SecurityContextHolder.getContext().getAuthentication();
User user = (User) authentication.getPrincipal();
System.out.println("获取username:" + user.getUsername());
System.out.println("获取password:" + user.getPassword());
来实现对用户信息的获取。
SecurityContextHolder
SecurityContextHolder 用来获取登录之后用户信息。Spring Security 会将登录用户数据保存在 Session 中。
- Spring Security在此基础上还做了一些改进,其中最主要的一个变化就是线程绑定。
- 当用户登录成功后,Spring Security 会将登录成功的用户信息保存到 SecurityContextHolder 中。SecurityContextHolder 中的数据保存默认是通过ThreadLocal 来实现的,使用 ThreadLocal 创建的变量只能被当前线程访问,不能被其他线程访问和修改,也就是用户数据和请求线程绑定在一起。
- 请求处理完毕后,Spring Security 会将 SecurityContextHolder 中的数据拿出来保存到 Session 中,同时将 SecurityContexHolder 中的数据清空。
- 释放线程
好处: 方便用户在 Controller、Service 层以及任何代码中获取当前登录用户数据
以上就是在安全认证时,最重要的几个接口
认证实现
依赖
web和security依赖
<dependency>
    <groupId>org.springframework.boot</groupId>
    <artifactId>spring-boot-starter-security</artifactId>
</dependency>
<dependency>
    <groupId>org.springframework.boot</groupId>
    <artifactId>spring-boot-starter-web</artifactId>
</dependency>
数据库和mybatis依赖
<!--数据库的依赖-->
<dependency>
    <groupId>org.mybatis.spring.boot</groupId>
    <artifactId>mybatis-spring-boot-starter</artifactId>
    <version>2.2.0</version>
</dependency>
<dependency>
    <groupId>mysql</groupId>
    <artifactId>mysql-connector-java</artifactId>
    <version>5.1.38</version>
</dependency>
<dependency>
    <groupId>com.alibaba</groupId>
    <artifactId>druid</artifactId>
    <version>1.2.7</version>
</dependency>
thymeleaf 和 security 联合依赖
<dependency>
    <groupId>org.springframework.boot</groupId>
    <artifactId>spring-boot-starter-thymeleaf</artifactId>
</dependency>
<!--        springSecurity 和前端的交互-->
<dependency>
    <groupId>org.thymeleaf.extras</groupId>
    <artifactId>thymeleaf-extras-springsecurity5</artifactId>
</dependency>
数据库和Mybatis配置
# 设置thymeleaf的缓存
spring.thymeleaf.cache=false
# datasource
spring.datasource.type=com.alibaba.druid.pool.DruidDataSource
spring.datasource.driver-class-name=com.mysql.jdbc.Driver
spring.datasource.url=jdbc:mysql://localhost:3306/ssm?characterEncoding=UTF-8&useSSL=false
spring.datasource.username=root
spring.datasource.password=root
# mybatis
mybatis.mapper-locations=classpath:security/mapper/*.xml
mybatis.type-aliases-package=security.pojo
# log为了展现mybatis运行 sql 语句
logging.level.com.security=debug
自定义配置MVC层
@Configuration
public class MvcConfig implements WebMvcConfigurer {
    @Override
    public void addViewControllers(ViewControllerRegistry registry) {
        registry.addViewController("/loginPages").setViewName("loginPage");
        registry.addViewController("/index").setViewName("index");
    }
}
主要配置了常用的公共视图跳转资源的接口,减少了controller层的代码量
自定义配置Security
@Configuration
public class SecurityConfig extends WebSecurityConfigurerAdapter {
  //配置资源...
}
void configure(WebSecurity web)
覆盖此方法以配置 WebSecurity。
例如,如果您希望忽略某些请求。Spring Security将忽略此方法中指定的端点,这意味着它不会保护它们免受CSRF,XSS,点击劫持等的侵害。相反,如果要保护终结点免受常见漏洞的影响,请参阅 configure(HttpSecurity) 和 HttpSecurity.authorizeRequests 配置方法。
void configure(HttpSecurity http) —认证主要配置
重写此方法以配置 HttpSecurity.通常,子类不应通过调用 super 来调用此方法,因为它可能会覆盖其配置。默认配置为:
http.authorizeRequests().anyRequest().authenticated().and().formLogin().and().httpBasic();
可以在此处指定任何需要防御常见漏洞的终结点,包括公共终结点。有关公共终结点的更多详细信息,请参阅 HttpSecurity.authorizeRequests 和“permitAll()”授权规则。
形参:
HTTP – HttpSecurity 要修改的
抛出:
Exception – 如果发生错误
- permitAll() 代表放行该资源,该资源为公共资源 无需认证和授权可以直接访问
- anyRequest().authenticated() 代表所有请求,必须认证之后才能访问
- formLogin() 代表开启表单认证
注意: 放行资源必须放在所有认证请求之前!
//认证
@Override
protected void configure(HttpSecurity http) throws Exception {
    http.authorizeRequests()
            .mvcMatchers("/index").permitAll()
            .mvcMatchers("/loginPages").permitAll()
            .anyRequest().authenticated()
            .and()
            .formLogin().loginPage("/loginPages")
            .loginProcessingUrl("/doLogin")
            .usernameParameter("username")
            .passwordParameter("password")
            .defaultSuccessUrl("/index")
            //.successForwardUrl("/index")
            //.failureUrl("/loginPages")
            // .failureForwardUrl("/loginPages")
            //.successHandler(new MyAuthenticationSuccessHandler()) //前后端分离的处理方式
            .failureHandler(new FailureHandler())
            .and()
            .logout()
            .invalidateHttpSession(true)        //默认删除session会话
            .clearAuthentication(true)          // 默认清楚认证标记
            .logoutSuccessUrl("/loginPages")
            .logoutSuccessHandler(new MyLogout())       //前后端分离注销成功的处理
            .and()
            .csrf().disable();
}
各个方法的详细说明
.and()
.logout()
.invalidateHttpSession(true)        //默认删除session会话
.clearAuthentication(true)          // 默认清楚认证标记
.logoutSuccessUrl("/loginPages")
.logoutSuccessHandler(new MyLogout())       //前后端分离注销成功的处理
.and()
- 通过 logout() 方法开启注销配置
- logoutUrl 指定退出登录请求地址,默认是 GET 请求,路径为 /logout
- invalidateHttpSession 退出时是否是 session 失效,默认值为 true
- clearAuthentication 退出时是否清除认证信息,默认值为 true
- logoutSuccessUrl 退出登录时跳转地址
.loginProcessingUrl("/doLogin")
.usernameParameter("username")
.passwordParameter("password")
一般来讲,我们用户完成输入,表单进行提交时都需要与security中的方法进行匹配
默认的loginProcessingUrl为login 、 usernameParameter 为 username 、passwordParameter 为 password
因此我们可以通过修改其中的值,来匹配我们自己的接口,及其属性value
*  .anyRequest().authenticated()
*  下面的所有请求都是需要认证之后的
*
*  .formLogin()
*  开启表单认证(value为登录页面)
*
*  .formLogin().loginPage("/loginPages")
*  用于覆盖默认的登录页面 ,“/loginPages”为一个请求接口
*
*  .loginProcessingUrl("/login")
*  用来处理登录请求的url
*  .defaultSuccessUrl("/index")
*  默认成功地址, 是一个重定向,
*  比如之前打开/hello请求,但是它跳转到了login,登录完成后
*  如果使用的是defaultSuccessUrl ,那么他依然会跳转至/hello请求
*   .successForwardUrl("/index")
*    成功跳转路径, 始终跳转到指定的请求, 比如之前打开/hello请求,但是它跳转到了login,登录完成后
*    如果使用的是上面这个successForwardUrl,那么他就会优先跳转至指定的index请求,而不是/hello
*
*  .failureForwardUrl("/toLogin")
*   登录失败跳转路径 ,返回的错误信息是在request作用域中
*     展示错误信息 :th:text="${SPRING_SECURITY_LAST_EXCEPTION}">
*
* .failureUrl()
*   登录失败跳转路径 ,返回的错误信息是在session作用域中
*   展示错误信息 th:text="${session.SPRING_SECURITY_LAST_EXCEPTION}">
*   .and().csrf().disable();
*   关闭跨站请求保护,为了测试
一般来讲 , .anyRequest().authenticated() 后面配置的资源/请求 , 他们都是需要实现认证才能被访问的
所以,我们通常将公共资源放置他之前, 然后用permitAll() 来过滤
.mvcMatchers("/index").permitAll()
.mvcMatchers("/loginPages").permitAll()
void setApplicationContext(ApplicationContext context)
作用: 设置应用上下文
public AuthenticationManager authenticationManagerBean()
如果我们想要自己设置userDetailsService认证 , 我们就可以通过重写protected void configure(AuthenticationManagerBuilder builder)方法
@Override
protected void configure(AuthenticationManagerBuilder builder) throws Exception {
    builder.userDetailsService(userDetailsService);
}
来设置我们自己定义的service接口,然后注入到容器中,等待被调用
重写此方法以将 AuthenticationManager 要公开的 from configure(AuthenticationManagerBuilder) 作为 Bean 公开。例如:
@Bean(name name=”myAuthenticationManager”)
@Override
public AuthenticationManager authenticationManagerBean() throws Exception {
return super.authenticationManagerBean();
}
返回值:
这 AuthenticationManager
抛出:
Exception
//将自定义的认证暴露在工厂中 (加入到容器中去管理)
@Override
@Bean
public AuthenticationManager authenticationManagerBean() throws Exception {
    return super.authenticationManagerBean();
}
UserDetailsService userDetailsServiceBean()
重写自己的userDetailsService()然后通过上面的authenticationManagerBean,将自己重写的serivce注入到容器中,作为公开的bean
重写此方法以将 UserDetailsService 创建自 configure(AuthenticationManagerBuilder) 公开为 Bean。通常,此方法只应执行以下覆盖:
@Bean(name = “myUserDetailsService”)
// any or no name specified is allowed
@Override
public UserDetailsService userDetailsServiceBean() throws Exception {
return super.userDetailsServiceBean();
}
要更改返回的实例,开发人员应改为更改userDetailsService()
返回值:
这 UserDetailsService
抛出:
Exception –
请参阅:
userDetailsService()