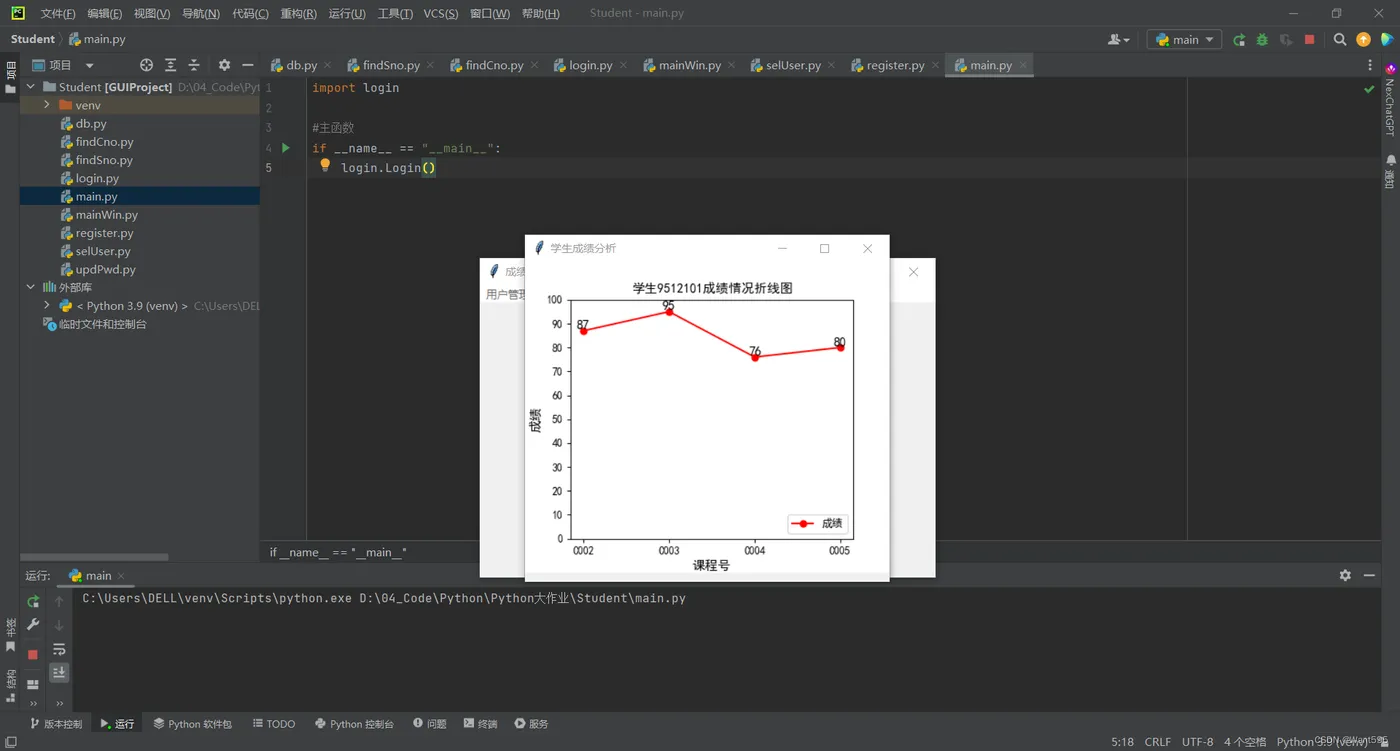
前言
用Python和数据库一起实现了一个简单的学生成绩管理系统,一起来看看吧!
本篇博客主要分为两大部分,数据库部分和Python程序设计部分,先将数据导入到数据库中,随后通过python程序设计连接到数据库,实现一系列的操作。
MySQL部分
1. 导入信息
以下是用MySQL语言创建用户表,学生表,课程表以及成绩表的完整程序,直接导入数据库即可。
-- ----------------------------
-- Table structure for `users`
-- ----------------------------
CREATE TABLE `users` (
  `username` varchar(20),
  `passwords` varchar(20),
  PRIMARY KEY(username)
)ENGINE=InnoDB DEFAULT CHARSET=utf8;
-- ----------------------------
-- Records of users
-- ----------------------------
INSERT INTO users VALUES ('user01', '123');
-- ----------------------------
-- Table structure for `student`
-- ----------------------------
CREATE TABLE `student` (
  `sno` char(7) NOT NULL,
  `sname` char(10) NOT NULL,
  `ssex` enum('男','女') DEFAULT '男',
  `sage` tinyint(3) unsigned DEFAULT NULL,
  `sdept` char(20) DEFAULT '计算机科学与工程学院',
  PRIMARY KEY (`sno`)
) ENGINE=InnoDB DEFAULT CHARSET=utf8;
-- ----------------------------
-- Records of student
-- ----------------------------
INSERT INTO student VALUES ('9512101', '李勇', '男', '19', '计算机系');
INSERT INTO student VALUES ('9512103', '王敏', '女', '20', '计算机系');
INSERT INTO student VALUES ('9513101', '周璐', '女', '17', '物理系');
INSERT INTO student VALUES ('9521101', '张莉', '女', '22', '计算机系');
INSERT INTO student VALUES ('9521102', '吴宾', '男', '21', '计算机系');
INSERT INTO student VALUES ('9521103', '张海', '男', '20', '计算机系');
INSERT INTO student VALUES ('9531101', '钱小平', '女', '18', '数学系');
INSERT INTO student VALUES ('9531102', '王大力', '男', '19', '数学系');
INSERT INTO student VALUES ('9531103', '刘梅', '女', '19', '计算机系');
-- ----------------------------
-- Table structure for `course`
-- ----------------------------
CREATE TABLE `course` (
  `cno` char(4) NOT NULL,
  `cname` varchar(40) NOT NULL,
  `cpno` char(4) DEFAULT NULL,
  `ccredit` tinyint(4) DEFAULT NULL,
  PRIMARY KEY (`cno`),
  KEY `cpno` (`cpno`),
  CONSTRAINT `course_ibfk_1` FOREIGN KEY (`cpno`) REFERENCES `course` (`cno`)
) ENGINE=InnoDB DEFAULT CHARSET=utf8;
-- ----------------------------
-- Records of course
-- ----------------------------
INSERT INTO course VALUES ('C001', '计算机导论', null, '3');
INSERT INTO course VALUES ('C002', '高等数学', null, '4');
INSERT INTO course VALUES ('C003', '程序设计语言', 'C001', '4');
INSERT INTO course VALUES ('C004', '数据结构与算法', 'C003', '5');
INSERT INTO course VALUES ('C005', '数据库原理与应用', 'C004', '4');
-- ----------------------------
-- Table structure for `sc`
-- ----------------------------
CREATE TABLE `sc` (
  `sno` char(7) NOT NULL DEFAULT '',
  `cno` char(4) NOT NULL DEFAULT '',
  `grade` decimal(5,1) DEFAULT NULL,
  PRIMARY KEY (`sno`,`cno`),
  KEY `sno`(`sno`),
  KEY `cno` (`cno`),
  CONSTRAINT `sc_ibfk_1` FOREIGN KEY (`sno`) REFERENCES `student` (`sno`),
  CONSTRAINT `sc_ibfk_2` FOREIGN KEY (`cno`) REFERENCES `course` (`cno`)
) ENGINE=InnoDB DEFAULT CHARSET=utf8;
-- ----------------------------
-- Records of sc
-- ----------------------------
INSERT INTO sc VALUES ('9512101', 'C001', null);
INSERT INTO sc VALUES ('9512101', 'C002', '87.0');
INSERT INTO sc VALUES ('9512101', 'C003', '95.0');
INSERT INTO sc VALUES ('9512101', 'C004', '76.0');
INSERT INTO sc VALUES ('9512101', 'C005', '80.0');
INSERT INTO sc VALUES ('9512103', 'C003', '51.0');
INSERT INTO sc VALUES ('9512103', 'C005', '60.0');
INSERT INTO sc VALUES ('9521101', 'C005', '72.0');
INSERT INTO sc VALUES ('9521102', 'C005', '80.0');
INSERT INTO sc VALUES ('9521103', 'C005', '45.0');
INSERT INTO sc VALUES ('9531101', 'C005', '81.0');
INSERT INTO sc VALUES ('9531101', 'C001', null);
INSERT INTO sc VALUES ('9531101', 'C002', '87.0');
INSERT INTO sc VALUES ('9531101', 'C003', '95.0');
INSERT INTO sc VALUES ('9531101', 'C004', '76.0');
INSERT INTO sc VALUES ('9531102', 'C001', null);
INSERT INTO sc VALUES ('9531102', 'C002', '87.0');
INSERT INTO sc VALUES ('9531102', 'C003', '95.0');
INSERT INTO sc VALUES ('9531102', 'C004', '76.0');
INSERT INTO sc VALUES ('9531102', 'C005', '94.0');
2. 演示说明
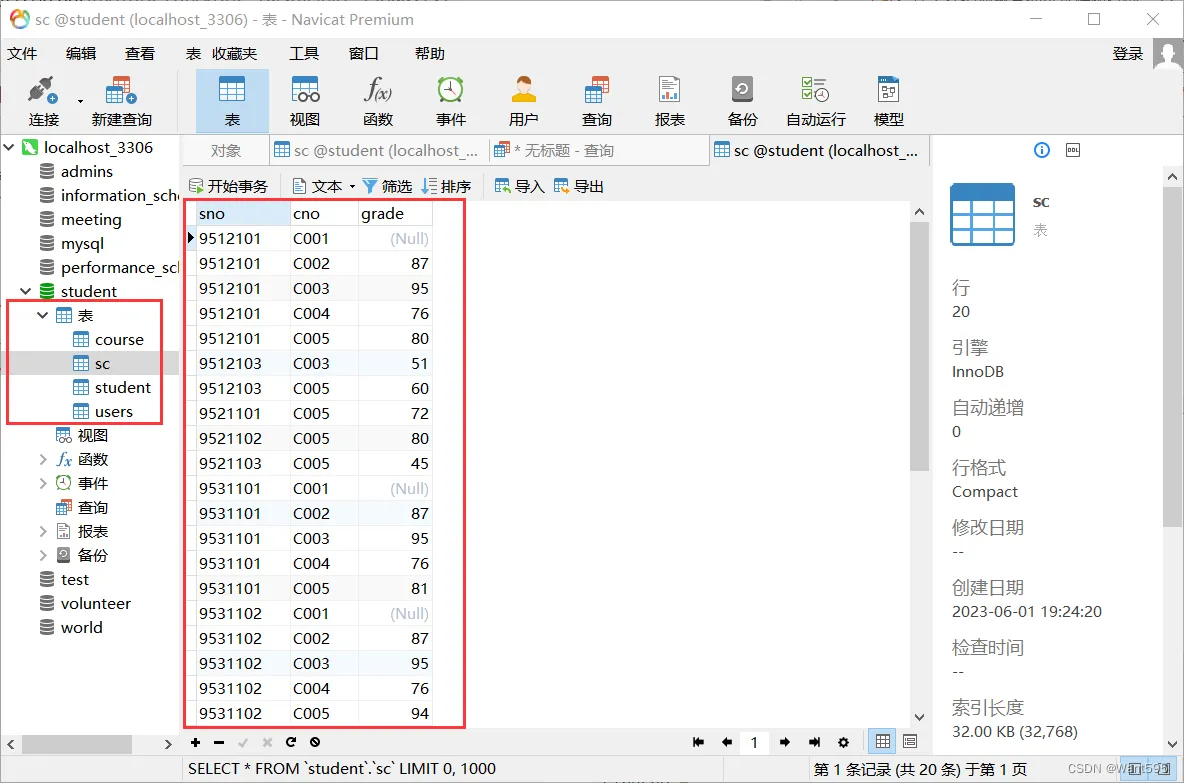
我用的是navicat数据库,下面具体演示一下如何将数据导入到navicat数据库中
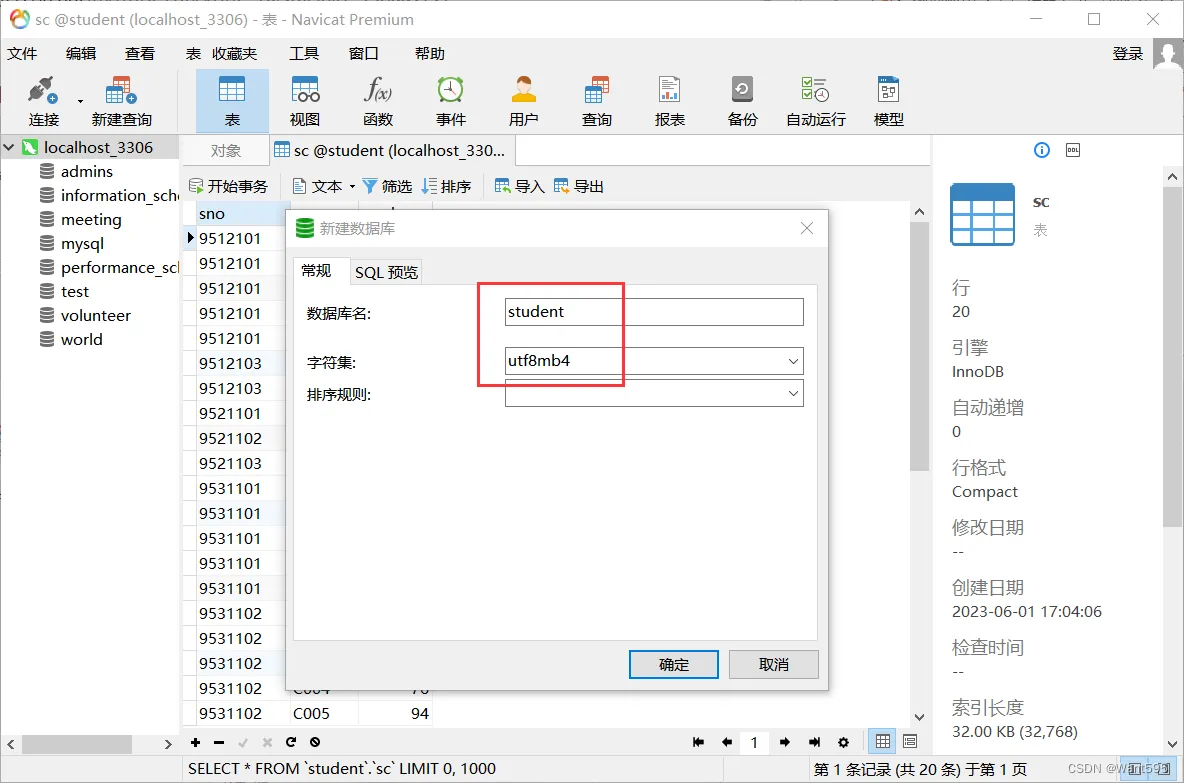
- 新建一个数据库,取名 “student”,字符集选 utf8,然后点击确定。
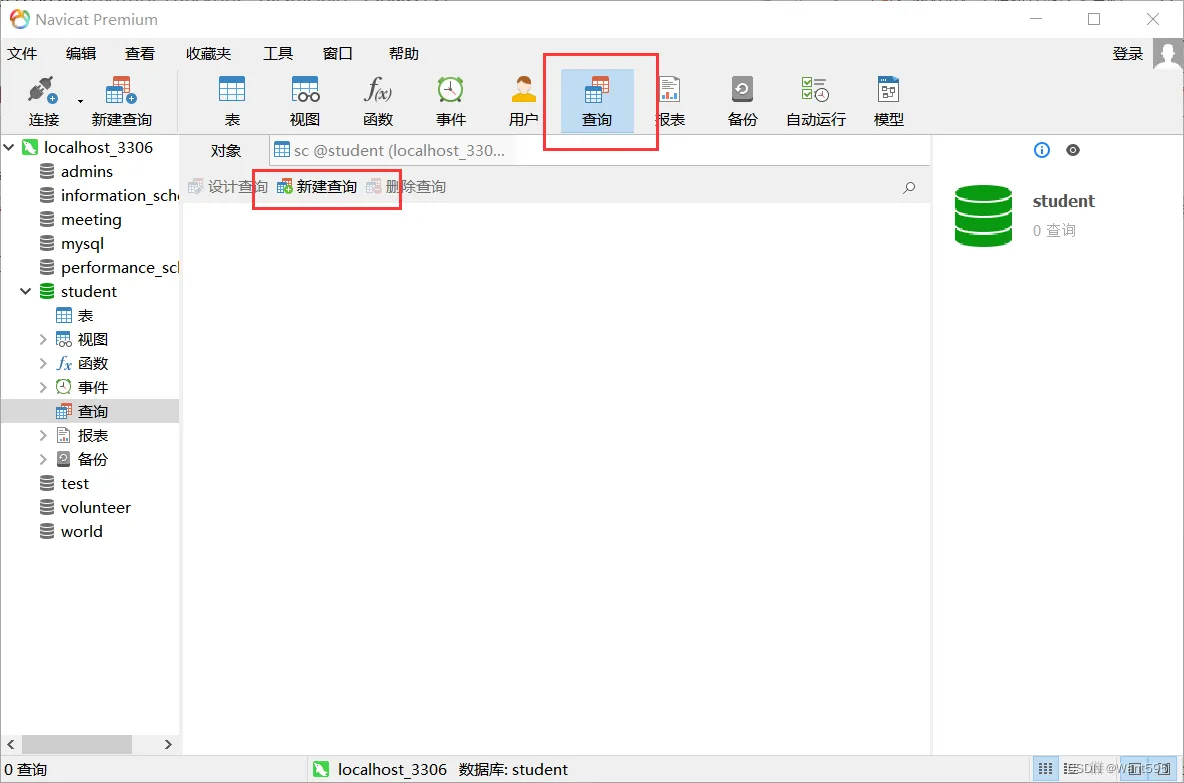
- 打开刚刚创建的student数据库,点击"查询",然后点击"新建查询"。
- 将以上MySQL语句复制黏贴到数据库中,点击运行即可。
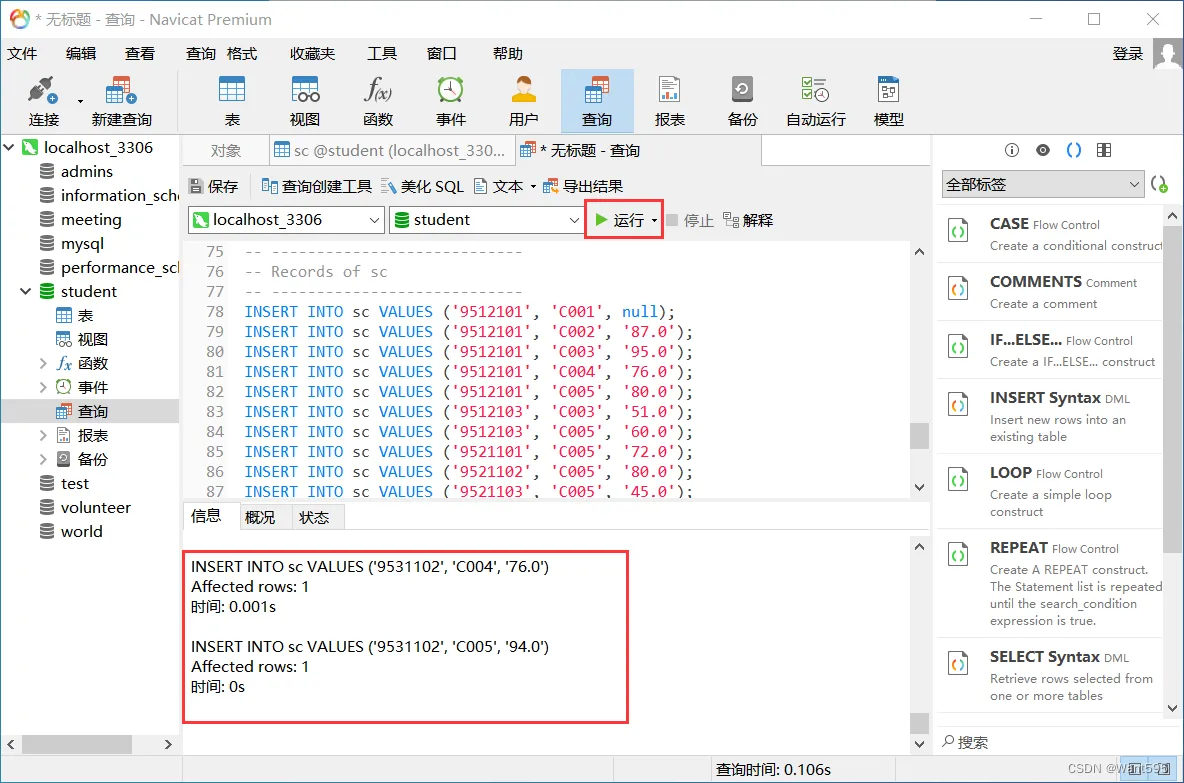
- 等程序运行完成后,点击左侧的表并刷新一下,此时就会出现刚才创建的所有表了。
Python程序设计部分
1. 连接数据库
程序设计
import pymysql
Username = ""
Findsno = ""
Findcno = ""
def conn():  # 连接数据库
    db = pymysql.connect(host="localhost", user="root", database="student", charset='utf8')
    return db
def update(sql, *values):  # shift键,单tab
    db1 = conn()
    cursor1 = db1.cursor()
    try:
        cursor1.execute(sql, values)
        db1.commit()
        return 1
    except:
        db1.rollback()
        return 0
    finally:
        cursor1.close()
        db1.close()
def update2(sql):  # shift键,单tab
    db1 = conn()
    cursor1 = db1.cursor()
    try:
        cursor1.execute(sql)
        db1.commit()
        return 1
    except:
        db1.rollback()
        return 0
    finally:
        cursor1.close()
        db1.close()
def query(sql, *keys):
    db2 = conn()
    cursor2 = db2.cursor()
    cursor2.execute(sql, keys)
    rs = cursor2.fetchall()
    cursor2.close()
    db2.close()
    return rs
def query2(sql):
    db3 = conn()
    cursor3 = db3.cursor()
    cursor3.execute(sql)
    rs = cursor3.fetchall()
    row = cursor3.rowcount
    cursor3.close()
    db3.close()
    return rs, row
程序分析
在python中,我们使用了pymysql模块来连接MySQL数据库,并提供了一系列的函数来执行数据库操作。下面是对代码中各个函数的具体分析:
conn()函数
该函数用来连接到MySQL数据库,并返回一个数据库连接对象。
update()函数
该函数用来执行DML语句(如INSERT、UPDATE、DELETE等),可以使用占位符参数(*values)来代替SQL语句中的参数,函数会自动替换,防止SQL注入攻击。
update2()函数
该函数同样用来执行DML语句,但不需要使用占位符参数,因为这种情况下SQL语句中没有参数,所以直接执行即可。
query()函数
该函数用来执行SQL查询语句,并可以使用占位符参数来代替SQL语句中的参数。函数会返回所有匹配的结果集(即fetchall)。
query2()函数
该函数同样用来执行SQL查询语句,但不需要使用占位符参数,因为这种情况下SQL语句中没有参数,所以直接执行即可。函数会返回所有匹配的结果集和行数(即fetchall和rowcount)。
2. 登录界面
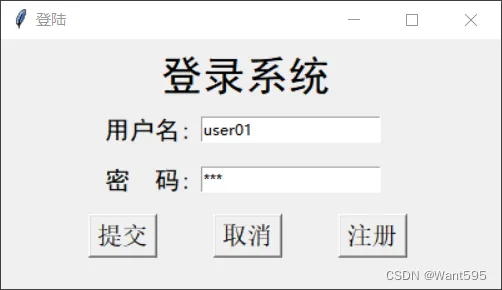
效果
程序设计
import tkinter as tk
import tkinter.messagebox
import db
import mainWin
import register
# 登录界面
class Login():
    def __init__(self):
        self.root2 = tk.Tk()
        self.root2.title("登陆")
        self.screenwidth = self.root2.winfo_screenwidth()
        self.screenheight = self.root2.winfo_screenheight()
        self.root2.geometry('%dx%d+%d+%d' % (400, 200, (self.screenwidth - 400) / 2, (self.screenheight - 200) / 2))
        self.label = tk.Label(self.root2, text='登录系统', font=("黑体", 25))
        self.label.place(x=125, y=10)
        self.userlabel = tk.Label(self.root2, text="用户名:", font=("黑体", 15))
        self.userlabel.place(x=80, y=60)
        self.userentry = tk.Entry(self.root2)
        self.userentry.place(x=160, y=62)
        self.pwdlabel = tk.Label(self.root2, text="密  码:", font=("黑体", 15))
        self.pwdlabel.place(x=80, y=100)
        self.pwdentry = tk.Entry(self.root2, width=20, show='*')
        self.pwdentry.place(x=160, y=102)
        self.userentry.insert(0, 'user01')
        self.pwdentry.insert(0, '123')
        self.okbutton = tk.Button(self.root2, text='提交', font=10, command=self.openMain)
        self.okbutton.place(x=70, y=140)
        self.cancelbutton = tk.Button(self.root2, text='取消', font=10, command=self.root2.destroy)
        self.cancelbutton.place(x=170, y=140)
        self.addbutton = tk.Button(self.root2, text='注册', font=10, command=self.adduser)
        self.addbutton.place(x=270, y=140)
        self.root2.mainloop()
    def openMain(self):
        username2 = self.userentry.get()
        userpwd2 = self.pwdentry.get()
        if username2.strip() == "" or userpwd2.strip() == "":
            tk.messagebox.showerror("登录失败", "用户名或密码不能为空")
            return False
        else:
            try:
                rs = db.query("select * from users where username = %s and passwords = %s", username2, userpwd2)
                if len(rs) > 0:
                    db.Username = username2
                    self.root2.destroy()
                    mainWin.MainWin()
                else:
                    tk.messagebox.showinfo("ee", "你输入的信息不正确,请重新输入")
            except Exception as e:
                print("登陆异常")
                print(e)
    def adduser(self):
        self.root2.destroy()
        register.Register()
程序分析
这是一个使用Tkinter编写的用户登录界面程序。程序主要分为两部分,即界面设计和响应事件处理。
在界面设计部分,代码使用了Tkinter的各种控件,包括Label、Entry、Button等,用于显示和接收用户输入信息。具体设计如下:
- 创建一个顶级窗口root2,并设置标题和窗口大小。
- 在窗口上添加一个Label控件,用于显示“登录系统”。
- 添加两个Label控件和两个Entry控件,用于接收用户名和密码,并初始化默认值。
- 添加三个Button控件,分别用于提交、取消和注册操作。
在响应事件处理部分,代码使用了各种函数来实现登录和注册功能:
openMain()函数用于处理提交操作,获取用户输入的用户名和密码,并按照先验证是否为空,再验证是否存在于数据库中。最后,如果登录成功则跳转到主界面,否则给出相应提示。
adduser()函数用于处理注册操作,当用户按下“注册”按钮时,关闭当前登录窗口(root2),并跳转到注册界面。
程序中还调用了db.py模块,实现数据库操作。
3. 注册界面
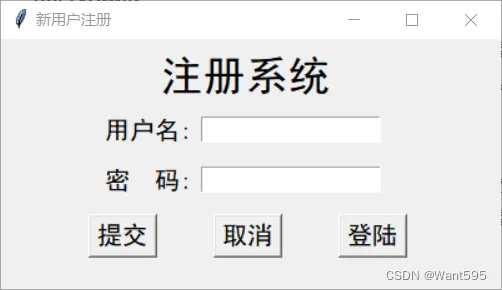
效果
程序设计
import tkinter as tk
import tkinter.messagebox
import db
import login
class Register():
    def __init__(self):
        self.root1 = tk.Tk()
        self.root1.title("新用户注册")
        self.screenwidth = self.root1.winfo_screenwidth()
        self.screenheight = self.root1.winfo_screenheight()
        self.root1.geometry('%dx%d+%d+%d' % (400, 200, (self.screenwidth - 400) / 2, (self.screenheight - 200) / 2))
        self.label = tk.Label(self.root1, text='注册系统', font=("黑体", 25))
        self.label.place(x=125, y=10)
        self.userlabel = tk.Label(self.root1, text="用户名:", font=("黑体", 15))
        self.userlabel.place(x=80, y=60)
        self.userentry = tk.Entry(self.root1)
        self.userentry.place(x=160, y=62)
        self.pwdlabel = tk.Label(self.root1, text="密  码:", font=("黑体", 15))
        self.pwdlabel.place(x=80, y=100)
        self.pwdentry = tk.Entry(self.root1, width=20, show='*')
        self.pwdentry.place(x=160, y=102)
        self.okbutton = tk.Button(self.root1, text='提交', font=("黑体", 15), command=self.addUser)
        self.okbutton.place(x=70, y=140)
        self.cancelbutton = tk.Button(self.root1, text='取消', font=("黑体", 15), command=self.root1.destroy)
        self.cancelbutton.place(x=170, y=140)
        self.loginbutton = tk.Button(self.root1, text='登陆', font=("黑体", 15), command=self.loginUser)
        self.loginbutton.place(x=270, y=140)
        self.root1.mainloop()
    def addUser(self):
        username1 = self.userentry.get()
        userpwd1 = self.pwdentry.get()
        if username1.strip() == "" or userpwd1.strip() == "":
            tk.messagebox.showerror("警告", "用户名或密码不能为空")
            return False
        else:
            rs1 = db.query('select * from users where username=%s', username1)
            if len(rs1) > 0:
                tk.messagebox.showinfo("注册失败", "该用户名已经存在")
                self.userentry.delete(0)
                self.pwdentry.delete(0)
            else:
                rs = db.update("insert into users(username,passwords) values(%s,%s)", username1, userpwd1)
                if rs > 0:
                    tk.messagebox.showinfo("用户", "添加成功")
                else:
                    self.userentry.delete(0)
                    self.pwdentry.delete(0)
    def loginUser(self):
        self.root1.destroy()
        login.Login()
程序分析
这是一个使用Tkinter编写的用户注册界面程序。程序主要分为两部分,即界面设计和响应事件处理。
在界面设计部分,代码使用了Tkinter的各种控件,包括Label、Entry、Button等,用于显示和接收用户输入信息。具体设计如下:
- 创建一个顶级窗口root1,并设置标题和窗口大小。
- 在窗口上添加一个Label控件,用于显示“注册系统”。
- 添加两个Label控件和两个Entry控件,用于接收用户名和密码。
- 添加三个Button控件,分别用于提交、取消和登录操作。
在响应事件处理部分,代码使用了各种函数来实现用户注册和登录功能:
addUser()函数用于处理提交操作,获取用户输入的用户名和密码,并按照先验证是否为空,再验证是否已经存在于数据库中。最后,将用户名和密码插入到数据库中,并给出相应提示。
loginUser()函数用于处理登录操作,当用户按下“登录”按钮时,关闭当前注册窗口(root1),并跳转到登录界面。
程序中还调用了db.py模块,实现数据库操作。