
CreateCollection API执行流程(addCollectionMetaStep)源码解析
milvus版本:v2.3.2
CreateCollection这个API流程较长,也是milvus的核心API之一,涉及的内容比较复杂。这里介绍和channel相关的流程。
整体架构:
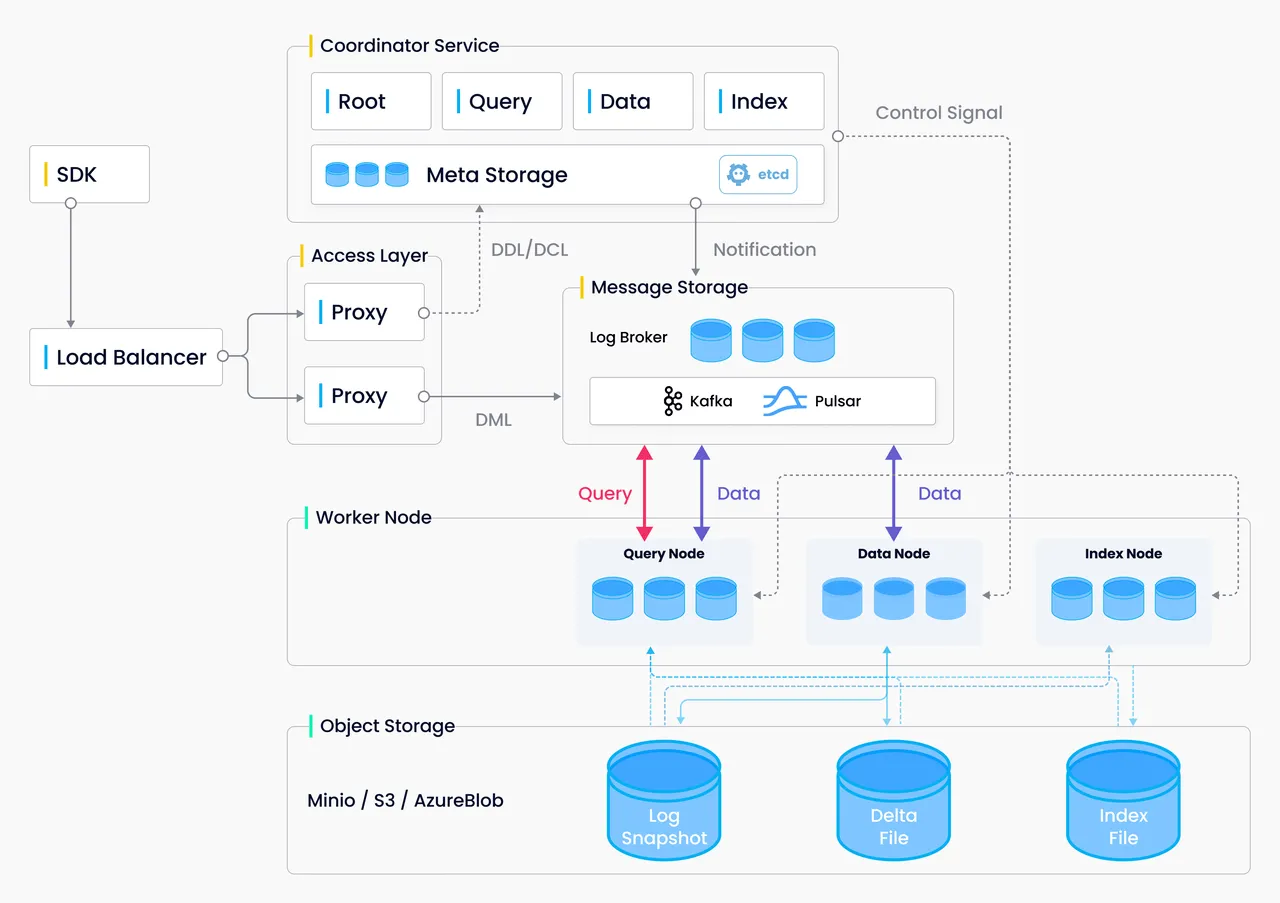
CreateCollection(addCollectionMetaStep)的数据流向:
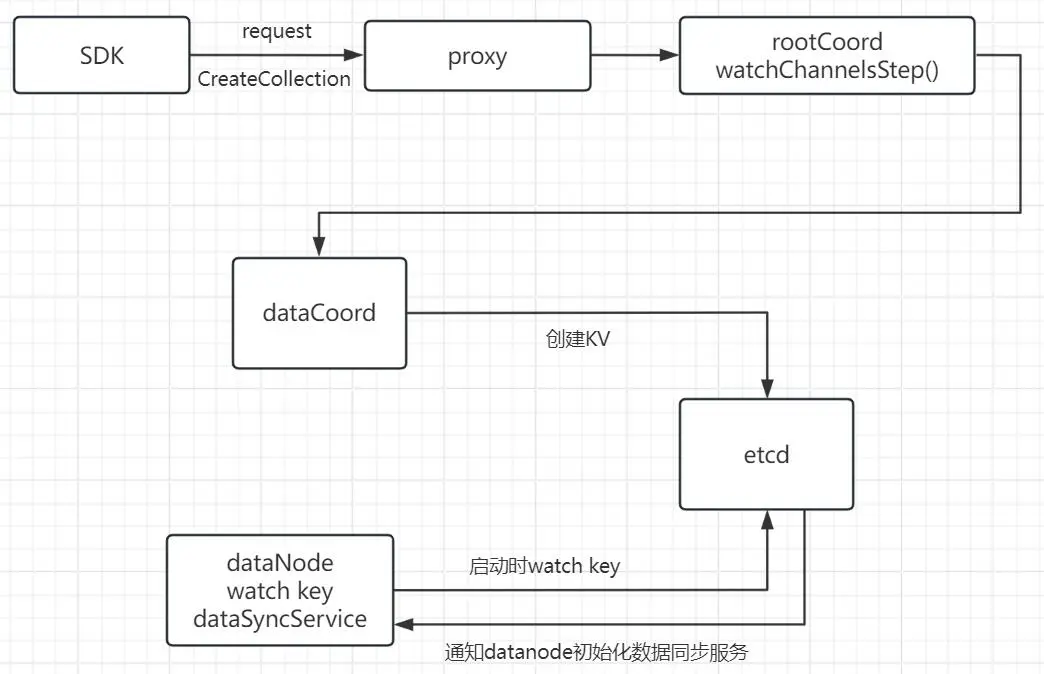
1.客户端sdk发出CreateCollection API请求。
from pymilvus import (
    connections,
    FieldSchema, CollectionSchema, DataType,
    Collection,
)

num_entities, dim = 3000, 1024

print("start connecting to Milvus")
connections.connect("default", host="192.168.230.71", port="19530")

fields = [
    FieldSchema(name="pk", dtype=DataType.VARCHAR, is_primary=True, auto_id=False, max_length=100),
    FieldSchema(name="random", dtype=DataType.DOUBLE),
    FieldSchema(name="embeddings", dtype=DataType.FLOAT_VECTOR, dim=dim)
]

schema = CollectionSchema(fields, "hello_milvus is the simplest demo to introduce the APIs")

print("Create collection `hello_milvus`")
hello_milvus = Collection("hello_milvus", schema, consistency_level="Strong",shards_num=2)
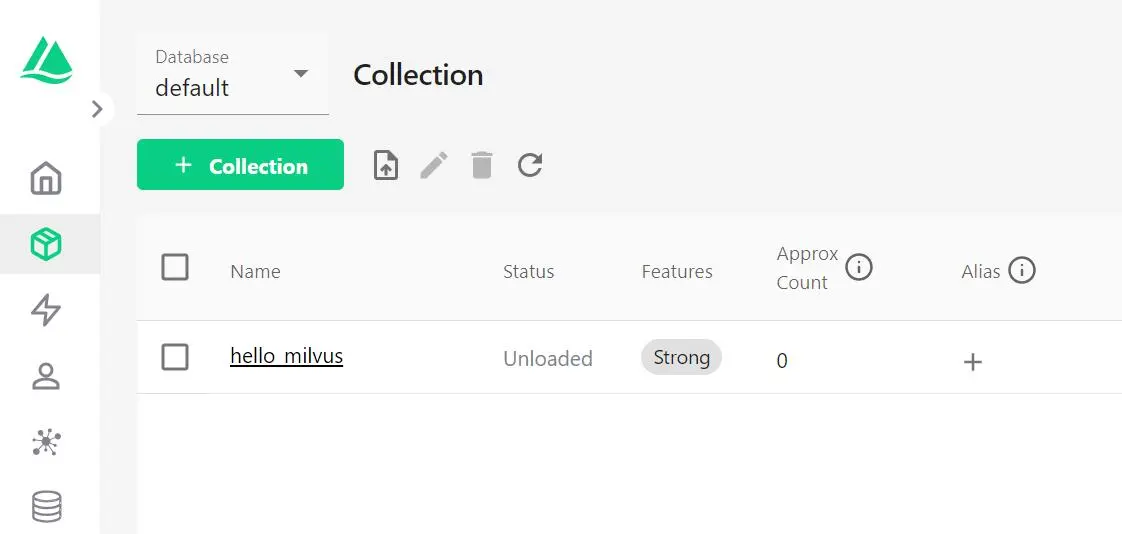
客户端SDK向proxy发送一个CreateCollection API请求,创建一个名为hello_milvus的collection。
2.客户端接受API请求,将request封装为createCollectionTask,并压入ddQueue队列。
代码路径:internal\proxy\impl.go
func (node *Proxy) CreateCollection(ctx context.Context, request *milvuspb.CreateCollectionRequest) (*commonpb.Status, error) {


    ......
    // request封装为task
    cct := &createCollectionTask{


        ctx:                     ctx,
        Condition:               NewTaskCondition(ctx),
        CreateCollectionRequest: request,
        rootCoord:               node.rootCoord,
    }

    ......
    // 将task压入ddQueue队列
    if err := node.sched.ddQueue.Enqueue(cct); err != nil {


        ......
    }

    ......
    // 等待cct执行完
    if err := cct.WaitToFinish(); err != nil {


        ......
    }

    ......
}
3.执行createCollectionTask的3个方法PreExecute、Execute、PostExecute。
PreExecute()一般为参数校验等工作。
Execute()一般为真正执行逻辑。
PostExecute()执行完后的逻辑,什么都不做,返回nil。
代码路径:internal\proxy\task.go
func (t *createCollectionTask) Execute(ctx context.Context) error {


    var err error
    t.result, err = t.rootCoord.CreateCollection(ctx, t.CreateCollectionRequest)
    return err
}
从代码可以看出调用了rootCoord的CreateCollection接口。
4.进入rootCoord的CreateCollection接口。
代码路径:internal\rootcoord\root_coord.go
继续将请求封装为rootcoord里的createCollectionTask
func (c *Core) CreateCollection(ctx context.Context, in *milvuspb.CreateCollectionRequest) (*commonpb.Status, error) {


    ......
    // 封装为createCollectionTask
    t := &createCollectionTask{


        baseTask: newBaseTask(ctx, c),
        Req:      in,
    }
    // 加入调度
    if err := c.scheduler.AddTask(t); err != nil {


        ......
    }
    // 等待task完成
    if err := t.WaitToFinish(); err != nil {


        ......
    }

    ......
}
5.执行createCollectionTask的Prepare、Execute、NotifyDone方法。
Execute()为核心方法。
代码路径:internal\rootcoord\create_collection_task.go
func (t *createCollectionTask) Execute(ctx context.Context) error {


    // collID为collectionID,在Prepare()里分配
    // partIDs为partitionID,在Prepare()里分配
    collID := t.collID
    partIDs := t.partIDs
    // 产生时间戳
    ts, err := t.getCreateTs()
    if err != nil {


        return err
    }
    // vchanNames为虚拟channel,在Prepare()里分配
    // chanNames为物理channel,在Prepare()里分配
    vchanNames := t.channels.virtualChannels
    chanNames := t.channels.physicalChannels

    startPositions, err := t.addChannelsAndGetStartPositions(ctx, ts)
    if err != nil {


        t.core.chanTimeTick.removeDmlChannels(t.channels.physicalChannels...)
        return err
    }
    // 填充partition,创建collection的时候,默认只有一个名为"Default partition"的partition。
    partitions := make([]*model.Partition, len(partIDs))
    for i, partID := range partIDs {


        partitions[i] = &model.Partition{


            PartitionID:               partID,
            PartitionName:             t.partitionNames[i],
            PartitionCreatedTimestamp: ts,
            CollectionID:              collID,
            State:                     pb.PartitionState_PartitionCreated,
        }
    }
    // 填充collection
    // 可以看出collection由collID、dbid、schemaName、fields、vchanName、chanName、partition、shardNum等组成
    collInfo := model.Collection{


        CollectionID:         collID,
        DBID:                 t.dbID,
        Name:                 t.schema.Name,
        Description:          t.schema.Description,
        AutoID:               t.schema.AutoID,
        Fields:               model.UnmarshalFieldModels(t.schema.Fields),
        VirtualChannelNames:  vchanNames,
        PhysicalChannelNames: chanNames,
        ShardsNum:            t.Req.ShardsNum,
        ConsistencyLevel:     t.Req.ConsistencyLevel,
        StartPositions:       toKeyDataPairs(startPositions),
        CreateTime:           ts,
        State:                pb.CollectionState_CollectionCreating,
        Partitions:           partitions,
        Properties:           t.Req.Properties,
        EnableDynamicField:   t.schema.EnableDynamicField,
    }

    clone := collInfo.Clone()

    existedCollInfo, err := t.core.meta.GetCollectionByName(ctx, t.Req.GetDbName(), t.Req.GetCollectionName(), typeutil.MaxTimestamp)
    if err == nil {


        equal := existedCollInfo.Equal(*clone)
        if !equal {


            return fmt.Errorf("create duplicate collection with different parameters, collection: %s", t.Req.GetCollectionName())
        }

        log.Warn("add duplicate collection", zap.String("collection", t.Req.GetCollectionName()), zap.Uint64("ts", ts))
        return nil
    }
    // 分为多个step执行,每一个undoTask由todoStep和undoStep构成
    // 执行todoStep,报错则执行undoStep
    undoTask := newBaseUndoTask(t.core.stepExecutor)
    undoTask.AddStep(&expireCacheStep{


        baseStep:        baseStep{

   core: t.core},
        dbName:          t.Req.GetDbName(),
        collectionNames: []string{

   t.Req.GetCollectionName()},
        collectionID:    InvalidCollectionID,
        ts:              ts,
    }, &nullStep{

   })
    undoTask.AddStep(&nullStep{

   }, &removeDmlChannelsStep{


        baseStep:  baseStep{

   core: t.core},
        pChannels: chanNames,
    })
    undoTask.AddStep(&addCollectionMetaStep{


        baseStep: baseStep{

   core: t.core},
        coll:     &collInfo,
    }, &deleteCollectionMetaStep{


        baseStep:     baseStep{

   core: t.core},
        collectionID: collID,
        ts: ts,
    })

    undoTask.AddStep(&nullStep{

   }, &unwatchChannelsStep{


        baseStep:     baseStep{

   core: t.core},
        collectionID: collID,
        channels:     t.channels,
        isSkip:       !Params.CommonCfg.TTMsgEnabled.GetAsBool(),
    })
    undoTask.AddStep(&watchChannelsStep{


        baseStep: baseStep{

   core: t.core},
        info: &watchInfo{


            ts:             ts,
            collectionID:   collID,
            vChannels:      t.channels.virtualChannels,
            startPositions: toKeyDataPairs(startPositions),
            schema: &schemapb.CollectionSchema{


                Name:        collInfo.Name,
                Description: collInfo.Description,
                AutoID:      collInfo.AutoID,
                Fields:      model.MarshalFieldModels(collInfo.Fields),
            },
        },
    }, &nullStep{

   })
    undoTask.AddStep(&changeCollectionStateStep{


        baseStep:     baseStep{

   core: t.core},
        collectionID: collID,
        state:        pb.CollectionState_CollectionCreated,
        ts:           ts,
    }, &nullStep{

   })

    return undoTask.Execute(ctx)
}
创建collection涉及多个步骤,可以看出这里依次分为expireCacheStep、addCollectionMetaStep、watchChannelsStep、changeCollectionStateStep这几个步骤,addCollectionMetaStep是关于etcd元数据的step,已在另一篇文章对其进行详细解析。本篇幅对watchChannelsStep进行解析。
6.进入watchChannelsStep,执行其Execute()方法。
代码路径:internal\rootcoord\step.go
func (s *watchChannelsStep) Execute(ctx context.Context) ([]nestedStep, error) {


    err := s.core.broker.WatchChannels(ctx, s.info)
    return nil, err
}
在这里重点研究s.core.broker.WatchChannels()这个方法做了什么事情。
调用栈如下:
s.core.broker.WatchChannels()
  |--WatchChannels()(internal\rootcoord\broker.go)
    |--b.s.dataCoord.WatchChannels()
      |--WatchChannels()(internal\datacoord\services.go)
        |--s.channelManager.Watch()
          |--c.updateWithTimer()(internal\datacoord\channel_manager.go)
            |--c.store.Update()
              |--c.update()(internal\datacoord\channel_store.go)
                |--c.txn()(同上)
                  |--c.store.MultiSaveAndRemove()(同上)
                    |--MultiSaveAndRemove()(internal\kv\etcd\etcd_kv.go)
        |--s.meta.catalog.MarkChannelAdded()
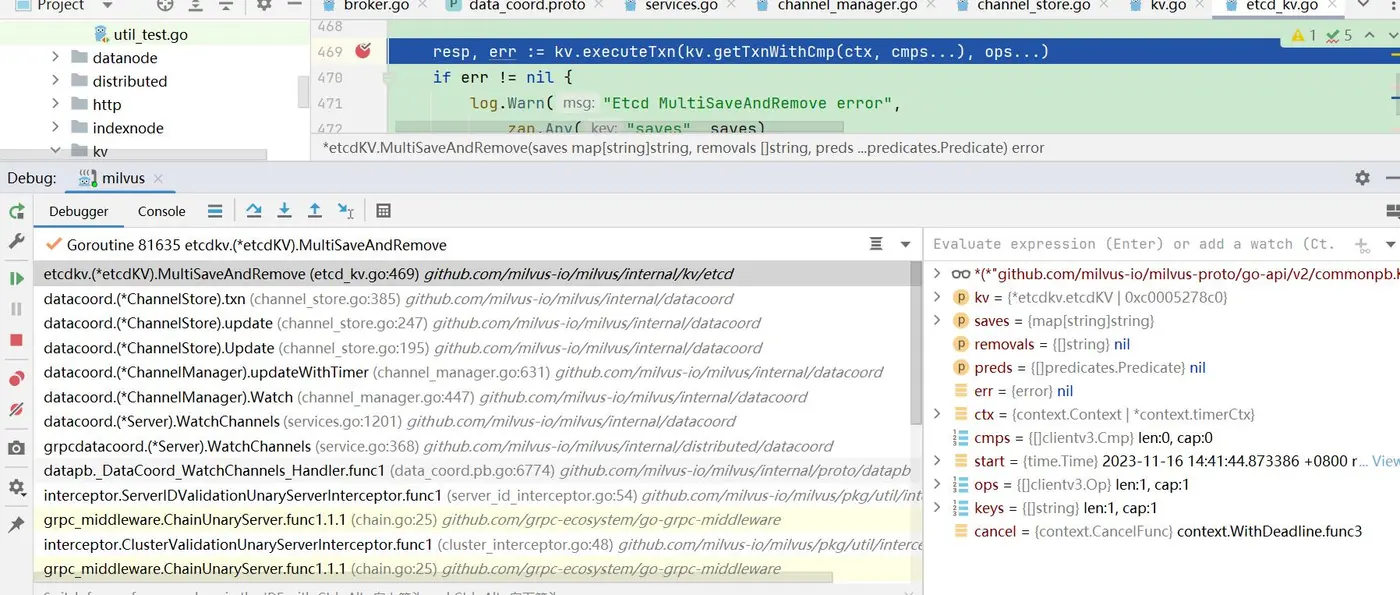
WatchChannels这个操作最终是在etcd写入kv。那么我们研究写入的kv是什么。
根据堆栈顺序来进行分析。
1.WatchChannels()方法
代码路径:internal\datacoord\services.go
// WatchChannels notifies DataCoord to watch vchannels of a collection.
func (s *Server) WatchChannels(ctx context.Context, req *datapb.WatchChannelsRequest) (*datapb.WatchChannelsResponse, error) {


    log := log.Ctx(ctx).With(
        zap.Int64("collectionID", req.GetCollectionID()),
        zap.Strings("channels", req.GetChannelNames()),
    )
    log.Info("receive watch channels request")
    resp := &datapb.WatchChannelsResponse{


        Status: merr.Success(),
    }

    if err := merr.CheckHealthy(s.GetStateCode()); err != nil {


        return &datapb.WatchChannelsResponse{


            Status: merr.Status(err),
        }, nil
    }
    // req.GetChannelNames()得到的值为:
    // by-dev-rootcoord-dml_2_445674962009727985v0
    // by-dev-rootcoord-dml_3_445674962009727985v1
    for _, channelName := range req.GetChannelNames() {


        ch := &channel{


            Name:            channelName,
            CollectionID:    req.GetCollectionID(),
            StartPositions:  req.GetStartPositions(),
            Schema:          req.GetSchema(),
            CreateTimestamp: req.GetCreateTimestamp(),
        }
        // 循环执行watch()
        err := s.channelManager.Watch(ctx, ch)
        if err != nil {


            log.Warn("fail to watch channelName", zap.Error(err))
            resp.Status = merr.Status(err)
            return resp, nil
        }
        // 向etcd写入另外一个kv
        if err := s.meta.catalog.MarkChannelAdded(ctx, ch.Name); err != nil {


            // TODO: add background task to periodically cleanup the orphaned channel add marks.
            log.Error("failed to mark channel added", zap.Error(err))
            resp.Status = merr.Status(err)
            return resp, nil
        }
    }

    return resp, nil
}
函数入参req的值如下:
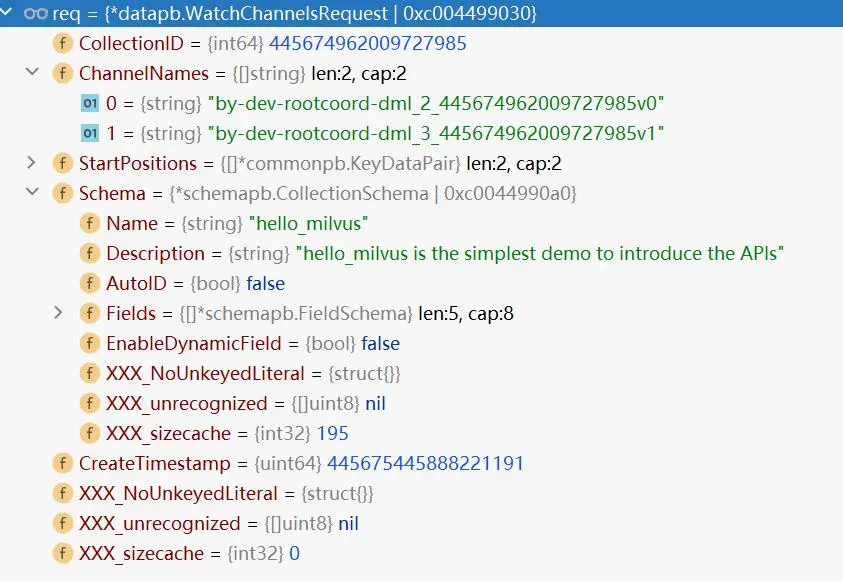
在这里有2个channelName,是虚拟channel,为什么是2个channel?因为客户端SDK创建collection传入了shards_num=2。一个shard对应一个虚拟channel。
channel名称by-dev-rootcoord-dml_2_445674962009727985v0中的445674962009727985是collectionID。
2.进入到s.channelManager.Watch()
代码路径:internal\datacoord\channel_manager.go
// Watch tries to add the channel to cluster. Watch is a no op if the channel already exists.
func (c *ChannelManager) Watch(ctx context.Context, ch *channel) error {


    log := log.Ctx(ctx)
    c.mu.Lock()
    defer c.mu.Unlock()
    // 使用分配策略:datacoord.AverageAssignPolicy
    updates := c.assignPolicy(c.store, []*channel{

   ch})
    if len(updates) == 0 {


        return nil
    }
    log.Info("try to update channel watch info with ToWatch state",
        zap.String("channel", ch.String()),
        zap.Array("updates", updates))
    // 操作etcd
    err := c.updateWithTimer(updates, datapb.ChannelWatchState_ToWatch)
    if err != nil {


        log.Warn("fail to update channel watch info with ToWatch state",
            zap.String("channel", ch.String()), zap.Array("updates", updates), zap.Error(err))
    }
    return err
}
updates的值为:
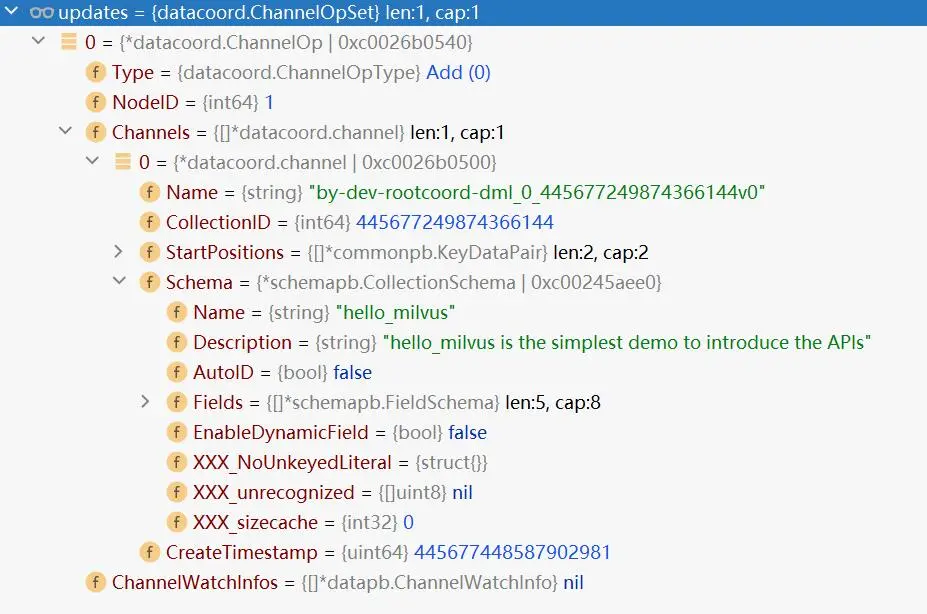
updates变量是一个ChannelOpSet类型。这时候ChannelWatchInfos为空。
type ChannelOpSet []*ChannelOp

type ChannelOp struct {


    Type              ChannelOpType
    NodeID            int64
    Channels          []*channel
    ChannelWatchInfos []*datapb.ChannelWatchInfo
}
3.进入c.updateWithTimer()
代码路径:internal\datacoord\channel_manager.go
func (c *ChannelManager) updateWithTimer(updates ChannelOpSet, state datapb.ChannelWatchState) error {


    channelsWithTimer := []string{

   }
    // updates此时数组长度为1
    for _, op := range updates {


        if op.Type == Add {


            // 填充ChannelWatchInfos
            channelsWithTimer = append(channelsWithTimer, c.fillChannelWatchInfoWithState(op, state)...)
        }
    }
    // 操作etcd
    err := c.store.Update(updates)
    if err != nil {


        log.Warn("fail to update", zap.Array("updates", updates), zap.Error(err))
        c.stateTimer.removeTimers(channelsWithTimer)
    }
    c.lastActiveTimestamp = time.Now()
    return err
}
4.进入c.store.Update()
代码路径:internal\datacoord\channel_store.go
// Update applies the channel operations in opSet.
func (c *ChannelStore) Update(opSet ChannelOpSet) error {


    totalChannelNum := 0
    for _, op := range opSet {


        totalChannelNum += len(op.Channels)
    }
    // totalChannelNum = 1
    // maxOperationsPerTxn = 64
    if totalChannelNum <= maxOperationsPerTxn {


        // 走这条路径
        return c.update(opSet)
    }
    // 如果超过则分批执行
    ......
}
5.进入c.update(opSet)
代码路径:internal\datacoord\channel_store.go
// update applies the ADD/DELETE operations to the current channel store.
func (c *ChannelStore) update(opSet ChannelOpSet) error {


    // Update ChannelStore's kv store.
    // 操作etcd
    if err := c.txn(opSet); err != nil {


        return err
    }

    // Update node id -> channel mapping.
    for _, op := range opSet {


        switch op.Type {


        case Add:
            for _, ch := range op.Channels {


                if c.checkIfExist(op.NodeID, ch) {


                    continue // prevent adding duplicated channel info
                }
                // Append target channels to channel store.
                c.channelsInfo[op.NodeID].Channels = append(c.channelsInfo[op.NodeID].Channels, ch)
            }
        case Delete:
            // Remove target channels from channel store.
            del := make(map[string]struct{

   })
            for _, ch := range op.Channels {


                del[ch.Name] = struct{

   }{

   }
            }
            prev := c.channelsInfo[op.NodeID].Channels
            curr := make([]*channel, 0, len(prev))
            for _, ch := range prev {


                if _, ok := del[ch.Name]; !ok {


                    curr = append(curr, ch)
                }
            }
            c.channelsInfo[op.NodeID].Channels = curr
        default:
            return errUnknownOpType
        }
        metrics.DataCoordDmlChannelNum.WithLabelValues(strconv.FormatInt(op.NodeID, 10)).Set(float64(len(c.channelsInfo[op.NodeID].Channels)))
    }
    return nil
}
6.进入c.txn(opSet)
代码路径:internal\datacoord\channel_store.go
// txn updates the channelStore's kv store with the given channel ops.
func (c *ChannelStore) txn(opSet ChannelOpSet) error {


    saves := make(map[string]string)
    var removals []string
    for _, op := range opSet {


        for i, ch := range op.Channels {


            // 构建key的规则
            k := buildNodeChannelKey(op.NodeID, ch.Name)
            switch op.Type {


            case Add:
                // 构建value,ChannelWatchInfo
                info, err := proto.Marshal(op.ChannelWatchInfos[i])
                if err != nil {


                    return err
                }
                saves[k] = string(info)
            case Delete:
                removals = append(removals, k)
            default:
                return errUnknownOpType
            }
        }
    }
    return c.store.MultiSaveAndRemove(saves, removals)
}
因为op.Type是Add,所以removals是nil。
key的值:
channelwatch/1/by-dev-rootcoord-dml_2_445674962009727985v0
规则为:channelwatch/{nodeID}/{chName}
saves变量的值:
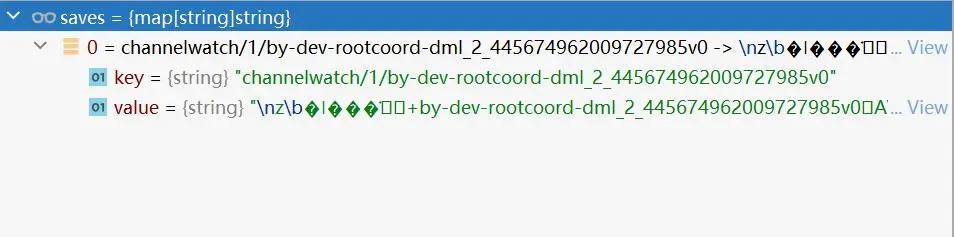
后面已经不用再跟踪下去。
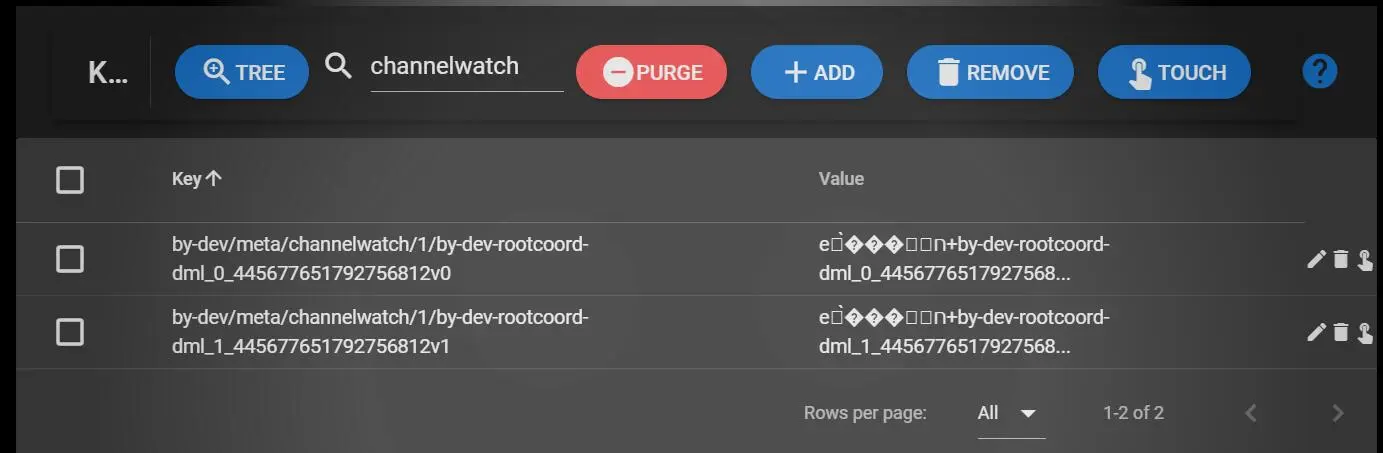
使用etcd-manager查看etcd。
7.进入s.meta.catalog.MarkChannelAdded()
代码路径:internal\metastore\kv\datacoord\kv_catalog.go
func (kc *Catalog) MarkChannelAdded(ctx context.Context, channel string) error {


    // 构建key的规则:datacoord-meta/channel-removal/{channelName}
    key := buildChannelRemovePath(channel)
    // 构建value:NonRemoveFlagTomestone = "non-removed"
    err := kc.MetaKv.Save(key, NonRemoveFlagTomestone)
    if err != nil {


        log.Error("failed to mark channel added", zap.String("channel", channel), zap.Error(err))
        return err
    }
    log.Info("NON remove flag tombstone added", zap.String("channel", channel))
    return nil
}
构建key的规则:
datacoord-meta/channel-removal/{channelName}
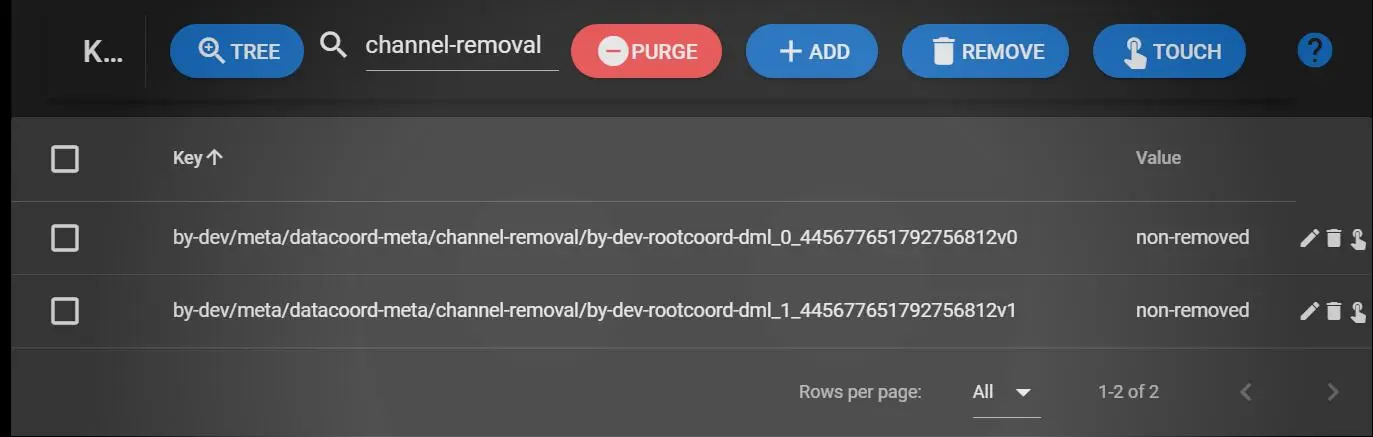
总结:
1.CreateCollection的addCollectionMetaStep会创建2种类型的key。
- channelwatch/{nodeID}/{chName}
- datacoord-meta/channel-removal/{channelName}
