spring与springboot
SpringBoot提供了一种快速开发Spring项目的方式,而不是对Spring功能上的增强。
Spring的缺点:
- 配置繁琐
- 依赖繁琐
SpringBoot功能:
- 自动配置
- 依赖管理
- 辅助功能(例如嵌入式服务器)
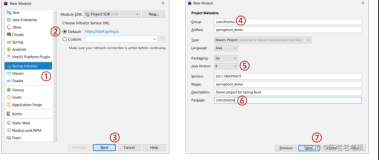
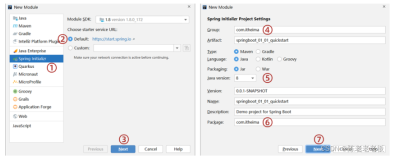
springboot入门:
- SpringBoot在创建项目时,使用jar的打包方式。
- SpringBoot的引导类,是项目入口,运行main方法就可以启动项目。
- 使用SpringBoot和Spring构建的项目,业务代码编写方式完全一样。
一、SpringBoot特点
1. 依赖管理
- 在spring-boot-starter-parent中定义了各种技术的版本信息,组合了一套最优搭配的技术版本。
- 在各种starter中,定义了完成该功能需要的坐标合集,其中大部分版本信息来自于父工程。
- 我们的工程继承spring-boot-starter-parent,引入starter后,通过依赖传递,就可以简单方便获得需要的jar包,并且不会存在版本冲突等问题。
父项目做依赖管理
//pom文件中的父项目
<parent>
<groupId>org.springframework.boot</groupId>
<artifactId>spring-boot-starter-parent</artifactId>
<version>2.3.4.RELEASE</version>
</parent>
//他的父项目
<parent>
<groupId>org.springframework.boot</groupId>
<artifactId>spring-boot-dependencies</artifactId>
<version>2.3.4.RELEASE</version>
</parent>
//几乎声明了所有开发中常用依赖的版本号
导入starter场景启动器
1、见到很多 spring-boot-starter-* : *就是某种场景
2、只要引入starter,这个场景的所有常规需要的依赖都会自动引入
3、SpringBoot所有支持的场景
4、见到的 *-spring-boot-starter: 第三方为我们提供的简化开发的场景启动器。
5、所有场景启动器最底层的依赖
<dependency>
<groupId>org.springframework.boot</groupId>
<artifactId>spring-boot-starter</artifactId>
<version>2.3.4.RELEASE</version>
<scope>compile</scope>
</dependency>
修改默认版本号
1、查看父父项目spring-boot-dependencies里面规定当前依赖的版本用的 key。
2、在当前项目里面重写配置
<properties>
<mysql.version>5.1.43</mysql.version>
</properties>
2. 自动配置
- 自动配好Tomcat
- 引入Tomcat依赖。
- 配置Tomcat
- 自动配好SpringMVC
- 引入SpringMVC全套组件
- 自动配好SpringMVC常用组件(功能)
- 自动配好Web常见功能,如:字符编码问题
- SpringBoot帮我们配置好了所有web开发的常见场景
- 默认的包结构
- 主程序所在包及其下面的所有子包里面的组件都会被默认扫描进来
- 无需以前的包扫描配置
- 想要改变扫描路径,@SpringBootApplication(scanBasePackages="com.atguigu")或者@ComponentScan 指定扫描路径
@SpringBootApplication
通过查看源码,发现上面这个注解等同于下面三个注解的组合
@SpringBootConfiguration
@EnableAutoConfiguration
@ComponentScan("com.atguigu.boot")
- 各种配置拥有默认值
- 默认配置最终都是映射到某个类上,如:MultipartProperties
- 配置文件的值最终会绑定每个类上,这个类会在容器中创建对象
- 按需加载所有自动配置项
- 存在非常多的starter,但只有引入了某个场景,这个场景的自动配置才会开启
- SpringBoot所有的自动配置功能都在 spring-boot-autoconfigure 包里面
二、SpringBoot配置文件
1. 配置文件的分类
SpringBoot是基于约定的,所以很多配置都有默认值,但如果想使用自己的配置替换默认配置的话,就可以使用application.properties或者application.yml(application.yaml)进行配置。
- 默认配置文件名称:application
- 在同一级目录下优先级为:properties > yml > yaml
2. yaml
1. 基本语法
- 大小写敏感
- 数据值前边必须有空格,作为分隔符
- 使用缩进表示层级关系
- 缩进时不允许使用Tab键,只允许使用空格(各个系统 Tab对应的 空格数目可能不同,导致层次混乱)。
- 缩进的空格数目不重要,只要相同层级的元素左侧对齐即可
- # 表示注释,从这个字符一直到行尾,都会被解析器忽略。
2. 数据类型
纯量
单个的、不可再分的值。date、boolean、string、number、null
k: v
字符串无需加引号,如果要加
' '会忽略转义字符,即将\n作为字符串输出" "会识别转义字符,即将\n作为换行输出
对象
键值对的集合。map、hash、object
k:
k1: v1
k2: v2
k3: v3
#行内写法
k: {k1: v1,k2: v2,k3: v3}
数组
一组按次序排列的值。array、list、queue、set
k:
- v1
- v2
- v3
#行内写法
k: [v1,v2,v3]
3. 参数引用
${key}
name: lisi
person:
name: ${name}# 引用上边定义的name值
3. 读取配置文件内容
yaml文件
#对象
person:
name: zhangsan
age: 20
#集合
address:
- beijing
- shanghai
#纯量
msg1: 12
@Value
作用:注入数据
使用:@Value("${xxx}")作用在变量上,将配置文件中的值注入到当前变量
@Value("${person.name}")
private String name2;
@Value("${person.age}")
private int age;
@Value("${address[0]}")
private String address1;
@Value("${msg1}")
private String msg1;
Environment
Environment对象在容器中本来就存在,直接注入进来使用即可
@Autowired
private Environment env;
System.out.println(env.getProperty("person.name"));
System.out.println(env.getProperty("address[0]"));
@ConfigurationProperties
读取配置文件中的内容,把它封装到变量上
1. @Component + @ConfigurationProperties
只有在容器中的组件,才能使用配置绑定功能
即先添加到容器@Component,再将配置绑定@ConfigurationProperties
@Component
@ConfigurationProperties(prefix = "mycar")
public class Car {
private String brand;
private Integer price;
……
}
2. @EnableConfigurationProperties + @ConfigurationProperties
@EnableConfigurationProperties作用在配置类上
@EnableConfigurationProperties(Car.class)
public class MyConfig {
}
//1. 对Car开启配置绑定功能
//2. 把Car这个组件添加到容器,就无需@Component注解(适用于第三方jar包,我们无法修改源码的情况下)
@ConfigurationProperties(prefix = "mycar")
public class Car {
private String brand;
private Integer price;
……
}
4. profile
profile是用来完成不同环境下,配置动态切换功能的。
profile配置方式
- 多profile文件方式:提供多个配置文件,每个代表一种环境。
application-dev.properties/yml——开发环境
application-test.properties/yml——测试环境
application-pro.properties/yml——生产环境 - yml多文档方式:在yml中使用
---分隔不同配置
---
server:
port: 8081
#给当前配置部分起别名
spring:
profiles: dev
---
server:
port: 8082
spring:
profiles: test
---
server:
port: 8083
spring:
profiles: pro
---
#激活配置文件
spring:
profiles:
active: dev
profile激活方式
- 配置文件: 在配置文件中配置:
spring.profiles.active=dev - 虚拟机参数:在VM options 指定:
-Dspring.profiles.active=dev - 命令行参数:
java –jar xxx.jar --spring.profiles.active=dev
5. 内部配置加载顺序
Springboot程序启动时,会从以下位置加载配置文件:
- file:./config/:当前项目下的/config目录下
- file:./ :当前项目的根目录
- classpath:/config/:classpath的/config目录
- classpath:/ :classpath的根目录
加载顺序为上文的排列顺序,高优先级配置的属性会生效
6. 外部配置加载顺序
三、日志
1. 日志框架
日志框架可分为日志门面(即接口)和日志实现,即面向接口编程
| 日志门面 (日志的抽象层) | 日志实现 |
| SLF4j(Simple Logging Facade for Java) | Log4j JUL(java.util.logging) Log4j2 Logback |
SpringBoot选用 SLF4j和logback
2. SLF4j使用
1. 在程序中使用slf4j
以后开发的时候,日志记录方法的调用,不应该来直接调用日志的实现类,而是调用日志接口里面的方法;
给系统里面导入slf4j的jar和 logback的实现jar
import org.slf4j.Logger;
import org.slf4j.LoggerFactory;
public class HelloWorld {
public static void main(String[] args) {
Logger logger = LoggerFactory.getLogger(HelloWorld.class);
logger.info("Hello World");
}
}
每一个日志的实现框架都有自己的配置文件。使用slf4j以后,配置文件还是做成日志实现框架自己本身的配置文件
2. 统一日志为slf4j
a(slf4j+logback): Spring(commons-logging)、Hibernate(jboss-logging)、MyBatis、xxxx
如何让系统中所有的日志都统一到slf4j;
- 将系统中其他日志框架先排除出去
- 用中间包来替换原有的日志框架
- 我们导入slf4j其他的实现
3. SpringBoot日志使用
Spring Boot默认使用LogBack日志系统,如果不需要更改为其他日志系统如Log4j2等,则无需多余的配置,LogBack默认将日志打印到控制台上。
如果要使用LogBack,原则上是需要添加dependency依赖的
<groupId>org.springframework.boot</groupId>
<artifactId>spring-boot-starter-logging</artifactId></pre>
但是因为新建的Spring Boot项目一般都会引用spring-boot-starter或者spring-boot-starter-web,而这两个起步依赖中都已经包含了对于spring-boot-starter-logging的依赖,所以,无需额外添加依赖。
打印日志
新建一个配置类LogConfig,注入一个Bean,并在方法中打印日志
package com.jackie.springbootdemo.config;
import com.jackie.springbootdemo.model.Person;
import org.slf4j.Logger;
import org.slf4j.LoggerFactory;
import org.springframework.context.annotation.Bean;
import org.springframework.context.annotation.Configuration;
@Configuration public class LogConfig {
private static final Logger LOG = LoggerFactory.getLogger(LogConfig.class);
@Bean
public Person logMethod() {
LOG.info("==========print log==========");
return new Person();
}
}
Spring Boot默认的日志级别为INFO(只打印info及以上级别的日志),这里打印的是INFO级别的日志所以可以显示。
很多开发者在日常写private static final Logger LOG = LoggerFactory.getLogger(LogConfig.class);总觉得后面的LogConfig.class可有可无,因为随便写个其他类也不会报错,但是准确编写class信息能够提供快速定位日志的效率。
我们看到打印的日志内容左侧就是对应的类名称,这个是通过private static final Logger LOG = LoggerFactory.getLogger(LogConfig.class);实现的。
如果将LogConfig.class换成xxx.class,输出日志就会显示对应的xxx类名。这样声明的好处就是方便定位日志。
存储日志
在我们创建的springboot-demo项目中,resources目录下有个application.properties文件(如果是application.yml文件也是同样的道理,只是采用的不同的编写风格而已)。添加如下配置
logging:
level:
root: info
cn.upeveryday: debug
file:
name: log/blog-dev.log
logging.path
该属性用来配置日志文件的路径
logging.file
该属性用来配置日志文件名,如果该属性不配置,默认文件名为spring.log
| logging.file | logging.path | Example | Description |
| (none) | (none) | 只在控制台输出 | |
| 指定文件名 | (none) | my.log | 输出日志到my.log文件 |
| (none) | 指定目录 | /var/log | 输出到指定目录的 spring.log 文件中 |
日志级别
日志级别总共有trace< debug< info< warn< error< fatal,且级别是逐渐提供,如果日志级别设置为INFO,则意味TRACE和DEBUG级别的日志都看不到。
logging.level
该属性用于配置日志级别。
- root级别,即项目的所有日志
- package级别,即指定包下使用相应的日志级别
logging:
level:
root: info
cn.upeveryday: debug
file:
name: log/blog-dev.log
- 这里除了
cn.upeveryday包下的日志是debug级别,其他日志是info级别
四、SpringBoot整合其他框架
1. SpringBoot整合Junit
1. 添加Junit的起步依赖
<!--测试的起步依赖-->
<dependency>
<groupId>org.springframework.boot</groupId>
<artifactId>spring-boot-starter-test</artifactId>
<scope>test</scope>
</dependency>
2. 编写测试类
package com.itheima.test;
@RunWith(SpringRunner.class)
@SpringBootTest(classes = MySpringBootApplication.class)
public class MapperTest {
@Autowired
private UserMapper userMapper;
@Test
public void test() {
List<User> users = userMapper.queryUserList();
System.out.println(users);
}
}
测试相关注解
- @RunWith(SpringRunner.class)
- @SpringBootTest(classes = 启动类.class)
2. SpringBoot整合Mybatis
1. 添加Mybatis的起步依赖
<!--mybatis起步依赖-->
<dependency>
<groupId>org.mybatis.spring.boot</groupId>
<artifactId>mybatis-spring-boot-starter</artifactId>
<version>2.2.0</version>
</dependency>
2. 添加数据库驱动坐标
<!-- MySQL连接驱动 -->
<dependency>
<groupId>mysql</groupId>
<artifactId>mysql-connector-java</artifactId>
<scope>runtime</scope>
</dependency>
3. 添加数据库连接信息
在application.yaml中添加数据源的连接信息
spring:
datasource:
url: jdbc:mysql://127.0.0.1:3306/springboot?useUnicode=true&characterEncoding=utf8
username: ggbond
password: xxxx
driver-class-name: com.mysql.cj.jdbc.Driver
4. 创建t_user表
在test数据库中创建t_user表
CREATE DATABASE /*!32312 IF NOT EXISTS*/`springboot` /*!40100 DEFAULT CHARACTER SET utf8mb4 COLLATE utf8mb4_unicode_ci */;
USE `springboot`;
/*Table structure for table `t_user` */
DROP TABLE IF EXISTS `t_user`;
CREATE TABLE `t_user` (
`id` int(11) NOT NULL AUTO_INCREMENT,
`username` varchar(32) COLLATE utf8mb4_unicode_ci DEFAULT NULL,
`password` varchar(32) COLLATE utf8mb4_unicode_ci DEFAULT NULL,
PRIMARY KEY (`id`)
) ENGINE=InnoDB AUTO_INCREMENT=3 DEFAULT CHARSET=utf8mb4 COLLATE=utf8mb4_unicode_ci;
/*Data for the table `t_user` */
insert into `t_user`(`id`,`username`,`password`) values (1,'zhangsan','123'),(2,'lisi','234');
5. 创建实体Bean
@ToString
@NoArgsConstructor
@AllArgsConstructor
@Data
public class User {
private int id;
private String username;}
6.1 使用注解
7. 编写mapper
@Mapper
public interface UserMapper {
@Select("select * from t_user")
public List<User> findAll();
}
注意:@Mapper注解是由Mybatis框架中定义的一个描述持久层接口的注解,注解往往起到的都是一个描述性作用,用于告诉spring框架此接口的实现类由Mybatis负责创建,并将其实现类对象存储到spring容器中。
8. 测试
@RunWith(SpringRunner.class)
@SpringBootTest(classes = SpringbootMybatisApplication.class)
class SpringbootMybatisApplicationTests {
@Autowired
private UserMapper userMapper;
@Test
void testFindAll() {
List<User> users = userMapper.findAll();
System.out.println(users);
}
}
6.2 使用xml
7. 编写接口
@Mapper
public interface UserXmlMapper {
List<User> findAll();
}
8. 配置映射文件
在src\main\resources\mapper路径下加入UserMapper.xml配置文件
<?xml version="1.0" encoding="utf-8" ?>
<!DOCTYPE mapper PUBLIC "-//mybatis.org//DTD Mapper 3.0//EN" "http://mybatis.org/dtd/mybatis-3-mapper.dtd" >
<mapper namespace="com.example.springbootmybatis.mapper.UseXmlMapper">
<select id="findAll" resultType="user">
select * from t_user
</select>
</mapper>
9. 在application.yaml中配置mybatis
mybatis:
#加载Mybatis映射文件
mapper-locations: classpath:mapper/*Mapper.xml
#对于mapper文件中实体类的别名,要进行扫描的包
type-aliases-package: com.example.springbootmybatis.domain
10. 测试
@RunWith(SpringRunner.class)
@SpringBootTest(classes = SpringbootMybatisApplication.class)
class SpringbootMybatisApplicationTests {
@Autowired
private UseXmlMapper useXmlMapper;
@Test
void testFindAll2(){
List<User> users = useXmlMapper.findAll();
System.out.println(users);
}
}
@Mapper
@Mapper注解是由Mybatis框架中定义的一个描述持久层接口的注解,注解往往起到的都是一个描述性作用,用于告诉spring框架此接口的实现类由Mybatis负责创建,并将其实现类对象存储到spring容器中。
添加Mapper注解之后,就不用添加@@Repository注解了
@MapperScan注解
之前是,直接在Mapper类上面添加注解@Mapper,这种方式要求每一个mapper类都需要添加此注解,麻烦。
通过@MapperScan作用在主启动类上,可以指定要扫描的Mapper类的包的路径。这样dao包下的接口什么注解都不用加
@SpringBootApplication
@MapperScan("cn.upeveyday.springboot_ems.dao")
public class SpringbootEmsApplication {
}
五、web开发
static中的静态资源可以直接通过url访问
templates中的动态资源只能通过控制器访问(请求转发)
1. 静态资源
存放位置:
默认情况下,Spring Boot从类路径中名为/static(/public或/resources或/META-INF/resources)的目录中提供静态内容。(这些目录都在resources目录下,例如:src/main/resources/static)
访问:
当前项目根路径/ + 静态资源名
原理:
当请求进来,先去找Controller看能不能处理,不能处理的请求再交给静态资源处理器。静态资源也找不到则响应404页面
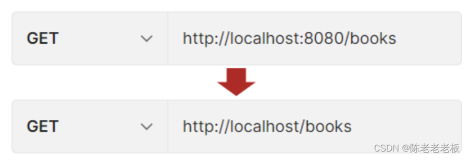
静态资源访问前缀:
- 默认无前缀
spring:
mvc:
static-path-pattern: /**
- 设置前缀
spring:
mvc:
static-path-pattern: /res/**
改变默认的静态资源路径
spring:
resources:
static-locations: [classpath:/haha/] # 这是个字符串数组
2. 欢迎页
访问http://localhost:8080/,会默认找到欢迎页:静态资源路径下的index.html
注意:可以配置静态资源路径,但是不可以配置静态资源的访问前缀。否则导致 index.html不能被默认访问
spring:
# mvc:
# static-path-pattern: /res/** 配置静态资源的访问前缀,会导致welcome page功能失效
resources:
static-locations: [classpath:/haha/]
3. 请求参数处理
rest的使用与原理
Rest风格:使用HTTP请求方式动词来表示对资源的操作,传递参数不再是请求参数而是URI的一部分
- 以前:/getUser 获取用户 /deleteUser 删除用户 /editUser 修改用户 /saveUser 保存用户
- 现在: /user GET-获取用户 DELETE-删除用户 PUT-修改用户 POST-保存用户。请求路径一样,根据请求方式的不同来执行不同的方法
rest使用
核心Filter:HiddenHttpMethodFilter,需要在配置文件中手动开启
用法:
- HTML的表单提交方法为post,增加隐藏域
name="_method" value="put" - controller中方法的请求映射注解添加属性
method = RequestMethod.PUT
//controller
@RequestMapping(value = "/user",method = RequestMethod.GET)
public String getUser(){
return "GET-张三";
}
@RequestMapping(value = "/user",method = RequestMethod.POST)
public String saveUser(){
return "POST-张三";
}
// @RequestMapping(value = "/user",method = RequestMethod.PUT)
@PutMapping("/user")//springboot提供的新注解,其他方法类似
public String putUser(){
return "PUT-张三";
}
@RequestMapping(value = "/user",method = RequestMethod.DELETE)
public String deleteUser(){
return "DELETE-张三";
}
//HTML
<form action="/user" method="post">
<input type="hidden" name="_method" value="put">
<input type="submit" value="提交">
</form>
//application.yaml
spring:
mvc:
hiddenmethod:
filter:
enabled: true
rest原理
- HTML表单提交要使用REST时
- 表单提交会带上_method=PUT
- 请求过来被
HiddenHttpMethodFilter拦截 - 检查表单请求是否正常,并且是POST请求
- 获取到_method的值。兼容这些请求:PUT.DELETE.PATCH
- 原生request(post),包装模式requesWrapper重写了getMethod方法,返回的是传入的值。
- 过滤器链放行的时候用wrapper,以后的方法调用getMethod得到的是requesWrapper重写后的PUT
- 客户端工具发送请求使用rest
如PostMan直接发送Put、delete等方式请求,无需Filter
参数处理原理
- DispatcherServlet通过处理器映射器HandlerMapping找到能够处理请求的处理器Handler(控制器中的方法)
- 为当前Handler找一个处理器适配器HandlerAdapter
- 适配器执行目标方法并确定方法参数的每一个值
1. 作用在参数上的注解
@PathVariable:路径变量(rest风格)
作用:
用于绑定 url 中的占位符。例如:请求 url 中 /delete/{id},这个{id}就是 url 占位符。
属性:
value:用于指定 url 中占位符名称,不指定则是获取全部。
出现位置:
控制器方法参数上,参数可以是Map<String,String>类型的,会将所有占位符存入
@GetMapping("/car/{id}/owner/{username}")
public Map<String,Object> getCar(@PathVariable("id") Integer id,
@PathVariable("username") String name,
@PathVariable Map<String,String> pv){
Map<String,Object> map = new HashMap<>();
map.put("id",id);
map.put("name",name);
map.put("pv",pv);
}
@RequestHeader
作用
用于获取请求消息头。
属性
value:指定消息头名称,不指定则是全部。
出现位置
控制器方法参数上,参数可以是Map<String,String>类型的,将所有请求头存入
@GetMapping("/car/{id}/owner/{username}")
public Map<String,Object> getCar(
@RequestHeader("User-Agent") String userAgent,
@RequestHeader Map<String,String> header){
Map<String,Object> map = new HashMap<>();
map.put("userAgent",userAgent);
map.put("headers",header);
return map;
}
@RequestParam、@CookieValue
作用
@RequestParam:把请求中指定名称的参数给控制器中的形参赋值
@CookieValue:用于把指定 cookie 名称的值传入控制器方法参数。
属性
@RequestParam:
- value:指定请求参数中的名称,不指定则是全部。
@CookieValue:
- value:指定 cookie 的名称。
出现位置
@RequestParam:
控制器方法参数上,可以使用Map<String,String>类型的参数,将所有请求参数存入
@CookieValue:
控制器方法参数上,可以使用Cookie类型接收
public Map<String,Object> getCar(
@RequestParam("age") Integer age,
@RequestParam("inters") List<String> inters,
@RequestParam Map<String,String> params,
@CookieValue("_ga") String _ga,
@CookieValue("_ga") Cookie cookie){
Map<String,Object> map = new HashMap<>();
map.put("age",age);
map.put("inters",inters);
map.put("params",params);
map.put("_ga",_ga);
System.out.println(cookie.getName()+"===>"+cookie.getValue());
return map;
}
@RequestBody
作用
用于获取请求体内容。直接使用得到是 key=value&key=value...结构的数据。
只适用于post请求,get 请求方式不适用,因为get方式没有请求体,只有请求参数
出现位置
控制器方法参数上
@PostMapping("/save")
public Map postMethod(@RequestBody String content){
Map<String,Object> map = new HashMap<>();
map.put("content",content);
return map;
}
@RequestAttribute
获取request域属性(HttpServetRequest在request域中添加属性)
@MatrixVariable
矩阵变量使用在请求路径中,将cookie的值使用矩阵变量的方式传递
矩阵变量以;分隔
//1、语法: 请求路径:/cars/sell;low=34;brand=byd,audi,yd
//2、SpringBoot默认是禁用了矩阵变量的功能
// 手动开启:原理。对于路径的处理。UrlPathHelper进行解析。
// removeSemicolonContent(移除分号内容)支持矩阵变量的
//3、矩阵变量必须有url路径变量才能被解析
@GetMapping("/cars/{path}")
public Map carsSell(@MatrixVariable("low") Integer low,
@MatrixVariable("brand") List<String> brand,
@PathVariable("path") String path){
Map<String,Object> map = new HashMap<>();
map.put("low",low);
map.put("brand",brand);
map.put("path",path);
return map;
}
// /boss/1;age=20/2;age=10
@GetMapping("/boss/{bossId}/{empId}")
public Map boss(@MatrixVariable(value = "age",pathVar = "bossId") Integer bossAge,
@MatrixVariable(value = "age",pathVar = "empId") Integer empAge){
Map<String,Object> map = new HashMap<>();
map.put("bossAge",bossAge);
map.put("empAge",empAge);
return map;
}
2. Servlet API
WebRequest、ServletRequest、MultipartRequest、 HttpSession、javax.servlet.http.PushBuilder、Principal、InputStream、Reader、HttpMethod、Locale、TimeZone、ZoneId
3. 复杂参数
Map、Model(map、model里面的数据会被放在request的请求域 request.setAttribute)、Errors/BindingResult、RedirectAttributes( 重定向携带数据)、ServletResponse(response)、SessionStatus、UriComponentsBuilder、ServletUriComponentsBuilder
Map<String,Object> map, Model model, HttpServletRequest request 都是可以给request域中放数据,
request.getAttribute();
4. 模板引擎thymeleaf
<html lang="en" xmlns:th="http://www.thymeleaf.org">
视图解析:SpringBoot默认不支持 JSP,需要引入第三方模板引擎技术实现页面渲染。
1、表达式
| 表达式名字 | 语法 | 用途 |
| 变量取值 | ${...} | 获取域中的值,默认从request域从获取 |
| 选择变量 | *{...} | 获取上下文对象值 |
| 消息 | #{...} | 获取国际化等值 |
| 链接 | @{...} | 生成链接(会自动添加虚拟目录) |
| 片段表达式 | ~{...} | jsp:include 作用,引入公共页面片段 |
变量取值
${...}默认取的是request域中数据
要取session域中数据:${session.user.name}
标签内写法
双引号
<p>Hello, <span th:text="${session.user.name}">Sebastian</span>!</p>
标签外写法
双中括号
<p>Hello, [[${session.user.name}]]!</p>
2、常用语法
①、文本操作
- 字符串拼接:
+ - 变量替换:
|The name is ${name}|
<p th:text="${userName}">neo</p>
<span th:text="'Welcome to our application, ' + ${userName} + '!'"></span>
<span th:text="|Welcome to our application, ${userName}!|"></span>
②、条件判断 If/Unless
Thymeleaf 中使用 th:if 和 th:unless 属性进行条件判断,下面的例子中,<a>标签只有在 th:if 中条件成立时才显示
<a th:if="${flag == 'yes'}" th:href="@{/home}"> home </a>
<a th:unless="${flag != 'no'}" th:href="@{http://www.ityouknow.com/}" >ityouknow</a>
<div th:unless="${#strings.isEmpty(session.message)}" th:text="${session.message}">用户名和密码错误</div>
//只有表达式为false时才显示当前标签,为true则不显示
<div th:if="${session.account!=null}">
<span th:text="${session.account.username}+'欢迎回来!'"></span>
<a href="/logout">退出</a>
</div>
//只有session中的account不为空,才会在HTML代码中显示当前标签k,否则不显示
th:unless 与 th:if 恰好相反,只有表达式中的条件不成立,才会显示其内容。
也可以使用 (if) ? (then) : (else) 这种语法来判断显示的内容
If-then: (if) ? (then)
If-then-else: (if) ? (then) : (else)
Default: (value) ?: (defaultvalue)
<!--根据公共片段传来的参数n,判断当光标应该在哪一个导航项-->
<div th:fragment="nav(n)">
<li class="layui-nav-item" th:classappend="${n==1}?'layui-this'">首页</li>
<li class="layui-nav-item" th:classappend="${n==2}?'layui-this'">交流社区</li>
<li class="layui-nav-item" th:classappend="${n==3}?'layui-this'">生活社区</li>
</div>
③、for 循环
遍历users中的元素,每一个都用user接收,类似java增强for循环
<table>
<tr th:each="user,iterStat : ${users}">
<td th:text="${user.name}">neo</td>
<td th:text="${user.age}">6</td>
<td th:text="${user.pass}">213</td>
<td th:text="${iterStat.index}">index</td>
</tr>
</table>
iterStat 称作状态变量,属性有
- index:当前迭代对象的 index(从 0 开始计算)
- count:当前迭代对象的 index(从 1 开始计算)
- size:被迭代对象的大小
- current:当前迭代变量
- even/odd:布尔值,当前循环是否是偶数/奇数(从 0 开始计算)
- first:布尔值,当前循环是否是第一个
- last:布尔值,当前循环是否是最后一个
④、URL
URL 在 Web 应用模板中占据着十分重要的地位,需要特别注意的是 Thymeleaf 对于 URL 的处理是通过语法 @{…} 来处理的。 如果需要 Thymeleaf 对 URL 进行渲染,那么务必使用 th:href、th:src 等属性,下面举一个例子:
<a th:href="@{http://www.ityouknow.com/{type}(type=${type})}">link1</a>
<a href="details.html" th:href="@{http://www.ityouknow.com/{pageId}/can-use-springcloud.html(pageId=${pageId})}">view</a>
设置背景:
<div th:style="'background:url(' + @{${img}} + ');'">
根据属性值改变背景:
<div class="media-object resource-card-image" th:style="'background:url(' + @{(${collect.webLogo}=='' ? 'img/favicon.png' : ${collect.webLogo})} + ')'" ></div>
几点说明:
- 上例中 URL 最后的 (pageId=${pageId}) 表示将括号内的内容作为 URL 参数处理,该语法避免使用字符串拼接,大大提高了可读性。
- @{…} 表达式中可以通过 {pageId} 访问 Context 中的 pageId 变量。
- @{/order} 是 Context 相关的相对路径,在渲染时会自动添加上当前 Web 应用的 Context 名字,假设 context 名字为 app,那么结果应该是 /app/order。
⑤、内联 [ [ ] ]
内联文本:[[…]] 内联文本的表示方式,使用时,必须先用在 th:inline=”text/javascript/none” 激活,th:inline 可以在父级标签内使用,甚至作为 body 的标签。内联文本尽管比 th:text 的代码少,不利于原型显示。
文本内联:
<div th:inline="text" >
<h1>内联js</h1>
<p>Hello, [[${userName}]]</p>
<br/>
</div>
脚本内联,脚本内联可以在 js 中取到后台传过来的参数:
<script th:inline="javascript">
var name = [[${userName}]] + ', Sebastian';
alert(name);
</script>
⑥、内嵌变量
为了模板更加易用,Thymeleaf 还提供了一系列 Utility 对象(内置于 Context 中),可以通过 # 直接访问:
- dates:java.util.Date 的功能方法类
- calendars: 类似 #dates,面向 java.util.Calendar
- numbers:格式化数字的功能方法类
- strings:字符串对象的功能类,contains、startWiths、prepending/appending 等
- objects:对 objects 的功能类操作
- bools: 对布尔值求值的功能方法
- arrays:对数组的功能类方法
- lists:对 lists 的功能类方法
- sets
- maps
下面用一段代码来举例一些常用的方法:
dates
<p th:text="${#dates.format(date, 'dd/MMM/yyyy HH:mm')}">neo</p>
<p th:text="${#dates.createToday()}">neo</p>
<p th:text="${#dates.createNow()}">neo</p>
strings
<p th:text="${#strings.isEmpty(userName)}">userName</p>
<p th:text="${#strings.listIsEmpty(users)}">userName</p>
<p th:text="${#strings.length(userName)}">userName</p>
<p th:text="${#strings.concat(userName)}"></p>
<p th:text="${#strings.randomAlphanumeric(count)}">userName</p>
3. 设置属性值-th:attr
设置单个值
<form action="subscribe.html" th:attr="action=@{/subscribe}">
<fieldset>
<input type="text" name="email" />
<input type="submit" value="Subscribe!" th:attr="value=#{subscribe.submit}"/>
</fieldset>
</form>
设置多个值
<img src="../../images/gtvglogo.png" th:attr="src=@{/images/gtvglogo.png},title=#{logo},alt=#{logo}" />
以上两个的代替写法 th:属性名="表达式"
<input type="submit" value="Subscribe!" th:value="#{subscribe.submit}"/>
<form action="subscribe.html" th:action="@{/subscribe}">
4、常用th标签
| 关键字 | 功能介绍 | 案例 |
| th:id | 替换id | <input th:id=”‘xxx’ + ${collect.id}”/> |
| th:text | 文本替换 | <p th:text="${collect.description}">description</p> |
| th:utext | 支html的文本替换 | <p th:utext="${htmlcontent}">conten</p> |
| th:object | 替换对象 | <div th:object="${session.user}"> |
| th:value | 属性赋值 | <input th:value="${user.name}" /> |
| th:with | 变量赋值运算 | <div th:with=”isEven=${prodStat.count}%2==0″></div> |
| th:style | 设置样式 | th:style=”‘display:’ + @{(${sitrue} ? ‘none’ : ‘inline-block’)} + ”” |
| th:onclick | 点击事件 | th:onclick=”‘getCollect()'” |
| th:each | 属性赋值 | tr th:each=”user,userStat:${users}”> |
| th:if | 判断条件 | <a th:if=”${userId == collect.userId}” > |
| th:unless | 和th:if判断相反 | <a th:href=”@{/login}” th:unless=${session.user != null}>Login</a> |
| th:href | 链接地址 | <a th:href=”@{/login}” th:unless=${session.user != null}>Login</a> /> |
| th:switch | 多路选择 配合th:case 使用 | <div th:switch="${user.role}"> |
| th:case | th:switch的一个分支 | <p th:case=”‘admin'”>User is an administrator</p> |
| th:fragment | 布局标签,定义一个代码片段,方便其它地方引用 | <div th:fragment="alert"> |
| th:include | 布局标签,替换内容到引入的文件 | <head th:include=”layout :: htmlhead” th:with=”title=’xx'”></head> /> |
| th:replace | 布局标签,替换整个标签到引入的文件 | <div th:replace=”fragments/header :: title”></div> |
| th:selected | selected选择框 选中 | th:selected=”(${xxx.id} == ${configObj.dd})” |
| th:src | 图片类地址引入 | <img class=”img-responsive” alt=”App Logo” th:src=”@{/img/logo.png}” /> |
| th:inline | 定义js脚本可以使用变量 | <script type="text/javascript" th:inline="javascript"> |
| th:action | 表单提交的地址 | <form action="subscribe.html" th:action="@{/subscribe}"> |
| th:remove | 删除某个属性 | <tr th:remove="all"> |
- all:删除包含标签和所有的子节点。
- body:不包含标记删除,但删除其所有的子节点。
- tag:包含标记的删除,但不删除它的子节点。
- all-but-first:删除所有包含标签的子节点,除了第一个。
- none:什么也不做。这个值是有用的动态评估
5. springboot使用thymeleaf
引入依赖
<dependency>
<groupId>org.springframework.boot</groupId>
<artifactId>spring-boot-starter-thymeleaf</artifactId>
</dependency>
文件都在templates中,后缀为HTML
<!DOCTYPE html>
<html lang="en" xmlns:th="http://www.thymeleaf.org">
<head>
<meta charset="UTF-8">
<title>Title</title>
</head>
<body>
<h1 th:text="${msg}">哈哈</h1>
<h2>
<a href="www.atguigu.com" th:href="${link}">去百度</a> <br/>
<a href="www.atguigu.com" th:href="@{link}">去百度2</a>
</h2>
</body>
</html>
6. 抽取公共页面
fragment:碎片;片段
声明公共片段
th:fragment="xxx"
1、抽取公共片段
<div th:fragment="copy">
© 2011 The Good Thymes Virtual Grocery
</div>
2、引入公共片段
<div th:insert="~{footer :: copy}"></div>
~{templatename::selector}:模板名::选择器
~{templatename::fragmentname}:模板名::片段名
3、默认效果:
insert的公共片段在div标签中
如果使用th:insert等属性进行引入,可以不用写~{}:
行内写法可以加上:[[~{}]];[(~{})];
id="xxx"
<div id="commonScript">
<script src="js/jquery-1.10.2.min.js"></script>
……
</div>
<div th:replace="common :: #commonScript"></div>
使用公共片段
th:insert="文件名 :: 片段名"
th:insert:在当前标签中插入指定的标签th:replace:用指定的标签替换当前标签th:include:与 th:insert 类似,但它不是插入标签,而是仅插入指定标签包含的内容
<footer th:fragment="copy">
1
</footer>
<div th:insert="footer :: copy">
</div>
对应如下:
<div>
<footer>
1
</footer>
</div>
-----------------------------------------------------
<div th:replace="footer :: copy">
</div>
对应如下:
<footer>
1
</footer>
-----------------------------------------------------
<div th:include="footer :: copy">
</div>
对应如下:
<div>
1
</div>
片段的参数
给定义的片段th:fragment设置参数:
<div th:fragment="frag (onevar,twovar)">
<p th:text="${onevar} + ' - ' + ${twovar}">...</p>
</div>
以下两种方法调用片段都可以:
<div th:replace="::frag (${value1},${value2})">...</div>
<div th:replace="::frag (onevar=${value1},twovar=${value2})">...</div>
示例:
1、定义携带参数的片段
<!--header-->
<head th:fragment="header(title)">
<title th:text="${title}">title</title>
</head>
2、使用携带参数的片段(参数用单引号包围)
<head th:replace="_fragment::header('【摸鱼宝典】坚持摸鱼,坚持自我')"></head>
7. 携带请求参数
表达式里加个括号,参数名=xxxx
<a th:href="@{/emp/delete(id=${emp.id})}">删除信息</a>
<a th:href="@{/emp/find(id=${emp.id})}">修改信息</a>
8. 相关采坑
HTML中的图片路径要使用绝对路径,即
/开头的路径
找不到favicon.ico
使用一个标签,告诉Thymeleaf解析时查找该文件的位置,即便目标位置不存在该文件,也不会报错了
<link rel="shortcut icon" href="/favicon.ico" th:href="@{/favicon.ico}"/>
5. 拦截器
- 编写一个拦截器实现HandlerInterceptor接口
- 拦截器注册到容器中(实现WebMvcConfigurer的addInterceptors)
- 指定拦截规则【如果是拦截所有,静态资源也会被拦截】
用于登录检查的拦截器
1. 编写拦截器类
package cn.upeveryday.springbootadmin.interceptor;
public class LoginInterceptor implements HandlerInterceptor {
@Override
public boolean preHandle(HttpServletRequest request, HttpServletResponse response, Object handler) throws Exception {
//登录检查
HttpSession session = request.getSession();
Object loginUser = session.getAttribute("loginUser");
if (loginUser!=null){
return true;
}else{
//未登录,将请求转发
request.setAttribute("msg", "请先登录!");
request.getRequestDispatcher("/").forward(request, response);
// response.sendRedirect("/");
return false;
}
}
}
2. 将拦截器注册到容器中
package cn.upeveryday.springbootadmin.config;
@Configuration
public class AdminWebConfig implements WebMvcConfigurer {
@Override
public void addInterceptors(InterceptorRegistry registry) {
//registry:注册器
registry.addInterceptor(new LoginInterceptor())
.addPathPatterns("/**")//拦截所有请求,包括静态资源
.excludePathPatterns("/","/login",//放行登录请求
"/css/**","/js/**","/fonts/**","/images/**");//放行静态资源的请求
}
}
6. 文件上传
前端代码
1. form标签的属性
th:action="@{请求路径}"method="post"enctype="multipart/form-data"
2. input标签的属性
type="file"- 默认为单文件上传
- 添加
multiple属性后,可以实现多文件上传
<form role="form" th:action="@{/upload}" method="post" enctype="multipart/form-data">
<div class="form-group">
<label for="exampleInputFile">File input</label>
<input name="file" type="file" id="exampleInputFile">
<p class="help-block">Example block-level help text here.</p>
</div>
<div class="form-group">
<label for="exampleInputFile">Files input</label>
<input name="files" type="file" id="exampleInputFiles" multiple><!--多文件上传-->
<p class="help-block">Example block-level help text here.</p>
</div>
</form>
后端代码
spring:
servlet:
multipart:
max-file-size: 10MB #单个文件最大大小
max-request-size: 100MB #整体上传的最大大小
/**
* MultipartFile自动封装上传的文件
*/
@PostMapping("/upload")
public String upload(@RequestParam("email")String email,
@RequestParam("password")String password,
@RequestParam("file")MultipartFile file,
@RequestParam("files")MultipartFile[] files){
log.info("email={},password={},file={},files={}",
email,password,file.getSize(),files.length);
//判断文件是否为空
if(!file.isEmpty()){
//上传至文件服务器
……
}
return "main";
}
7. 异常处理
默认的错误响应
- 浏览器,返回一个默认的错误页面
- 如果是其他客户端,默认响应一个json数据
自定义错误响应
1. 定制错误的页面
- 有模板引擎
templates的情况下;error/状态码.html (将错误页面命名为 错误状态码.html 放在模板引擎文件夹templates里面的 error文件夹下),发生此状态码的错误就会来到对应的页面;
我们可以使用4xx和5xx作为错误页面的文件名来匹配这种类型的所有错误,精确优先(优先寻找精确的状态码.html);
页面能获取的信息;
timestamp:时间戳
status:状态码
error:错误提示
exception:异常对象
message:异常消息
errors:JSR303数据校验的错误都在这里
将错误信息从json中提取出来,放在错误页面上展示
<section class="error-wrapper text-center">
<h3 th:text="${messgae}">Something went wrong.</h3>
<p class="nrml-txt" th:text="${trace}">Or you can if </p>
</section>
- 没有模板引擎(模板引擎找不到这个错误页面),静态资源文件夹下找;
- 以上都没有错误页面,就是默认来到SpringBoot默认的错误提示页面;
2. 定制错误的json数据
使用@ControllerAdvice来声明一些全局性的东西,最常见的是结合@ExceptionHandler注解用于全局异常的处理
@ControllerAdvice是在类上声明的注解,其用法主要有三点:
- @ExceptionHandler注解标注的方法:用于捕获Controller中抛出的不同类型的异常,从而达到异常全局处理的目的;
- @InitBinder注解标注的方法:用于请求中注册自定义参数的解析,从而达到自定义请求参数格式的目的;
- @ModelAttribute注解标注的方法:表示此方法会在执行目标Controller方法之前执行 。
8. 常用注解
@ControllerAdvice
@ControllerAdvice,是Spring3.2提供的新注解,它是一个Controller增强器,可对controller中被 @RequestMapping注解的方法加一些逻辑处理。主要作用有一下三种
- 通过@ControllerAdvice注解可以将对于控制器的全局配置放在同一个位置。
- 注解了@ControllerAdvice的类的方法可以使用@ExceptionHandler、@InitBinder、@ModelAttribute注解到方法上。
- **
@ExceptionHandler:用于全局处理控制器里的异常,进行全局异常处理** - @InitBinder:用来设置WebDataBinder,用于自动绑定前台请求参数到Model中,全局数据预处理。
- @ModelAttribute:本来作用是绑定键值对到Model中,此处让全局的@RequestMapping都能获得在此处设置的键值对 ,全局数据绑定。
- @ControllerAdvice注解将作用在所有注解了@RequestMapping的控制器的方法上。
全局异常处理
需要配合@ExceptionHandler使用。当将异常抛到controller时,可以对异常进行统一处理,规定返回的json格式或是跳转到一个错误页面
/**
* 统一处理所有异常(除了带有ResponseStatus注解的异常)
*/
@ControllerAdvice
public class ControllerExceptionHandler {
//日志
private Logger logger = LoggerFactory.getLogger(this.getClass());
@ExceptionHandler(Exception.class)//异常处理器:处理所有的异常
public ModelAndView exceptionHandler(HttpServletRequest request,Exception e) throws Exception {
//输出日志:请求url + 错误信息
logger.error("RequestURL: {}, Exception: {}",
request.getRequestURL(),e);
//如果异常带有ResponseStatus注解,那么就交给springboot处理
if(AnnotationUtils.findAnnotation(e.getClass(),ResponseStatus.class)!=null){
throw e;
}
//返回ModelAndView:存储数据并且转发页面
ModelAndView mv = new ModelAndView();
mv.addObject("url", request.getRequestURL());
mv.addObject("exception", e);
mv.setViewName("error/error");
return mv;
}
}
错误页面异常信息显示处理:把错误信息放在error.html源码的注释中
<div>
<div th:utext="'<!--'" th:remove="tag"></div>
<div th:utext="'Failed Request URL : ' + ${url}" th:remove="tag"></div>
<div th:utext="'Exception message : ' + ${exception.message}" th:remove="tag"></div>
<ul th:remove="tag">
<li th:each="st : ${exception.stackTrace}" th:remove="tag"><span th:utext="${st}" th:remove="tag"></span></li>
</ul>
<div th:utext="'-->'" th:remove="tag"></div>
</div>
@ResponseStatus
指定响应状态码——@ResponseStatus注解有两种用法:
- 加在自定义异常类上
- 加在**
@RequestMapping修饰的方法**上
三个参数:
- value和code作用一样:设置异常的状态码
- reason是对于异常的描述
1. @ResponseStatus响应失败
@RequestMapping(value = "/helloResponseStatus")
@ResponseStatus(value = HttpStatus.NOT_FOUND, reason = "404-NotFound")//响应404
@ResponseBody
public void helloResponseStatus(@RequestParam(value = "name") String name) {
System.out.println("======");
}
2. @ResponseStatus响应成功
@RequestMapping(value = "/helloResponseStatus1")
@ResponseStatus(value = HttpStatus.OK, reason = "200-Success")//响应200
@ResponseBody
public void helloResponseStatus1(@RequestParam(value = "name") String name) {
System.out.println("======");
}
3. @ResponseStatus作用在自定义异常类上
使用时,先声明一个自定义异常类,在自定义异常类上面加上@ResponseStatus注释表示系统运行期间,当抛出自定义异常的时候,将@ResponseStatus注解中的状态码code和异常信息reason返回给客户端,提高可读性。
/**
* 自定义异常类
*/
@ResponseStatus(HttpStatus.NOT_FOUND)//指定响应状态码,springboot对应找到404.html
public class NotFoundException extends RuntimeException {
public NotFoundException() {
super();
}
public NotFoundException(String s) {
super(s);
}
public NotFoundException(String s, Throwable throwable) {
super(s, throwable);
}
}
其他
3. 容器功能
1. 添加组件
springboot不再使用xml配置文件,而是直接将一个类作为配置类
@Configuration
@Configuration注解作用在一个类上,表明当前类是一个配置类- 配置类本身也是容器中的组件,可以通过容器获取到
MyConfig bean = run.getBean(MyConfig.class);
@Configuration注解有一个属性proxyBeanMethods:是否代理配置类中被@bean标注的方法,默认为true
- 当
proxyBeanMethods=true,此时从容器中获取的配置类对象是CGLIB动态代理对象,通过配置类对象调用方法时,获取的对象是单例的。这是FULL模式
解决组件依赖的问题:配置类组件之间有依赖关系,方法会被调用得到之前的单例组件 - 当
proxyBeanMethods=false,此时从容器中获取的配置类对象是普通类对象,通过普通类对象调用方法,获取的对象是多例的。这是LITE模式
- FULL模式与LITE模式分别适用的场景:
- FULL模式:配置类组件之间有依赖关系,SpringBoot总会检查这个组件是否在容器中有,有则使用,没有则创建
- LITE模式:配置类组件之间无依赖关系用Lite模式加速容器启动过程,减少判断
@Bean
配置类里面使用@Bean注解标注在方法上给容器注册组件,默认是单例的,如果传入了对象参数,这个参数的值就会从容器中找
方法名是组件的id,返回类型是组件类型,返回值是组件在容器中的实例
//组件id:tom
//组件类型:Pet
//容器中实例:new Pet("tomcat")
@Bean("tom")
public Pet tomcatPet(){
return new Pet("tomcat");
}
@Component、@Controller、@Service、@Repository
spring中的注解在springboot中同样适用
@Import
作用在类上
* 4、@Import({User.class, DBHelper.class})
* 在容器中调用无参构造,自动创建出这两个类型的组件,默认组件id为全类名
*/
@Import({User.class, DBHelper.class})
public class MyConfig {
}
@Conditional
条件装配:满足Conditional指定的条件,则进行组件注入
作用在类上:当前条件不符合,整个类都不执行
作用在方法上:当前条件不符合,整个方法不执行
=====================测试条件装配==========================
@Configuration(proxyBeanMethods = false)
//@ConditionalOnBean(name = "tom")
@ConditionalOnMissingBean(name = "tom")
public class MyConfig {
@Bean
public User user01(){
User zhangsan = new User("zhangsan", 18);
zhangsan.setPet(tomcatPet());
return zhangsan;
}
@Bean("tom22")
public Pet tomcatPet(){
return new Pet("tomcat");
}
}
2. 原生配置文件引入
@ImportResource
spring是使用的xml文件配置组件,springboot通过该注解读取xml文件,进而将文件中配置的组件添加到容器
@ImportResource("classpath:beans.xml")
public class MyConfig {}
4. 自动配置原理
1. 引导加载自动配置类
主程序上的注解是
@SpringBootApplication
public class BootWeb01Application {
}
点进去查看@SpringBootApplication源码,发现这是一个合成注解
@SpringBootConfiguration
@EnableAutoConfiguration
@ComponentScan()
public @interface SpringBootApplication {
}
@SpringBootConfiguration
相当于@Configuration,表示主程序是一个配置类
@ComponentScan
指定对哪些包进行组件扫描
@EnableAutoConfiguration
开启自动配置
@AutoConfigurationPackage
@Import({AutoConfigurationImportSelector.class})
public @interface EnableAutoConfiguration {
}
@AutoConfigurationPackage
自动配置包:指定了默认的包规则
@Import({Registrar.class})
public @interface AutoConfigurationPackage {}
//利用Registrar将主程序所在包下的所有组件导入容器
查看Registrar类
static class Registrar implements ImportBeanDefinitionRegistrar, DeterminableImports {
//AnnotationMetadata metadata:注解元信息
public void registerBeanDefinitions(AnnotationMetadata metadata, BeanDefinitionRegistry registry) {
AutoConfigurationPackages.register(registry, (String[])(new AutoConfigurationPackages.PackageImports(metadata)).getPackageNames().toArray(new String[0]));
}
public Set<Object> determineImports(AnnotationMetadata metadata) {
return Collections.singleton(new AutoConfigurationPackages.PackageImports(metadata));
}
}
@Import({AutoConfigurationImportSelector.class})
查看AutoConfigurationImportSelector类的源码
- 利用
getAutoConfigurationEntry(annotationMetadata);给容器中批量导入一些组件 - 调用
List<String> configurations = getCandidateConfigurations(annotationMetadata, attributes)获取到所有需要导入到容器中的配置类 - 利用工厂加载
Map<String, List<String>> loadSpringFactories(@Nullable ClassLoader classLoader)得到所有的组件 - 从META-INF/spring.factories位置来加载一个文件,文件里面写死了springboot一启动就要给容器中加载的所有配置类
默认扫描所有依赖中的META-INF/spring.factories文件
spring-boot-autoconfigure-2.3.4.RELEASE.jar包里面也有META-INF/spring.factories
2. 按需开启自动配置项
- 虽然所有自动配置启动的时候默认全部加载。xxxxAutoConfiguration
- 按照条件装配规则(@Conditional),最终会按需配置(只有条件生效,自动配置类才能生效)
检测文件上传解析器,防止我们自己配置的解析器名字不符合规范:
@Bean
@ConditionalOnBean(MultipartResolver.class) //容器中有这个类型的组件
@ConditionalOnMissingBean(name = DispatcherServlet.MULTIPART_RESOLVER_BEAN_NAME) //容器中没有这个名字 multipartResolver的组件
public MultipartResolver multipartResolver(MultipartResolver resolver) {
//给@Bean标注的方法传入了对象参数,这个参数的值就会从容器中找。
return resolver;
}
3. 修改默认配置
SpringBoot默认会在底层配好所有的组件,但是如果用户自己配置了以用户的优先
- SpringBoot先加载所有的自动配置类 xxxxxAutoConfiguration
- 每个自动配置类按照条件进行生效,默认都会绑定配置文件指定的值
组件中的值从xxxxProperties里面拿,而xxxProperties和配置文件进行了绑定 - 生效的配置类就会给容器中装配很多组件
- 只要容器中有这些组件,相当于这些功能就有了
- 修改默认组件的默认配置
- 直接在配置类中@Bean替换底层的组件
- 查看这个组件是获取的配置文件什么值,在配置文件中修改
加载xxxxxAutoConfiguration ---> 添加组件 --->组件从xxxxProperties里面拿值 ----> application.properties
5. 开发小技巧
1. Lombok
简化JavaBean和日志的开发
- idea中搜索安装lombok插件
- 导入maven依赖
<dependency>
<groupId>org.projectlombok</groupId>
<artifactId>lombok</artifactId>
</dependency>
使用示例:
===============================简化JavaBean开发===================================
@NoArgsConstructor //全参构造器,某几个参数的构造器就需要手动写了
@AllArgsConstructor //无参构造器
@Data //生成getter/setter方法
@ToString //toString方法
@EqualsAndHashCode //equals和hashCode方法
public class User {
private String name;
private Integer age;
private Pet pet;
}
================================简化日志开发===================================
@Slf4j //给当前类注入日志log对象
@RestController
public class HelloController {
@RequestMapping("/hello")
public String handle01(@RequestParam("name") String name){
log.info("请求进来了....");
return "Hello, Spring Boot 2!"+"你好:"+name;
}
}
2. dev-tools
<dependency>
<groupId>org.springframework.boot</groupId>
<artifactId>spring-boot-devtools</artifactId>
<optional>true</optional>
</dependency>
项目或者页面修改以后:Ctrl+F9
6. 代码技巧
1. 对象的整体复制
将一个对象赋值给另一个对象,使用spring自带的BeanUtils.copyProperties(source, target);
@Override
@Transactional
public Integer updateType(Long id, Type type) {
Type t = typeMapper.selectById(id);
if(t==null){
throw new NotFoundException("不存在");
}
//spring提供的将一个对象的值批量赋给另一个对象,适合在更新操作时使用,避免了自己手动赋值
BeanUtils.copyProperties(type, t);
int i = typeMapper.updateById(t);
return i;
}