在生产环境中部署 PyTorch 模型
通过 Flask 在 Python 中部署 PyTorch 的 REST API
原文:
pytorch.org/tutorials/intermediate/flask_rest_api_tutorial.html译者:飞龙
注意
点击这里下载完整的示例代码
在本教程中,我们将使用 Flask 部署 PyTorch 模型,并为模型推理暴露一个 REST API。特别是,我们将部署一个预训练的 DenseNet 121 模型来检测图像。
提示
这里使用的所有代码都是根据 MIT 许可发布的,并且可以在Github上找到。
这代表了一系列关于在生产中部署 PyTorch 模型的教程中的第一篇。以这种方式使用 Flask 是迄今为止最简单的开始为您的 PyTorch 模型提供服务的方法,但对于高性能要求的用例不适用。为此:
- 如果您已经熟悉 TorchScript,可以直接查看我们的C++中加载 TorchScript 模型教程。
- 如果您需要关于 TorchScript 的复习,请查看我们的TorchScript 简介教程。
API 定义
我们将首先定义我们的 API 端点、请求和响应类型。我们的 API 端点将位于/predict,接受带有file参数的 HTTP POST 请求,该参数包含图像。响应将是一个包含预测的 JSON 响应:
{"class_id": "n02124075", "class_name": "Egyptian_cat"}
依赖项
通过运行以下命令安装所需的依赖项:
pip install Flask==2.0.1 torchvision==0.10.0
简单的 Web 服务器
以下是一个简单的 Web 服务器,摘自 Flask 的文档
from flask import Flask
app = Flask(__name__)
@app.route('/')
def hello():
    return 'Hello World!'
我们还将更改响应类型,以便返回一个包含 ImageNet 类别 ID 和名称的 JSON 响应。更新后的app.py文件将是:
from flask import Flask, jsonify
app = Flask(__name__)
@app.route('/predict', methods=['POST'])
def predict():
    return jsonify({'class_id': 'IMAGE_NET_XXX', 'class_name': 'Cat'})
推理
在接下来的部分中,我们将专注于编写推理代码。这将涉及两个部分,一个是我们准备图像以便它可以被馈送到 DenseNet 中,接下来,我们将编写代码从模型中获取实际预测。
准备图像
DenseNet 模型要求图像为尺寸为 224 x 224 的 3 通道 RGB 图像。我们还将使用所需的均值和标准差值对图像张量进行归一化。您可以在这里了解更多信息。
我们将使用torchvision库中的transforms构建一个转换管道,根据需要转换我们的图像。您可以在这里了解更多关于转换的信息。
import io
import torchvision.transforms as transforms
from PIL import Image
def transform_image(image_bytes):
    my_transforms = transforms.Compose([transforms.Resize(255),
                                        transforms.CenterCrop(224),
                                        transforms.ToTensor(),
                                        transforms.Normalize(
                                            [0.485, 0.456, 0.406],
                                            [0.229, 0.224, 0.225])])
    image = Image.open(io.BytesIO(image_bytes))
    return my_transforms(image).unsqueeze(0)
上述方法接受字节形式的图像数据,应用一系列转换并返回一个张量。要测试上述方法,请以字节模式读取图像文件(首先用您计算机上文件的实际路径替换…/_static/https://gitcode.net/OpenDocCN/pytorch-doc-zh/-/raw/master/docs/2.2/img/sample_file.jpeg),看看是否返回一个张量:
with open("../_static/https://gitcode.net/OpenDocCN/pytorch-doc-zh/-/raw/master/docs/2.2/img/sample_file.jpeg", 'rb') as f:
    image_bytes = f.read()
    tensor = transform_image(image_bytes=image_bytes)
    print(tensor)
预测
现在我们将使用一个预训练的 DenseNet 121 模型来预测图像类别。我们将使用torchvision库中的一个模型,加载模型并进行推理。虽然在此示例中我们将使用一个预训练模型,但您可以使用相同的方法来加载您自己的模型。在这个 tutorial 中了解更多关于加载您的模型的信息。
from torchvision import models
# Make sure to set `weights` as `'IMAGENET1K_V1'` to use the pretrained weights:
model = models.densenet121(weights='IMAGENET1K_V1')
# Since we are using our model only for inference, switch to `eval` mode:
model.eval()
def get_prediction(image_bytes):
    tensor = transform_image(image_bytes=image_bytes)
    outputs = model.forward(tensor)
    _, y_hat = outputs.max(1)
    return y_hat
张量y_hat将包含预测类别 ID 的索引。然而,我们需要一个可读的类别名称。为此,我们需要一个类别 ID 到名称的映射。下载此文件作为imagenet_class_index.json并记住保存的位置(或者,如果您按照本教程中的确切步骤进行操作,请将其保存在 tutorials/_static 中)。该文件包含 ImageNet 类别 ID 到 ImageNet 类别名称的映射。我们将加载此 JSON 文件并获取预测索引的类别名称。
import json
imagenet_class_index = json.load(open('../_static/imagenet_class_index.json'))
def get_prediction(image_bytes):
    tensor = transform_image(image_bytes=image_bytes)
    outputs = model.forward(tensor)
    _, y_hat = outputs.max(1)
    predicted_idx = str(y_hat.item())
    return imagenet_class_index[predicted_idx]
在使用imagenet_class_index字典之前,我们将首先将张量值转换为字符串值,因为imagenet_class_index字典中的键是字符串。我们将测试我们上面的方法:
with open("../_static/https://gitcode.net/OpenDocCN/pytorch-doc-zh/-/raw/master/docs/2.2/img/sample_file.jpeg", 'rb') as f:
    image_bytes = f.read()
    print(get_prediction(image_bytes=image_bytes))
您应该会收到这样的响应:
['n02124075', 'Egyptian_cat']
数组中的第一项是 ImageNet 类别 ID,第二项是可读的名称。
将模型集成到我们的 API 服务器中
在最后一部分中,我们将把我们的模型添加到我们的 Flask API 服务器中。由于我们的 API 服务器应该接受一个图像文件,我们将更新我们的predict方法以从请求中读取文件:
from flask import request
@app.route('/predict', methods=['POST'])
def predict():
    if request.method == 'POST':
        # we will get the file from the request
        file = request.files['file']
        # convert that to bytes
        img_bytes = file.read()
        class_id, class_name = get_prediction(image_bytes=img_bytes)
        return jsonify({'class_id': class_id, 'class_name': class_name})
import io
import json
from torchvision import models
import torchvision.transforms as transforms
from PIL import Image
from flask import Flask, jsonify, request
app = Flask(__name__)
imagenet_class_index = json.load(open('<PATH/TO/.json/FILE>/imagenet_class_index.json'))
model = models.densenet121(weights='IMAGENET1K_V1')
model.eval()
def transform_image(image_bytes):
    my_transforms = transforms.Compose([transforms.Resize(255),
                                        transforms.CenterCrop(224),
                                        transforms.ToTensor(),
                                        transforms.Normalize(
                                            [0.485, 0.456, 0.406],
                                            [0.229, 0.224, 0.225])])
    image = Image.open(io.BytesIO(image_bytes))
    return my_transforms(image).unsqueeze(0)
def get_prediction(image_bytes):
    tensor = transform_image(image_bytes=image_bytes)
    outputs = model.forward(tensor)
    _, y_hat = outputs.max(1)
    predicted_idx = str(y_hat.item())
    return imagenet_class_index[predicted_idx]
@app.route('/predict', methods=['POST'])
def predict():
    if request.method == 'POST':
        file = request.files['file']
        img_bytes = file.read()
        class_id, class_name = get_prediction(image_bytes=img_bytes)
        return jsonify({'class_id': class_id, 'class_name': class_name})
if __name__ == '__main__':
    app.run()
FLASK_ENV=development FLASK_APP=app.py flask run
发送 POST 请求到我们的应用程序的库:
import requests
resp = requests.post("http://localhost:5000/predict",
                     files={"file": open('<PATH/TO/.jpg/FILE>/cat.jpg','rb')})
现在打印 resp.json()将显示以下内容:
{"class_id": "n02124075", "class_name": "Egyptian_cat"}
我们编写的服务器相当简单,可能无法满足您的生产应用程序的所有需求。因此,以下是一些可以改进的事项:
- 端点
/predict假定请求中始终会有一个图像文件。这可能并非对所有请求都成立。我们的用户可能使用不同的参数发送图像,或者根本不发送图像。- 用户也可以发送非图像类型的文件。由于我们没有处理错误,这将破坏我们的服务器。添加一个明确的错误处理路径,将抛出异常,这样我们就可以更好地处理不良输入。
- 尽管模型可以识别大量图像类别,但可能无法识别所有图像。增强实现以处理模型无法识别图像的情况。
- 我们以开发模式运行 Flask 服务器,这不适合在生产中部署。您可以查看此教程以在生产中部署 Flask 服务器。
- 您还可以通过创建一个带有表单的页面来添加 UI,该表单接受图像并显示预测结果。查看类似项目的演示及其源代码。
- 在本教程中,我们仅展示了如何构建一个可以一次返回单个图像预测的服务。我们可以修改我们的服务,使其能够一次返回多个图像的预测。此外,service-streamer库会自动将请求排入您的服务队列,并将其抽样成可以馈送到模型中的小批次。您可以查看此教程。
- 最后,我们鼓励您查看我们在页面顶部链接的其他部署 PyTorch 模型的教程。
脚本的总运行时间:(0 分钟 0.000 秒)
下载 Python 源代码:flask_rest_api_tutorial.py
下载 Jupyter 笔记本:flask_rest_api_tutorial.ipynb
TorchScript 介绍
原文:
pytorch.org/tutorials/beginner/Intro_to_TorchScript_tutorial.html译者:飞龙
注意
点击这里下载完整的示例代码
作者: James Reed (jamesreed@fb.com), Michael Suo (suo@fb.com), rev2
本教程是 TorchScript 的介绍,TorchScript 是 PyTorch 模型(nn.Module子类)的中间表示,然后可以在高性能环境(如 C++)中运行。
在本教程中,我们将涵盖:
- PyTorch 中模型编写的基础,包括:
- 模块
- 定义
forward函数 - 将模块组合成模块层次结构
- 将 PyTorch 模块转换为 TorchScript 的特定方法,我们的高性能部署运行时
- 跟踪现有模块
- 使用脚本编译模块
- 如何组合这两种方法
- 保存和加载 TorchScript 模块
我们希望在完成本教程后,您将继续阅读后续教程,该教程将指导您实际从 C++中调用 TorchScript 模型的示例。
import torch  # This is all you need to use both PyTorch and TorchScript!
print(torch.__version__)
torch.manual_seed(191009)  # set the seed for reproducibility
2.2.0+cu121
<torch._C.Generator object at 0x7fcf1e81f070>
PyTorch 模型编写基础
让我们从定义一个简单的Module开始。Module是 PyTorch 中的组合基本单元。它包含:
- 一个构造函数,为调用准备模块
- 一组
Parameters和子Modules。这些由构造函数初始化,并且可以在调用期间被模块使用。 - 一个
forward函数。这是在调用模块时运行的代码。
让我们来看一个小例子:
class MyCell(torch.nn.Module):
    def __init__(self):
        super(MyCell, self).__init__()
    def forward(self, x, h):
        new_h = torch.tanh(x + h)
        return new_h, new_h
my_cell = MyCell()
x = torch.rand(3, 4)
h = torch.rand(3, 4)
print(my_cell(x, h))
(tensor([[0.8219, 0.8990, 0.6670, 0.8277],
        [0.5176, 0.4017, 0.8545, 0.7336],
        [0.6013, 0.6992, 0.2618, 0.6668]]), tensor([[0.8219, 0.8990, 0.6670, 0.8277],
        [0.5176, 0.4017, 0.8545, 0.7336],
        [0.6013, 0.6992, 0.2618, 0.6668]]))
所以我们:
- 创建了一个继承
torch.nn.Module的类。 - 定义了一个构造函数。构造函数并没有做太多事情,只是调用了
super的构造函数。 - 定义了一个
forward函数,它接受两个输入并返回两个输出。forward函数的实际内容并不是很重要,但它有点像一个虚假的RNN 单元——也就是说——它是一个在循环中应用的函数。
我们实例化了模块,并创建了x和h,它们只是随机值的 3x4 矩阵。然后我们用my_cell(x, h)调用了这个单元。这反过来调用了我们的forward函数。
让我们做一些更有趣的事情:
class MyCell(torch.nn.Module):
    def __init__(self):
        super(MyCell, self).__init__()
        self.linear = torch.nn.Linear(4, 4)
    def forward(self, x, h):
        new_h = torch.tanh(self.linear(x) + h)
        return new_h, new_h
my_cell = MyCell()
print(my_cell)
print(my_cell(x, h))
MyCell(
  (linear): Linear(in_features=4, out_features=4, bias=True)
)
(tensor([[ 0.8573,  0.6190,  0.5774,  0.7869],
        [ 0.3326,  0.0530,  0.0702,  0.8114],
        [ 0.7818, -0.0506,  0.4039,  0.7967]], grad_fn=<TanhBackward0>), tensor([[ 0.8573,  0.6190,  0.5774,  0.7869],
        [ 0.3326,  0.0530,  0.0702,  0.8114],
        [ 0.7818, -0.0506,  0.4039,  0.7967]], grad_fn=<TanhBackward0>))
我们重新定义了我们的模块MyCell,但这次我们添加了一个self.linear属性,并在前向函数中调用了self.linear。
这里到底发生了什么?torch.nn.Linear是 PyTorch 标准库中的一个Module。就像MyCell一样,它可以使用调用语法来调用。我们正在构建一个Module的层次结构。
在Module上使用print将给出Module子类层次结构的可视化表示。在我们的示例中,我们可以看到我们的Linear子类及其参数。
通过这种方式组合Module,我们可以简洁而易读地编写具有可重用组件的模型。
您可能已经注意到输出中的grad_fn。这是 PyTorch 自动微分方法的一个细节,称为autograd。简而言之,这个系统允许我们通过可能复杂的程序计算导数。这种设计允许在模型编写中具有极大的灵活性。
现在让我们来看看这种灵活性:
class MyDecisionGate(torch.nn.Module):
    def forward(self, x):
        if x.sum() > 0:
            return x
        else:
            return -x
class MyCell(torch.nn.Module):
    def __init__(self):
        super(MyCell, self).__init__()
        self.dg = MyDecisionGate()
        self.linear = torch.nn.Linear(4, 4)
    def forward(self, x, h):
        new_h = torch.tanh(self.dg(self.linear(x)) + h)
        return new_h, new_h
my_cell = MyCell()
print(my_cell)
print(my_cell(x, h))
MyCell(
  (dg): MyDecisionGate()
  (linear): Linear(in_features=4, out_features=4, bias=True)
)
(tensor([[ 0.8346,  0.5931,  0.2097,  0.8232],
        [ 0.2340, -0.1254,  0.2679,  0.8064],
        [ 0.6231,  0.1494, -0.3110,  0.7865]], grad_fn=<TanhBackward0>), tensor([[ 0.8346,  0.5931,  0.2097,  0.8232],
        [ 0.2340, -0.1254,  0.2679,  0.8064],
        [ 0.6231,  0.1494, -0.3110,  0.7865]], grad_fn=<TanhBackward0>))
我们再次重新定义了MyCell类,但这次我们定义了MyDecisionGate。这个模块利用控制流。控制流包括循环和if语句。
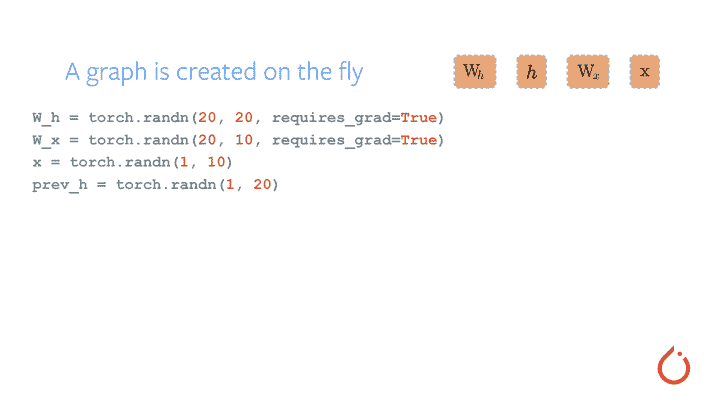
许多框架采用计算符号导数的方法,给定完整程序表示。然而,在 PyTorch 中,我们使用梯度磁带。我们记录操作的发生,并在计算导数时向后重放它们。通过这种方式,框架不必为语言中的所有构造显式定义导数。
自动求导的工作原理
TorchScript 的基础知识
现在让我们拿我们正在运行的示例来看看我们如何应用 TorchScript。
简而言之,TorchScript 提供了工具来捕获您模型的定义,即使在 PyTorch 灵活和动态的特性下。让我们开始检查我们所谓的跟踪。
跟踪模块
class MyCell(torch.nn.Module):
    def __init__(self):
        super(MyCell, self).__init__()
        self.linear = torch.nn.Linear(4, 4)
    def forward(self, x, h):
        new_h = torch.tanh(self.linear(x) + h)
        return new_h, new_h
my_cell = MyCell()
x, h = torch.rand(3, 4), torch.rand(3, 4)
traced_cell = torch.jit.trace(my_cell, (x, h))
print(traced_cell)
traced_cell(x, h)
MyCell(
  original_name=MyCell
  (linear): Linear(original_name=Linear)
)
(tensor([[-0.2541,  0.2460,  0.2297,  0.1014],
        [-0.2329, -0.2911,  0.5641,  0.5015],
        [ 0.1688,  0.2252,  0.7251,  0.2530]], grad_fn=<TanhBackward0>), tensor([[-0.2541,  0.2460,  0.2297,  0.1014],
        [-0.2329, -0.2911,  0.5641,  0.5015],
        [ 0.1688,  0.2252,  0.7251,  0.2530]], grad_fn=<TanhBackward0>))
我们已经倒带了一点,拿到了我们MyCell类的第二个版本。和以前一样,我们已经实例化了它,但这次,我们调用了torch.jit.trace,传入了Module,并传入了示例输入网络可能会看到的。
这到底做了什么?它调用了Module,记录了Module运行时发生的操作,并创建了torch.jit.ScriptModule的一个实例(其中TracedModule是一个实例)
TorchScript 将其定义记录在一个中间表示(IR)中,在深度学习中通常被称为图。我们可以使用.graph属性检查图:
print(traced_cell.graph)
• 1
graph(%self.1 : __torch__.MyCell,
      %x : Float(3, 4, strides=[4, 1], requires_grad=0, device=cpu),
      %h : Float(3, 4, strides=[4, 1], requires_grad=0, device=cpu)):
  %linear : __torch__.torch.nn.modules.linear.Linear = prim::GetAttrname="linear"
  %20 : Tensor = prim::CallMethodname="forward"
  %11 : int = prim::Constant[value=1]() # /var/lib/jenkins/workspace/beginner_source/Intro_to_TorchScript_tutorial.py:189:0
  %12 : Float(3, 4, strides=[4, 1], requires_grad=1, device=cpu) = aten::add(%20, %h, %11) # /var/lib/jenkins/workspace/beginner_source/Intro_to_TorchScript_tutorial.py:189:0
  %13 : Float(3, 4, strides=[4, 1], requires_grad=1, device=cpu) = aten::tanh(%12) # /var/lib/jenkins/workspace/beginner_source/Intro_to_TorchScript_tutorial.py:189:0
  %14 : (Float(3, 4, strides=[4, 1], requires_grad=1, device=cpu), Float(3, 4, strides=[4, 1], requires_grad=1, device=cpu)) = prim::TupleConstruct(%13, %13)
  return (%14)
然而,这是一个非常低级的表示,图中包含的大部分信息对最终用户来说并不有用。相反,我们可以使用.code属性来给出代码的 Python 语法解释:
print(traced_cell.code)
def forward(self,
    x: Tensor,
    h: Tensor) -> Tuple[Tensor, Tensor]:
  linear = self.linear
  _0 = torch.tanh(torch.add((linear).forward(x, ), h))
  return (_0, _0)
那么为什么我们要做所有这些?有几个原因:
- TorchScript 代码可以在其自己的解释器中调用,这基本上是一个受限制的 Python 解释器。这个解释器不会获取全局解释器锁定,因此可以同时处理同一实例上的许多请求。
- 这种格式允许我们将整个模型保存到磁盘,并加载到另一个环境中,比如在一个不是 Python 语言编写的服务器中
- TorchScript 为我们提供了一个表示,我们可以对代码进行编译优化,以提供更高效的执行
- TorchScript 允许我们与许多需要比单个运算符更广泛视图的后端/设备运行时进行接口。
我们可以看到调用traced_cell产生与 Python 模块相同的结果:
print(my_cell(x, h))
print(traced_cell(x, h))
(tensor([[-0.2541,  0.2460,  0.2297,  0.1014],
        [-0.2329, -0.2911,  0.5641,  0.5015],
        [ 0.1688,  0.2252,  0.7251,  0.2530]], grad_fn=<TanhBackward0>), tensor([[-0.2541,  0.2460,  0.2297,  0.1014],
        [-0.2329, -0.2911,  0.5641,  0.5015],
        [ 0.1688,  0.2252,  0.7251,  0.2530]], grad_fn=<TanhBackward0>))
使用脚本化转换模块
我们之所以使用我们模块的第二个版本,而不是带有控制流的子模块的版本,是有原因的。现在让我们来检查一下:
class MyDecisionGate(torch.nn.Module):
    def forward(self, x):
        if x.sum() > 0:
            return x
        else:
            return -x
class MyCell(torch.nn.Module):
    def __init__(self, dg):
        super(MyCell, self).__init__()
        self.dg = dg
        self.linear = torch.nn.Linear(4, 4)
    def forward(self, x, h):
        new_h = torch.tanh(self.dg(self.linear(x)) + h)
        return new_h, new_h
my_cell = MyCell(MyDecisionGate())
traced_cell = torch.jit.trace(my_cell, (x, h))
print(traced_cell.dg.code)
print(traced_cell.code)
/var/lib/jenkins/workspace/beginner_source/Intro_to_TorchScript_tutorial.py:261: TracerWarning:
Converting a tensor to a Python boolean might cause the trace to be incorrect. We can't record the data flow of Python values, so this value will be treated as a constant in the future. This means that the trace might not generalize to other inputs!
def forward(self,
    argument_1: Tensor) -> NoneType:
  return None
def forward(self,
    x: Tensor,
    h: Tensor) -> Tuple[Tensor, Tensor]:
  dg = self.dg
  linear = self.linear
  _0 = (linear).forward(x, )
  _1 = (dg).forward(_0, )
  _2 = torch.tanh(torch.add(_0, h))
  return (_2, _2)
查看.code输出,我们可以看到if-else分支不见了!为什么?跟踪确切地做了我们说过的事情:运行代码,记录发生的操作,并构建一个完全做同样操作的ScriptModule。不幸的是,像控制流这样的东西被擦除了。
我们如何在 TorchScript 中忠实地表示这个模块?我们提供了一个脚本编译器,它直接分析您的 Python 源代码,将其转换为 TorchScript。让我们使用脚本编译器转换MyDecisionGate:
scripted_gate = torch.jit.script(MyDecisionGate())
my_cell = MyCell(scripted_gate)
scripted_cell = torch.jit.script(my_cell)
print(scripted_gate.code)
print(scripted_cell.code)
def forward(self,
    x: Tensor) -> Tensor:
  if bool(torch.gt(torch.sum(x), 0)):
    _0 = x
  else:
    _0 = torch.neg(x)
  return _0
def forward(self,
    x: Tensor,
    h: Tensor) -> Tuple[Tensor, Tensor]:
  dg = self.dg
  linear = self.linear
  _0 = torch.add((dg).forward((linear).forward(x, ), ), h)
  new_h = torch.tanh(_0)
  return (new_h, new_h)
万岁!我们现在已经忠实地捕获了我们程序在 TorchScript 中的行为。现在让我们尝试运行程序:
# New inputs
x, h = torch.rand(3, 4), torch.rand(3, 4)
print(scripted_cell(x, h))
(tensor([[ 0.5679,  0.5762,  0.2506, -0.0734],
        [ 0.5228,  0.7122,  0.6985, -0.0656],
        [ 0.6187,  0.4487,  0.7456, -0.0238]], grad_fn=<TanhBackward0>), tensor([[ 0.5679,  0.5762,  0.2506, -0.0734],
        [ 0.5228,  0.7122,  0.6985, -0.0656],
        [ 0.6187,  0.4487,  0.7456, -0.0238]], grad_fn=<TanhBackward0>))
混合脚本化和跟踪
有些情况需要使用跟踪而不是脚本化(例如,一个模块有许多基于常量 Python 值做出的架构决策,我们希望这些值不会出现在 TorchScript 中)。在这种情况下,脚本化可以与跟踪组合使用:torch.jit.script将内联跟踪模块的代码,而跟踪将内联脚本化模块的代码。
第一个案例的示例:
class MyRNNLoop(torch.nn.Module):
    def __init__(self):
        super(MyRNNLoop, self).__init__()
        self.cell = torch.jit.trace(MyCell(scripted_gate), (x, h))
    def forward(self, xs):
        h, y = torch.zeros(3, 4), torch.zeros(3, 4)
        for i in range(xs.size(0)):
            y, h = self.cell(xs[i], h)
        return y, h
rnn_loop = torch.jit.script(MyRNNLoop())
print(rnn_loop.code)
def forward(self,
    xs: Tensor) -> Tuple[Tensor, Tensor]:
  h = torch.zeros([3, 4])
  y = torch.zeros([3, 4])
  y0 = y
  h0 = h
  for i in range(torch.size(xs, 0)):
    cell = self.cell
    _0 = (cell).forward(torch.select(xs, 0, i), h0, )
    y1, h1, = _0
    y0, h0 = y1, h1
  return (y0, h0)
以及第二种情况的示例:
class WrapRNN(torch.nn.Module):
    def __init__(self):
        super(WrapRNN, self).__init__()
        self.loop = torch.jit.script(MyRNNLoop())
    def forward(self, xs):
        y, h = self.loop(xs)
        return torch.relu(y)
traced = torch.jit.trace(WrapRNN(), (torch.rand(10, 3, 4)))
print(traced.code)
def forward(self,
    xs: Tensor) -> Tensor:
  loop = self.loop
  _0, y, = (loop).forward(xs, )
  return torch.relu(y)
这样,当情况需要时,可以同时使用脚本化和跟踪。
保存和加载模型
我们提供 API 来保存和加载 TorchScript 模块到/从磁盘的存档格式中。这种格式包括代码、参数、属性和调试信息,这意味着存档是模型的一个独立表示,可以在完全不同的进程中加载。让我们保存和加载我们包装的 RNN 模块:
traced.save('wrapped_rnn.pt')
loaded = torch.jit.load('wrapped_rnn.pt')
print(loaded)
print(loaded.code)
RecursiveScriptModule(
  original_name=WrapRNN
  (loop): RecursiveScriptModule(
    original_name=MyRNNLoop
    (cell): RecursiveScriptModule(
      original_name=MyCell
      (dg): RecursiveScriptModule(original_name=MyDecisionGate)
      (linear): RecursiveScriptModule(original_name=Linear)
    )
  )
)
def forward(self,
    xs: Tensor) -> Tensor:
  loop = self.loop
  _0, y, = (loop).forward(xs, )
  return torch.relu(y)
正如您所看到的,序列化保留了模块层次结构和我们一直在检查的代码。该模型也可以被加载,例如,到 C++中以进行无 Python 执行。
进一步阅读
我们已经完成了我们的教程!要进行更深入的演示,请查看 NeurIPS 演示,了解如何使用 TorchScript 转换机器翻译模型:colab.research.google.com/drive/1HiICg6jRkBnr5hvK2-VnMi88Vi9pUzEJ
脚本的总运行时间:(0 分钟 0.244 秒)
下载 Python 源代码:Intro_to_TorchScript_tutorial.py
下载 Jupyter 笔记本:Intro_to_TorchScript_tutorial.ipynb
PyTorch 2.2 中文官方教程(九)(2)https://developer.aliyun.com/article/1482546