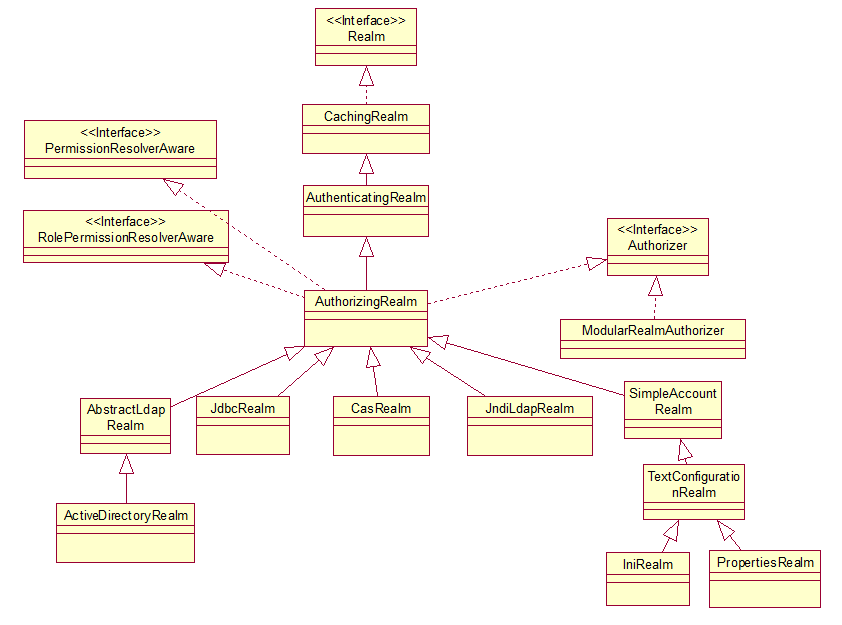
首先还是Realm的接口设计图:
这里只来说明SimpleAccountRealm和JdbcRealm的实现。
首先是SimpleAccountRealm不用关心数据的具体来源,只提供了与上层的交互,即实现了AuthenticatingRealm遗留的AuthenticationInfo doGetAuthenticationInfo和AuthorizingRealm遗留的AuthorizationInfo doGetAuthorizationInfo。
如下:
SimpleAccountRealm内部有四个属性,Map<String, SimpleAccount> users:用于存放用户账号信息,Map<String, SimpleRole> roles用于存放角色名的信息。这两个都是各种配置的最终归属存储地。
ReadWriteLock USERS_LOCK:由于这些配置信息,一般不会去修改,大部分时间用于查询,所以要使用读写锁。一般的synchronized同步,不管你是读还是写,都要进行等待。写与写需要进行同步,写与读也要进行同步,但读与读却并不需要进行同步,所以对于那些经常读的场景,要使用读写锁ReadWriteLock 来提升性能。ReadWriteLock ROLES_LOCK同理。
有了以上数据源,实现父类的遗留的方法就比较简单了。如下:
代码就很简单了,就是从users中取出相应的用户数据。接下来要分析清几个概念:
AuthorizationInfo、AuthenticationInfo、SimpleAccount、SimpleRole、PrincipalCollection。
PrincipalCollection:看下文档介绍
/**
* A collection of all principals associated with a corresponding { @link Subject Subject}. A <em>principal</em> is
* just a security term for an identifying attribute, such as a username or user id or social security number or
* anything else that can be considered an 'identifying' attribute for a { @code Subject}.
* <p/>
* A PrincipalCollection organizes its internal principals based on the { @code Realm} where they came from when the
* Subject was first created. To obtain the principal(s) for a specific Realm, see the { @link #fromRealm} method. You
* can also see which realms contributed to this collection via the { @link #getRealmNames() getRealmNames()} method.
*/
一个principal仅仅是Subject的一个标识而已,如可以是用户名,用户id等。PrincipalCollection则是这些属性的集合。每个用户属性可以来自不同的Realm。Collection fromRealm(String realmName)可以获取某个Realm的所有用户属性。Set<String> getRealmNames()可以获取到与Subject关联的用户的属性来自于哪些Realm。
Object getPrimaryPrincipal():主要是用于获取唯一标示,如UUID、username等。
接口如下:

MutablePrincipalCollection如下:
我们知道每一个标示都有所属的realm,所以再添加的时候,要带上realmName。
SimplePrincipalCollection:
一个重要的数据集合,key是realm的name,value是principal集合。
这个接口分支一直在强调,每个principal都是有所属的realm的。
PrincipalMap:我这一块没有搞明白,先放下。
AuthenticationInfo 它是含有用户和密码信息的地方:
AuthorizationInfo :存放用户权限的地方
类图如下:
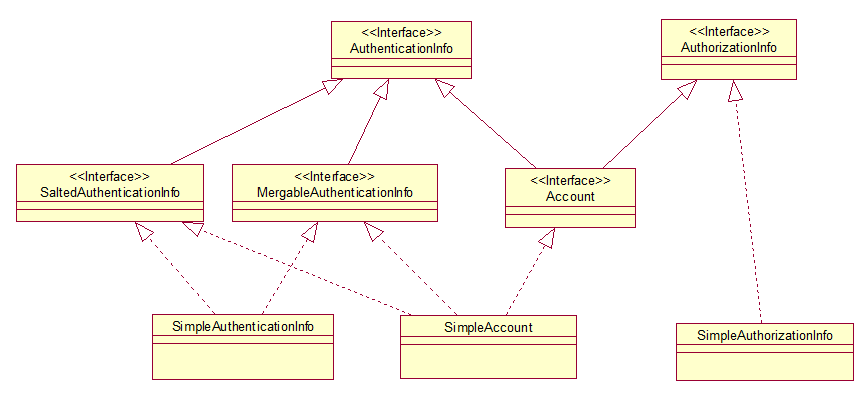
MergableAuthenticationInfo 意味着AuthenticationInfo可以进行合并:
SaltedAuthenticationInfo 主要用于密码匹配,后续文章专门说明:
SimpleAuthenticationInfo:存储了三个重要的属性:
然后就是实现了MergableAuthenticationInfo 接口,可以进行合并,这里的合并在第一篇文章中Realm认证中提到过:
主要分principals、credentialsSalt 和credentials三项的合并,代码也和简单。
SimpleAuthorizationInfo:存放了认证用户的角色和用户权限。
最重要的就是SimpleAccount:
它有SimpleAuthenticationInfo 、SimpleAuthorizationInfo ,所以是用户认证信息和权限信息的汇总。
还有两个属性locked和credentialsExpired,用来表示用户的锁定和密码过期的状态。
至此整个SimpleAccount便介绍完了。
回到SimpleAccountRealm,SimpleAccountRealm已经拥有Map<String, SimpleAccount> users和Map<String, SimpleRole> roles数据了,但是这些数据是怎么产生的呢?这就需要交给它的子类TextConfigurationRealm来完成:
仅仅两个字符串包含了所有的用户和角色的配置总来源。所以TextConfigurationRealm主要就是对这两个字符串的解析:
再通过PermissionResolver将字符串形式的权限转化成Permission对象,知道大致情况了,就可以了,不需要每一步都弄清楚。
TextConfigurationRealm主要用于解析两个配置字符串,这两个配置字符串的产生则继续交给子类来完成。IniRealm则是通过ini配置文件来产生这两个字符串,PropertiesRealm则是通过properties文件来产生这两个字符串。
至此,SimpleAccountRealm这一路就大致走通了,接下来就是另一条路JdbcRealm了。
首先是含有这几个默认的sql和DataSource dataSource,用于从数据库中获取相应的用户、角色、权限等数据。
根据上一篇文章我们知道JdbcRealm 要实现AuthenticatingRealm遗留的AuthenticationInfo doGetAuthenticationInfo和AuthorizingRealm遗留的AuthorizationInfo doGetAuthorizationInfo。下面就看看是怎么来实现的:
代码很简单就不再一一细说。再看下doGetAuthorizationInfo是怎么实现的:
第一步先根据PrincipalCollection 来获取用户名,第二步根据用户名来获取角色,第三部根据角色和用户名来获取权限。后两步都是执行简单的sql,不再说,看下如何由PrincipalCollection 获取用户名,该方法定义在CachingRealm中:
两种情况,首先是获取当前Realm的Principals,如果有取其第一个。如果没有,则调用getPrimaryPrincipal()方法。然后看下JdbcRealm的一个简单使用:
如果默认按照JdbcRealm的sql来作为数据库的查询来说,建表如下:
users表:
user_roles表:
roles_permissions表:
文章最后会给出数据库sql文件。
然后就是配置ini文件:
使用的dataSource是c3p0的dataSource,mysql驱动也是必然不能少的,所以maven中要加入依赖:
为了输出方便代码更改为:
对于lg用户,在数据库中它是有两个角色的,role1和role2。所以结果为true、true、false。
OK,通过。最后附上JdbcRealm的使用例子。
这里只来说明SimpleAccountRealm和JdbcRealm的实现。
首先是SimpleAccountRealm不用关心数据的具体来源,只提供了与上层的交互,即实现了AuthenticatingRealm遗留的AuthenticationInfo doGetAuthenticationInfo和AuthorizingRealm遗留的AuthorizationInfo doGetAuthorizationInfo。
如下:
|
1
2
3
4
5
6
7
8
9
10
11
12
13
14
|
protected
final
Map<String, SimpleAccount> users;
//username-to-SimpleAccount
protected
final
Map<String, SimpleRole> roles;
//roleName-to-SimpleRole
protected
final
ReadWriteLock USERS_LOCK;
protected
final
ReadWriteLock ROLES_LOCK;
public
SimpleAccountRealm() {
this
.users =
new
LinkedHashMap<String, SimpleAccount>();
this
.roles =
new
LinkedHashMap<String, SimpleRole>();
USERS_LOCK =
new
ReentrantReadWriteLock();
ROLES_LOCK =
new
ReentrantReadWriteLock();
//SimpleAccountRealms are memory-only realms - no need for an additional cache mechanism since we're
//already as memory-efficient as we can be:
setCachingEnabled(
false
);
}
|
SimpleAccountRealm内部有四个属性,Map<String, SimpleAccount> users:用于存放用户账号信息,Map<String, SimpleRole> roles用于存放角色名的信息。这两个都是各种配置的最终归属存储地。
ReadWriteLock USERS_LOCK:由于这些配置信息,一般不会去修改,大部分时间用于查询,所以要使用读写锁。一般的synchronized同步,不管你是读还是写,都要进行等待。写与写需要进行同步,写与读也要进行同步,但读与读却并不需要进行同步,所以对于那些经常读的场景,要使用读写锁ReadWriteLock 来提升性能。ReadWriteLock ROLES_LOCK同理。
有了以上数据源,实现父类的遗留的方法就比较简单了。如下:
|
1
2
3
4
5
6
7
8
9
10
11
12
13
14
15
16
17
18
19
20
21
22
23
24
25
26
27
28
|
protected
AuthenticationInfo doGetAuthenticationInfo(AuthenticationToken token)
throws
AuthenticationException {
UsernamePasswordToken upToken = (UsernamePasswordToken) token;
SimpleAccount account = getUser(upToken.getUsername());
if
(account !=
null
) {
if
(account.isLocked()) {
throw
new
LockedAccountException(
"Account ["
+ account +
"] is locked."
);
}
if
(account.isCredentialsExpired()) {
String msg =
"The credentials for account ["
+ account +
"] are expired"
;
throw
new
ExpiredCredentialsException(msg);
}
}
return
account;
}
protected
AuthorizationInfo doGetAuthorizationInfo(PrincipalCollection principals) {
String username = getUsername(principals);
USERS_LOCK.readLock().lock();
try
{
return
this
.users.get(username);
}
finally
{
USERS_LOCK.readLock().unlock();
}
}
|
代码就很简单了,就是从users中取出相应的用户数据。接下来要分析清几个概念:
AuthorizationInfo、AuthenticationInfo、SimpleAccount、SimpleRole、PrincipalCollection。
PrincipalCollection:看下文档介绍
引用
/**
* A collection of all principals associated with a corresponding { @link Subject Subject}. A <em>principal</em> is
* just a security term for an identifying attribute, such as a username or user id or social security number or
* anything else that can be considered an 'identifying' attribute for a { @code Subject}.
* <p/>
* A PrincipalCollection organizes its internal principals based on the { @code Realm} where they came from when the
* Subject was first created. To obtain the principal(s) for a specific Realm, see the { @link #fromRealm} method. You
* can also see which realms contributed to this collection via the { @link #getRealmNames() getRealmNames()} method.
*/
一个principal仅仅是Subject的一个标识而已,如可以是用户名,用户id等。PrincipalCollection则是这些属性的集合。每个用户属性可以来自不同的Realm。Collection fromRealm(String realmName)可以获取某个Realm的所有用户属性。Set<String> getRealmNames()可以获取到与Subject关联的用户的属性来自于哪些Realm。
Object getPrimaryPrincipal():主要是用于获取唯一标示,如UUID、username等。
接口如下:
MutablePrincipalCollection如下:
|
1
2
3
4
5
6
|
public
interface
MutablePrincipalCollection
extends
PrincipalCollection {
void
add(Object principal, String realmName);
void
addAll(Collection principals, String realmName);
void
addAll(PrincipalCollection principals);
void
clear();
}
|
我们知道每一个标示都有所属的realm,所以再添加的时候,要带上realmName。
SimplePrincipalCollection:
|
1
|
private
Map<String, Set> realmPrincipals;
|
一个重要的数据集合,key是realm的name,value是principal集合。
这个接口分支一直在强调,每个principal都是有所属的realm的。
PrincipalMap:我这一块没有搞明白,先放下。
AuthenticationInfo 它是含有用户和密码信息的地方:
|
1
2
3
4
|
public
interface
AuthenticationInfo
extends
Serializable {
PrincipalCollection getPrincipals();
Object getCredentials();
}
|
AuthorizationInfo :存放用户权限的地方
|
1
2
3
4
5
|
public
interface
AuthorizationInfo
extends
Serializable {
Collection<String> getRoles();
Collection<String> getStringPermissions();
Collection<Permission> getObjectPermissions();
}
|
类图如下:
MergableAuthenticationInfo 意味着AuthenticationInfo可以进行合并:
|
1
2
3
|
public
interface
MergableAuthenticationInfo
extends
AuthenticationInfo {
void
merge(AuthenticationInfo info);
}
|
SaltedAuthenticationInfo 主要用于密码匹配,后续文章专门说明:
|
1
2
3
|
public
interface
SaltedAuthenticationInfo
extends
AuthenticationInfo {
ByteSource getCredentialsSalt();
}
|
SimpleAuthenticationInfo:存储了三个重要的属性:
|
1
2
3
|
protected
PrincipalCollection principals;
protected
Object credentials;
protected
ByteSource credentialsSalt;
|
然后就是实现了MergableAuthenticationInfo 接口,可以进行合并,这里的合并在第一篇文章中Realm认证中提到过:
|
1
2
3
4
5
6
7
8
9
10
11
12
13
14
15
16
17
18
19
20
21
22
23
24
25
26
27
28
29
30
31
32
33
34
35
36
37
38
39
40
41
42
43
44
45
46
47
48
49
50
|
public
void
merge(AuthenticationInfo info) {
if
(info ==
null
|| info.getPrincipals() ==
null
|| info.getPrincipals().isEmpty()) {
return
;
}
if
(
this
.principals ==
null
) {
this
.principals = info.getPrincipals();
}
else
{
if
(!(
this
.principals
instanceof
MutablePrincipalCollection)) {
this
.principals =
new
SimplePrincipalCollection(
this
.principals);
}
((MutablePrincipalCollection)
this
.principals).addAll(info.getPrincipals());
}
//only mess with a salt value if we don't have one yet. It doesn't make sense
//to merge salt values from different realms because a salt is used only within
//the realm's credential matching process. But if the current instance's salt
//is null, then it can't hurt to pull in a non-null value if one exists.
//
//since 1.1:
if
(
this
.credentialsSalt ==
null
&& info
instanceof
SaltedAuthenticationInfo) {
this
.credentialsSalt = ((SaltedAuthenticationInfo) info).getCredentialsSalt();
}
Object thisCredentials = getCredentials();
Object otherCredentials = info.getCredentials();
if
(otherCredentials ==
null
) {
return
;
}
if
(thisCredentials ==
null
) {
this
.credentials = otherCredentials;
return
;
}
if
(!(thisCredentials
instanceof
Collection)) {
Set newSet =
new
HashSet();
newSet.add(thisCredentials);
setCredentials(newSet);
}
// At this point, the credentials should be a collection
Collection credentialCollection = (Collection) getCredentials();
if
(otherCredentials
instanceof
Collection) {
credentialCollection.addAll((Collection) otherCredentials);
}
else
{
credentialCollection.add(otherCredentials);
}
}
|
主要分principals、credentialsSalt 和credentials三项的合并,代码也和简单。
SimpleAuthorizationInfo:存放了认证用户的角色和用户权限。
|
1
2
3
|
protected
Set<String> roles;
protected
Set<String> stringPermissions;
protected
Set<Permission> objectPermissions;
|
最重要的就是SimpleAccount:
|
1
2
3
4
5
6
|
public
class
SimpleAccount
implements
Account, MergableAuthenticationInfo, SaltedAuthenticationInfo, Serializable {
private
SimpleAuthenticationInfo authcInfo;
private
SimpleAuthorizationInfo authzInfo;
private
boolean
locked;
private
boolean
credentialsExpired;
}
|
它有SimpleAuthenticationInfo 、SimpleAuthorizationInfo ,所以是用户认证信息和权限信息的汇总。
还有两个属性locked和credentialsExpired,用来表示用户的锁定和密码过期的状态。
至此整个SimpleAccount便介绍完了。
回到SimpleAccountRealm,SimpleAccountRealm已经拥有Map<String, SimpleAccount> users和Map<String, SimpleRole> roles数据了,但是这些数据是怎么产生的呢?这就需要交给它的子类TextConfigurationRealm来完成:
|
1
2
|
private
volatile
String userDefinitions;
private
volatile
String roleDefinitions;
|
仅仅两个字符串包含了所有的用户和角色的配置总来源。所以TextConfigurationRealm主要就是对这两个字符串的解析:
|
1
2
3
4
5
6
7
8
9
10
11
12
13
14
15
16
17
18
19
20
21
22
23
24
25
26
27
28
29
30
31
32
33
34
35
36
37
38
39
40
41
42
|
@Override
protected
void
onInit() {
super
.onInit();
processDefinitions();
}
protected
void
processDefinitions() {
try
{
//解析角色配置
processRoleDefinitions();
//解析用户配置
processUserDefinitions();
}
catch
(ParseException e) {
String msg =
"Unable to parse user and/or role definitions."
;
throw
new
ConfigurationException(msg, e);
}
}
protected
void
processRoleDefinitions()
throws
ParseException {
String roleDefinitions = getRoleDefinitions();
if
(roleDefinitions ==
null
) {
return
;
}
//先将角色字符串按行分割,然后每行再按照key value分割
Map<String, String> roleDefs = toMap(toLines(roleDefinitions));
processRoleDefinitions(roleDefs);
}
protected
void
processRoleDefinitions(Map<String, String> roleDefs) {
if
(roleDefs ==
null
|| roleDefs.isEmpty()) {
return
;
}
for
(String rolename : roleDefs.keySet()) {
String value = roleDefs.get(rolename);
SimpleRole role = getRole(rolename);
if
(role ==
null
) {
role =
new
SimpleRole(rolename);
add(role);
}
Set<Permission> permissions = PermissionUtils.resolveDelimitedPermissions(value, getPermissionResolver());
role.setPermissions(permissions);
}
}
|
再通过PermissionResolver将字符串形式的权限转化成Permission对象,知道大致情况了,就可以了,不需要每一步都弄清楚。
TextConfigurationRealm主要用于解析两个配置字符串,这两个配置字符串的产生则继续交给子类来完成。IniRealm则是通过ini配置文件来产生这两个字符串,PropertiesRealm则是通过properties文件来产生这两个字符串。
至此,SimpleAccountRealm这一路就大致走通了,接下来就是另一条路JdbcRealm了。
|
1
2
3
4
5
6
7
|
public
class
JdbcRealm
extends
AuthorizingRealm {
protected
static
final
String DEFAULT_AUTHENTICATION_QUERY =
"select password from users where username = ?"
;
protected
static
final
String DEFAULT_SALTED_AUTHENTICATION_QUERY =
"select password, password_salt from users where username = ?"
;
protected
static
final
String DEFAULT_USER_ROLES_QUERY =
"select role_name from user_roles where username = ?"
;
protected
static
final
String DEFAULT_PERMISSIONS_QUERY =
"select permission from roles_permissions where role_name = ?"
;
protected
DataSource dataSource;
}
|
首先是含有这几个默认的sql和DataSource dataSource,用于从数据库中获取相应的用户、角色、权限等数据。
根据上一篇文章我们知道JdbcRealm 要实现AuthenticatingRealm遗留的AuthenticationInfo doGetAuthenticationInfo和AuthorizingRealm遗留的AuthorizationInfo doGetAuthorizationInfo。下面就看看是怎么来实现的:
|
1
2
3
4
5
6
7
8
9
10
11
12
13
14
15
16
17
18
19
20
21
22
23
24
25
26
27
28
29
30
31
32
33
34
35
36
37
38
39
40
41
42
43
44
45
46
47
48
49
50
51
52
53
54
55
56
57
58
59
60
61
62
63
64
65
66
67
68
69
70
71
72
73
74
75
76
77
78
79
80
81
82
83
84
85
86
87
88
89
90
91
92
93
94
95
96
97
98
99
100
101
102
103
104
105
106
107
108
109
110
111
|
protected
AuthenticationInfo doGetAuthenticationInfo(AuthenticationToken token)
throws
AuthenticationException {
UsernamePasswordToken upToken = (UsernamePasswordToken) token;
String username = upToken.getUsername();
// Null username is invalid
if
(username ==
null
) {
throw
new
AccountException(
"Null usernames are not allowed by this realm."
);
}
Connection conn =
null
;
SimpleAuthenticationInfo info =
null
;
try
{
conn = dataSource.getConnection();
String password =
null
;
String salt =
null
;
switch
(saltStyle) {
case
NO_SALT:
//根据用户名去查找密码
password = getPasswordForUser(conn, username)[
0
];
break
;
case
CRYPT:
// TODO: separate password and hash from getPasswordForUser[0]
throw
new
ConfigurationException(
"Not implemented yet"
);
//break;
case
COLUMN:
String[] queryResults = getPasswordForUser(conn, username);
password = queryResults[
0
];
salt = queryResults[
1
];
break
;
case
EXTERNAL:
password = getPasswordForUser(conn, username)[
0
];
//此时salt不存在数据库中,默认的值为username
salt = getSaltForUser(username);
}
if
(password ==
null
) {
throw
new
UnknownAccountException(
"No account found for user ["
+ username +
"]"
);
}
//根据用户名、密码、盐值构建一个SimpleAuthenticationInfo
info =
new
SimpleAuthenticationInfo(username, password.toCharArray(), getName());
if
(salt !=
null
) {
info.setCredentialsSalt(ByteSource.Util.bytes(salt));
}
}
catch
(SQLException e) {
final
String message =
"There was a SQL error while authenticating user ["
+ username +
"]"
;
if
(log.isErrorEnabled()) {
log.error(message, e);
}
// Rethrow any SQL errors as an authentication exception
throw
new
AuthenticationException(message, e);
}
finally
{
JdbcUtils.closeConnection(conn);
}
return
info;
}
private
String[] getPasswordForUser(Connection conn, String username)
throws
SQLException {
String[] result;
boolean
returningSeparatedSalt =
false
;
switch
(saltStyle) {
case
NO_SALT:
case
CRYPT:
case
EXTERNAL:
result =
new
String[
1
];
break
;
default
:
result =
new
String[
2
];
returningSeparatedSalt =
true
;
}
PreparedStatement ps =
null
;
ResultSet rs =
null
;
try
{
ps = conn.prepareStatement(authenticationQuery);
ps.setString(
1
, username);
// Execute query
rs = ps.executeQuery();
// Loop over results - although we are only expecting one result, since usernames should be unique
boolean
foundResult =
false
;
while
(rs.next()) {
// Check to ensure only one row is processed
if
(foundResult) {
throw
new
AuthenticationException(
"More than one user row found for user ["
+ username +
"]. Usernames must be unique."
);
}
result[
0
] = rs.getString(
1
);
if
(returningSeparatedSalt) {
result[
1
] = rs.getString(
2
);
}
foundResult =
true
;
}
}
finally
{
JdbcUtils.closeResultSet(rs);
JdbcUtils.closeStatement(ps);
}
return
result;
}
protected
String getSaltForUser(String username) {
return
username;
}
|
代码很简单就不再一一细说。再看下doGetAuthorizationInfo是怎么实现的:
|
1
2
3
4
5
6
7
8
9
10
11
12
13
14
15
16
17
18
19
20
21
22
23
24
25
26
27
28
29
30
31
32
33
34
35
36
37
38
|
protected
AuthorizationInfo doGetAuthorizationInfo(PrincipalCollection principals) {
//null usernames are invalid
if
(principals ==
null
) {
throw
new
AuthorizationException(
"PrincipalCollection method argument cannot be null."
);
}
String username = (String) getAvailablePrincipal(principals);
Connection conn =
null
;
Set<String> roleNames =
null
;
Set<String> permissions =
null
;
try
{
conn = dataSource.getConnection();
// Retrieve roles and permissions from database
roleNames = getRoleNamesForUser(conn, username);
if
(permissionsLookupEnabled) {
permissions = getPermissions(conn, username, roleNames);
}
}
catch
(SQLException e) {
final
String message =
"There was a SQL error while authorizing user ["
+ username +
"]"
;
if
(log.isErrorEnabled()) {
log.error(message, e);
}
// Rethrow any SQL errors as an authorization exception
throw
new
AuthorizationException(message, e);
}
finally
{
JdbcUtils.closeConnection(conn);
}
SimpleAuthorizationInfo info =
new
SimpleAuthorizationInfo(roleNames);
info.setStringPermissions(permissions);
return
info;
}
|
第一步先根据PrincipalCollection 来获取用户名,第二步根据用户名来获取角色,第三部根据角色和用户名来获取权限。后两步都是执行简单的sql,不再说,看下如何由PrincipalCollection 获取用户名,该方法定义在CachingRealm中:
|
1
2
3
4
5
6
7
8
9
10
11
12
13
14
|
protected
Object getAvailablePrincipal(PrincipalCollection principals) {
Object primary =
null
;
if
(!CollectionUtils.isEmpty(principals)) {
Collection thisPrincipals = principals.fromRealm(getName());
if
(!CollectionUtils.isEmpty(thisPrincipals)) {
primary = thisPrincipals.iterator().next();
}
else
{
//no principals attributed to this particular realm. Fall back to the 'master' primary:
primary = principals.getPrimaryPrincipal();
}
}
return
primary;
}
|
两种情况,首先是获取当前Realm的Principals,如果有取其第一个。如果没有,则调用getPrimaryPrincipal()方法。然后看下JdbcRealm的一个简单使用:
如果默认按照JdbcRealm的sql来作为数据库的查询来说,建表如下:
users表:
|
1
2
3
4
5
6
7
8
|
CREATE
TABLE
`users` (
`id`
int
(11)
NOT
NULL
AUTO_INCREMENT,
`username`
varchar
(45)
NOT
NULL
,
`
password
`
varchar
(45)
NOT
NULL
,
`password_salt`
varchar
(45)
DEFAULT
NULL
,
PRIMARY
KEY
(`id`),
UNIQUE
KEY
`username_UNIQUE` (`username`)
) ENGINE=InnoDB AUTO_INCREMENT=4
DEFAULT
CHARSET=utf8;
|
user_roles表:
|
1
2
3
4
5
6
|
CREATE
TABLE
`user_roles` (
`id`
int
(11)
NOT
NULL
AUTO_INCREMENT,
`username`
varchar
(45)
DEFAULT
NULL
,
`role_name`
varchar
(45)
DEFAULT
NULL
,
PRIMARY
KEY
(`id`)
) ENGINE=InnoDB AUTO_INCREMENT=7
DEFAULT
CHARSET=utf8;
|
roles_permissions表:
|
1
2
3
4
5
6
|
CREATE
TABLE
`roles_permissions` (
`id`
int
(11)
NOT
NULL
AUTO_INCREMENT,
`role_name`
varchar
(45)
DEFAULT
NULL
,
`permission`
varchar
(45)
DEFAULT
NULL
,
PRIMARY
KEY
(`id`)
) ENGINE=InnoDB
DEFAULT
CHARSET=utf8;
|
文章最后会给出数据库sql文件。
然后就是配置ini文件:
|
1
2
3
4
5
6
7
8
9
10
11
|
[main]
#realm
dataSource=com.mchange.v2.c3p0.ComboPooledDataSource
dataSource.driverClass=com.mysql.jdbc.Driver
dataSource.jdbcUrl=jdbc:mysql:
//localhost:3306/shiro
dataSource.user=root
dataSource.password=XXXXXX
jdbcRealm=org.apache.shiro.realm.jdbc.JdbcRealm
jdbcRealm.dataSource=$dataSource
jdbcRealm.permissionsLookupEnabled=
true
securityManager.realms=$jdbcRealm
|
使用的dataSource是c3p0的dataSource,mysql驱动也是必然不能少的,所以maven中要加入依赖:
|
1
2
3
4
5
6
7
8
9
10
11
12
13
|
<!-- mysql驱动 -->
<
dependency
>
<
groupId
>mysql</
groupId
>
<
artifactId
>mysql-connector-java</
artifactId
>
<
version
>5.1.29</
version
>
</
dependency
>
<!-- 连接池 -->
<
dependency
>
<
groupId
>c3p0</
groupId
>
<
artifactId
>c3p0</
artifactId
>
<
version
>0.9.1.2</
version
>
</
dependency
>
|
为了输出方便代码更改为:
|
1
2
3
4
5
6
7
8
9
10
11
12
13
14
15
16
17
18
19
20
21
22
23
24
25
26
27
28
29
|
public
class
ShiroTest {
@Test
public
void
testHelloworld() {
init();
Subject subject=login(
"lg"
,
"123"
);
System.out.println(subject.hasRole(
"role1"
));
System.out.println(subject.hasRole(
"role2"
));
System.out.println(subject.hasRole(
"role3"
));
}
private
Subject login(String userName,String password){
//3、得到Subject及创建用户名/密码身份验证Token(即用户身份/凭证)
Subject subject = SecurityUtils.getSubject();
UsernamePasswordToken token =
new
UsernamePasswordToken(userName,password);
subject.login(token);
return
subject;
}
private
void
init(){
//1、获取SecurityManager工厂,此处使用Ini配置文件初始化SecurityManager
Factory<org.apache.shiro.mgt.SecurityManager> factory =
new
IniSecurityManagerFactory(
"classpath:shiro.ini"
);
//2、得到SecurityManager实例 并绑定给SecurityUtils
org.apache.shiro.mgt.SecurityManager securityManager = factory.getInstance();
SecurityUtils.setSecurityManager(securityManager);
}
}
|
对于lg用户,在数据库中它是有两个角色的,role1和role2。所以结果为true、true、false。
|
1
2
3
|
true
true
false
|
OK,通过。最后附上JdbcRealm的使用例子。