一、是什么
SpringCloud Eureka 是 SpringCloud Netflix 微服务套件的一部分,基于 Netflix Eureka 做了二次封装,主要负责实现微服务架构中的服务治理功能。
SpringCloud Eureka 是一个基于 REST 的服务,并且提供了基于 Java 的客户端组件,能够非常方便地将服务注册到 SpringCloud Eureka 中进行统一管理。
在微服务架构体系中,服务治理是必不可少的。在服务治理中,服务注册中心是一定要有的,而除了用 Eureka 作为注册中心之外,还可以用,Consul、Etcd、Zookeeper 等来作为服务的注册中心。
当然,在常见的可以作为服务注册中心的组件中,Zookeeper 和 Eureka 一样都是使用的比较多的。那为什么SpringCloud不用 Zookeeper 当作注册中心而选用 Eureka呢!
这就不得不提一个在分布式领域中的著名定理CAP了。
1.1 CAP定理
CAP定理又称CAP原则,指的是在一个分布式系统中,Consistency(一致性)、 Availability(可用性)、Partition tolerance(分区容错性),最多只能同时满足三个特性中的两个,三者不可兼得。

C:Consisteny(一致性),比如数据库是主从模式,一个写库请求进来了,master库完成了写入操作,但是再slave同步数据之前,另一个用户查了这条数据,结果没查到,但是也没报错,这就不是强一致性。虽然最终会同步成功,但这是最终一致性的体现。强一致性的体现在于我不管你因为什么没同步成功(可能网络延迟或其他等),只要没同步成功,我这个slave就不能对外提供服务。必须主从数据一致才可以提供服务。(很少有做到这点的)
A:Availability(可用性),还是上面的例子,就是保证了可用性。因为虽然主从没同步完成,但是我从库照样能提供服务而且及时响应结果。也就是说可用性保证服务可用,而不在乎数据是否一致。明显和C是冲突的,那CA怎么还能组合到一起?其实是可以的(单机部署)。
P:Partition Tolerance(分区容错性),集群部署了三台服务。挂了一台,其他两台还能继续对外提供服务,这时候我就认为他是没问题的,也就是我能容忍你挂了一台,只要还有服务能对外提供请求即可。所以一般分区容忍性是必须的,一般都需要从C和A之间做选择。
那么现在两两组合的话就有下面三种情况:
CP:满足一致性和分区容忍性,常见的就是 Zookeeper 集群。
AP:满足可用性和分区容忍性,创建的就是 Eureka 集群。
CA:满足一致性和可用性,适用单机部署系统,扩展性不强。
至于在分布式微服务系统中如何抉择,就没有很好的定论了。所以在设计系统架构的时候,我们应该根据系统具体的业务场景来权衡CAP。
只有适合的才是最好的,切不可为了追求完美而浪费太多的时间精力在CAP的抉择上。
更多CAP内容可看扩展阅读一1
1.2 为什么SpringCloud注册中心选择Eureka
根据上面的CAP理论,我们知道 zookeeper 和 Eureka 在设计的时候就已经对分布式场景作出了一些取舍。
zookeeper的CP保证
当向注册中心查询服务列表时,我们可以容忍注册中心返回的是几分钟以前的注册信息,但不能接受服务直接down掉不可用。也就是说,服务注册功能对可用性的要求要高于一致性。但是zk会出现这样一种情况,当master节点因为网络故障与其他节点失去联系时,剩余节点会重新进行leader选举。问题在于,选举leader的时间太长,30 ~ 120s,且选举期间整个zk集群都是不可用的,这就导致在选举期间注册服务瘫痪。在云部署的环境下,因网络问题使得zk集群失去master节点是较大概率会发生的事,虽然服务能够最终恢复,但是漫长的选举时间导致的注册长期不可用是不能容忍的。
Eureka的AP保证
Eureka看明白了这一点,因此在设计时就优先保证可用性。Eureka各个节点都是平等的,几个节点挂掉不会影响正常节点的工作,剩余的节点依然可以提供注册和查询服务。而Eureka的客户端在向某个Eureka注册或时如果发现连接失败,则会自动切换至其它节点,只要有一台Eureka还在,就能保证注册服务可用(保证可用性),只不过查到的信息可能不是最新的(不保证强一致性)。除此之外,Eureka还有一种自我保护机制,如果在15分钟内超过85%的节点都没有正常的心跳,那么Eureka就认为客户端与注册中心出现了网络故障,此时会出现以下几种情况:
Eureka不再从注册列表中移除因为长时间没收到心跳而应该过期的服务
Eureka仍然能够接受新服务的注册和查询请求,但是不会被同步到其它节点上(即保证当前节点依然可用)
当网络稳定时,当前实例新的注册信息会被同步到其它节点中
结论:Eureka可以很好的应对因网络故障导致部分节点失去联系的情况,而不会像Zookeeper那样使整个注册服务瘫痪。
1.3 Eureka架构
Eureka1.x版本架构图

从架构图中我先来说一下Eureka的分区。
Eureka 提供了 Region(区域) 和 Availability Zone(可用区) 两个概念来进行分区,这两个概念均来自于亚马逊的 AWS:
region:可以理解为地理上的不同区域,比如亚洲地区,中国区或者深圳等等。没有具体大小的限制,根据项目具体的情况,可以自行合理划分 region。图中us-east-1c、us-east-1d、us-east-1e就是一个个不同的区域。
Availability Zone:可以简单理解为 region 内的具体机房,比如说 region 划分为深圳,然后深圳有两个机房,就可以在此 region 之下划分出 zone1、zone2 两个 zone。
了解分区之后,可以知道 Eureka 之间的行为非常之多,具体如下:
- Application Service:由名字可知,它是一个服务的提供者,同时也是一个Eureka Client。作用,扮演服务提供角色,提供业务服务,向 Eureka Server 注册和更新自己的信息,同时能从 Eureka Server 注册表中获取到其它服务信息。
- Eureka Server:扮演服务注册中心的角色,提供服务注册和发现的功能。每个 Eureka Client 向 Eureka Server 注册自己的信息,也可以通过 Eureka 获取到其它服务的信息达到发现和调用其它服务的目的。
- Application Client:是一个 Eureka Client ,扮演服务消费者的角色,通过 Eureka Server 获取注册到其上的其它服务信息,从而根据信息找到所需的服务发起远程调用。
- Replicate:Eureka Server 之间注册表信息的同步复制,使 Eureka Server 集群中不同注册表中的服务实例信息保持一致。
- Make Remote Call:服务之间的远程调用。
- Register:注册服务实例,Client 端向 Server 端注册自身的元数据以提供服务发现。
- Renew:续约,通过发送心跳到 Server 以维持和更新注册表中服务实例元数据的有效性。当在一定时长内,Server 没有收到 Client 的心跳信息,将默认服务下线,会把服务实例信息从注册表中删除。
- Cancel:服务下线,Client 再关闭时主动向 Server 注销服务实例元数据,这是 Client 的服务实例数据信息将从注册表中删除。
- Get Registry:获取注册表,Client 向 Server 请求注册表信息,用于服务发现,从而发起服务之间的远程调用。
这些行为在 Eureka 中发挥着重要的作用,那了解了以上的这些内容相信Eureka中各位的脑海中有了一个大致的轮廓的。比如Eureka是一个服务治理框架,用于服务注册发现,强调AP、用分区的架构来实现集群等。
二、基础应用
好记性不然烂笔头,虽然用在这里不恰当,但明白我的意思就行,讲了很多,下面就来实操搭建一下Eureka的Server,Client端应用程序。
一点说明:
SpringCloud版本:Finchley.SR3
SpringBoot版本:2.0.3.RELEASE
所有项目都是基于SpringBoot开发
2.1 项目基础模块规划
因为 Eureka 是 SpringCloud 的一个组件,所以前期肯定是搭建一个微服务项目,而对于微服务项目,依照本人的搭建习惯,会将项目的目录结构做如下调整:
spring-cloud-study(父工程)
|
----server(业务模块)
  ----server-user(业务具体模块)
  ----server-XXXX
|
----spring-cloud(cloud模块)
  ----spring-cloud-eureka(cloud的各个组件)
  ----spring-cloud-config
  ----spring-cloud-XXXX
既然目录结构清晰了,那先创建父工程,业务模块,cloud 模块出来

1)父工程 pom 文件
<?xml version="1.0" encoding="UTF-8"?>
<project xmlns="http://maven.apache.org/POM/4.0.0" xmlns:xsi="http://www.w3.org/2001/XMLSchema-instance"
         xsi:schemaLocation="http://maven.apache.org/POM/4.0.0 https://maven.apache.org/xsd/maven-4.0.0.xsd">
    <modelVersion>4.0.0</modelVersion>
    <parent>
        <groupId>org.springframework.boot</groupId>
        <artifactId>spring-boot-starter-parent</artifactId>
        <version>2.0.3.RELEASE</version>
        <relativePath/> <!-- lookup parent from repository -->
    </parent>
    <groupId>cn.baiqi</groupId>
    <artifactId>springcloud-study</artifactId>
    <version>0.0.1-SNAPSHOT</version>
    <packaging>pom</packaging>
    <!--父工程名称-->
    <name>springcloud-study</name>
    <!--聚合子模块-->
    <modules>
        <module>spring-cloud</module>
        <module>server</module>
    </modules>
    <!--版本控制-->
    <properties>
        <java.version>1.8</java.version>
        <spring-cloud.version>Finchley.SR3</spring-cloud.version>
    </properties>
    <!--版本管理-->
    <dependencyManagement>
        <dependencies>
            <dependency>
                <groupId>org.springframework.cloud</groupId>
                <artifactId>spring-cloud-dependencies</artifactId>
                <version>${spring-cloud.version}</version>
                <type>pom</type>
                <scope>import</scope>
            </dependency>
        </dependencies>
    </dependencyManagement>
    <dependencies>
        <!--web启动器-->
        <dependency>
            <groupId>org.springframework.boot</groupId>
            <artifactId>spring-boot-starter-web</artifactId>
        </dependency>
    </dependencies>
    <build>
        <plugins>
            <plugin>
                <groupId>org.springframework.boot</groupId>
                <artifactId>spring-boot-maven-plugin</artifactId>
            </plugin>
        </plugins>
    </build>
</project>
2)业务模块 pom 文件
<?xml version="1.0" encoding="UTF-8"?>
<project xmlns="http://maven.apache.org/POM/4.0.0" xmlns:xsi="http://www.w3.org/2001/XMLSchema-instance"
         xsi:schemaLocation="http://maven.apache.org/POM/4.0.0 https://maven.apache.org/xsd/maven-4.0.0.xsd">
    <modelVersion>4.0.0</modelVersion>
    <!--父级依赖-->
    <parent>
        <artifactId>springcloud-study</artifactId>
        <groupId>cn.baiqi</groupId>
        <version>0.0.1-SNAPSHOT</version>
    </parent>
    <artifactId>server</artifactId>
    <version>0.0.1-SNAPSHOT</version>
    <name>server</name>
    <!--打包方式:pom-->
    <packaging>pom</packaging>
    <!--业务模块下的子业务模块-->
    <modules>
    </modules>
    <dependencies>
        <!-- Eureka客户端 -->
        <dependency>
            <groupId>org.springframework.cloud</groupId>
            <artifactId>spring-cloud-starter-netflix-eureka-client</artifactId>
        </dependency>
    </dependencies>
    <build>
        <plugins>
            <plugin>
                <groupId>org.springframework.boot</groupId>
                <artifactId>spring-boot-maven-plugin</artifactId>
            </plugin>
        </plugins>
    </build>
</project>
3)cloud 模块 pom 文件
<?xml version="1.0" encoding="UTF-8"?>
<project xmlns="http://maven.apache.org/POM/4.0.0" xmlns:xsi="http://www.w3.org/2001/XMLSchema-instance"
         xsi:schemaLocation="http://maven.apache.org/POM/4.0.0 https://maven.apache.org/xsd/maven-4.0.0.xsd">
    <modelVersion>4.0.0</modelVersion>
    <!--父级依赖-->
    <parent>
        <artifactId>springcloud-study</artifactId>
        <groupId>cn.baiqi</groupId>
        <version>0.0.1-SNAPSHOT</version>
    </parent>
    <artifactId>spring-cloud</artifactId>
    <version>0.0.1-SNAPSHOT</version>
    <name>spring-cloud</name>
    <!--打包方式:pom-->
    <packaging>pom</packaging>
    <!--cloud模块下的子组件模块-->
    <modules>
    </modules>
    <dependencies>
    </dependencies>
    <build>
        <plugins>
            <plugin>
                <groupId>org.springframework.boot</groupId>
                <artifactId>spring-boot-maven-plugin</artifactId>
            </plugin>
        </plugins>
    </build>
</project>
到此项目的架子算是搭建起来了,创建聚合工程的时候我们要注意如下几点
父级项目只做聚合,不写任何代码,打包方式为 pom
父级项目的 pom 文件中要聚合子项目将其下的子项目聚合到<modules>标签中
子模块的<parent>依赖要写父级坐标,打包方式为 jar
现在可以往项目中添加一个个的组件模块了。
2.2 Eureka注册中心搭建
首先我们在 spring-cloud 模块中添加一个子模块,用来当作 Eureka 注册中心,子模块名:spring-cloud-eureka
1)创建 SpringBoot 项目,目录结构如下:

2)编写 pom 文件,并导入 Eureka 服务端依赖
<?xml version="1.0" encoding="UTF-8"?>
<project xmlns="http://maven.apache.org/POM/4.0.0" xmlns:xsi="http://www.w3.org/2001/XMLSchema-instance"
         xsi:schemaLocation="http://maven.apache.org/POM/4.0.0 https://maven.apache.org/xsd/maven-4.0.0.xsd">
    <modelVersion>4.0.0</modelVersion>
    <!--父项目依赖-->
    <parent>
        <artifactId>spring-cloud</artifactId>
        <groupId>cn.baiqi</groupId>
        <version>0.0.1-SNAPSHOT</version>
    </parent>
    <artifactId>spring-cloud-eureka</artifactId>
    <version>0.0.1-SNAPSHOT</version>
    <!--模块名-->
    <name>spring-cloud-eureka</name>
    <dependencies>
        <!--Eureka服务端依赖-->
        <dependency>
            <groupId>org.springframework.cloud</groupId>
            <artifactId>spring-cloud-starter-netflix-eureka-server</artifactId>
        </dependency>
    </dependencies>
    <build>
        <plugins>
            <plugin>
                <groupId>org.springframework.boot</groupId>
                <artifactId>spring-boot-maven-plugin</artifactId>
            </plugin>
        </plugins>
    </build>
</project>
3)编写配置文件:application.yml
server:
  port: 9000 #端口
spring:
  application:
    name: spring-cloud-eureka #应用名称
eureka:
  client:
    service-url:
      defaultZone: http://localhost:9000/eureka #暴露的服务注册中心地址,用于Server和Client之间交互
    register-with-eureka: false #因为本服务是服务注册中心,所以不需要注册自己
    fetch-registry: false #不需要向注册中心获取注册表信息
4)启动类上添加@EnableEurekaServer注解
@EnableEurekaServer // 开启Eureka服务端
@SpringBootApplication
public class SpringCloudEurekaApplication {
    public static void main(String[] args) {
        SpringApplication.run(SpringCloudEurekaApplication.class, args);
    }
}
5)启动 Eureka 注册中心服务,访问:http://localhost:9000/,看到如下页面即注册中心搭建完成。

注册中心搭建好之后,其它服务就可以往这个注册中心注册服务了,按照习惯我准备了两个业务服务:
server-user(调用者)
server-order(提供者)
下面分别搭建一下把。
2.3 Eureka Client搭建-服务提供者
业务服务名:server-order
1)创建 SpringBoot 项目,目录结构如下:

2)因为 server-order 的父项目是 server ,所以只需在 server 中的 pom 里添加 Eureka 的客户端依赖,这样只要是 server 下面的项目,都会因为依赖传递而获取到相关的依赖,记住别忘了将子项目聚合到父项目中(<modules>标签里)
server-order 的 pom 文件
<?xml version="1.0" encoding="UTF-8"?>
<project xmlns="http://maven.apache.org/POM/4.0.0" xmlns:xsi="http://www.w3.org/2001/XMLSchema-instance"
         xsi:schemaLocation="http://maven.apache.org/POM/4.0.0 https://maven.apache.org/xsd/maven-4.0.0.xsd">
    <modelVersion>4.0.0</modelVersion>
        <!--父级依赖-->
    <parent>
        <artifactId>server</artifactId>
        <groupId>cn.baiqi</groupId>
        <version>0.0.1-SNAPSHOT</version>
    </parent>
    <artifactId>server-order</artifactId>
    <version>0.0.1-SNAPSHOT</version>
    <name>server-order</name>
    <dependencies>
    </dependencies>
    <build>
        <plugins>
            <plugin>
                <groupId>org.springframework.boot</groupId>
                <artifactId>spring-boot-maven-plugin</artifactId>
            </plugin>
        </plugins>
    </build>
</project>
server 的 pom 文件
<?xml version="1.0" encoding="UTF-8"?>
<project xmlns="http://maven.apache.org/POM/4.0.0" xmlns:xsi="http://www.w3.org/2001/XMLSchema-instance"
         xsi:schemaLocation="http://maven.apache.org/POM/4.0.0 https://maven.apache.org/xsd/maven-4.0.0.xsd">
    <modelVersion>4.0.0</modelVersion>
    <!--父级依赖-->
    <parent>
        <artifactId>springcloud-study</artifactId>
        <groupId>cn.baiqi</groupId>
        <version>0.0.1-SNAPSHOT</version>
    </parent>
    <artifactId>server</artifactId>
    <version>0.0.1-SNAPSHOT</version>
    <name>server</name>
    <!--打包方式:pom-->
    <packaging>pom</packaging>
    <!--业务模块下的子业务模块-->
    <modules>
        <module>server-user</module>
        <module>server-order</module>
    </modules>
    <dependencies>
        <!-- Eureka客户端 -->
        <dependency>
            <groupId>org.springframework.cloud</groupId>
            <artifactId>spring-cloud-starter-netflix-eureka-client</artifactId>
        </dependency>
    </dependencies>
    <build>
        <plugins>
            <plugin>
                <groupId>org.springframework.boot</groupId>
                <artifactId>spring-boot-maven-plugin</artifactId>
            </plugin>
        </plugins>
    </build>
</project>
3)配置文件:application.yml
server:
  port: 9001 #端口
eureka:
  instance:
    lease-renewal-interval-in-seconds: 2 #每间隔2s,向服务端发送一次心跳,证明自己依然"存活"
    lease-expiration-duration-in-seconds: 10 #告诉服务端,如果我10s之内没有给你发心跳,就代表我故障了,将我踢出掉
    prefer-ip-address: true #告诉服务端,服务实例以IP作为链接,而不是取机器名
  client:
    service-url:
      defaultZone: http://localhost:9000/eureka #注册中心地址
spring:
  application:
    name: server-order #服务名
logging:
  level:
    org.springframework: debug #对应模块的日志级别
4)添加一个 Controller,对外提供调用
/**
 * @author J3-白起
 * @package cn.baiqi.serverorder.controller
 * @createTime 2021/5/7 - 14:38
 * @description 订单控制器
 */
@RestController
@RequestMapping("/order")
public class OrderController {
    @GetMapping("/getAll/{value}")
    public String getAll(@PathVariable String value) {
        return "order服务提供了相关数据:" + value;
    }
}
该接口被调用后会返回相应的数据
5)Eureka Client 端在启动类中不需要添加 @EnableXXXX 注解,只要添加了 Client 依赖,它就是一个 Eureka Client 应用,直接启动就行了。
2.4 Eureka Client搭建-服务调用者
业务服务名:server-user
1)创建 SpringBoot 项目,目录结构如下:

2)server-user 模块的 pom 文件同服务提供者一样,不赘述,server 的 pom 文件只需聚合子项目模块就行。
3)配置文件:application.yml
server:
  port: 9002 #端口
eureka:
  instance:
    lease-renewal-interval-in-seconds: 2 #每间隔2s,向服务端发送一次心跳,证明自己依然"存活"
    lease-expiration-duration-in-seconds: 10 #告诉服务端,如果我10s之内没有给你发心跳,就代表我故障了,将我踢出掉
    prefer-ip-address: true #告诉服务端,服务实例以IP作为链接,而不是取机器名
  client:
    service-url:
      defaultZone: http://localhost:9000/eureka #注册中心地址
spring:
  application:
    name: server-user #服务名
logging:
  level:
    org.springframework: debug #对应模块的日志级别
4)添加一个调用 Controller,获取相关数据
/**
 * @author J3-白起
 * @package cn.baiqi.serveruser.controller
 * @createTime 2021/5/7 - 14:46
 * @description 用户控制器
 */
@RestController
@RequestMapping("/user")
public class UserController {
    @Autowired
    private RestTemplate restTemplate;
    @GetMapping("/getUserOrder/{userId}")
    public String getUserOrder(@PathVariable Long userId) {
        // 调用地址
        String url = "http://server-order/order/getAll/{userId}";
        // 调用
        String body = restTemplate.getForEntity(url, String.class, 1L).getBody();
        return body;
    }
    /**
     * 注入一个负载均衡的 restTemplate 用于服务调用
     *
     * @return
     */
    @Bean
    @LoadBalanced
    public RestTemplate restTemplate() {
        return new RestTemplate();
    }
}
访问该接口就可以调用对应的服务提供者获得相关数据。
5)Eureka Client 端在启动类中不需要添加 @EnableXXXX 注解,只要添加了 Client 依赖,它就是一个 Eureka Client 应用,直接启动就行了。
2.5 启动测试
依次启动应用,访问 Eureka 的注册中心主页,界面如下:

访问:http://localhost:9002/user/getUserOrder/2,结果如下
order服务提供了相关数据:2
RestTemplate 将根据服务名 server-order 通过预先从 spring-cloud-eureka 缓存到本地的注册表中获取到 server-order 服务的具体地址 ,从而发起服务间调用。
三、Eureka Client 源码解析
通过上面的服务调用案例,我们基本上不用做过多的复杂操作,即可完成一个远程的服务调用。
所以 Eureka Client 为了简化开发人员的工作,将很多与 Eureka Server 交互的工作都隐藏起来了,自主完成。
下面看看各个阶段,Eureka Client 在后台自动完成的工作图:

对于 Eureka Client 而言,它没有在启动类上加 @EnableXXXX 注解依然可以正常使用其相关的功能,那么我们肯定就想到了 SpringBoot 的自动装配原理。
找到 Eureka Client 源码包中的 spring.factories 文件就可以知道在启动的时候,自动配置了那些功能。

在自动装配类中,我们关注下面三个配置类:
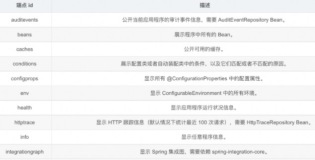
EurekaClientAutoConfiguration:Eureka Client 自动配置类,负责Eureka Client 中关键Beans的配置和初始化,如ApplicationManager 和 EurekaClientConfig 等。
RibbonEurekaAutoConfiguration:Ribbon 负载均衡相关配置。
EurekaDiscoveryClientConfiguration:配置自动注册和应用的健康检测器。
3.1 读取应用自身配置
EurekaClientAutoConfiguration 配置类中定义了非常多的Bean,在 SpringBoot 启动的时候就会完成这些Bean的读取和配置,主要的配置如下。

EurekaClientAutoConfiguration 配置类代码:
@Configuration
@EnableConfigurationProperties
@ConditionalOnClass(EurekaClientConfig.class)
@Import(DiscoveryClientOptionalArgsConfiguration.class)
@ConditionalOnBean(EurekaDiscoveryClientConfiguration.Marker.class)
@ConditionalOnProperty(value = "eureka.client.enabled", matchIfMissing = true)
@ConditionalOnDiscoveryEnabled
@AutoConfigureBefore({NoopDiscoveryClientAutoConfiguration.class,
                      CommonsClientAutoConfiguration.class, ServiceRegistryAutoConfiguration.class})
@AutoConfigureAfter(name = {"org.springframework.cloud.autoconfigure.RefreshAutoConfiguration",
                            "org.springframework.cloud.netflix.eureka.EurekaDiscoveryClientConfiguration",
                            "org.springframework.cloud.client.serviceregistry.AutoServiceRegistrationAutoConfiguration"})
public class EurekaClientAutoConfiguration {
    // ......
}
看到这么多注解不要慌,有些不是我们的关注点,我们只需要关注下面几点就可:
关注点一:@ConditionalOnBean注解作用,该类在加载之前环境中必须要有EurekaClientConfig.class,EurekaDiscoveryClientConfiguration.Marker.class两个类,否则不加载。
关注点二:@ConditionalOnProperty注解作用,配置文件中eureka.client.enabled属性的值为 ture 时,该配置类才生效,而该属性默认值就为true,所以该属性配置可以忽略。这也是我们不用在 Eureka 客户端程序的启动类上添加@EnableEurekaClient注解,程序依然生效的原因。
关注点三:@AutoConfigureBefore和@AutoConfigureAfter注解作用,该类的加载的顺序为@AutoConfigureAfter注解中定义的配置类之后,然后再是该配置类,最后再是@AutoConfigureBefore注解中定义的类加载。
加载顺序:@AutoConfigureAfter ==> EurekaClientAutoConfiguration ==> @AutoConfigureBefore
在加载@AutoConfigureAfter注解时,当加载到EurekaDiscoveryClientConfiguration后,EurekaClientAutoConfiguration配置类就满足了所有定义的条件,即生效了。

3.2 客户端发现
先来了解一下DiscoveryClient接口,和DiscoveryClient类。
DiscoveryClient 接口是 SpringCloud 框架提供的,主要为了扩展 Netflix 提供的 Eureka 客户端而提供的,该接口的实现类通过组合的方式引入了 Netflix 提供的 DiscoveryClient 类,然后进行了进一步封装,让开发者更加容易使用 SpringBoot 进行基于 Eureka 的开发。
DiscoveryClient 类是 Netflix 开源框架提供的,主要用于与Eureka服务端(即注册中心)进行交互。
DiscoveryClient接口和其默认实现类EurekaDiscoveryClient代码
DiscoveryClient.java
public interface DiscoveryClient {
    // 获取实现类的描述
    String description();
  // 通过服务id获取服务实例信息
    List<ServiceInstance> getInstances(String serviceId);
    // 获取所有服务实例id
    List<String> getServices();
}
EurekaDiscoveryClient.java # getInstances()
public class EurekaDiscoveryClient implements DiscoveryClient {
    // ......
    private final EurekaClient eurekaClient;
    // ......
    @Override
    public List<ServiceInstance> getInstances(String serviceId) {
        List<InstanceInfo> infos = this.eurekaClient.getInstancesByVipAddress(serviceId,
                                                                              false);
        List<ServiceInstance> instances = new ArrayList<>();
        for (InstanceInfo info : infos) {
            instances.add(new EurekaServiceInstance(info));
        }
        return instances;
    }
    // ......
}
EurekaDiscoveryClient 实现了 DiscoveryClient 接口,通过 getInstances() 方法会发现,其中又调用了 Netflix 提供的 EurekaClient 接口这种组合形式的方式使得我们非常容易的进行 Eureka 开发。

通过组合形式,我们就将代码拉回到了 Netflix 包中。
EurekaClient 接口来自于 com.netflix.discovery 包中,默认实现为 com.netflix.discovery.DiscoveryClient 它属于 eureka-client的源代码。
DiscoveryClient 可以说时功能非常的强大,提供了 Eureka Client 注册到 Server上、续租、下线、及获取Server中注册表信息等诸多关键功能。
下面继续分析这个类。
3.3 DiscoveryClient类分析
DiscoveryClient 是 Eureka Client 的核心类,负责与 Eureka Server 交互的关键逻辑,具体功能如下:
注册服务实例到 Eureka Server 中
发送心跳更新与 Eureka Server 的续约
在服务关闭时从 Eureka Server 中取消续约,服务下线
查询在 Eureka Server 中注册的服务实例列表
上面有该类的类图👆。
DiscoveryClient 继承了 LookupService 接口, LookupService作用是发现活跃的服务实例, 主要方法如下:
public interface LookupService<T> {
    // 根据服务实例注册的appName来获取封装有相同appName的服务实例信息容器
    Application getApplication(String appName);
    // 返回当前注册表中所有的服务实例信息
    Applications getApplications();
    // 根据服务实例的 id 获取服务实例信息
    List<InstanceInfo> getInstancesById(String id);
    // ......
}
Application:持有服务实例信息列表,它可以理解成同一个服务的集群信息,这些服实例都挂在同一个服务名 appName 下。
Applications:表示注册表中所有服务实例信息的集合
InstanceInfo:表示一个服务实例信息。
Application和Applications类中,对InstanceInfo的操作都是同步操作,防止出错。
EurekaClient在LookupService接口的基础上扩充了更多的接口,并提供了非常丰富的获取服务实例的方式,下面主要关注两个接口。
@ImplementedBy(DiscoveryClient.class)
public interface EurekaClient extends LookupService {
    // ......
    // 为Eureka Client注册健康检查处理器
    public void registerHealthCheck(HealthCheckHandler healthCheckHandler);
    // 为Eureka Client注册一个EurekaEventListener(事件监听器)监听client服务器实力信息的更新
    public void registerEventListener(EurekaEventListener eventListener);
    // ......
}
在 Eureka Server 中一般通过心跳(heartbeats)来识别一个实例的状态。Eureka Client 中存在一个定时任务定时通过 HealthCheckHandler 检测当前 Client 的状态,如果 Client 的状态发生改变,将会触发新的注册事件,更新 Eureka Server 的注册表中该服务的相关信息。
HealthCheckHandler代码如下:
public interface HealthCheckHandler {
    InstanceInfo.InstanceStatus getStatus(InstanceInfo.InstanceStatus currentStatus);
}
Eureka 中的事件监听模式属于观察者模式,事间监听器将监听 Client 的服务实例信息变化,触发对应的处理事件,EurekaEvent类图如下。

3.4 DiscoveryClient构造函数
咱们再回到EurekaClientAutoConfiguration类中。
当程序加载该类的时候,关注如下代码:
public class EurekaClientAutoConfiguration {
    // ......
    @Bean(destroyMethod = "shutdown")
    @ConditionalOnMissingBean(value = EurekaClient.class, search = SearchStrategy.CURRENT)
    @org.springframework.cloud.context.config.annotation.RefreshScope
    @Lazy
    public EurekaClient eurekaClient(ApplicationInfoManager manager, EurekaClientConfig config, EurekaInstanceConfig instance,
        @Autowired(required = false) HealthCheckHandler healthCheckHandler) {
      //If we use the proxy of the ApplicationInfoManager we could run into a problem
      //when shutdown is called on the CloudEurekaClient where the ApplicationInfoManager bean is
      //requested but wont be allowed because we are shutting down.  To avoid this we use the
      //object directly.
      ApplicationInfoManager appManager;
      if (AopUtils.isAopProxy(manager)) {
        appManager = ProxyUtils.getTargetObject(manager);
      }
      else {
        appManager = manager;
      }
            // 创建Eureka Client
      CloudEurekaClient cloudEurekaClient = new CloudEurekaClient(appManager, config, this.optionalArgs,
          this.context);
      cloudEurekaClient.registerHealthCheck(healthCheckHandler);
      return cloudEurekaClient;
    }
    // ......
}
该类加载时,Eureka Client 的初始化入口就是从这里开始进入的,具体的说,可以是下面这都段代码:
// 创建Eureka Client
CloudEurekaClient cloudEurekaClient = new CloudEurekaClient(appManager, config, this.optionalArgs,
                                                            this.context);
进入 CloudEurekaClient 类的构造器,可以确认最终它调用的是 DiscoveryClient类的构造器。
DiscoveryClient 构造器所做的功能非常多,包含:
Eureka Client 从 Eureka Server 中拉取注册表信息
服务注册
初始化发送心跳
缓存刷新(重新拉去注册表信息)
按需注册定时任务
上面所列的功能,可以说是贯穿了 Eureka Client 启动阶段的各项工作。
构造器代码如下:
@Inject // java自带的自动注入注解
DiscoveryClient(ApplicationInfoManager applicationInfoManager, EurekaClientConfig config, AbstractDiscoveryClientOptionalArgs args,
                Provider<BackupRegistry> backupRegistryProvider) {
    // ......
}
简单介绍一下构造参数:
ApplicationInfoManager:上面提到过,它是应用信息管理器。
EurekaClientConfig:上面提到过,封装了 Client 和 Server 交互配置信息的类。
AbstractDiscoveryClientOptionalArgs:注入一些可选参数,和一些像 jersey1,jersey2等通用过滤器。
BackupRegistry:备份注册中心的职责,当 Eureka Client 无法从任何一个Eureka Server 中获取注册表信息时,BackupRegistry将被调用以获取注册表信息。
从构造器代码往下看,忽略一些参数校验,属性赋值等之后,先来关注下面几行代码:
@Inject
DiscoveryClient(ApplicationInfoManager applicationInfoManager, EurekaClientConfig config, AbstractDiscoveryClientOptionalArgs args,
                Provider<BackupRegistry> backupRegistryProvider) {
    // ......
    this.applicationInfoManager = applicationInfoManager;
    InstanceInfo myInfo = applicationInfoManager.getInfo();
    // 客户端配置 大部分信息采用DefaultEurekaClientConfig
    clientConfig = config;
    // 已经过时,主要为了兼容遗留客户端问题
    staticClientConfig = clientConfig;
    // 传输层如http请求超时、重试等信息
    transportConfig = config.getTransportConfig();
    // 该eureka实例的信息 如主机信息,健康检测接口等
    instanceInfo = myInfo;
    if (myInfo != null) {
        appPathIdentifier = instanceInfo.getAppName() + "/" + instanceInfo.getId();
    } else {
        logger.warn("Setting instanceInfo to a passed in null value");
    }
    // 备份注册表信息,当服务端不可用时,客户度可以从这里获取注册表信息
    this.backupRegistryProvider = backupRegistryProvider;
    // 如果eureka server的地址来源dns服务,则随机获取urls
    this.urlRandomizer = new EndpointUtils.InstanceInfoBasedUrlRandomizer(instanceInfo);
    // 采用cas Applications存放的时服务器返回的存储客户端注册信息的
    localRegionApps.set(new Applications());
    // cas 递增版本,防止客户端注册旧的信息
    fetchRegistryGeneration = new AtomicLong(0);
    remoteRegionsToFetch = new AtomicReference<String>(clientConfig.fetchRegistryForRemoteRegions());
    remoteRegionsRef = new AtomicReference<>(remoteRegionsToFetch.get() == null ? null : remoteRegionsToFetch.get().split(","));
    // 判断是否需要从eureka server 获取注册表信息 并初始化相应的度量信息
    if (config.shouldFetchRegistry()) {
        this.registryStalenessMonitor = new ThresholdLevelsMetric(this, METRIC_REGISTRY_PREFIX + "lastUpdateSec_", new long[]{15L, 30L, 60L, 120L, 240L, 480L});
    } else {
        this.registryStalenessMonitor = ThresholdLevelsMetric.NO_OP_METRIC;
    }
    // 是否需要将信息注册到eureka server上,通过这个开关可以实现,
    // 只获取其他实例的信息,而不将自己的信息给其他客户端发现
    if (config.shouldRegisterWithEureka()) {
        this.heartbeatStalenessMonitor = new ThresholdLevelsMetric(this, METRIC_REGISTRATION_PREFIX + "lastHeartbeatSec_", new long[]{15L, 30L, 60L, 120L, 240L, 480L});
    } else {
        this.heartbeatStalenessMonitor = ThresholdLevelsMetric.NO_OP_METRIC;
    }
    // 如果不需要注册信息到server和拉取注册信息表,则初始化完成。
    if (!config.shouldRegisterWithEureka() && !config.shouldFetchRegistry()) {
        // ......
        return;  // no need to setup up an network tasks and we are done
    }
    // ......
}
上面两个 if 判断语句中,就对应着 Eureka 拉取注册列表和注册服务,如果两个都为 flase 得话,那 Discovery 初始化直接结束,表示该客户端既不进行服务注册也不进行服务发现。
config.shouldFetchRegistry()对应的配置:eureka client.fetch.register
为 true 则表示将从 Eureka Server 中拉去注册表信息
config.shouldRegisterWithEureka()对应的配置:eureka.client.register.with-eureka
为 true 则表示将注册到 Eureka Server 中
往下看,接着定义了一个线程池 ScheduledExecutorService ,线程池大小为2,一个线程用于发送心跳,另一个线程用于缓存刷新,同时定义了发送心跳和缓存刷新线程池。
scheduler = Executors.newScheduledThreadPool(2,
                                             new ThreadFactoryBuilder()
                                             .setNameFormat("DiscoveryClient-%d")
                                             .setDaemon(true)
                                             .build());
// 发送心跳线程池
heartbeatExecutor = new ThreadPoolExecutor(...);  // use direct handoff
// 缓存刷新线程池
cacheRefreshExecutor = new ThreadPoolExecutor(...);  // use direct handoff
往下看,初始化了 Eureka Client 和 Eureka Service 进行 HTTP 交互的 Jersey 客户端,将 AbstractDiscoveryClientOptionalArgs 中的属性用来构建 EurekaTransport。
eurekaTransport = new EurekaTransport();
scheduleServerEndpointTask(eurekaTransport, args);
往下看,接着从 Eureka Server 中拉取注册表信息。
if (clientConfig.shouldFetchRegistry() && !fetchRegistry(false)) {
    fetchRegistryFromBackup();
}
如果 EurekaClientConfig # shouldFetchRegistry 为 ture 时,fetchRegistry 方法将被调用。
在 Eureka Client 向 Eureka Server 注册前,需要先从 Eureka Server 中拉取注册表中的信息,这是服务发现的前提。通过将 Eureka Server 中的注册表信息缓存到本地,就可以就近获取其它服务的相关信息,减少与 Eureka Server 的网络通信。
拉取完 Eureka Server 中的注册表信息后,将对服务实例进行注册,代码如下:
if (clientConfig.shouldRegisterWithEureka() && clientConfig.shouldEnforceRegistrationAtInit()) {
    try {
        // 发起服务注册
        if (!register() ) {
            // 失败抛出异常
            throw new IllegalStateException("Registration error at startup. Invalid server response.");
        }
    } catch (Throwable th) {
        logger.error("Registration error at startup: {}", th.getMessage());
        throw new IllegalStateException(th);
    }
}
// finally, init the schedule tasks (e.g. cluster resolvers, heartbeat, instanceInfo replicator, fetch
// 最后初始化定时任务
initScheduledTasks();
在服务注册之前会进行注册预注册,Eureka 没有对此提供默认实现。构造函数的最后将初始化并启动发送心跳,刷新缓存和按需注册等定时任务。
看到这里,DiscoveryClient 的构造函数中重要的功能步骤都讲解了一下,那咱们来总结一下在这里面所做的所有功能:
- 相关属性的赋值,如:ApplicationInfoManager,EurekaClientConfig等。
- 备份注册中心的初始化,默认没有实现。
- 拉取 Eureka Server 注册表中的信息
- 注册前的预处理
- 向 Eureka Server 注册自身
- 初始化心跳定时任务,缓存刷新和按需注册等定时任务
来一个清晰的流程图:

整体的 Eureka Client 初始化的功能都分析完了,下面根据具体的功能进行分析,如拉取注册信息,续约,心跳,注册等。
3.5 拉取注册表信息
拉取注册表的入口在,DiscoveryClient类的 fetchRegistry 方法,相关代码如下:
private boolean fetchRegistry(boolean forceFullRegistryFetch) {
    Stopwatch tracer = FETCH_REGISTRY_TIMER.start();
    try {
        // If the delta is disabled or if it is the first time, get all
        // applications
        // 如果增量式拉取被禁止,或者Applications为null,进行全量拉取
        Applications applications = getApplications();
        if (clientConfig.shouldDisableDelta()
            || (!Strings.isNullOrEmpty(clientConfig.getRegistryRefreshSingleVipAddress()))
            || forceFullRegistryFetch
            || (applications == null)
            || (applications.getRegisteredApplications().size() == 0)
            || (applications.getVersion() == -1)) //Client application does not have latest library supporting delta
        {
            logger.info("Disable delta property : {}", clientConfig.shouldDisableDelta());
            logger.info("Single vip registry refresh property : {}", clientConfig.getRegistryRefreshSingleVipAddress());
            logger.info("Force full registry fetch : {}", forceFullRegistryFetch);
            logger.info("Application is null : {}", (applications == null));
            logger.info("Registered Applications size is zero : {}",
                        (applications.getRegisteredApplications().size() == 0));
            logger.info("Application version is -1: {}", (applications.getVersion() == -1));
            // 全量拉取注册表信息
            getAndStoreFullRegistry();
        } else {
            // 增量拉取注册表信息
            getAndUpdateDelta(applications);
        }
        // 计算应用集合一致性哈希码
        applications.setAppsHashCode(applications.getReconcileHashCode());
        // 打印注册表上所有服务实例的总数量
        logTotalInstances();
    } catch (Throwable e) {
        logger.error(PREFIX + "{} - was unable to refresh its cache! status = {}", appPathIdentifier, e.getMessage(), e);
        return false;
    } finally {
        if (tracer != null) {
            tracer.stop();
        }
    }
    // Notify about cache refresh before updating the instance remote status
    // 在更新远程实例状态之前推送缓存刷新事件,但是Eureka 中并没有提供默认的事件监听器
    onCacheRefreshed();
    // Update remote status based on refreshed data held in the cache
    // 基于缓存中被刷新的数据更新远程实例状态
    updateInstanceRemoteStatus();
    // registry was fetched successfully, so return true
    // 注册表拉取成功,返回true
    return true;
}
当 Eureka 客户端第一次注册到 Eureka 服务端时才会进行全量拉取,其他时候都只进行增量拉取,下面来看看这两个拉取注册表信息的具体逻辑。
DiscoveryClient # getAndStoreFullRegistry():全量拉取
DiscoveryClient # getAndUpdateDelta():增量拉取
3.5.1 全量拉取注册表信息
DiscoveryClient # getAndStoreFullRegistry()代码如下:
private void getAndStoreFullRegistry() throws Throwable {
    // 获取拉取的注册表版本,防止拉取版本落后(由其他的线程引起)
    long currentUpdateGeneration = fetchRegistryGeneration.get();
    logger.info("Getting all instance registry info from the eureka server");
    Applications apps = null;
    // 全量拉取注册表
    EurekaHttpResponse<Applications> httpResponse = clientConfig.getRegistryRefreshSingleVipAddress() == null
            ? eurekaTransport.queryClient.getApplications(remoteRegionsRef.get())
            : eurekaTransport.queryClient.getVip(clientConfig.getRegistryRefreshSingleVipAddress(), remoteRegionsRef.get());
    // 获取成功
    if (httpResponse.getStatusCode() == Status.OK.getStatusCode()) {
        apps = httpResponse.getEntity();
    }
    logger.info("The response status is {}", httpResponse.getStatusCode());
    if (apps == null) {
        logger.error("The application is null for some reason. Not storing this information");
        // 检查currentUpdateGeneration的更新版本是否发生改变,无改变得华说明版本拉取是最新得
    } else if (fetchRegistryGeneration.compareAndSet(currentUpdateGeneration, currentUpdateGeneration + 1)) {
        // 从apps中筛选出状态为 UP 得实例,同时打乱实例得顺序,方式同一个服务得不同实例在其同时接受流量
        localRegionApps.set(this.filterAndShuffle(apps));
        logger.debug("Got full registry with apps hashcode {}", apps.getAppsHashCode());
    } else {
        logger.warn("Not updating applications as another thread is updating it already");
    }
}
全量拉取的方式将会从 Eureka Server 中拉取注册表中所有得服务实例信息(封装在 Applications中),并经过处理后替换掉本地注册表缓存Applications。
通过 debug 启动方式启动,我们可以看到向 Eureka Server 全量拉取服务注册表信息的 url 为:http://localhost:9000/eureka/apps,前面“http://localhost:9000/eureka”是配置文件配置的注册中心地址,后面“/apps/”是程序自己拼接的。
具体代码:AbstractJerseyEurekaHttpClient # getApplicationsInternal,截图如下。

getAndStoreFullRegistry() 方法是有可能被多个线程同时调用的,这会导致拉取的注册表被旧的注册表所覆盖(有可能出现先拉取注册表信息的线程在覆盖 apps 时被阻塞,被后拉取注册表信息的线程抢先设置了 apps,被阻塞的线程恢复后在次设置了 apps,导致 apps 数据版本落后),产生脏数据,对此,Eureka 通过类型为 AtomicLong 的 currentUpdateGeneration 对 apps 的更新版本进行跟踪。如果跟新版本不一致,说明本次拉取注册表信息已过时,不需要缓存到本地。
最后对拉取到的注册表信息 apps 进行了筛选,只保留状态为 UP 的服务实例信息。
3.5.2 增量拉取注册表信息
DiscoveryClient # getAndUpdateDelta()代码如下:
private void getAndUpdateDelta(Applications applications) throws Throwable {
    long currentUpdateGeneration = fetchRegistryGeneration.get();
    Applications delta = null;
    // 增量拉取注册表
    EurekaHttpResponse<Applications> httpResponse = eurekaTransport.queryClient.getDelta(remoteRegionsRef.get());
    if (httpResponse.getStatusCode() == Status.OK.getStatusCode()) {
        delta = httpResponse.getEntity();
    }
  // 拉取失败,进行全量拉取
    if (delta == null) {
        logger.warn("The server does not allow the delta revision to be applied because it is not safe. "
                    + "Hence got the full registry.");
        // 全量拉取
        getAndStoreFullRegistry();
        // 检查currentUpdateGeneration的更新版本是否发生改变,无改变得华说明版本拉取是最新得
    } else if (fetchRegistryGeneration.compareAndSet(currentUpdateGeneration, currentUpdateGeneration + 1)) {
        logger.debug("Got delta update with apps hashcode {}", delta.getAppsHashCode());
        String reconcileHashCode = "";
        if (fetchRegistryUpdateLock.tryLock()) {
            try {
                // 更新本地缓存
                updateDelta(delta);
                // 计算应用集合一致性哈希码
                reconcileHashCode = getReconcileHashCode(applications);
            } finally {
                fetchRegistryUpdateLock.unlock();
            }
        } else {
            logger.warn("Cannot acquire update lock, aborting getAndUpdateDelta");
        }
        // 比较应用集合一致性哈希码,如果不一致将认为本次增量式拉取数据已脏,将发起全量拉取更新本地缓存注册表信息
        // There is a diff in number of instances for some reason
        if (!reconcileHashCode.equals(delta.getAppsHashCode()) || clientConfig.shouldLogDeltaDiff()) {
            reconcileAndLogDifference(delta, reconcileHashCode);  // this makes a remoteCall
        }
    } else {
        logger.warn("Not updating application delta as another thread is updating it already");
        logger.debug("Ignoring delta update with apps hashcode {}, as another thread is updating it already", delta.getAppsHashCode());
    }
}
增量更新注册表信息,访问 Eureka Server 的 url 为:http://localhost:9000/eureka/apps/delta,前面“http://localhost:9000/eureka”是配置文件配置的注册中心地址,后面“/apps/delta”是程序自己拼接的。
具体代码:AbstractJerseyEurekaHttpClient # getApplicationsInternal,截图如下。

由于更新的过程时间比较久,时间成本为O(N^2),所以需要通过同步代码快防止多个线程同时进行更新,污染数据。
在根据从 Eureka Server 拉取的 delta 信息更新本地缓存的时候,Eureka 定义了 ActionType 来标记变更状态,代码在 InstanceInfo 类中,代码如下:
public enum ActionType {
    // 添加 Eureka Server
    ADDED, // Added in the discovery server
    // 在 Eureka Server 中的信息已经修改
    MODIFIED, // Changed in the discovery server
    // 被从 Eureka Server 中删除
    DELETED // Deleted from the discovery server
}
在更新本地缓存的时候,根据 InstanceInfo # ActionType 的不同,对 delta 中的 InstanceInfo 采取不同的操作,其中 ADDED 和 MODIFIED 状态变更的服务实例信息将添加到本地注册标中,DELETED 状态变更的服务实例将从本地注册表中删除,具体代码如下:
private void updateDelta(Applications delta) {
    // ......
    // 变更类型为 ADDED
    if (ActionType.ADDED.equals(instance.getActionType())) {
        Application existingApp = applications.getRegisteredApplications(instance.getAppName());
        if (existingApp == null) {
            applications.addApplication(app);
        }
        logger.debug("Added instance {} to the existing apps in region {}", instance.getId(), instanceRegion);
        // 添加到本地注册表
        applications.getRegisteredApplications(instance.getAppName()).addInstance(instance);
        // 变更类型为 MODIFIED
    } else if (ActionType.MODIFIED.equals(instance.getActionType())) {
        Application existingApp = applications.getRegisteredApplications(instance.getAppName());
        if (existingApp == null) {
            applications.addApplication(app);
        }
        logger.debug("Modified instance {} to the existing apps ", instance.getId());
        // 添加到本地注册表
        applications.getRegisteredApplications(instance.getAppName()).addInstance(instance);
        // 变更类型为 DELETED
    } else if (ActionType.DELETED.equals(instance.getActionType())) {
        Application existingApp = applications.getRegisteredApplications(instance.getAppName());
        if (existingApp == null) {
            applications.addApplication(app);
        }
        logger.debug("Deleted instance {} to the existing apps ", instance.getId());
        // 从本地注册表中移除
        applications.getRegisteredApplications(instance.getAppName()).removeInstance(instance);
    }
    // ......
}
在更新完本地缓存的注册表中之后,Eureka Client 会通过 DiscoveryClient # getReconcileHashCode(Applications applications)方法计算合并后的 Applications 的 appHashCode (应用集合一直性哈希码),和 Eureka Server 传递的 delta 上的 appsHashCode 进行比较(delta 中携带的 appsHashCode 通过 Eureka Server 的全量注册表计算得出),比对客户端和服务端上注册表的差异。如果哈希值不一致的话将再次调用一次 getAndStoreFullRegistry 获取全量数据保证 Eureka Client 与 Eureka Server 之间注册表数据的一致。
private void getAndUpdateDelta(Applications applications) throws Throwable {
    // ......
    // There is a diff in number of instances for some reason
    if (!reconcileHashCode.equals(delta.getAppsHashCode()) || clientConfig.shouldLogDeltaDiff()) {
        reconcileAndLogDifference(delta, reconcileHashCode);  // this makes a remoteCall
    }
    // ......
}
在 reconcileAndLogDifference() 方法中将会执行全量拉取注册表信息操作
appsHashCode 的一般表示为:
appsHashCode = ${status}_ ${count} _
它通过将应用状态和数量拼接成字符串,表示了当前注册表中服务实例状态的统计信息。比如:有 10 个应用实例的状态为 UP ,有 5 个应用实例状态为 DOWN ,其中它的状态数量为 0 (不进行表示),那么 appsHashCode 的形式如下是:
appsHashCode = UP_ 10 _ DOWN _ 5 _
3.4.3 拉取注册表流程图