1、贝塞尔曲线
贝塞尔曲线(Bézier curve),又称贝兹曲线或贝济埃曲线,是应用于二维图形应用程序的数学曲线。一般的矢量图形软件通过它来精确画出曲线,贝兹曲线由线段与节点组成,节点是可拖动的支点,线段像可伸缩的皮筋,我们在绘图工具上看到的钢笔工具就是来做这种矢量曲线的。贝塞尔曲线是计算机图形学中相当重要的参数曲线,在一些比较成熟的位图软件中也有贝塞尔曲线工具,如 PhotoShop 等。在 Flash4 中还没有完整的曲线工具,而在 Flash5 里面已经提供出贝塞尔曲线工具。
-
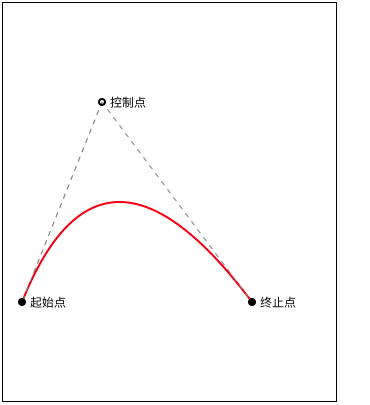
二阶贝塞尔曲线示意图
-
三阶贝塞尔曲线示意图

贝塞尔路径(UIBezierPath)是 iOS UIKit 框架中对 Quartz 2D 绘图的封装。实际操作起来,使用贝塞尔路径,更为方便。用法与 CGContextRef 类似,但是 OC 对其进行了封装,更加面向对象。
-
贝塞尔路径常用的方法
    // 设置起始点
    - (void)moveToPoint:(CGPoint)point;

    // 添加直线到一点
    - (void)addLineToPoint:(CGPoint)point;

    // 封闭闭路径
    - (void)closePath;

    // 返回一个描述椭圆的路径
    + (UIBezierPath *)bezierPathWithOvalInRect:(CGRect)rect;

    // 贝塞尔曲线
    - (void)addQuadCurveToPoint:(CGPoint)endPoint controlPoint:(CGPoint)controlPoint;

    // 三次贝塞尔曲线
    - (void)addCurveToPoint:(CGPoint)endPoint controlPoint1:(CGPoint)controlPoint1 controlPoint2:(CGPoint)controlPoint2;

    // 绘制圆弧
    - (void)addArcWithCenter:(CGPoint)center radius:(CGFloat)radius startAngle:(CGFloat)startAngle endAngle:(CGFloat)endAngle clockwise:(BOOL)clockwise;
2、基本图形的绘制
- 贝塞尔路径基本图形的绘制详情见 Quartz 2D 二维绘图 基本图形绘制
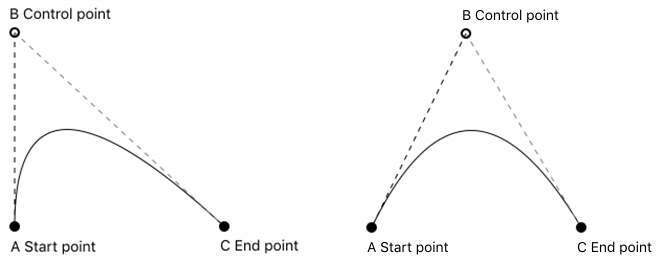
3、二三阶贝塞尔曲线示例
3.1 二阶贝塞尔曲线示例
-
QBezierPathView.h
@interface QBezierPathView : UIView @end -
QBezierPathView.m
@interface QBezierPathView () /// 路径 @property (nonatomic, strong) UIBezierPath *path; /// 起始点 @property (nonatomic, assign) CGPoint startP; /// 终止点 @property (nonatomic, assign) CGPoint endP; /// 控制点 @property (nonatomic, assign) CGPoint controlP; /// 线的颜色 @property (nonatomic, strong) UIColor *pathColor; /// 线的宽度 @property (nonatomic, assign) CGFloat pathWidth; /// 当前触摸的点 @property (nonatomic, assign) NSUInteger currentTouchP; @end @implementation QBezierPathView /// 初始化 - (instancetype)initWithFrame:(CGRect)frame { if (self = [super initWithFrame:frame]) { // 设置初始值 self.startP = CGPointMake(20, 300); self.endP = CGPointMake(250, 300); self.controlP = CGPointMake(100, 100); self.pathColor = [UIColor redColor]; self.pathWidth = 2; } return self; } /// 绘制二阶贝塞尔曲线 - (void)drawRect:(CGRect)rect { // 绘制贝塞尔曲线 self.path = [UIBezierPath bezierPath]; [self.path moveToPoint:self.startP]; [self.path addQuadCurveToPoint:self.endP controlPoint:self.controlP]; self.path.lineWidth = self.pathWidth; [self.pathColor setStroke]; [self.path stroke]; // 绘制辅助线 self.path = [UIBezierPath bezierPath]; self.path.lineWidth = 1; [[UIColor grayColor] setStroke]; CGFloat lengths[] = {5}; [self.path setLineDash:lengths count:1 phase:1]; [self.path moveToPoint:self.controlP]; [self.path addLineToPoint:self.startP]; [self.path stroke]; [self.path moveToPoint:self.controlP]; [self.path addLineToPoint:self.endP]; [self.path stroke]; // 绘制辅助点及信息 self.path = [UIBezierPath bezierPathWithArcCenter:self.startP radius:4 startAngle:0 endAngle:M_PI * 2 clockwise:YES]; [[UIColor blackColor] setStroke]; [self.path fill]; self.path = [UIBezierPath bezierPathWithArcCenter:self.endP radius:4 startAngle:0 endAngle:M_PI * 2 clockwise:YES]; [[UIColor blackColor] setStroke]; [self.path fill]; self.path = [UIBezierPath bezierPathWithArcCenter:self.controlP radius:3 startAngle:0 endAngle:M_PI * 2 clockwise:YES]; self.path.lineWidth = 2; [[UIColor blackColor] setStroke]; [self.path stroke]; CGRect startMsgRect = CGRectMake(self.startP.x + 8, self.startP.y - 7, 50, 20); [@"起始点" drawInRect:startMsgRect withAttributes:nil]; CGRect endMsgRect = CGRectMake(self.endP.x + 8, self.endP.y - 7, 50, 20); [@"终止点" drawInRect:endMsgRect withAttributes:nil]; CGRect control1MsgRect = CGRectMake(self.controlP.x + 8, self.controlP.y - 7, 50, 20); [@"控制点" drawInRect:control1MsgRect withAttributes:nil]; } /// 触摸开始 - (void)touchesBegan:(NSSet<UITouch *> *)touches withEvent:(nullable UIEvent *)event { // 获取触摸点位置 CGPoint startPoint = [touches.anyObject locationInView:self]; CGRect startR = CGRectMake(self.startP.x - 4, self.startP.y - 4, 8, 8); CGRect endR = CGRectMake(self.endP.x - 4, self.endP.y - 4, 8, 8); CGRect controlR = CGRectMake(self.controlP.x - 4, self.controlP.y - 4, 8, 8); // 判断当前触摸点 if (CGRectContainsPoint(startR, startPoint)) { self.currentTouchP = 1; } else if (CGRectContainsPoint(endR, startPoint)) { self.currentTouchP = 2; } else if (CGRectContainsPoint(controlR, startPoint)) { self.currentTouchP = 3; } } /// 触摸移动 - (void)touchesMoved:(NSSet<UITouch *> *)touches withEvent:(nullable UIEvent *)event { // 获取触摸点位置 CGPoint touchPoint = [touches.anyObject locationInView:self]; // 限制触摸点的边界 if (touchPoint.x < 0) { touchPoint.x = 0; } if (touchPoint.x > self.bounds.size.width) { touchPoint.x = self.bounds.size.width; } if (touchPoint.y < 0) { touchPoint.y = 0; } if (touchPoint.y > self.bounds.size.height) { touchPoint.y = self.bounds.size.height; } // 设置当前触摸点的值 switch (self.currentTouchP) { case 1: self.startP = touchPoint; break; case 2: self.endP = touchPoint; break; case 3: self.controlP = touchPoint; break; default: break; } // 刷新 [self setNeedsDisplay]; } /// 触摸结束 - (void)touchesEnded:(NSSet<UITouch *> *)touches withEvent:(nullable UIEvent *)event { // 释放之前的触摸点 self.currentTouchP = 0; } /// 触摸取消 - (void)touchesCancelled:(NSSet *)touches withEvent:(nullable UIEvent *)event { [self touchesEnded:touches withEvent:event]; } @end -
ViewController.m
CGRect frame = CGRectMake(20, 50, self.view.bounds.size.width - 40, 400); QBezierPathView *pathView = [[QBezierPathView alloc] initWithFrame:frame]; pathView.backgroundColor = [UIColor whiteColor]; pathView.layer.borderWidth = 1; [self.view addSubview:pathView]; -
效果
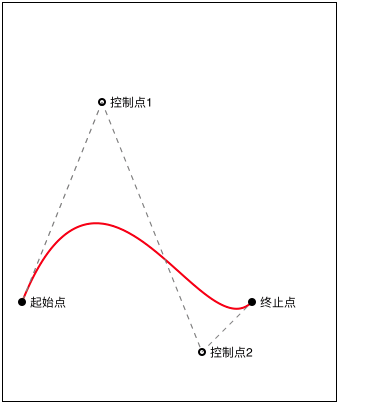
3.2 三阶贝塞尔曲线示例
-
QBezierPathView.h
@interface QBezierPathView : UIView @end -
QBezierPathView.m
@interface QBezierPathView : UIView @interface QBezierPathView () /// 路径 @property (nonatomic, strong) UIBezierPath *path; /// 起始点 @property (nonatomic, assign) CGPoint startP; /// 终止点 @property (nonatomic, assign) CGPoint endP; /// 控制点 @property (nonatomic, assign) CGPoint controlP1; @property (nonatomic, assign) CGPoint controlP2; /// 线的颜色 @property (nonatomic, strong) UIColor *pathColor; /// 线的宽度 @property (nonatomic, assign) CGFloat pathWidth; /// 当前触摸的点 @property (nonatomic, assign) NSUInteger currentTouchP; @end @implementation QBezierPathView /// 初始化 - (instancetype)initWithFrame:(CGRect)frame { if (self = [super initWithFrame:frame]) { // 设置初始值 self.startP = CGPointMake(20, 300); self.endP = CGPointMake(250, 300); self.controlP1 = CGPointMake(100, 100); self.controlP2 = CGPointMake(200, 350); self.pathColor = [UIColor redColor]; self.pathWidth = 2; } return self; } /// 绘制二阶贝塞尔曲线 - (void)drawRect:(CGRect)rect { // 绘制贝塞尔曲线 self.path = [UIBezierPath bezierPath]; [self.path moveToPoint:self.startP]; [self.path addCurveToPoint:self.endP controlPoint1:self.controlP1 controlPoint2:self.controlP2]; self.path.lineWidth = self.pathWidth; [self.pathColor setStroke]; [self.path stroke]; // 绘制辅助线 self.path = [UIBezierPath bezierPath]; self.path.lineWidth = 1; [[UIColor grayColor] setStroke]; CGFloat lengths[] = {5}; [self.path setLineDash:lengths count:1 phase:1]; [self.path moveToPoint:self.controlP1]; [self.path addLineToPoint:self.startP]; [self.path stroke]; [self.path moveToPoint:self.controlP1]; [self.path addLineToPoint:self.controlP2]; [self.path stroke]; [self.path moveToPoint:self.controlP2]; [self.path addLineToPoint:self.endP]; [self.path stroke]; // 绘制辅助点及信息 self.path = [UIBezierPath bezierPathWithArcCenter:self.startP radius:4 startAngle:0 endAngle:M_PI * 2 clockwise:YES]; [[UIColor blackColor] setStroke]; [self.path fill]; self.path = [UIBezierPath bezierPathWithArcCenter:self.endP radius:4 startAngle:0 endAngle:M_PI * 2 clockwise:YES]; [[UIColor blackColor] setStroke]; [self.path fill]; self.path = [UIBezierPath bezierPathWithArcCenter:self.controlP1 radius:3 startAngle:0 endAngle:M_PI * 2 clockwise:YES]; self.path.lineWidth = 2; [[UIColor blackColor] setStroke]; [self.path stroke]; self.path = [UIBezierPath bezierPathWithArcCenter:self.controlP2 radius:3 startAngle:0 endAngle:M_PI * 2 clockwise:YES]; self.path.lineWidth = 2; [[UIColor blackColor] setStroke]; [self.path stroke]; CGRect startMsgRect = CGRectMake(self.startP.x + 8, self.startP.y - 7, 50, 20); [@"起始点" drawInRect:startMsgRect withAttributes:nil]; CGRect endMsgRect = CGRectMake(self.endP.x + 8, self.endP.y - 7, 50, 20); [@"终止点" drawInRect:endMsgRect withAttributes:nil]; CGRect control1MsgRect = CGRectMake(self.controlP1.x + 8, self.controlP1.y - 7, 50, 20); [@"控制点1" drawInRect:control1MsgRect withAttributes:nil]; CGRect control2MsgRect = CGRectMake(self.controlP2.x + 8, self.controlP2.y - 7, 50, 20); [@"控制点2" drawInRect:control2MsgRect withAttributes:nil]; } /// 触摸开始 - (void)touchesBegan:(NSSet<UITouch *> *)touches withEvent:(nullable UIEvent *)event { // 获取触摸点位置 CGPoint startPoint = [touches.anyObject locationInView:self]; CGRect startR = CGRectMake(self.startP.x - 4, self.startP.y - 4, 8, 8); CGRect endR = CGRectMake(self.endP.x - 4, self.endP.y - 4, 8, 8); CGRect controlR1 = CGRectMake(self.controlP1.x - 4, self.controlP1.y - 4, 8, 8); CGRect controlR2 = CGRectMake(self.controlP2.x - 4, self.controlP2.y - 4, 8, 8); // 判断当前触摸点 if (CGRectContainsPoint(startR, startPoint)) { self.currentTouchP = 1; } else if (CGRectContainsPoint(endR, startPoint)) { self.currentTouchP = 2; } else if (CGRectContainsPoint(controlR1, startPoint)) { self.currentTouchP = 3; } else if (CGRectContainsPoint(controlR2, startPoint)) { self.currentTouchP = 4; } } /// 触摸移动 - (void)touchesMoved:(NSSet<UITouch *> *)touches withEvent:(nullable UIEvent *)event { // 获取触摸点位置 CGPoint touchPoint = [touches.anyObject locationInView:self]; // 限制触摸点的边界 if (touchPoint.x < 0) { touchPoint.x = 0; } if (touchPoint.x > self.bounds.size.width) { touchPoint.x = self.bounds.size.width; } if (touchPoint.y < 0) { touchPoint.y = 0; } if (touchPoint.y > self.bounds.size.height) { touchPoint.y = self.bounds.size.height; } // 设置当前触摸点的值 switch (self.currentTouchP) { case 1: self.startP = touchPoint; break; case 2: self.endP = touchPoint; break; case 3: self.controlP1 = touchPoint; break; case 4: self.controlP2 = touchPoint; break; default: break; } // 刷新 [self setNeedsDisplay]; } /// 触摸结束 - (void)touchesEnded:(NSSet<UITouch *> *)touches withEvent:(nullable UIEvent *)event { // 释放之前的触摸点 self.currentTouchP = 0; } /// 触摸取消 - (void)touchesCancelled:(NSSet *)touches withEvent:(nullable UIEvent *)event { [self touchesEnded:touches withEvent:event]; } @end -
ViewController.m
CGRect frame = CGRectMake(20, 50, self.view.bounds.size.width - 40, 400); QBezierPathView *pathView = [[QBezierPathView alloc] initWithFrame:frame]; pathView.backgroundColor = [UIColor whiteColor]; pathView.layer.borderWidth = 1; [self.view addSubview:pathView]; -
效果