1.web启动:
1)locust -f x.py --host=xxxxx.com
2)通过浏览器访问:
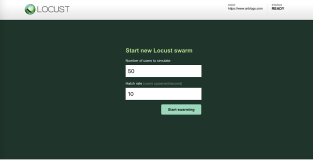
Number of users to simulate 设置虚拟用户数
Hatch rate(users spawned/second)每秒产生(启动)的虚拟用户数 , 点击Start swarming 按钮,开始运行性能测试。
2.no-web启动:
1)locust -f x.py --no-web --csv=result -c10 -r2 -t 1m
--no-web 表示不使用web界面运行测试
-c 设置虚拟用户数
-r 设置每秒启动虚拟用户数
-t 设置运行时间.
--csv=result将测试结果保存到当前.py目录中
3.分布式压测:
主从机中必须运行相同的测试代码(把主机中代码复制一份到多个从机中),主机负责收集测试数据,从机进行施压测试;
locust -f xxxoo.py --master
locust -f xxxoo.py --slave --master-host=master-ip
分布式压测no-web模式保存结果到主机中当前运行.py的目录中:]locust -f test2.py --csv=foobartt --no-web -c2 -t10s --master
实例脚本
伪代码:
from locust import HttpLocust, TaskSet, task
class WebsiteTasks(TaskSet):
def on_start(self): #进行初始化的工作,每个Locust用户开始做的第一件事
payload = {
"username": "test_user",
"password": "123456",
}
header = {
"User-Agent":"Mozilla/5.0 (Windows NT 6.1; WOW64) AppleWebKit/537.36 (KHTML, like Gecko) Chrome/58.0.3029.110 Safari/537.36",
}
self.client.post("/login",data=payload,headers=header)#self.client属性使用Python request库的所有方法,调用和使用方法和requests完全一致;
@task(5) #通过@task()装饰的方法为一个事务,方法的参数用于指定该行为的执行权重,参数越大每次被虚拟用户执行的概率越高,默认为1
def index(self):
self.client.get("/")
@task(1)
def about(self):
self.client.get("/about/")
class WebsiteUser(HttpLocust):
host = "" #被测系统的host,在终端中启动locust时没有指定--host参数时才会用到
task_set = WebsiteTasks #TaskSet类,该类定义用户任务信息,必填。这里就是:WebsiteTasks类名,因为该类继承TaskSet;
min_wait = 5000 #每个用户执行两个任务间隔时间的上下限(毫秒),具体数值在上下限中随机取值,若不指定默认间隔时间固定为1秒
max_wait = 15000
4.WebsiteTasks类中调用 WebsiteUser(HttpLocust)类中定义的字段和方法:
通过在WebsiteTasks类中self.locust.xxoo xxoo就是我们在WebsiteUser类中定义的字段或方法;
伪代码:
from locust import HttpLocust, TaskSet, taskimport hashlibimport queue class WebsiteTasks(TaskSet): @task(5) def index(self): data = self.locust.user_data_queue #获取WebsiteUser里面定义的ser_data_queue队列 md5_data=self.locust.md5_encryption() #获取WebsiteUser里面定义的md5_encryption()方法 self.client.get("/") class WebsiteUser(HttpLocust): host = "" task_set = WebsiteTasks min_wait = 5000 max_wait = 15000 user_data_queue = queue.Queue() def md5_encryption(self,star): '''md5加密方法''' obj = hashlib.md5() obj.update(bytes(star,encoding="utf-8")) result = obj.hexdigest() return result
伪代码中测试场景如何表达?
代码主要包含两个类:
WebsiteUser继承(HttpLocust,而HttpLocust继承自Locust)
WebsiteTasks继承(TaskSet)
3. WebsiteTasks(TaskSet),继承TaskSet,该类下面写需要请求的接口以及相关信息;
self.client调用get和post方法,和requests一样;
4. @task装饰该方法表示为用户行为,括号里面参数表示该行为的执行权重:数值越大,执行频率越高,不设置默认是1;
5. WebsiteUser()类用于设置生成负载的基本属性:
6.Locust类中,除了client属性,还有几个属性需要关注:
task_set ---> 指向一个TaskSet类,TaskSet类定义了用户的任务信息,该静态字段为必填;
max_wait/min_wait ---> 每个用户执行两个任务间隔的上下限(毫秒),具体数值在上下限中随机取值,若不指定则默认间隔时间为1秒;
host --->被测试系统的host,当在终端中启动locust时没有指定--host参数时才会用到;
weight--->同时运行多个Locust类时,用于控制不同类型的任务执行权重;
7.Locust流程,测试开始后,每个虚拟用户(Locust实例)运行逻辑都会遵守如下规律:
先执行WebsiteTasks中的on_start(只执行一次),作为初始化;
从WebsiteTasks中随机挑选(如果定义了任务间的权重关系,那么就按照权重关系随机挑选)一个任务执行;
根据Locust类中min_wait和max_wait定义的间隔时间范围(如果TaskSet类中也定义了min_wait或者max_wait,以TaskSet中的优先),在时间范围中随机取一个值,休眠等待;
重复2~3步骤,直到测试任务终止;
8.关联
在某些请求中,需要携带之前response中提取的参数,常见场景就是session_id。Python中可用通过re正则匹配,对于返回的html页面,可用采用lxml库来定位获取需要的参数;
from locust import HttpLocust, TaskSet, task
from lxml import etree
class WebsiteTasks(TaskSet):
def get_session(self,html): #关联例子
tages = etree.html(html)
return tages.xpath("//div【@class='btnbox'】/input【@name='session'】/@value")【0】
def on_start(self):
html = self.client.get('/index')
session = self.get_session(html.text)
payload = {
"username": "test_user",
"password": "123456",
'session' : session
}
header = {
"User-Agent":"Mozilla/5.0 //代码效果参考:http://www.zidongmutanji.com/bxxx/487128.html
(Windows NT 6.1; WOW64) AppleWebKit/537.36 (KHTML, like Gecko) Chrome/58.0.3029.110 Safari/537.36",}
self.client.post("/login",data=payload,headers=header)
@task(5)
def index(self):
self.client.get("/")
assert response【'ErrorCode'】==0 #断言
@task(1)
def about(self):
self.client.get("/about/")
class WebsiteUser(HttpLocust):
host = ""
task_set = WebsiteTasks
min_wait = 5000
max_wait = 15000
9.参数化
循环取数据,数据可重复使用
例如:模拟3个用户并发请求网页,共有100个URL地址,每个虚拟用户都会依次循环加载100个URL地址
from locust import TaskSet, task, HttpLocustclass UserBehavior(TaskSet): def on_start(self): self.index = 0 @task def test_visit(self): url = self.locust.share_data【self.index】 print('visit url: %s' % url) self.index = (self.index +//代码效果参考:http://www.zidongmutanji.com/bxxx/343912.html
1) % len(self.locust.share_data) self.client.get(url)class WebsiteUser(HttpLocust): host = '' task_set = UserBehavior share_data = 【'url1', 'url2', 'url3', 'url4', 'url5'】 min_wait = 1000 max_wait = 3000保证并发测试数据唯一性,不循环取数据;
所有并发虚拟用户共享同一份测试数据,并且保证虚拟用户使用的数据不重复;
例如:模拟3用户并发注册账号,共有9个账号,要求注册账号不重复,注册完毕后结束测试
采用队列
from locust import TaskSet, task, HttpLocustimport queueclass UserBehavior(TaskSet): @task def test_register(self): try: data = self.locust.user_data_queue.get() except queue.Empty: print('account data run out, test ended.') exit(0) print('register with user: {}, pwd: {}'\ .format(data【'username'】, data【'password'】)) payload = { 'username': data【'username'】, 'password': data【'password'】 } //代码效果参考:http://www.zidongmutanji.com/bxxx/244748.html
self.client.post('/register', data=payload)class WebsiteUser(HttpLocust): host = '' task_set = UserBehavior user_data_queue = queue.Queue() for index in range(100): data = { "username": "test%04d" % index, "password": "pwd%04d" % index, "email": "test%04d@debugtalk.test" % index, "phone": "186%08d" % index, } user_data_queue.put_nowait(data) min_wait = 1000 max_wait = 3000保证并发测试数据唯一性,循环取数据;
所有并发虚拟用户共享同一份测试数据,保证并发虚拟用户使用的数据不重复,并且数据可循环重复使用;
例如:模拟3个用户并发登录账号,总共有9个账号,要求并发登录账号不相同,但数据可循环使用;
from locust import TaskSet, task, HttpLocustimport queueclass UserBehavior(TaskSet): @task def test_register(self): try: data = self.locust.user_data_queue.get() except queue.Empty: print('account data run out, test ended') exit(0) print('register with user: {0}, pwd: {1}' .format(data【'username'】, data【'password'】)) payload = { 'username': data【'username'】, 'password': data【'password'】 } self.client.post('/register', data=payload) self.locust.user_data_queue.put_nowait(data)class WebsiteUser(HttpLocust): host = '' task_set = UserBehavior user_data_queue = queue.Queue() for index in range(100): data = { "username": "test%04d" % index, "password": "pwd%04d" % index, "email": "test%04d@debugtalk.test" % index, "phone": "186%08d" % index, } user_data_queue.put_nowait(data) min_wait = 1000 max_wait = 3000
10.断言(即检查点)
通过with self.client.get("url地址",catch_response=True) as response的形式;
response.status_code获取http响应码进行判断,失败后会加到统计错误表中;
python自带的断言assert失败后代码就不会向下走,且失败后不会被Locust报表统计进去;
默认不写参数catch_response=False断言无效,将catch_response=True才生效;
下面例子中:
首先使用python断言对接口返回值进行判断(python断言不通过,代码就不向下执行,get请求数为0),通过后对该接口的http响应是否为200进行判断;
@task
def all_interface(self):
#豆瓣图书api为例子
with self.client.get("",name="/LhcActivity/GetActConfig",catch_response=True) as response:
assert response.json()【'rating'】【'max'】==10 #python断言对接口返回值中的max字段进行断言
if response.status_code ==200: #对http响应码是否200进行判断
response.success()
else:
response.failure("GetActConfig【Failed!】")
11.locust的UI界面
1、启动界面
Number of users to simulate:设置模拟的用户总数
Hatch rate (users spawned/second):每秒启动的虚拟用户数
Start swarming:执行locust脚本
2、测试结果界面
PS:点击STOP可以停止locust脚本运行:
Type:请求类型,即接口的请求方法;
Name:请求路径;
requests:当前已完成的请求数量;
fails:当前失败的数量;
Median:响应时间的中间值,即50%的响应时间在这个数值范围内,单位为毫秒;
Average:平均响应时间,单位为毫秒;
Min:最小响应时间,单位为毫秒;
Max:最大响应时间,单位为毫秒;
Content Size:所有请求的数据量,单位为字节;
reqs/sec:每秒钟处理请求的数量,即QPS;
3、各模块说明
New test:点击该按钮可对模拟的总虚拟用户数和每秒启动的虚拟用户数进行编辑;
Statistics:类似于jmeter中Listen的聚合报告;
Charts:测试结果变化趋势的曲线展示图,分别为每秒完成的请求数(RPS)、响应时间、不同时间的虚拟用户数;
Failures:失败请求的展示界面;
Exceptions:异常请求的展示界面;
Download Data:测试数据下载模块, 提供三种类型的CSV格式的下载,分别是:Statistics、responsetime、exceptions;
参考文档: