@[toc]
前言: 放眼全网,我找不出一篇在 Ubuntu 里面搭建 DM 集群的文章,虽然 TiDB 官方推荐使用 CentOS 系统,但因为工作需要,不得不在 Ubantu 里面搭建 DM 集群用作数据迁移,期间碰到了一些部署问题,折磨了我很久,这次通过这篇文章造福大众吧。
测试环境说明
当前我在 Ubantu 中有如下三台主机:
| IP 映射主机名 | 功能 | CPU | 内存 | 备注 |
|---|---|---|---|---|
| master | master | 4核 | 8G | DM-master 主节点 |
| slave1 | worker | 4核 | 8G | DM-worker 工作节点 |
| slave2 | worker | 4核 | 8G | DM-worker 工作节点 |
使用的 Ubantu 版本为 Ubuntu 20.04.3 LTS ,后续通过这三台主机部署 TiDB DM 集群环境。
TiDB 单机环境部署
在三台机器中都部署好 TiDB 单机环境,分别在三台机器中执行下列命令:
1. 下载并安装 TiUP 工具
curl --proto '=https' --tlsv1.2 -sSf https://tiup-mirrors.pingcap.com/install.sh | sh

# 刷新全局变量
source /root/.bashrc
2. 在线快速部署单机集群
默认会选择当前的最新版进行部署。
tiup playground
部署完成后,会出现如下提示:

该窗口保持前台运行,后续命令在新增窗口中完成。
3. 使用 TiUP client 连接 TiDB
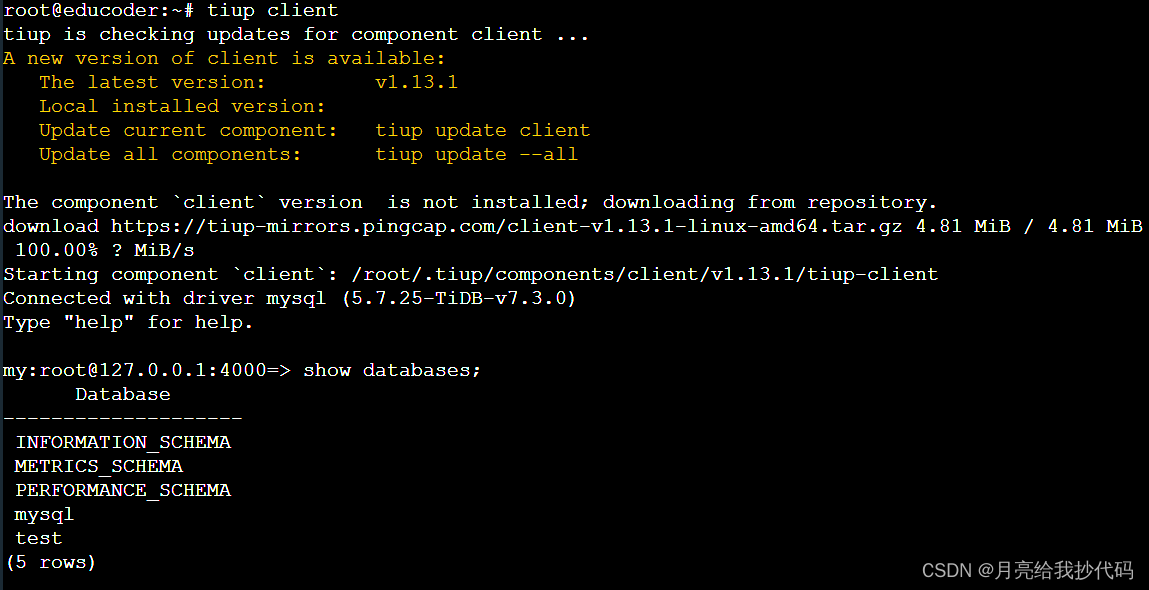
tiup client
进去后,执行 show databases; 命令,如果可以查询出库名,表示安装成功:
DM 集群部署
前提条件
- 每台机器已经安装并至少部署了单机版的 TiDB 集群。
- 每台机器均已防火墙关闭或者开放后续要用到的端口。
1. 免密设置
设置三台机器之间的免密登录。
# 在三台主机中都执行,生成公钥和私钥
ssh-keygen -t rsa

# 在 master 主机执行,复制公钥,期间需要输入 slave1 与 slave2 的密码
cat ~/.ssh/id_rsa.pub>> ~/.ssh/authorized_keys
ssh slave1 cat ~/.ssh/id_rsa.pub>> ~/.ssh/authorized_keys
ssh slave2 cat ~/.ssh/id_rsa.pub>> ~/.ssh/authorized_keys

# 在 slave1 与 slave2 主机执行,复制公钥
ssh master cat ~/.ssh/authorized_keys>> ~/.ssh/authorized_keys
2. 组件下载
在三台主机中都执行,安装下列组件。
# 用于提升权限以执行特权操作的命令
apt-get install sudo -y

# 安装服务管理器
apt-get install systemd -y
apt-get install systemctl -y

# 用于查看套接字统计和网络信息
apt-get install iproute2 -y

# 安装 TiDB DM 组件及其控制工具 DMctl
tiup install dm dmctl
这个地方是最折磨我的,因为日志里面并不会直接告诉你需要哪个命令,需要自己去找,官方也并没有提供说明需要下载这些 Ubantu 组件,可能因为我用的是 Ubantu,而官方更兼容的是 CentOS 系统。
装好上列组件后,你会规避以下问题:
2023-10-02T10:29:10.118+0800    DEBUG   retry error     {"error": "operation timed out after 2m0s"}

2023-10-02T10:29:10.117+0800    ERROR   SSHCommand      {"host": "master", "port": "22", "cmd": "export LANG=C; PATH=$PATH:/bin:/sbin:/usr/bin:/usr/sbin ss -ltn", "error": "Process exited with status 127", "stdout": "", "stderr": "bash: ss: command not found\n"}

System has not been booted with systemd as init system (PID 1). Can't operate.
Failed to connect to bus: Host is down
如果还是出现该问题,调大内存即可,我刚开是 6G,后面调到 8G 就没有这个错误了。
System has not been booted with systemd as init system (PID 1). Can't operate.
Failed to connect to bus: Host is down
3. DM 配置文件模板获取
我们可以通过在线或者离线的方式设置 DM 配置文件模板。
在线模板
官方提供了在线的 DM 配置文件模板获取,执行以下命令即可:
tiup dm template > topology.yaml
将模板下载到你指定的 yaml 文件中。
离线模板
---
# Global variables are applied to all deployments and as the default value of
# them if the specific deployment value missing.
global:
  user: "tidb"
  ssh_port: 22
  deploy_dir: "/dm-deploy"
  data_dir: "/dm-data"

server_configs:
  master:
    log-level: info
    # rpc-timeout: "30s"
    # rpc-rate-limit: 10.0
    # rpc-rate-burst: 40
  worker:
    log-level: info

master_servers:
  - host: 10.0.1.11
    name: master1
    # ssh_port: 22
    # port: 8261
    # peer_port: 8291
    # deploy_dir: "/dm-deploy/dm-master-8261"
    # data_dir: "/dm-data/dm-master-8261"
    # log_dir: "/dm-deploy/dm-master-8261/log"
    # numa_node: "0,1"
    # # The following configs are used to overwrite the `server_configs.master` values.
    config:
      log-level: info
      # rpc-timeout: "30s"
      # rpc-rate-limit: 10.0
      # rpc-rate-burst: 40
  - host: 10.0.1.18
    name: master2
  - host: 10.0.1.19
    name: master3

worker_servers:
  - host: 10.0.1.12
    # ssh_port: 22
    # port: 8262
    # deploy_dir: "/dm-deploy/dm-worker-8262"
    # log_dir: "/dm-deploy/dm-worker-8262/log"
    # numa_node: "0,1"
    # # Config is used to overwrite the `server_configs.dm-worker` values
    config:
      log-level: info
      # keepalive-ttl: 60
      # relay-keepalive-ttl: 1800 # since v2.0.2
      # relay-dir: "" # since v5.4.0
  - host: 10.0.1.19

monitoring_servers:
  - host: 10.0.1.13
    # ssh_port: 22
    # port: 9090
    # deploy_dir: "/tidb-deploy/prometheus-8249"
    # data_dir: "/tidb-data/prometheus-8249"
    # log_dir: "/tidb-deploy/prometheus-8249/log"
    # prometheus rule dir on TiUP machine
    # rule_dir: /home/tidb/prometheus_rule

grafana_servers:
  - host: 10.0.1.14
    # port: 3000
    # deploy_dir: /tidb-deploy/grafana-3000
    # grafana dashboard dir on TiUP machine
    # dashboard_dir: /home/tidb/dashboards

alertmanager_servers:
  - host: 10.0.1.15
    # ssh_port: 22
    # web_port: 9093
    # cluster_port: 9094
    # deploy_dir: "/tidb-deploy/alertmanager-9093"
    # data_dir: "/tidb-data/alertmanager-9093"
    # log_dir: "/tidb-deploy/alertmanager-9093/log"

# if monitored is set, node_exporter and blackbox_exporter will be
# deployed with the port specified, otherwise they are not deployed
# on the server to avoid conflict with tidb clusters
#monitored:
#  node_exporter_port: 9100
#  blackbox_exporter_port: 9115
来自 TiDB 官方的建议:
不建议在一台主机上运行太多 DM-worker。每个 DM-worker 至少应有 2 核 CPU 和 4 GiB 内存。
需要确保以下组件间端口可正常连通:
各
DM-master节点间的peer_port(默认为8291)可互相连通。各
DM-master节点可连通所有DM-worker节点的port(默认为8262)。各
DM-worker节点可连通所有DM-master节点的port(默认为8261)。TiUP 节点可连通所有
DM-master节点的port(默认为8261)。TiUP 节点可连通所有
DM-worker节点的port(默认为8262)。
4.DM 配置文件设置
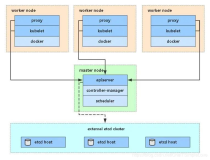
我这里设置了一台 DM-master 节点以及两台 DM-worker 节点,你可以根据需要调整或者新增其它节点,例如:监控节点、警报节点等。
在 /opt 目录下创建 topology.yaml 文件,然后添加了如下内容:
global:
  user: "root"
  ssh_port: 22
  deploy_dir: "/dm-deploy"
  data_dir: "/dm-data"

server_configs:
  master:
    log-level: info
  worker:
    log-level: info

master_servers:
  - host: master
    ssh_port: 22
    port: 8261

worker_servers:
  - host: slave1
    ssh_port: 22
    port: 8262
  - host: slave2
    ssh_port: 22
    port: 8262
5.部署与启动 DM 集群
我这里部署目前的最新版 v7.3.0,指定编写的配置文件,进行一键化自动部署。
tiup dm deploy dm-test 7.3.0 /opt/topology.yaml --user root
命令解析
tiup dm deploy为部署 DM 集群的命令,固定前缀。dm-test为 DM 集群的名称。7.3.0为指定的版本。/opt/topology.yaml指定配置文件。--user root指定操作用户为root账号。
这里不需要指定密码是因为我们之前做了三台机器的免密登录,如果你的免密存在问题,请按我的免密进行设置。
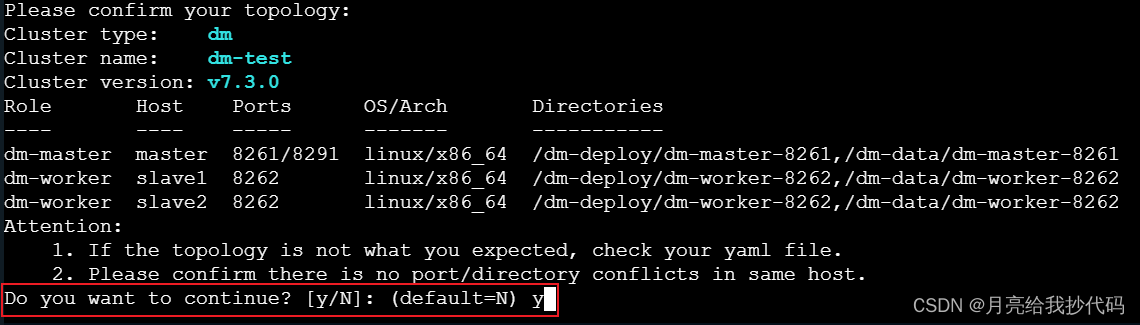
部署过程中需要进行确认:
部署完成后,会出现如下成功提示:

启动 DM 集群
这里要将 dm-test 修改为你设置的 DM 集群名称。
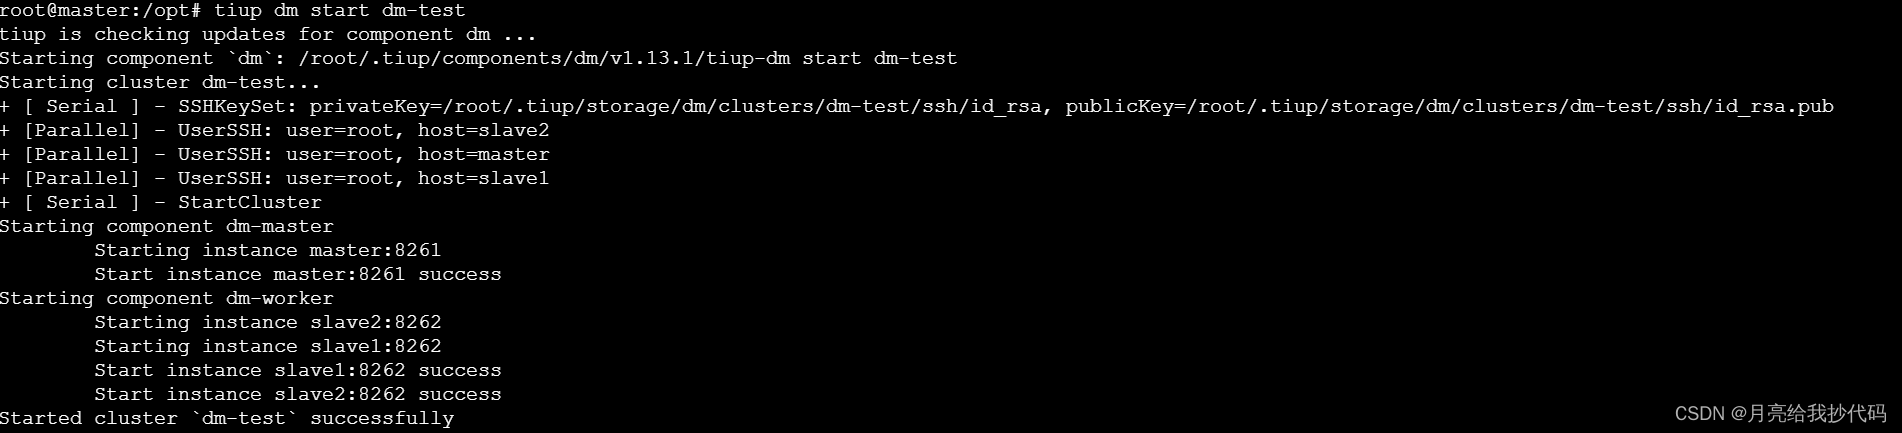
tiup dm start dm-test
正常启动后,会出现如下提示成功的信息:
我们可以通过如下命令来检测 DM 集群各节点是否运行正常:
tiup dm display dm-test

可以看到主节点和工作节点都是正常状态,DM 集群启动完成。