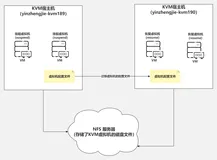
kvm虚拟机的克隆分为两种情况,本文也就通过以下两种情况进行克隆,克隆虚拟机为OEL5.8X64。
(1) KVM主机本机虚拟机直接克隆。
(2) 通过复制配置文件与磁盘文件的虚拟机复制克隆(适用于异机的静态迁移)。
1. 本机虚拟机直接克隆
(1) 查看虚拟机配置文件
[root@node1 ~]# cat /etc/libvirt/qemu/oeltest01.xml
01.<!--
02.WARNING: THIS IS AN AUTO-GENERATED FILE. CHANGES TO IT ARE LIKELY TO BE
03.OVERWRITTEN AND LOST. Changes to this xml configuration should be made using:
04.virsh edit oeltest01
05.or other application using the libvirt API.
06.-->
07.<domain type='kvm'>
08.<name>oeltest01</name>
09.<uuid>8f2bb4a7-c7ed-32aa-3676-9fb05923269d</uuid>
10.<memory unit='KiB'>524288</memory>
11.<currentMemory unit='KiB'>524288</currentMemory>
12.<vcpu placement='static'>1</vcpu>
13.<os>
14.<type arch='x86_64' machine='rhel6.4.0'>hvm</type>
15.<boot dev='hd'/>
16.</os>
17.<features>
18.<acpi/>
19.<apic/>
20.<pae/>
21.</features>
22.<clock offset='utc'/>
23.<on_poweroff>destroy</on_poweroff>
24.<on_reboot>restart</on_reboot>
25.<on_crash>restart</on_crash>
26.<devices>
27.<emulator>/usr/libexec/qemu-kvm</emulator>
28.<disk type='file' device='disk'>
29.<driver name='qemu' type='raw' cache='none'/>
30.<source file='/data/test01.img'/>
31.<target dev='hda' bus='ide'/>
32.<address type='drive' controller='0' bus='0' target='0' unit='0'/>
33.</disk>
34.<disk type='block' device='cdrom'>
35.<driver name='qemu' type='raw'/>
36.<target dev='hdc' bus='ide'/>
37.<readonly/>
38.<address type='drive' controller='0' bus='1' target='0' unit='0'/>
39.</disk>
40.<controller type='usb' index='0'>
41.<address type='pci' domain='0x0000' bus='0x00' slot='0x01' function='0x2'/>
42.</controller>
43.<controller type='ide' index='0'>
44.<address type='pci' domain='0x0000' bus='0x00' slot='0x01' function='0x1'/>
45.</controller>
46.<interface type='bridge'>
47.<mac address='52:54:00:82:39:01'/>
48.<source bridge='br0'/>
49.<model type='virtio'/>
50.<address type='pci' domain='0x0000' bus='0x00' slot='0x03' function='0x0'/>
51.</interface>
52.<serial type='pty'>
53.<target port='0'/>
54.</serial>
55.<console type='pty'>
56.<target type='serial' port='0'/>
57.</console>
58.<input type='tablet' bus='usb'/>
59.<input type='mouse' bus='ps2'/>
60.<graphics type='vnc' port='5910' autoport='no' listen='0.0.0.0'>
61.<listen type='address' address='0.0.0.0'/>
62.</graphics>
63.<video>
64.<model type='cirrus' vram='9216' heads='1'/>
65.<address type='pci' domain='0x0000' bus='0x00' slot='0x02' function='0x0'/>
66.</video>
67.<memballoon model='virtio'>
68.<address type='pci' domain='0x0000' bus='0x00' slot='0x04' function='0x0'/>
69.</memballoon>
70.</devices>
71.</domain>
虚拟机磁盘文件: /data/test01.img
虚拟机名称:oeltest01

(2) 开始克隆
# virt-clone -o oeltest01 -n oeltest02 -f /data/test02.img
说明:以oeltest01做为源,克隆oeltest01虚拟机,并创建名称为oeltest02虚拟机,使用磁盘文件/data/test02.img

(3) 启动虚拟机并配置主机名,IP地址等

[root@node1 data]# virsh console oeltest02
kvm控制台配置请见kvm虚拟化学习笔记(六)之kvm虚拟机控制台登录配置。
01.连接到域 oeltest02
02.Escape character is ^]
03.Found volume group "vg" using metadata type lvm2
04.2 logical volume(s) in volume group "vg" now active
05.Welcome to Oracle Linux Oracle Linux Server release 5.8
06.Press 'I' to enter interactive startup.
07.Starting udev: [ OK ]
08.Loading default keymap (us): [ OK ]
09.Setting hostname test01: [ OK ]
10.Setting up Logical Volume Management: 2 logical volume(s) in volume group "vg" now active
11.[ OK ]
12.Checking filesystems
13.Checking all file systems.
14.[/sbin/fsck.ext3 (1) -- /] fsck.ext3 -a /dev/vg/root
15./dev/vg/root: clean, 135384/1540096 files, 851398/1540096 blocks
16.[/sbin/fsck.ext3 (1) -- /boot] fsck.ext3 -a /dev/hda1
17./boot: clean, 39/26104 files, 26897/104388 blocks
18.[ OK ]
19.Remounting root filesystem in read-write mode: [ OK ]
20.Mounting local filesystems: [ OK ]
21.Enabling local filesystem quotas: [ OK ]
22.Enabling /etc/fstab swaps: [ OK ]
23.INIT: Entering runlevel: 5
24.Entering non-interactive startup
25.Applying Intel CPU microcode update: [ OK ]
26.Starting background readahead: [ OK ]
27.Checking for hardware changes [ OK ]
28.[ OK ] iSCSI daemon: [ OK ]
29.[ OK ]
30.Bringing up loopback interface: [ OK ]
31.Bringing up interface eth0:
32.Determining IP information for eth0... done.
33.[ OK ]
34.Starting auditd: [ OK ]
35.Starting system logger: [ OK ]
36.Starting kernel logger: [ OK ]
37.Starting irqbalance: [ OK ]
38.iscsid (pid 1555) is running...
39.Setting up iSCSI targets: iscsiadm: No records found
40.[ OK ]
41.Starting portmap: [ OK ]
42.Starting NFS statd: [ OK ]
43.Starting RPC idmapd: [ OK ]
44.Starting system message bus: [ OK ]
45.Starting o2cb: [ OK ]
46.[ OK ] Bluetooth services:[ OK ]
47.Mounting other filesystems: [ OK ]
48.Starting PC/SC smart card daemon (pcscd): [ OK ]
49.Starting acpi daemon: [ OK ]
50.Starting HAL daemon: [ OK ]
51.Starting hidd: [ OK ]
52.Starting monitoring for VG vg: 2 logical volume(s) in volume group "vg" monitored
53.[ OK ]
54.Starting autofs: Loading autofs4: [ OK ]
55.Starting automount: [ OK ]
56.[ OK ]
57.Starting hpiod: [ OK ]
58.Starting hpssd: [ OK ]
59.Starting sshd: [ OK ]
60.Starting cups: [ OK ]
61.Starting xinetd: [ OK ]
62.Starting console mouse services: [ OK ]
63.Starting crond: [ OK ]
64.Starting xfs: [ OK ]
65.Starting anacron: [ OK ]
66.[ OK ] atd: [ OK ]
67.Starting background readahead: [ OK ]
68.Starting yum-updatesd: [ OK ]
69.Starting Avahi daemon... [ OK ]
70.Starting smartd: hdc: drive_cmd: status=0x41 { DriveReady Error }
71.hdc: drive_cmd: error=0x04 { AbortedCommand }
72.ide: failed opcode was: 0xec
73.[ OK ]
74.Oracle Linux Server release 5.8
75.Kernel 2.6.18-308.el5 on an x86_64
76.test01 login: mtrr: type mismatch for f0000000,100000 old: uncachable new: write-combining
77.mtrr: type mismatch for f0000000,400000 old: uncachable new: write-combining
78.Oracle Linux Server release 5.8
79.Kernel 2.6.18-308.el5 on an x86_64
80.test01 login:
81.Oracle Linux Server release 5.8
82.Kernel 2.6.18-308.el5 on an x86_64
83.test01 login: root
84.Password:
85.Last login: Sat Sep 7 05:21:11 on ttyS0
86.[root@test01 ~]#
87.[root@test01 ~]#
88.[root@test01 ~]#
(4) 修改主机名,IP地址等
# vi /etc/hosts
# Do not remove the following line, or various programs
# that require network functionality will fail.
127.0.0.1 test02 localhost.localdomain localhost
::1 localhost6.localdomain6 localhost6
# vi /etc/sysconfig/network
NETWORKING=yes
NETWORKING_IPV6=no
HOSTNAME=test02
GATEWAY=192.168.233.2
修改IP地址
# vi /etc/sysconfig/network-script/ifcfg-eth0
# Virtio Network Device
DEVICE=eth0
BOOTPROTO=static
ONBOOT=yes
HWADDR=52:54:00:56:bd:2b
IPADDR=192.168.233.142
NETMASK=255.255.255.0
[root@test01 ~]# service network restart
Shutting down interface eth0: [ OK ]
Shutting down loopback interface: [ OK ]
Bringing up loopback interface: [ OK ]
Bringing up interface eth0: [ OK ]
[root@test01 ~]#
2. 复制配置文件与磁盘文件克隆
(1) 导入kvm虚拟机配置文件
这里采用oeltest01做为模板,进行克隆。
# virsh shutdown oeltest01

# virsh dumpxml oeltest01 > /etc/libvirt/qemu/oeltest03.xml

(2) 复制kvm虚拟机磁盘文件
本系列文章都是采用虚拟磁盘文件进行测试,没有使用lvm卷。
通过查看配置文件:虚拟磁盘位置<source file='/data/test01.img'/>

(3) 直接编辑修改配置文件
修改name,uuid,disk位置,vnc端口
此时还是将该配置文件注册进来,无法通过virsh edit进行编辑。
[root@node1 data]# vi /etc/libvirt/qemu/oeltest03.xml
01.<domain type='kvm'>
02. <name>oeltest03</name>
03. <uuid>8f2bb4a7-c7ed-32aa-3676-9fb05923260d</uuid>
04. <memory unit='KiB'>524288</memory>
05. <currentMemory unit='KiB'>524288</currentMemory>
06. <vcpu placement='static'>1</vcpu>
07. <os>
08. <type arch='x86_64' machine='rhel6.4.0'>hvm</type>
09. <boot dev='hd'/>
10. </os>
11. <features>
12. <acpi/>
13. <apic/>
14. <pae/>
15. </features>
16. <clock offset='utc'/>
17. <on_poweroff>destroy</on_poweroff>
18. <on_reboot>restart</on_reboot>
19. <on_crash>restart</on_crash>
20. <devices>
21. <emulator>/usr/libexec/qemu-kvm</emulator>
22. <disk type='file' device='disk'>
23. <driver name='qemu' type='raw' cache='none'/>
24. <source file='/data/test03.img'/>
25. <target dev='hda' bus='ide'/>
26. <address type='drive' controller='0' bus='0' target='0' unit='0'/>
27. </disk>
28. <disk type='block' device='cdrom'>
29. <driver name='qemu' type='raw'/>
30. <target dev='hdc' bus='ide'/>
31. <readonly/>
32. <address type='drive' controller='0' bus='1' target='0' unit='0'/>
33. </disk>
34. <controller type='usb' index='0'>
35. <address type='pci' domain='0x0000' bus='0x00' slot='0x01' function='0x2'/>
36. </controller>
37. <controller type='ide' index='0'>
38. <address type='pci' domain='0x0000' bus='0x00' slot='0x01' function='0x1'/>
39. </controller>
40. <interface type='bridge'>
41. <mac address='52:54:00:82:39:01'/>
42. <source bridge='br0'/>
43. <model type='virtio'/>
44. <address type='pci' domain='0x0000' bus='0x00' slot='0x03' function='0x0'/>
45. </interface>
46. <serial type='pty'>
47. <target port='0'/>
48. </serial>
49. <console type='pty'>
50. <target type='serial' port='0'/>
51. </console>
52. <input type='tablet' bus='usb'/>
53. <input type='mouse' bus='ps2'/>
54. <graphics type='vnc' port='5911' autoport='no' listen='0.0.0.0'>
55. <listen type='address' address='0.0.0.0'/>
56. </graphics>
57. <video>
58. <model type='cirrus' vram='9216' heads='1'/>
59. <address type='pci' domain='0x0000' bus='0x00' slot='0x02' function='0x0'/>
60. </video>
61. <memballoon model='virtio'>
62. <address type='pci' domain='0x0000' bus='0x00' slot='0x04' function='0x0'/>
63. </memballoon>
64. </devices>
65.</domain>
(4) 定义新虚拟机配置文件
[root@node1 data]# virsh define /etc/libvirt/qemu/oeltest03.xml

启动虚拟机
[root@node1 data]# virsh start oeltest03
域 oeltest03 已开始
(5) 登录虚拟机进行主机名,IP等修改
[root@node1 data]# virsh console oeltest03
连接到域 oeltest03
Escape character is ^]
Oracle Linux Server release 5.8
Kernel 2.6.18-308.el5 on an x86_64
test01 login: mtrr: type mismatch for f0000000,100000 old: uncachable new: write-combining
mtrr: type mismatch for f0000000,400000 old: uncachable new: write-combining
Oracle Linux Server release 5.8
Kernel 2.6.18-308.el5 on an x86_64
test01 login: root
Password:
Last login: Sat Sep 7 05:21:11 on ttyS0
[root@test01 ~]#
[root@test01 ~]#
修改主机名
# vi /etc/hosts
# Do not remove the following line, or various programs
# that require network functionality will fail.
127.0.0.1 test03 localhost.localdomain localhost
::1 localhost6.localdomain6 localhost6
# vi /etc/sysconfig/network
NETWORKING=yes
NETWORKING_IPV6=no
HOSTNAME=test03
GATEWAY=192.168.233.2
修改IP地址
# vi /etc/sysconfig/network-script/ifcfg-eth0
# Virtio Network Device
DEVICE=eth0
BOOTPROTO=static
ONBOOT=yes
HWADDR=52:54:00:56:bd:3b
IPADDR=192.168.233.143
NETMASK=255.255.255.0
service network restart
Shutting down interface eth0: [ OK ]
Shutting down loopback interface: [ OK ]
Bringing up loopback interface: [ OK ]
Bringing up interface eth0: [ OK ]
本文到此通过两种方式进行kvm虚拟机克隆,其实各有用处。
再次说明:本文克隆的虚拟机是oel5.8,如果克隆的虚拟机是RHEL/CentOS/OEL6.x操作系统,还需要修改/etc/udev/rules.d/70-persistent-net.rules文件。