接着上一篇如何创建一个滑出式导航面板(1)
现在靠向右边
在MainViewController.m文件中,将下面的import语句添加到文件顶部:
- #import "RightPanelViewController.h"
然后添加下面的常量定义:
- #define RIGHT_PANEL_TAG 3
接着在@interface里面添加如下属性,这样就容易获取到right view和它的当前状态:
- @property (nonatomic, strong) RightPanelViewController *rightPanelViewController;
- @property (nonatomic, assign) BOOL showingRightPanel;
然后是找到getRightView方法,并移除里面已有的代码,然后添加下面的代码进去:
- // init view if it doesn't already exist
- if (_rightPanelViewController == nil)
- {
- // this is where you define the view for the right panel
- self.rightPanelViewController = [[RightPanelViewController alloc] initWithNibName:@"RightPanelViewController" bundle:nil];
- self.rightPanelViewController.view.tag = RIGHT_PANEL_TAG;
- self.rightPanelViewController.delegate = _centerViewController;
- [self.view addSubview:self.rightPanelViewController.view];
- [self addChildViewController:self.rightPanelViewController];
- [_rightPanelViewController didMoveToParentViewController:self];
- _rightPanelViewController.view.frame = CGRectMake(0, 0, self.view.frame.size.width, self.view.frame.size.height);
- }
- self.showingRightPanel = YES;
- // set up view shadows
- [self showCenterViewWithShadow:YES withOffset:2];
- UIView *view = self.rightPanelViewController.view;
- return view;
上面的代码是拷贝getLeftView的,只不过其中的类和属性不同而已。如果对上面的代码有任何疑问,可以回头看看之前的解释。
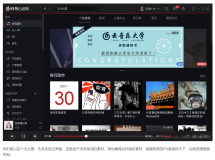
跟之前的一样,在xib文件中已经连接好了相关的IBAction和IBOutlet。下面是CenterViewController.xib文件的一个截图,显示出了puppies按钮的连接关系:

如上图所示,跟kitties按钮类似,puppies按钮连接到的IBOutlet是rightButton,IBAction是btnMovePanelLeft:。这个按钮控制着center panel的滑动以显示出右边的panel。
下面我们就来让panel移动起来吧。
打开CenterController.m文件,并将下面的代码添加到btnMovePanelLeft:中:
- UIButton *button = sender;
- switch (button.tag) {
- case 0: {
- [_delegate movePanelToOriginalPosition];
- break;
- }
- case 1: {
- [_delegate movePanelLeft];
- break;
- }
- default:
- break;
- }
同样,上面的代码与btnMovePanelRight:方法的实现没有什么不同。可以看到delegate的调用方法几乎是一样的。
因为之前已经实现了movePanelToOriginalPostion方法,所以剩下的任务只需要添加movePanelLeft 方法,并修改一下resetMainView以处理right panel即可。
将右边显示出来
打开MainViewController.m文件,并将下面的代码添加到movePanelLeft:方法中:
- UIView *childView = [self getRightView];
- [self.view sendSubviewToBack:childView];
- [UIView animateWithDuration:SLIDE_TIMING delay:0 options:UIViewAnimationOptionBeginFromCurrentState
- animations:^{
- _centerViewController.view.frame = CGRectMake(-self.view.frame.size.width + PANEL_WIDTH, 0, self.view.frame.size.width, self.view.frame.size.height);
- }
- completion:^(BOOL finished) {
- if (finished) {
- _centerViewController.rightButton.tag = 0;
- }
- }];
上面的代码与movePanelRight方法中的基本相同,这里就不再做过多的解释。
接着找到resetMainView方法,并用下面的代码替换已有的内容:
- // remove left and right views, and reset variables, if needed
- if (_leftPanelViewController != nil)
- {
- [self.leftPanelViewController.view removeFromSuperview];
- self.leftPanelViewController = nil;
- _centerViewController.leftButton.tag = 1;
- self.showingLeftPanel = NO;
- }
- if (_rightPanelViewController != nil)
- {
- [self.rightPanelViewController.view removeFromSuperview];
- self.rightPanelViewController = nil;
- _centerViewController.rightButton.tag = 1;
- self.showingRightPanel = NO;
- }
- // remove view shadows
- [self showCenterViewWithShadow:NO withOffset:0];
上面代码中唯一修改的地方是增加了一个if语句代码块:if(_rightPanelViewController != nil)。该语句判断一下right panel view是否存在,这跟之前检查left panel view一样,并且对_rightPanelViewController做相同的处理!
现在编译并运行程序,点击puppies按钮,将看到如下画面:

看起来不错吧?
在下面一节中,将介绍如何添加手势功能。
来回移动你的手指
在程序中添加手势处理非常简单,不要以为太复杂,很容易就能实现的!

还是在MainViewController.m文件中,找到setupView方法,并在方法的尾部添加如下一行代码:
- [self setupGestures];
接着,需要让MainViewController遵循UIGestureRecognizerDelegate协议——将UIGestureRecognizerDelegate添加到文件顶部的@interface中,添加后的代码如下:
- @interface MainViewController ()<UIGestureRecognizerDelegate, CenterViewControllerDelegate>
最后,找到setupGestures方法,并将下面的代码块添加进去:
- UIPanGestureRecognizer *panRecognizer = [[UIPanGestureRecognizer alloc] initWithTarget:self action:@selector(movePanel:)];
- [panRecognizer setMinimumNumberOfTouches:1];
- [panRecognizer setMaximumNumberOfTouches:1];
- [panRecognizer setDelegate:self];
- [_centerViewController.view addGestureRecognizer:panRecognizer];
上面的代码定义了一个UIPanGestureRecognizer,并将movePanel:方法赋值给它,当有检测到手势时,就会调用这个方法。(稍后需要实现movePanel:方法。)
接着,配置一下panRecognizer:将触摸的最大数目和最小数目设置为1,另外还设置了一下delegate。最后,将刚刚创建好的panRecognizer添加到_centerViewController.view中。
注意:更多关于UIGestureRecognizer类的信息, 请参考苹果官方文档。
接着,再做一件事情就可以用手势进行滑动了。
现在就来移动View吧
当识别到手势之后会调用movePanel:方法。所以,本文最后一个任务就是来实现一下这个方法。
movePanel:方法使用到两个属性:showPanel 和 preVelocity。在MainViewController.m文件的@interface中添加上这两个属性:
- @property (nonatomic, assign) BOOL showPanel;
- @property (nonatomic, assign) CGPoint preVelocity;
找到movePanel: 并将下面这段代码添加进去(很多哦!):
- [[[(UITapGestureRecognizer*)sender view] layer] removeAllAnimations];
- CGPoint translatedPoint = [(UIPanGestureRecognizer*)sender translationInView:self.view];
- CGPoint velocity = [(UIPanGestureRecognizer*)sender velocityInView:[sender view]];
- if([(UIPanGestureRecognizer*)sender state] == UIGestureRecognizerStateBegan) {
- UIView *childView = nil;
- if(velocity.x > 0) {
- if (!_showingRightPanel) {
- childView = [self getLeftView];
- }
- } else {
- if (!_showingLeftPanel) {
- childView = [self getRightView];
- }
- }
- // Make sure the view you're working with is front and center.
- [self.view sendSubviewToBack:childView];
- [[sender view] bringSubviewToFront:[(UIPanGestureRecognizer*)sender view]];
- }
- if([(UIPanGestureRecognizer*)sender state] == UIGestureRecognizerStateEnded) {
- if(velocity.x > 0) {
- // NSLog(@"gesture went right");
- } else {
- // NSLog(@"gesture went left");
- }
- if (!_showPanel) {
- [self movePanelToOriginalPosition];
- } else {
- if (_showingLeftPanel) {
- [self movePanelRight];
- } else if (_showingRightPanel) {
- [self movePanelLeft];
- }
- }
- }
- if([(UIPanGestureRecognizer*)sender state] == UIGestureRecognizerStateChanged) {
- if(velocity.x > 0) {
- // NSLog(@"gesture went right");
- } else {
- // NSLog(@"gesture went left");
- }
- // Are you more than halfway? If so, show the panel when done dragging by setting this value to YES (1).
- _showPanel = abs([sender view].center.x - _centerViewController.view.frame.size.width/2) > _centerViewController.view.frame.size.width/2;
- // Allow dragging only in x-coordinates by only updating the x-coordinate with translation position.
- [sender view].center = CGPointMake([sender view].center.x + translatedPoint.x, [sender view].center.y);
- [(UIPanGestureRecognizer*)sender setTranslation:CGPointMake(0,0) inView:self.view];
- // If you needed to check for a change in direction, you could use this code to do so.
- if(velocity.x*_preVelocity.x + velocity.y*_preVelocity.y > 0) {
- // NSLog(@"same direction");
- } else {
- // NSLog(@"opposite direction");
- }
- _preVelocity = velocity;
- }
上面代码中的注视已经有对功能做了不错的解释。下面是一些需要明白的关键信息:
- 需要处理3个状态:UIGestureRecognizerStateBegan, UIGestureRecognizerStateEnded和 UIGestureRecognizerStateChanged。
- translationInView:返回某个位置在指定view的坐标系中的point,并将这个point赋值给translatedPoint变量, 该变量用来设置view的位置。
- velocityInView: 返回每秒钟手势的移动速率。该变量有助于确定方向的改变。
你可以移动center,left和right view,并结合上面提到的3个状态,就可以确定手势的位置和速率/方向。
例如,如果手势方向是向右的,那么就显示出left panel。如果方向是向左,则显示出right panel。通过查看代码和相关的注释,就可以知道每一种状态都发生了什么。
再次编译并运行程序。现在应该可以把center panel滑动到左边或者右边了,并显示出center panel下面的panel。

何去何从
如果你完全按照本文介绍的方法来操作,那么恭喜你,你已经成为一名滑出式导航面板忍者了!

希望本文对你有用!这里是本文涉及到的完整示例工程:completed project file。
之前我提到过,如果你更喜欢已经定义好了的库,而不是DIY,那么请看SWRevealViewController. 看看这里的开发者相关介绍,很容易就能使用它了。