不需要账号密码的代理设置(Windows)
from selenium import webdriver
proxy = '127.0.0.1:9743'
chrome_options = webdriver.ChromeOptions()
chrome_options.add_argument('--proxy-server=http://' + proxy)
chrome = webdriver.Chrome(chrome_options=chrome_options)
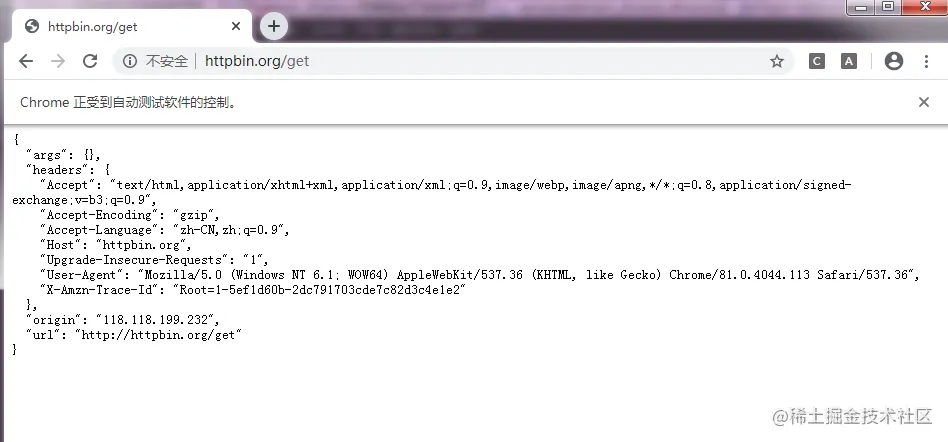
chrome.get('http://httpbin.org/get')
在这里我们通过 ChromeOption 来设置代理,在创建Chrom 对象的时候用 chrome_options 参数传 递即可。
使用阿布云的代理设置(Windows)
如果代理是认证代理,则设置方法相对比较麻烦,设置方法如下所示。这里需要在本地创建一个 manifest.json 置文件和 background.js 脚本来设置认证代理,运行代码 之后本地会生成一个 authProxy@http-dyn.abuyun.9020.zip 文件来保存当前配置
import base64
import string
from selenium import webdriver
from selenium.webdriver.chrome.options import Options
import zipfile
proxyHost = "http-dyn.abuyun.com"
proxyPort = "9020"
# 隧道身份信息
proxyUser = "xxxxxxxxxx"
proxyPass = "xxxxxxxxxx"
authStr = proxyUser + ":" + proxyPass
proxyAuth = "Basic " + base64.b64encode(authStr.encode('utf-8')).decode('utf-8')
def create_proxy_auth_extension(proxy_host, proxy_port,
                                proxy_username, proxy_password,
                                scheme='http', plugin_path=None):
    if plugin_path is None:
        plugin_path = r'./authProxy@http-dyn.abuyun.9020.zip'
    manifest_json = """
        {
            "version": "1.0.0",
            "manifest_version": 2,
            "name": "Abuyun Proxy",
            "permissions": [
                "proxy",
                "tabs",
                "unlimitedStorage",
                "storage",
                "<all_urls>",
                "webRequest",
                "webRequestBlocking"
            ],
            "background": {
                "scripts": ["background.js"]
            },
            "minimum_chrome_version":"22.0.0"
        }
        """
    background_js = string.Template(
        """
        var config = {
            mode: "fixed_servers",
            rules: {
                singleProxy: {
                    scheme: "${scheme}",
                    host: "${host}",
                    port: parseInt(${port})
                },
                bypassList: ["foobar.com"]
            }
          };
        chrome.proxy.settings.set({value: config, scope: "regular"}, function() {});
        function callbackFn(details) {
            return {
                authCredentials: {
                    username: "${username}",
                    password: "${password}"
                }
            };
        }
        chrome.webRequest.onAuthRequired.addListener(
            callbackFn,
            {urls: ["<all_urls>"]},
            ['blocking']
        );
        """
    ).substitute(
        host=proxy_host,
        port=proxy_port,
        username=proxy_username,
        password=proxy_password,
        scheme=scheme,
    )
    with zipfile.ZipFile(plugin_path, 'w') as zp:
        zp.writestr("manifest.json", manifest_json)
        zp.writestr("background.js", background_js)
    return plugin_path
proxy_auth_plugin_path = create_proxy_auth_extension(
    proxy_host=proxyHost,
    proxy_port=proxyPort,
    proxy_username=proxyUser,
    proxy_password=proxyPass)
chrome_options = Options()
chrome_options.add_argument("--start-maximized")
# 通过 option.add_extension 命令安装至chrome 通过插件实现动态代理
chrome_options.add_extension(proxy_auth_plugin_path)
# 多次打开浏览器,查看代理是否设置成功
for i in range(5):
    browser = webdriver.Chrome(chrome_options=chrome_options)
    browser.get('http://httpbin.org/get')

chromedriver 使用认证代理插件在无界面环境下运行
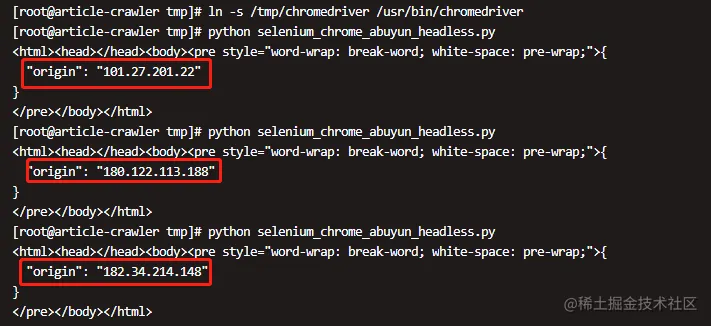
通过以上的代理设置后,会有一个普遍的问题,就是使用chromedriver添加认证代理时不能使用headless的问题。 装插件后无法直接使用无界面模式运行,可以通过虚拟现实技术间接实现pyvirtualdisplay
- 安装Xvfb虚拟界面工具
yum install Xvfb - 安装对应的python工具包
pip install pyvirtualdisplay
以下为测试代码
from selenium import webdriver
from pyvirtualdisplay import Display
# 在chromedriver启动前启动一个显示器
display = Display(visible=0, size=(800, 800))
display.start()
# 使用上个例子中制作好的阿布云代理插件
plugin_path = './authProxy@http-dyn.abuyun.9020.zip'
# 添加插件及必要的配置
option = webdriver.ChromeOptions()
option.add_argument('--no-sandbox')
option.add_extension(plugin_path)
# 测试查看效果
driver = webdriver.Chrome(chrome_options=option)
driver.get("https://httpbin.org/ip")
print(driver.page_source)
driver.quit()