前言
TinyMCE是一款开源、易用、UI时新、所见即所得的富文本编辑器。是富文本领域中的佼佼者。整体设计和模式,都是非常不错的。其提供的API 极其丰富和强大,简单点 就是专业牛👍,可供广大开发者用户,方便快捷的自行进行扩展或根据实际业务需求进行二次开发。下面我将分享3种方式,带你玩废 tinymce,适合接触过 tinymce 的 小伙伴,如果没有接触过 就随便看看,收藏也不吃亏,保不齐,后面用得上,知道可以这样玩就好了😎
利用tinymce官方提供的 UI 组件扩展
tinymce 官方提供还算多的 UI 组件,基本满足大部分应用场景,
| 组件名称 | 描述 |
| addAutocompleter() | 注册一个新的自动完成组件。当键入时在内容中匹配配置的字符串模式时,将触发自动完成器。Emoticons 和 Charmap 使用自动完成程序。有关创建自动完成器的信息, 可以查阅: UI Components - Autocompleter. |
| addButton() | 注册一个新的工具栏按钮,该按钮在通过键盘导航控件单击或激活时执行命令。有关创建基本工具栏按钮的信息,可以参阅: UI Components - Types of toolbar buttons: Basic button. |
| addContextForm() | 注册一个新的上下文表单项。与上下文菜单项类似,上下文表单是在匹配内容谓词时出现输入表单元素的项。上下文表单的一个示例是使用配置 { link_context_toolbar: true } 时的链接插件。当光标位于链接上时,会出现一个上下文输入表单,允许快速更改 url 字段。有关创建上下文表单的信息,可以参阅 : UI Components - Context forms. |
| addContextMenu() | 注册一个新的上下文菜单部分,该部分仅在匹配内容谓词时出现,例如,光标位于表内。有关创建上下文菜单的信息,可以参阅: UI Components - Context Menu. |
| addContextToolbar() | 注册一个新的上下文工具栏,该工具栏仅在内容谓词匹配时出现,例如光标位于图像元素上。有关创建上下文工具栏的信息, 可以参阅: UI Components - Context Toolbar. |
| addGroupToolbarButton() | 为工具栏注册一个新的组工具栏按钮。呈现一个工具栏按钮,单击该按钮会打开一个浮动工具栏。 注意:组工具栏按钮只能在使用浮动工具栏模式时使用。有关创建组工具栏按钮的信息, 可以参阅: UI Components - Types of toolbar buttons: Group toolbar button. |
| addIcon() | 注册一个新的 SVG 图标,图标名称引用可以由任何组件配置。该图标仅适用于为其配置的编辑器实例 |
| addMenuButton() | 注册一个新的菜单按钮。添加单击时打开菜单的工具栏按钮。菜单可以由 addMenuItem、addNestedMenuItem 或 addToggleMenuItem 创建的项目填充。有关创建工具栏菜单按钮的信息, 可以参阅: UI Components - Types of toolbar buttons: Menu button. |
| addMenuItem() | 注册一个新的菜单项,该菜单项在通过键盘导航控件单击或激活时执行命令。有关创建基本菜单项的信息, 可以参阅: UI Components - Custom menu items: Basic menu items. |
| addNestedMenuItem() | 注册一个新菜单项,当单击或被键盘导航控件激活时显示子菜单。子菜单可以由 addMenuItem、addNestedMenuItem 或 addToggleMenuItem 创建的项目填充。有关创建嵌套菜单项的信息, 可以参阅: UI Components - Custom menu items: Nested menu items. |
| addSidebar() | 注册一个新的侧边栏容器。此侧边栏容器附加到编辑器的右侧,可以打开或关闭。注册后,将创建一个具有相同侧边栏名称的新工具栏切换按钮。此外,还有一个 ToggleSidebar 命令和一个“ToggleSidebar”事件,可用于管理侧边栏的打开/关闭状态。tinycomments 插件为其 Ui 组件使用侧边栏。有关创建自定义侧边栏的信息,可以参阅: UI Components - Custom sidebar. |
| addSplitButton() | 为工具栏注册一个新的拆分按钮。高级列表插件使用拆分按钮来简化其功能。有关创建拆分工具栏按钮的信息, 可以参阅: UI Components - Types of toolbar buttons: Split button. |
| addToggleButton() | 为工具栏注册一个新的切换按钮。可以在配置中设置切换按钮状态。有关创建切换工具栏按钮的信息, 可以参阅: UI Components - Types of toolbar buttons: Toggle button. |
| addToggleMenuItem() | 注册一个新的菜单项,其作用类似于切换按钮,在菜单项中显示一个勾号以表示状态。有关创建切换菜单项的信息, 可以参阅: UI Components - Custom menu items: Toggle menu items. |
此外对话框(dialog)也是使用频次非常高的UI组件, 对话框(dialog)的主体必须是panel(单个面板)或tabpanel(面板的集合)。每个面板都可以包含面板组件,这些组件可以是布局组件,也可以是输入、按钮和文本等基本组件。通过提供的 UI 组件 你可以扩展成你想要的大部分组件
首行缩进
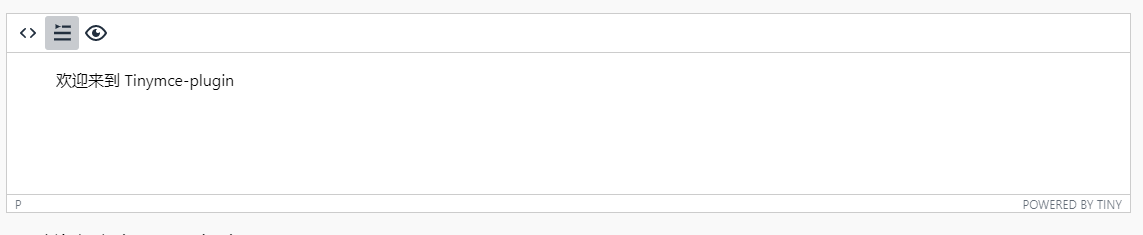
字间距

段落设置
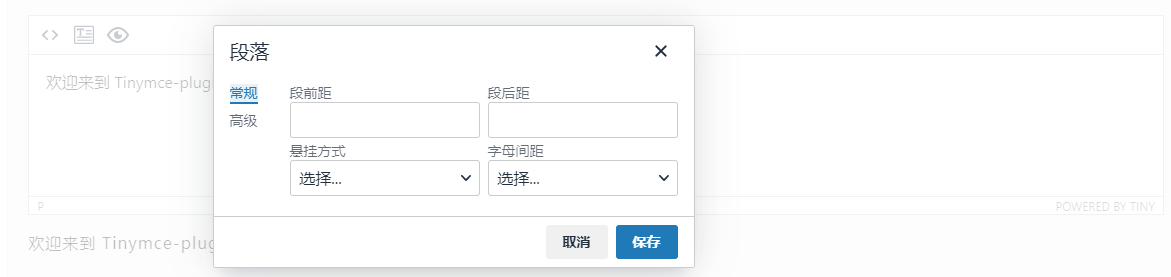
以上可以根据自己的实际业务,发挥自己的奇思妙想 去扩展成自己想要的
利用iframe引入自定义功能页面
利用iframe引入自定义功能页面 这种方式 ,自定义页面和tinymce本身相对独立,互不干扰,只需要控制好自定义功能页面 和 tinymce之间的数据通信就好了。这种开发模式,主要利用了 tinymce API的 URL 对话框 ( windowManager.openUrl(args: Object))URL 对话框配置具有三个主要部分,以匹配对话框 UI 的三个主要部分:
- 标题: 对话框的标题。这将显示在对话框的标题中。
- URL: 要在对话框中加载的外部页面的 URL。
- 按钮:( 可选)显示在对话框页脚中的页脚按钮数组。
主要配置参数有如下表格所示
| 名称 | 类型 | 是否必须 | 描述 |
| title | string | 必需 | 对话框的标题。 |
| url | string | 必需 | 要加载的外部页面的 URL。 |
| width | number | 可选的 | 对话框的宽度(以像素为单位)。 |
| height | number | 可选 | 对话框的高度(以像素为单位)。 |
| buttons | FooterButton[] | 可选 | 要在对话框的页脚中呈现的一组按钮。 |
| onAction | (dialogApi, details) => void |
可选 | 单击自定义类型页脚按钮时调用的函数。 |
| onCancel | (dialogApi) => void |
可选 | 取消对话框时调用的函数。对话框标题的关闭按钮和取消类型的页脚按钮调用此函数。 |
| onClose | () => void |
可选 | 对话框关闭时调用的函数。对话框标题的关闭按钮、取消类型的页脚按钮和对话框实例 API 的close()方法调用此函数。 |
| onMessage | (dialogApi, details) => void |
可选 | 从外部页面接收到消息时调用的函数。 |
还是先上手 先来搭个起手式 举一个小例子 一个不可编辑的输入框组件
先在创建一个 index.html
<htmllang="en"><head><metacharset="UTF-8"><metahttp-equiv="X-UA-Compatible"content="IE=edge"><metaname="viewport"content="width=device-width, initial-scale=1.0"><title>新窗口</title></head><body><div><inputid="inputID"type="text"value="Hello Five!"placeholder="Hello Five!"oninput="onInputFn()"></div><script>letinputID=document.getElementById('inputID') //初始化 如果有值 可以替换掉window.parent.openUrlData?inputID.value=window.parent.openUrlData: ''//使用window.parent.openUrlData 调用父页面的数据window.parent.openUrlData=inputID.value// 更新数据functiononInputFn(){ window.parent.openUrlData=inputID.value } </script></body></html>
核心代码
vargetOpenUrlValue=function (editor:any) {//获取选中节点的值作为初始值returneditor.dom.getParent(editor.selection.getNode(), '[data-tp-open-url]')?.innerText}
//@ts-ignorewindow.openUrlData=getOpenUrlValue(editor)||''// 利用window挂上全局 openUrlData 在iframe的子页面 使用window.parent.openUrlData 调用editor.windowManager.openUrl({
title: 'openUrl',
width: 300,
url: '/openUrl/index.html',//根据自己的实际路径来buttons: [
                {
type: 'cancel',
text: 'Close'                },
                {
type: 'custom',
text: 'Save',
name: 'save',
primary: true                },
            ],
onAction: function (api:any, details:any) {
switch (details.name) {
case'save':
//@ts-ignoreeditor.insertContent('<span style=""  contenteditable="false" >'+window.openUrlData+'</span>')
api.close();
break;
default:
break;
                }
            }
        });
}
效果如下图所示
当然基本搭好后开始美化,加上上下文菜单 和 按钮状态
添加按钮核心代码
//状态选择器适配器 用于更新按钮状态conststateSelectorAdapter=function (editor:any, selector:any) {
returnfunction (buttonApi:any) {
returneditor.selection.selectorChangedWithUnbind(selector.join(','),buttonApi.setActive).unbind;
  };
}
editor.ui.registry.addToggleButton('tp-openurl', {
icon: 'tp-openurl',
tooltip: 'Open Url',
onSetup: stateSelectorAdapter(editor, [
'*[data-tp-open-url]',
    ]),
onAction: () =>Main.create(editor,opt)
  });
varcmd=function (command:string) {
returnfunction () {
returneditor.execCommand(command);
    };
  };
//注册删除OpenUrl按钮editor.ui.registry.addButton('tpOpenUrlDelete', {
tooltip: 'Delete',
onAction: cmd('mceTpOpenUrlDelete'),
icon: 'table-delete-table',
  });
//注册编辑OpenUrl按钮editor.ui.registry.addButton('tpOpenUrlProps ', {
tooltip: 'Edit Open Url',
onAction: cmd('tpOpenUrl'),
icon: 'tp-openurl',
  });
//注册编辑OpenUrl 删除逻辑editor.addCommand('mceTpOpenurlDelete', function () {
try {
editor.dom.getParent(editor.selection.getNode(), '[data-tp-open-url]').remove() //获得选中节点 删除即可editor.focus();
    } catch (error) {
    }
  })
//上下文菜单配置 (已注册的按钮)varopenurlToolbar='tpOpenUrlProps \| tptpOpenUrlDelete'if (openurlToolbar.length>0) {
varisOpenurl=function (_openurl:any) {//判断是否是 Openurl 用于触发上下文菜单returneditor.dom.is(_openurl, '[data-tp-open-url]') &&editor.getBody().contains(_openurl);
    };
//注册上下文菜单editor.ui.registry.addContextToolbar('tp-openurl', {
predicate: isOpenurl,
items: openurlToolbar,
scope: 'node',
position: 'node'    });
  }
以上就是一个简单的小例子 可以自行扩展,例如接入 LogicFlow 流程图框架 ,开发成一个流程图插件,流程图插件,流程图部分是在vue2.0中开发,打包后通过 tinymce API URL 对话框 ( windowManager.openUrl(args: Object))引入核心代码
vargetLogicflowValue=function (editor:any) {
letobjectVal=editor.dom.getParent(editor.selection.getNode(), '[data-tp-logicflow]')
if(objectVal){
try {
//@ts-ignorewindow.tpLogicflow.tp_initData=objectVal.firstChild||''              } catch (error) {
//@ts-ignorewindow.tpLogicflow.tp_initData=''              }
  }else{
//@ts-ignorewindow.tpLogicflow.tp_initData=''  }
 };
getLogicflowValue(editor)
editor.windowManager.openUrl({
title: data.name,
size: 'large',
url: '/logicflow/index.html',
buttons: [
         {
type: 'cancel',
text: 'Close'         },
         {
type: 'custom',
text: 'Save',
name: 'save',
primary: true         },
       ],
onAction: function (api:any, details:any) {
switch (details.name) {
case'save'//@ts-ignorewindow.tpLogicflow.saveGraphSVGData().then(res=>{
editor.insertContent('<span data-tp-logicflow data-tp-logicflow contenteditable="false" data-tp-no-img><object data="'+res.url+'"  style="'+res.style+'"/></span>')
api.close();
break;
default:
break;
         }
       }
     });
利用 webCompontents 硬核扩展
想知道如何利用 webCompontent 扩展,哪肯定得先了解一下 webCompontents (必须得看 ,了解过的 麻烦再看一遍 😨)
什么是 Web Components?
Web Components 是一种 W3C标准 支持的组件化方案,通过它,我们可以编写可复用的 组件,同时,就如同写单页VUE模板,他并非一项单一的技术,而是由三项技术组成:
Custom elements(自定义元素):一组 JavaScript API,允许您定义 custom elements 及其行为,然后可以在您的用户界面中按照需要使用它们。
Shadow DOM(影子 DOM):一组 JavaScript API,用于将封装的“影子”DOM 树附加到元素(与主文档 DOM 分开呈现)并控制其关联的功能。通过这种方式,您可以保持元素的功能私有,这样它们就可以被 脚本化 和样式化,而不用担心与文档的其他部分发生冲突。
HTML templates(HTML 模板):<template>和 <slot> 元素使您可以编写不在呈现页面中显示的标记模板,类似比 Vue 的模板语法。然后它们可以作为自定义元素结构的基础被多次重用。
Web Components生命周期
和大多数框架一样,Web Components 也含有许多控制组件生命周期的方法。
- connectedCallback:当 custom elemen t首次被插入 DOM 时,被调用。
- disconnectedCallback:当 custom element 从 DOM 中删除时,被调用。
- adoptedCallback:当 custom element 被移动到新的文档时,被调用。
- attributeChangedCallback: 当 custom element 增加、删除、修改自身属性时,被调用。
他需要 搭配 observedAttributes 使用。
实现 web components 的基本方法
创建一个类或函数来指定 web 组件的功能,如果使用类,请使用 ECMAScript 2015 的类语法 (参阅类获取更多信息)。
使用 CustomElementRegistry.define() 方法注册您的新自定义元素 ,并向其传递要定义的元素名称、指定元素功能的类、以及可选的其所继承自的元素。
如果需要的话,使用Element.attachShadow() 方法将一个 shadow DOM 附加到自定义元素上。使用通常的 DOM 方法向 shadow DOM 中添加子元素、事件监听器等等。
如果需要的话,使用 和 定义一个 HTML 模板。再次使用常规 DOM 方法克隆模板并将其附加到您的 shadow DOM 中。
在页面任何您喜欢的位置使用自定义元素,就像使用常规 HTML 元素那样。
tinymce 相关配置和API
web components 基本概念 我们有了大致了解 ,下面还需要再了解一下 tinymce 中 需要用到的相关配置和API
配置只需要关注 custom_elements 配置就好了
custom_elements 这个配置的目的在于可以在tinymce编辑器中指定非 HTML 元素,换一话说 就是可以自定义标签(自定义节点,这个节点 与 Web Components 中的 Shadow DOM 相关联),告诉📣 tinymce 别把我自定义标签给过滤掉了 ,过滤了 就没法玩了。
因为是自定义的标签,并且是在 tinymce 编辑器中,所以出了这个编辑器,客户端的浏览器可是识别不了, 所以需要想个办法 转换一下。哪该如何转化,还得再了解认识一下 tinymce
tinymce 富文本中编辑的数据 会抽象为 ASTNode (可以直接看成tinymce官方自制简易版的DOM树),如打印出来如下图

既然有转换,哪就可以在 转换的过程作做文章,大概思路如下图,

利用 Parser 过滤器 和 Serializer 过滤器 分别对 HTML代码 转换为AST Node 进行过滤对自定义标签进行处理,AST Node 转化为 HTML代码过滤做处理。通过在两个过滤器中 ,针对自定义节点 加入对应的转换逻辑,实现无论是在编辑器环境中 还是客服的浏览器中都能完美的渲染出来
Parser : 即 API 中的 tinymce.html.DomParser
- 过滤器有 属性过滤器函数
addAttributeFilter(name: String, callback: Function)和 节点过滤函数addNodeFilter(name: String, callback: Function)
Serializer: 即 API 中的 tinymce.dom.serializer
- 过滤器有 属性过滤器函数
addAttributeFilter(name: String, callback: Function)和 节点过滤函数addNodeFilter(name: String, callback: Function)
硬核实现开始
先看看利用 web components 可以硬核扩展 那些好玩的东西👀。
折叠面板 : 多应用于文章内容过长 ,折叠/展开的内容区域提高用户的阅读体验

Tabs面板: 当页面的内容信息量较多,用标签页可以对其分类,一方面可以提升查找信息的效率,另一方面可以精简用户单次获取到的信息量,用户更能够专注于当前已显示的内容。

按钮组件: 可扩展丰富的按钮样式, 给文章展示类型更加丰富。
以实现一个 CodeGroup 组件(我给它的自定义的标签为tp-codegroup),便于多语言的代码展示。大概如下图所示一些场景(有图有真相),大概就是 开源项目的文档站,个人技术博客,等代码展示环节,实质也是一个 Tabs

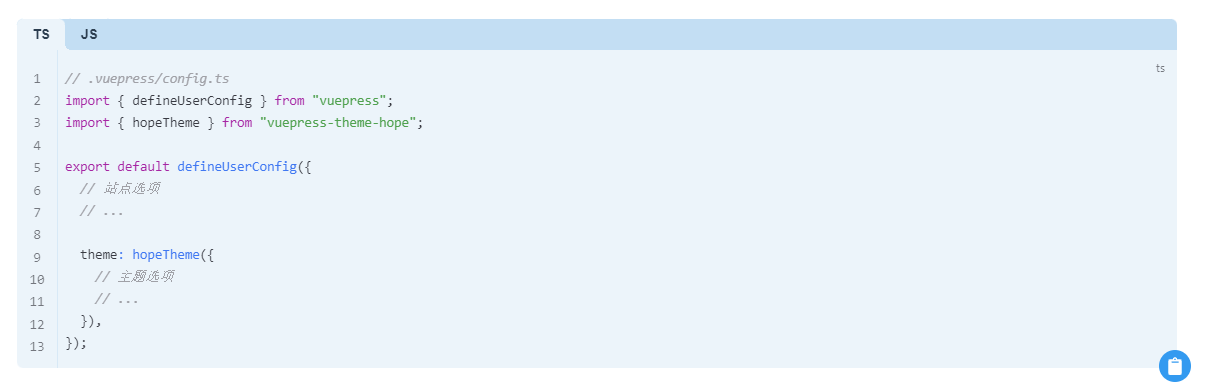
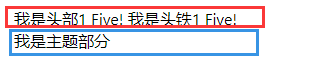
CodeGroup 组件 实现效果图大概如下

开始了 先搭一个CodeGroup 的架子出来,先来一个起手式
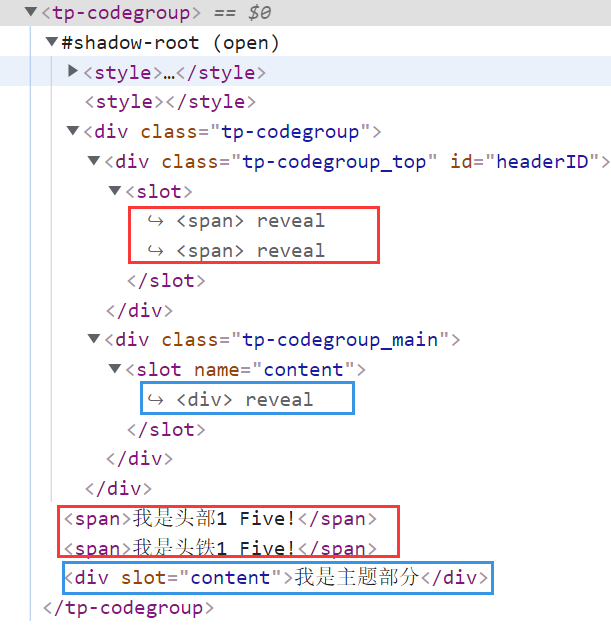
初始化一个自定义的 CodeGroup (WebComponent)
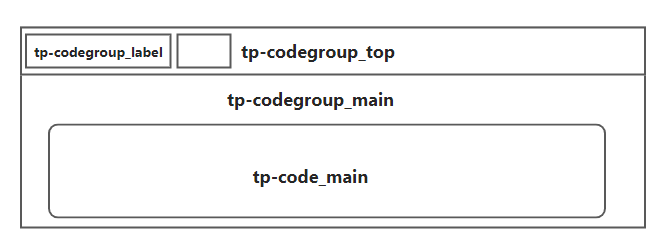
constsetupWebComponent= (win:any, doc:Document, editor:any) => {
consttemplate=doc.createElement('template');
conststaticStyle=document.createElement('style'); //固定样式 作于影子节点(根节点)constcustomStyle=document.createElement('style'); //自定义样式staticStyle.textContent=`body{padding: 0;margin: 0;}:host {overflow: hidden;display: block; }` ;
//HTML 模板 与 Vue 类似 这里我们需要实现 一个头部(tp-codegroup_top) 和 主体内容(tp-codegroup_main)两部分  template 如下template.innerHTML=`<div class="tp-codegroup"><div class="tp-codegroup_top" id="headerID"><slot></slot></div><div class="tp-codegroup_main"><slot name="content" ></slot></div></div>`// Create the conditional block custom element.// Familiarize yourself with web components and custom elements here:// https://developer.mozilla.org/en-US/docs/Web/Web_ComponentsclassTpCodegroupextendswin.HTMLElement {// 这里得是扩展的 tinymce 实例中的 Window 因为自定义的节点是插入 tinymce 的实例中。constructor() {
super();
// https://developer.mozilla.org/en-US/docs/Web/API/Element/attachShadowconstshadow=this.attachShadow({mode: 'open'});//closedtemplate.content.prepend(customStyle)
template.content.prepend(staticStyle)
this.shadowRoot.appendChild(template.content.cloneNode(true));
      }
  }
// Register our web component to the tag we want to use it as// https://developer.mozilla.org/en-US/docs/Web/API/CustomElementRegistry/definetry{
win.customElements.define('tp-codegroup' , TpCodegroup);//定义了一个自定义元素  }catch{
  }
}
<tp-codegroup><span>我是头部1 Five!</span><span>我是头铁1 Five!</span><divslot="content">我是主题部分</div></tp-codegrou>

架子搭好了,就得开始完善逻辑 并与 tinymce 结合起来
首先 先在 tinycme 的 custom_elements 的配置参数中添加 tp-codegroup
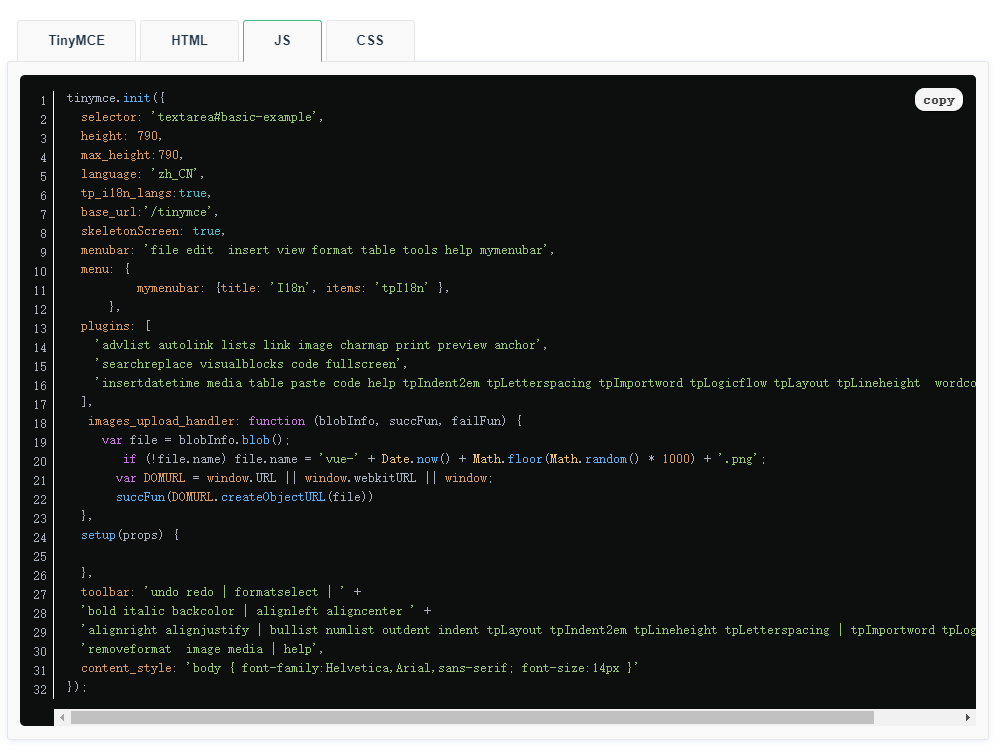
tinymce.init({
...
custom_elements: 'tp-codegroup',
...
})
然后 以插件的形式引入自定义的 WebComponent 核心代码如下
import { initPlugin } from'./core/webCompontent';
exportdefaultfunction(){
tinymce.PluginManager.add('tp-codegroup', function(editor: any, url: any) { //initPlugin(editor,opt)
return {
getMetadata: function () {
return  {
name: 'Codegroup',
url: 'https://github.com/tinymce-plugin',
          };
      }
  };
  });
};
webCompontent.ts
constheaderEditableFn= (self: any) => {
let_len=self.children.length;
// self.shadowRoot.querySelector('#headerID.tp-codegroup_top').setAttribute('style',( self.getAttribute("data-top-style") ? self.getAttribute("data-top-style") : ''));for (leti=_len-2; i>=0; i--) {
// self.tp$state.count ++;self.children[i].setAttribute("contenteditable", false);
self.children[i].setAttribute(
"class",
"tp-partition tp-codegroup_label"+ (i===0?" checked" : "")
    );
self.children[i].setAttribute("data-idx", i);
self.children[i].onkeydown=function () {
if (!this.innerText) {
console.dir(this.firstChild);
this.firstChild.innerText="five";
returnfalse;
      }
    };
self.children[i].firstChild?.setAttribute("class", "tp-component_inline");
self.children[i].firstChild?.setAttribute("data-idx", i);
self.children[i].firstChild?.setAttribute("contenteditable", true);
  }
self.removeChild= () => {
console.log("five");
  };
};
constcontentEditableFn= (self: any) => {
if (self.lastChild&&self.lastChild.className==="tp-codegroup_main") {
constpartitionEditableWrapper=self.lastChild;
//@ts-ignorepartitionEditableWrapper.setAttribute("contenteditable", false);
partitionEditableWrapper.setAttribute(
"class",
"tp-partition tp-codegroup_main"    );
partitionEditableWrapper.setAttribute("slot", "content");
if (self.lastChild.firstChild) {
self.lastChild.firstChild.setAttribute("class", "tp-code_main");
self.lastChild.firstChild.setAttribute(
"style",
"overflow: hidden; padding: 0 3px; max-height: 10000px; transition: all 0s"      );
self.lastChild.firstChild.setAttribute("contenteditable", true);
    }
let_len=self.lastChild.children.length;
for (leti=_len-1; i>0; i--) {
self.lastChild.children[i].setAttribute("class", "tp-code_main");
self.lastChild.children[i].setAttribute(
"style",
"overflow: hidden; padding: 0 3px; max-height: 0; transition: all 0s"      );
    }
  }
};
constconnectedCallback= (shadowRoot: any, dom: any) => {
letisChecked= (ele: any) => {
return (
      (ele.className&&ele.className.indexOf("tp-partition tp-codegroup_label") !==-1) ||      (ele.parentNode&&        ((ele.parentNode.className&&ele.parentNode.className.indexOf(
"tp-partition tp-codegroup_label"          ) !==-1) ||          (ele.parentNode.parentNode&&ele.parentNode.parentNode.className&&ele.parentNode.parentNode.className.indexOf(
"tp-partition tp-codegroup_label"            ) !==-1)))
    );
  };
shadowRoot    .getElementById("headerID")
    .addEventListener("click", function (e: any) {
if (isChecked(e.target)) {
let_idex=e.target.getAttribute("data-idx") ||e.target.parentNode.getAttribute("data-idx") ||"0";
let_tabsToplist=dom.querySelectorAll(
"div.tp-partition.tp-codegroup_label"        );
letoldSelectTopDom=dom.querySelector(
"div.tp-partition.tp-codegroup_label.checked"        );
oldSelectTopDom?oldSelectTopDom.setAttribute(
"class",
"tp-partition tp-codegroup_label"            )
          : "";
letnewSelectTopDom=_tabsToplist[_idex];
newSelectTopDom?newSelectTopDom.setAttribute(
"class",
"tp-partition tp-codegroup_label checked"            )
          : "";
let_tabslist=dom.querySelectorAll("div.tp-code_main");
letoldSelectDom=dom.querySelector(
"div.tp-code_main[contenteditable=true]"        );
oldSelectDom?oldSelectDom.setAttribute("contenteditable", false) ||            (oldSelectDom.style.maxHeight="0px")
          : "";
letnewSelectDom=_tabslist[_idex];
newSelectDom?newSelectDom.setAttribute("contenteditable", true) ||            (newSelectDom.style.maxHeight="10000px")
          : "";
      }
    });
};
constsetupWebComponent= (win: any, doc: Document, editor: any) => {
consttemplate=doc.createElement("template");
conststaticStyle=document.createElement("style"); //固定样式 作于影子节点(根节点)constcustomStyle=document.createElement("style"); //自定义样式staticStyle.textContent=`body{padding: 0;margin: 0;}:host {overflow: hidden;display: block; }.tp-codegroup {background: #1E1E1E;border-radius: 4px;overflow: hidden;}.tp-codegroup ::slotted(.tp-tabs_label) {display: none;}.tp-codegroup .tp-codegroup_top {border: none;padding: 4px 10px;}.tp-codegroup .tp-codegroup_top ::slotted(.tp-codegroup_label) {margin: 0;display: inline-block;vertical-align: bottom;box-sizing: border-box;cursor: default;background-color: #1E1E1E;line-height: 1.4;font-size: 20px;color: rgba(255,255,255,.9);font-weight: bold;border-bottom: 2px solid transparent;padding: 2px 4px;}.tp-codegroup .tp-codegroup_top ::slotted(.tp-codegroup_label.checked) {border-bottom: #43B984 2px solid;}.tp-codegroup  ::slotted(.tp-codegroup_main .tp-code_main){padding: 0 2px;}`;
//HTML 模板 与 Vue 类似 这里我们需要实现 一个头部 和 主体两部分  template 如下template.innerHTML=`<div class="tp-codegroup"><div class="tp-codegroup_top" id="headerID"><slot></slot></div><div class="tp-codegroup_main"><slot name="content" ></slot></div></div>`;
// Create the conditional block custom element.// Familiarize yourself with web components and custom elements here:// https://developer.mozilla.org/en-US/docs/Web/Web_ComponentsclassTpCodegroupextendswin.HTMLElement {
// 这里得是扩展的 tinymce 实例中的 Window 因为自定义的节点是插入 tinymce 的实例中。constructor() {
super();
this.setAttribute("contenteditable", false);
this.setAttribute("data-mce-tp-codegroup", "tp-codegroup");
// https://developer.mozilla.org/en-US/docs/Web/API/Element/attachShadowconstshadow=this.attachShadow({ mode: "open" }); //closedtemplate.content.prepend(customStyle);
template.content.prepend(staticStyle);
this.shadowRoot.appendChild(template.content.cloneNode(true));
    }
connectedCallback() {
//当 custom element首次被插入 DOM 时,被调用 ,这里我们需要对自定义标签进行调整改造,使其可以 点击切换//创建头部headerEditableFn(this);
//创建主体内容contentEditableFn(this);
//创建回调connectedCallback(this.shadowRoot, this);
    }
attributeChangedCallback() {
console.log("five222");
    }
staticgetobservedAttributes() {
return ["data-top-bg", "data-mce-tp-codegroup", "data-value"];
    }
  }
// Register our web component to the tag we want to use it as// https://developer.mozilla.org/en-US/docs/Web/API/CustomElementRegistry/definetry {
win.customElements.define("tp-codegroup", TpCodegroup); //定义了一个自定义元素  } catch {}
};
constparserFn= (node: any) => {
//解析组件标签node.attr({
"data-tp-codegroup": null,
"data-mce-tp-codegroup": "tp-codegroup",
"data-top-style": node.firstChild.attr("style"),
  });
while (node.firstChild.name==="input") {
node.firstChild.remove();
  }
let_node=node.firstChild.firstChild;
while (_node&&_node.name==="label") {
let_nextNode=_node.next;
letplaceTop=newtinymce.html.Node("div", 1);
_node.name="p";
_node.wrap(placeTop);
_node=_nextNode;
  }
letcodegroupMainFirst=node.lastChild.firstChild;
while (codegroupMainFirst&&codegroupMainFirst.name==="label") {
letcodegroupMainFirstNext=codegroupMainFirst.next.next;
codegroupMainFirst.remove();
codegroupMainFirst=codegroupMainFirstNext;
  }
node.firstChild.unwrap();
node.type=1;
node.name="tp-codegroup";
};
constserializerFn= (node: any) => {
//序列化组件标签node.attr({
"data-mce-tp-codegroup": null,
"data-tp-codegroup": "tp-codegroup",
contenteditable: null,
class: "tp-codegroup",
  });
letplaceTop=newtinymce.html.Node("div", 1);
placeTop.attr("class", "tp-codegroup_top");
placeTop.attr("style", node.attr("data-top-style"));
node.attr("data-top-style", null);
let_node=node.firstChild;
letcloneNodeList= [];
while (_node.attr("data-idx")) {
let_nextNode=_node.next;
_node.firstChild.name="label";
_node.firstChild.attr({
contenteditable: null,
"data-idx": null,
class: "tp-codegroup_label",
for: node.attr("data-id") +"code"+_node.attr("data-idx"),
    });
cloneNodeList.push(
newtinymce.html.Serializer().serialize(_node.firstChild)
    );
placeTop.append(_node.firstChild);
_node.remove();
_node=_nextNode;
  }
let_lastNode=node.lastChild.firstChild;
let_count=0;
while (_lastNode&&_lastNode.attr("class") ==="tp-codegroup_main") {
let_nextNode=_lastNode.next;
letplaceInput=newtinymce.html.Node("input", 1);
placeInput.shortEnded=true;
placeInput.attr({
id: node.attr("data-id") +"code"+_count,
type: "radio",
name: node.attr("data-id"),
    });
_count==0?placeInput.attr("checked", "") : "";
node.append(placeInput);
_lastNode.attr({
contenteditable: null,
style: null,
class: "tp-codegroup_main tp-code_main_"+_count,
    });
if (cloneNodeList[_count]) {
node.lastChild.insert(
newtinymce.html.DomParser().parse(cloneNodeList[_count]),
_lastNode,
true      );
_count++;
    }
_lastNode=_nextNode;
  }
node.append(placeTop);
node.firstChild.attr({
contenteditable: null,
class: "tp-codegroup_main",
  });
node.append(node.firstChild);
node.type=1;
//   node.attr('data-id', null)node.name="div";
};
varglobal$11=tinymce.util.Tools.resolve("tinymce.util.I18n");
varglobal$6=tinymce.util.Tools.resolve("tinymce.util.XHR");
exportconstinitPlugin= (editor: any, opt: pluginOpt) => {
editor.on("preInit", () => {
global$6.send({
url: "/tpcode.css",
async: false,
success: function (style: string) {
try {
editor.dom.addStyle(style);
        } catch (error) {}
      },
    });
constdoc=editor.getDoc();
constwin=editor.getWin();
setupWebComponent(win, doc, editor);
//解析editor.parser.addAttributeFilter(
"data-tp-codegroup",
      (nodes: { attr: (arg0: string) =>any }[]) => {
nodes&&nodes.forEach((node: { attr: (arg0: string) =>any }) => {
parserFn(node);
          });
      }
    );
//序列化editor.serializer.addAttributeFilter(
"data-mce-tp-codegroup",
      (nodes: any[]) => {
nodes&&nodes.forEach((node) => {
serializerFn(node);
          });
      }
    );
  });
};
成果效果: