本篇文章主要介绍
springBoot2.x配置文件解析流程,另外会涉及SpringBoot2.x在environment处理逻辑上相对于SpringBoot1.x的变动。 springCloud的配置文件解析,则是在此基础上做了扩展。在springBoot解析逻辑之前,添加了bootstrap配置,通过监听器BootstrapApplicationListener实现。后续有详细介绍。
一、概述
Environment是 spring 为运行环境提供的高度抽象接口,项目运行中的所有相关配置都基于此接口。 springBoot对此接口做了扩展。 先来看一个简单的SpringBoot应用。
@org.springframework.boot.autoconfigure.SpringBootApplication
@RestController
public class SpringBootApplication {
  @Autowired
  Environment environment;
  @RequestMapping(value = "/environment", method = RequestMethod.GET)
  public String environment() {
    //输出environment 类型
    System.out.println(environment.getClass());
    return JSON.toJSONString(environment);
  }
}
复制代码
上述代码注入的environment具体对象是什么呢? 跟着源码,搜寻答案。
二、源码分析
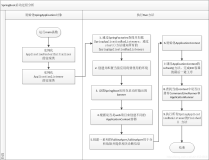
前面springBoot启动流程中,我们提到了有个prepareEnvironment方法:
ConfigurableEnvironment environment = prepareEnvironment(listeners,
          applicationArguments);
复制代码
private ConfigurableEnvironment prepareEnvironment(
      SpringApplicationRunListeners listeners,
      ApplicationArguments applicationArguments) {
    // Create and configure the environment
    //1、初始化environment
    ConfigurableEnvironment environment = getOrCreateEnvironment();
    //2、加载默认配置
    configureEnvironment(environment, applicationArguments.getSourceArgs());
    //3、通知环境监听器,加载项目中的配置文件
    listeners.environmentPrepared(environment);
    bindToSpringApplication(environment);
    if (this.webApplicationType == WebApplicationType.NONE) {
      environment = new EnvironmentConverter(getClassLoader())
          .convertToStandardEnvironmentIfNecessary(environment);
    }
    ConfigurationPropertySources.attach(environment);
    return environment;
  }
复制代码
接下来对上面三步进行详细分析:
1、初始化environment:
private ConfigurableEnvironment getOrCreateEnvironment() {
    if (this.environment != null) {
      return this.environment;
    }
    //springboot应用返回的environment
    if (this.webApplicationType == WebApplicationType.SERVLET) {
      return new StandardServletEnvironment();
    }
    return new StandardEnvironment();
  }
复制代码
可以看到根据类型进行匹配 environment,获取到StandardServletEnvironment,该实例直接注入到spring容器,所以上面示例代码的输出的类型就是StandardServletEnvironment。
StandardServletEnvironment是整个springboot应用运行环境的实现类,后面所有关于配置和环境的操作都基于此类。看一下该类的结构:

首先,StandardServletEnvironment的初始化必定会导致父类方法的初始化:AbstractEnvironment:
public AbstractEnvironment() {
    //从名字可以看出加载我们的自定义配置文件
    customizePropertySources(this.propertySources);
    if (logger.isDebugEnabled()) {
      logger.debug("Initialized " + getClass().getSimpleName() + " with PropertySources " + this.propertySources);
    }
  }
复制代码
在构造方法中调用自定义配置文件,spring的一贯做法,模板模式,调用的是实例对象的自定义逻辑:
@Override
  protected void customizePropertySources(MutablePropertySources propertySources) {
    propertySources.addLast(new StubPropertySource(SERVLET_CONFIG_PROPERTY_SOURCE_NAME));
    propertySources.addLast(new StubPropertySource(SERVLET_CONTEXT_PROPERTY_SOURCE_NAME));
    if (JndiLocatorDelegate.isDefaultJndiEnvironmentAvailable()) {
      propertySources.addLast(new JndiPropertySource(JNDI_PROPERTY_SOURCE_NAME));
    }
    super.customizePropertySources(propertySources);
  }
复制代码
因为该配置类是基于web环境,所以先加载和 servlet有关的参数,addLast放在最后:
/** System environment property source name: {@value} */
  public static final String SYSTEM_ENVIRONMENT_PROPERTY_SOURCE_NAME = "systemEnvironment";
  /** JVM system properties property source name: {@value} */
  public static final String SYSTEM_PROPERTIES_PROPERTY_SOURCE_NAME = "systemProperties";
复制代码
该类又是对StandardEnvironment的扩展,这里会调用super.customizePropertySources(propertySources);:
@Override
  protected void customizePropertySources(MutablePropertySources propertySources) {
    propertySources.addLast(new MapPropertySource(SYSTEM_PROPERTIES_PROPERTY_SOURCE_NAME, getSystemProperties()));
    propertySources.addLast(new SystemEnvironmentPropertySource(SYSTEM_ENVIRONMENT_PROPERTY_SOURCE_NAME, getSystemEnvironment()));
  }
复制代码
/** System environment property source name: {@value} */
  public static final String SYSTEM_ENVIRONMENT_PROPERTY_SOURCE_NAME = "systemEnvironment";
  /** JVM system properties property source name: {@value} */
  public static final String SYSTEM_PROPERTIES_PROPERTY_SOURCE_NAME = "systemProperties";
复制代码
可以看到放入顺序是永远放在最后面,也就是先加入的在前面。systemProperties是systemEnvironment在前面,这点很重要。因为前面的配置会覆盖后面的配置,也就是说系统变量中的配置比系统环境变量中的配置优先级更高。如下:

2)加载默认配置:
protected void configureEnvironment(ConfigurableEnvironment environment,
      String[] args) {
    //加载启动命令行配置属性
    configurePropertySources(environment, args);
    //设置active属性
    configureProfiles(environment, args);
  }
复制代码
这里接收的参数是ConfigurableEnvironment,也就是StandardServletEnvironment的父类。 继续跟进configurePropertySources方法:
protected void configurePropertySources(ConfigurableEnvironment environment,
      String[] args) {
    //获取配置存储集合
    MutablePropertySources sources = environment.getPropertySources();
    //判断是否有默认配置,默认为空
    if (this.defaultProperties != null && !this.defaultProperties.isEmpty()) {
      sources.addLast(
          new MapPropertySource("defaultProperties", this.defaultProperties));
    }
    //加载命令行配置
    if (this.addCommandLineProperties && args.length > 0) {
      String name = CommandLinePropertySource.COMMAND_LINE_PROPERTY_SOURCE_NAME;
      if (sources.contains(name)) {
        PropertySource<?> source = sources.get(name);
        CompositePropertySource composite = new CompositePropertySource(name);
        composite.addPropertySource(new SimpleCommandLinePropertySource(
            "springApplicationCommandLineArgs", args));
        composite.addPropertySource(source);
        sources.replace(name, composite);
      }
      else {
        sources.addFirst(new SimpleCommandLinePropertySource(args));
      }
    }
  }
复制代码
上述代码主要做两件事: 一是判断SpringBootApplication是否指定了默认配置, 二是加载默认的命令行配置。
上面有个核心关键类出现了,MutablePropertySources,mutable中文是可变的意思,该类封装了属性资源集合:
public class MutablePropertySources implements PropertySources {
  private final Log logger;
  private final List<PropertySource<?>> propertySourceList = new CopyOnWriteArrayList<>();
}
复制代码
该类又是如何使用的呢?

这里的设计很巧妙,将MutablePropertySources传递到文件解析器propertyResolver中,同时AbstractEnvironment又实现了文件解析接口ConfigurablePropertyResolver,所以AbstractEnvironment就有了文件解析的功能。所以StandardServletEnvironment文件解析功能实际委托给了PropertySourcesPropertyResolver来实现。
继续看一下configureProfiles(environment, args);方法:
protected void configureProfiles(ConfigurableEnvironment environment, String[] args) {
    environment.getActiveProfiles(); // ensure they are initialized
    // But these ones should go first (last wins in a property key clash)
    Set<String> profiles = new LinkedHashSet<>(this.additionalProfiles);
    profiles.addAll(Arrays.asList(environment.getActiveProfiles()));
    environment.setActiveProfiles(StringUtils.toStringArray(profiles));
  }
复制代码
该方法主要将SpringBootApplication中指定的additionalProfiles文件加载到environment中,一般默认为空。 该变量的用法,在项目启动类中,需要显示创建SpringApplication实例,如下:
SpringApplication springApplication = new SpringApplication(MyApplication.class);
    //设置profile变量
        springApplication.setAdditionalProfiles("prd");
        springApplication.run(MyApplication.class,args);
复制代码
3、通知环境监听器,加载项目中的配置文件
触发监听器:
listeners.environmentPrepared(environment);
复制代码
在SpringBoot2 | SpringBoot启动流程源码分析(一)中提到了该方法通知的监听器,和配置文件有关的监听器类型为ConfigFileApplicationListener,监听到事件时执行的方法:
@Override
  public void postProcessEnvironment(ConfigurableEnvironment environment,
      SpringApplication application) {
    //加载项目中的配置文件
    addPropertySources(environment, application.getResourceLoader());
    configureIgnoreBeanInfo(environment);
    bindToSpringApplication(environment, application);
  }
复制代码
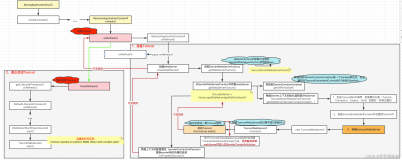
继续跟进去,会发现一个核心内部类 Loader ,配置文件加载也就委托给该内部类来处理:
private class Loader {
    private final Log logger = ConfigFileApplicationListener.this.logger;
    //当前环境
    private final ConfigurableEnvironment environment;
    //类加载器,可以在项目启动时通过 SpringApplication 构造方法指定,默认采用 Launcher.AppClassLoader加载器
    private final ResourceLoader resourceLoader;
    //资源加载工具类
    private final List<PropertySourceLoader> propertySourceLoaders;
    //LIFO队列
    private Queue<String> profiles;
    //已处理过的文件
    private List<String> processedProfiles;
    private boolean activatedProfiles;
    Loader(ConfigurableEnvironment environment, ResourceLoader resourceLoader) {
      this.environment = environment;
      //获取类加载器
      this.resourceLoader = resourceLoader == null ? new DefaultResourceLoader()
          : resourceLoader;
      //获取propertySourceLoaders
      this.propertySourceLoaders = SpringFactoriesLoader.loadFactories(
          PropertySourceLoader.class, getClass().getClassLoader());
    }
    //......
}
复制代码
上面propertySourceLoaders通过 SpringFactoriesLoader 获取当前项目中类型为 PropertySourceLoader 的所有实现类,默认有两个实现类,如下图:

继续来看主要解析方法:load():
public void load() {
      this.profiles = Collections.asLifoQueue(new LinkedList<Profile>());
      this.processedProfiles = new LinkedList<>();
      this.activatedProfiles = false;
      this.loaded = new LinkedHashMap<>();
      //初始化逻辑
      initializeProfiles();
      //定位解析资源文件
      while (!this.profiles.isEmpty()) {
        Profile profile = this.profiles.poll();
        load(profile, this::getPositiveProfileFilter,
            addToLoaded(MutablePropertySources::addLast, false));
        this.processedProfiles.add(profile);
      }
      //对加载过的配置文件进行排序
      load(null, this::getNegativeProfileFilter,
          addToLoaded(MutablePropertySources::addFirst, true));
      addLoadedPropertySources();
    }
复制代码
跟进去上面初始化方法:
private void initializeProfiles() {
      Set<Profile> initialActiveProfiles = initializeActiveProfiles();
      this.profiles.addAll(getUnprocessedActiveProfiles(initialActiveProfiles));
      //如果为空,添加默认的profile
      if (this.profiles.isEmpty()) {
        for (String defaultProfileName : this.environment.getDefaultProfiles()) {
          Profile defaultProfile = new Profile(defaultProfileName, true);
          if (!this.profiles.contains(defaultProfile)) {
            this.profiles.add(defaultProfile);
          }
        }
      }
      // The default profile for these purposes is represented as null. We add it
      // last so that it is first out of the queue (active profiles will then
      // override any settings in the defaults when the list is reversed later).
      //这里添加一个为null的profile,主要是加载默认的配置文件
      this.profiles.add(null);
    }
复制代码
上面主要做了两件事情:
1)判断是否指定了profile,如果没有,添加默认环境:default。后面的解析流程会解析default文件,比如:application-default.yml、application-default.properties。
注意:在第2步中我们提到了
additionalProfiles属性,如果我们通过该属性指定了profile,这里就不会加载默认的配置文件,根据我们指定的profile进行匹配。
2)添加一个null的profile,主要用来加载没有指定profile的配置文件,比如:application.properties因为 profiles 采用了 LIFO 队列,后进先出。所以会先加载profile为null的配置文件,也就是匹配application.properties、application.yml。
继续跟进解析方法load:
private void load(Profile profile, DocumentFilterFactory filterFactory,
        DocumentConsumer consumer) {
      //获取默认的配置文件路径
      getSearchLocations().forEach((location) -> {
        boolean isFolder = location.endsWith("/");
        Set<String> names = (isFolder ? getSearchNames() : NO_SEARCH_NAMES);
        //循环加载
        names.forEach(
            (name) -> load(location, name, profile, filterFactory, consumer));
      });
    }
复制代码
可以看到springBoot2.0底层的新的改动都是基于
lambda表达式实现。
继续跟进getSearchLocations()方法:

获取路径之后,会拼接配置文件名称,选择合适的yml或者properties解析器进行解析: (name) -> load(location, name, profile, filterFactory, consumer) 具体的解析逻辑比较简单,我们来梳理一下:
1)获取默认的配置文件路径,有4种。 2)遍历所有的路径,拼装配置文件名称。 3)再遍历解析器,选择yml或者properties解析,将解析结果添加到集合MutablePropertySources当中。
最后解析的结果如下:

至此,springBoot中的资源文件加载完毕,解析顺序从上到下,所以前面的配置文件会覆盖后面的配置文件。可以看到application.properties的优先级最低,系统变量和环境变量的优先级相对较高。
SpringBoot2.x和SpringBoot1.x不同点
主要有两处大的变化:
一、在SpringBoot1.x版本中,如果我们定义了application-default.properties文件,优先级顺序:

application-default.properties > application-dev.properties > application.properties
复制代码
在SpringBoot2.x版本中,如果我们定义了application-default.properties文件,会有两种情况:
1)没有配置application-dev.properties文件,优先级顺序:
application-default.properties > application.properties
复制代码
2)同时配置了application-dev.properties文件,优先级顺序:
application-dev.properties > application.properties
复制代码
这是因为在2.x版本中,如果定义了application-dev.properties文件,application-default.properties文件将会删除。
代码中,在解析application.properties时会有如下判断,判断是否有 active 文件,如果有,则会删除默认的profile:
private void maybeActivateProfiles(Set<Profile> profiles) {
            if (profiles.isEmpty()) {
                return;
            }
            if (this.activatedProfiles) {
                this.logger.debug("Profiles already activated, '" + profiles
                        + "' will not be applied");
                return;
            }
            addProfiles(profiles);
            this.logger.debug("Activated profiles "
                    + StringUtils.collectionToCommaDelimitedString(profiles));
            this.activatedProfiles = true;
            //删除默认的配置文件,即application-default.* 文件
            removeUnprocessedDefaultProfiles();
        }
        private void removeUnprocessedDefaultProfiles() {
            this.profiles.removeIf(Profile::isDefaultProfile);
        }
复制代码
二、SpringBoot 1.x版本中,项目的配置文件统一被封装在内部类ConfigFileApplicationListener$ConfigurationPropertySources对象中,存入environment。而在2.x版本中,配置文件则是分别被包装成OriginTrackedMapPropertySource存入environment中
在springboot1.x升级到springboot2.x的时候,还请注意以上两点。