前言:今天我们来讲解一个有名的框架Mybatis。学了它,我们可以在开发中简化我们的代码。
面试题:SQLSession的作用
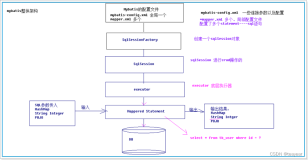
sqlsession的作用:
1.sqlsession可以拿到mapper对象
2.作为缓存使用,一级缓存,默认会开启的缓存、
3.出于对性能的考虑,会采用二级缓存,二级缓存需要手动开启
1.Mybatis简介
MyBatis 是一个开源、轻量级的数据持久化框架(ORM,全称:Object Relational Mapping,对象与关系型数据库之间的映射管理框架),是 JDBC 和 Hibernate 的替代方案。MyBatis 内部封装了 JDBC,简化了加载驱动、创建连接、创建 statement 等繁杂的过程,开发者只需要关注 SQL 语句本身。
1.1.什么是Mybatis
MyBatis 是一款优秀的持久层框架,它支持自定义 SQL、存储过程以及高级映射。MyBatis 免除了几乎所有的 JDBC 代码以及设置参数和获取结果集的工作。MyBatis 可以通过简单的 XML 或注解来配置和映射原始类型、接口和 Java POJO(Plain Old Java Objects,普通老式 Java 对象)为数据库中的记录。
MyBatis 支持定制化 SQL、存储过程以及高级映射,可以在实体类和 SQL 语句之间建立映射关系,是一种半自动化的 ORM 实现。其封装性低于 Hibernate,但性能优秀、小巧、简单易学、应用广泛。
ORM(Object Relational Mapping,对象关系映射)是一种数据持久化技术,它在对象模型和关系型数据库之间建立起对应关系,并且提供了一种机制,通过 JavaBean 对象去操作数据库表中的数据。
MyBatis 前身为 IBatis,2002 年由 Clinton Begin 发布。2010 年从 Apache 迁移到 Google,并改名为MyBatis,2013 年又迁移到了 Github。
MyBatis 的主要思想是将程序中的大量 SQL 语句剥离出来,使用 XML 文件或注解的方式实现 SQL 的灵活配置,将 SQL 语句与程序代码分离,在不修改程序代码的情况下,直接在配置文件中修改 SQL 语句。
MyBatis 与其它持久性框架最大的不同是,MyBatis 强调使用 SQL,而其它框架(例如 Hibernate)通常使用自定义查询语言,即 HQL(Hibernate查询语言)或 EJB QL(Enterprise JavaBeans查询语言)。
MyBatis 官方文档:

1.2.优缺点
优点
- MyBatis 是免费且开源的。
- 与 JDBC 相比,减少了 50% 以上的代码量。
- MyBatis 是最简单的持久化框架,小巧并且简单易学。
- MyBatis 相当灵活,不会对应用程序或者数据库的现有设计强加任何影响,SQL 写在 XML 中,和程序逻辑代码分离,降低耦合度,便于同一管理和优化,提高了代码的可重用性。
- 提供 XML 标签,支持编写动态 SQL 语句。
- 提供映射标签,支持对象与数据库的 ORM 字段关系映射。
- 支持存储过程。MyBatis 以存储过程的形式封装 SQL,可以将业务逻辑保留在数据库之外,增强应用程序的可移植性、更易于部署和测试。
缺点
- 编写 SQL 语句工作量较大,对开发人员编写 SQL 语句的功底有一定要求。
- SQL 语句依赖于数据库,导致数据库移植性差,不能随意更换数据库。
1.3.使用场景
MyBatis 专注于 SQL 本身,是一个足够灵活的 DAO 层解决方案。适用于性能要求高,且需求变化较多的项目,如互联网项目。
拓展
Mybatis-Plus(简称 MP)是 Mybatis 的增强工具,在 Mybatis 的基础上只做增强不做改变,支持 Mybatis 所有原生的特性,为简化开发、提高效率而生。有兴趣的小伙伴可以参考 MyBatis-Plus 官网。
2.Mybatis快速开始
2.1.创建Maven项目
**配置pom.xml添加junit+servlet依赖支持**
<properties>
    <maven.compiler.source>1.8</maven.compiler.source>
    <maven.compiler.target>1.8</maven.compiler.target>
    <!--junit-->
    <junit.version>4.12</junit.version>
    <!--servlet-->
    <servlet.version>4.0.0</servlet.version>
</properties>
<dependencies>
    <!-- ********************** junit单元测试依赖 ********************** -->
    <dependency>
        <groupId>junit</groupId>
        <artifactId>junit</artifactId>
        <version>${junit.version}</version>
        <scope>test</scope>
    </dependency>
    <!-- ********************** Java Servlet API  ********************** -->
    <dependency>
        <groupId>javax.servlet</groupId>
        <artifactId>javax.servlet-api</artifactId>
        <version>${servlet.version}</version>
        <scope>provided</scope>
    </dependency>
</dependencies>
**配置jdk1.8+web3.0**
**1)修改pom.xml配置jdk1.8**
<build>
  <plugins>
        <plugin>
            <groupId>org.apache.maven.plugins</groupId>
            <artifactId>maven-compiler-plugin</artifactId>
            <version>3.7.0</version>
            <configuration>
                <source>${maven.compiler.source}</source>
                <target>${maven.compiler.target}</target>
                <encoding>UTF-8</encoding>
            </configuration>
        </plugin>
  </plugins>
</build>
**2)修改web.xml配置web3.0**
<!--第一步就是配置maven-compiler-plugin插件-->
<!-- 修改web.xml由2.3至3.0 -->
<web-app xmlns:xsi="http://www.w3.org/2001/XMLSchema-instance"
         xmlns="http://java.sun.com/xml/ns/javaee"
         xsi:schemaLocation="http://java.sun.com/xml/ns/javaee http://java.sun.com/xml/ns/javaee/web-app_3_0.xsd"
         id="WebApp_ID" version="3.0">
</web-app>

2.2.添加相关依赖
<properties>
    <maven.compiler.source>1.8</maven.compiler.source>
    <maven.compiler.target>1.8</maven.compiler.target>
    <!--junit-->
    <junit.version>4.12</junit.version>
    <!--servlet-->
    <servlet.version>4.0.0</servlet.version>
    <!--mybatis-->
    <mybatis.version>3.4.5</mybatis.version>
    <!--mysql-->
    <mysql.version>5.1.44</mysql.version>
    <!--log4j2-->
    <log4j2.version>2.9.1</log4j2.version>
</properties>
<dependencies>
    <!-- ********************** junit单元测试依赖 ********************** -->
    <dependency>
        <groupId>junit</groupId>
        <artifactId>junit</artifactId>
        <version>${junit.version}</version>
        <scope>test</scope>
    </dependency>
    <!-- ********************** Java Servlet API  ********************** -->
    <dependency>
        <groupId>javax.servlet</groupId>
        <artifactId>javax.servlet-api</artifactId>
        <version>${servlet.version}</version>
        <scope>provided</scope>
    </dependency>
    <!-- ********************** Mybatis依赖 ********************** -->
    <dependency>
        <groupId>org.mybatis</groupId>
        <artifactId>mybatis</artifactId>
        <version>${mybatis.version}</version>
    </dependency>
    <!-- ********************** Mysql JDBC驱动 ********************** -->
    <dependency>
        <groupId>mysql</groupId>
        <artifactId>mysql-connector-java</artifactId>
        <version>${mysql.version}</version>
    </dependency>
    <!-- **********************  日志配置  ********************** -->
    <!--记得修改mybatis.cfg.xml添加如下内容-->
    <!--<setting name="logImpl" value="LOG4J2"/>-->
    <!--核心log4j2jar包-->
    <dependency>
        <groupId>org.apache.logging.log4j</groupId>
        <artifactId>log4j-core</artifactId>
        <version>${log4j2.version}</version>
    </dependency>
    <dependency>
        <groupId>org.apache.logging.log4j</groupId>
        <artifactId>log4j-api</artifactId>
        <version>${log4j2.version}</version>
    </dependency>
    <!--web工程需要包含log4j-web,非web工程不需要-->
    <dependency>
        <groupId>org.apache.logging.log4j</groupId>
        <artifactId>log4j-web</artifactId>
        <version>${log4j2.version}</version>
    </dependency>
</dependencies>
- jdbc.properties:用于定义数据库连接配置文件
jdbc.driver=com.mysql.jdbc.Driver
jdbc.url=jdbc:mysql://localhost:3306/mybatis_ssm?useUnicode=true&characterEncoding=UTF-8&useSSL=false
jdbc.username=root
jdbc.password=123456
注意:请修改数据库名、数据库账号及密码。
2.4.运行测试工具类
创建MybatisSessionFactoryUtils工具类
package com.lya.utils;
import org.apache.ibatis.session.SqlSession;
import org.apache.ibatis.session.SqlSessionFactory;
import org.apache.ibatis.session.SqlSessionFactoryBuilder;
import java.io.InputStream;
/**
 * @author 程序猿-小李哥
 * @site www.xiaolige.com
 * @company 猪八戒有限集团
 * @create 2023-08-19-14:14
 */
public class MybatisSessionFactoryUtils {
    public static SqlSessionFactory sqlSessionFactory;
    private static ThreadLocal<SqlSession> threadLocal = new ThreadLocal<SqlSession>();
    static {
        try {
            InputStream is = MybatisSessionFactoryUtils.class
                    .getResourceAsStream("/mybatis.cfg.xml");
            SqlSessionFactoryBuilder sqlSessionFactoryBuilder = new SqlSessionFactoryBuilder();
            sqlSessionFactory = sqlSessionFactoryBuilder.build(is);
        } catch (Exception e) {
            throw new RuntimeException(e);
        }
    }
    private MybatisSessionFactoryUtils() {
    }
    public static SqlSession openSession() {
        SqlSession sqlSession = threadLocal.get();
        if (null == sqlSession) {
            sqlSession = sqlSessionFactory.openSession();
            threadLocal.set(sqlSession);
        }
        return sqlSession;
    }
    public static void closeSession() {
        SqlSession sqlSession = threadLocal.get();
        if (null != sqlSession) {
            threadLocal.set(null);
            sqlSession.close();
        }
    }
    public static void main(String[] args) {
        SqlSession sqlSession = MybatisSessionFactoryUtils.openSession();
        System.out.println(sqlSession);
        System.out.println(sqlSession.getConnection());
        MybatisSessionFactoryUtils.closeSession();
    }
}
3.Mybatis-generator插件使用
3.1.配置mybatis-generator插件
因为IntelliJ中没有mybatis-generato对应的插件,所以需要在MAVEN中使用 mybatis-generator-maven-plugin插件来完成功能。修改pom.xml,添加mybatis-generator-maven-plugin插件相关依赖:
<plugin>
    <groupId>org.mybatis.generator</groupId>
    <artifactId>mybatis-generator-maven-plugin</artifactId>
    <version>1.3.2</version>
    <dependencies>
        <!--使用Mybatis-generator插件不能使用太高版本的mysql驱动 -->
        <dependency>
            <groupId>mysql</groupId>
            <artifactId>mysql-connector-java</artifactId>
            <version>5.1.44</version>
        </dependency>
    </dependencies>
    <configuration>
      <overwrite>true</overwrite>
    </configuration>
</plugin>
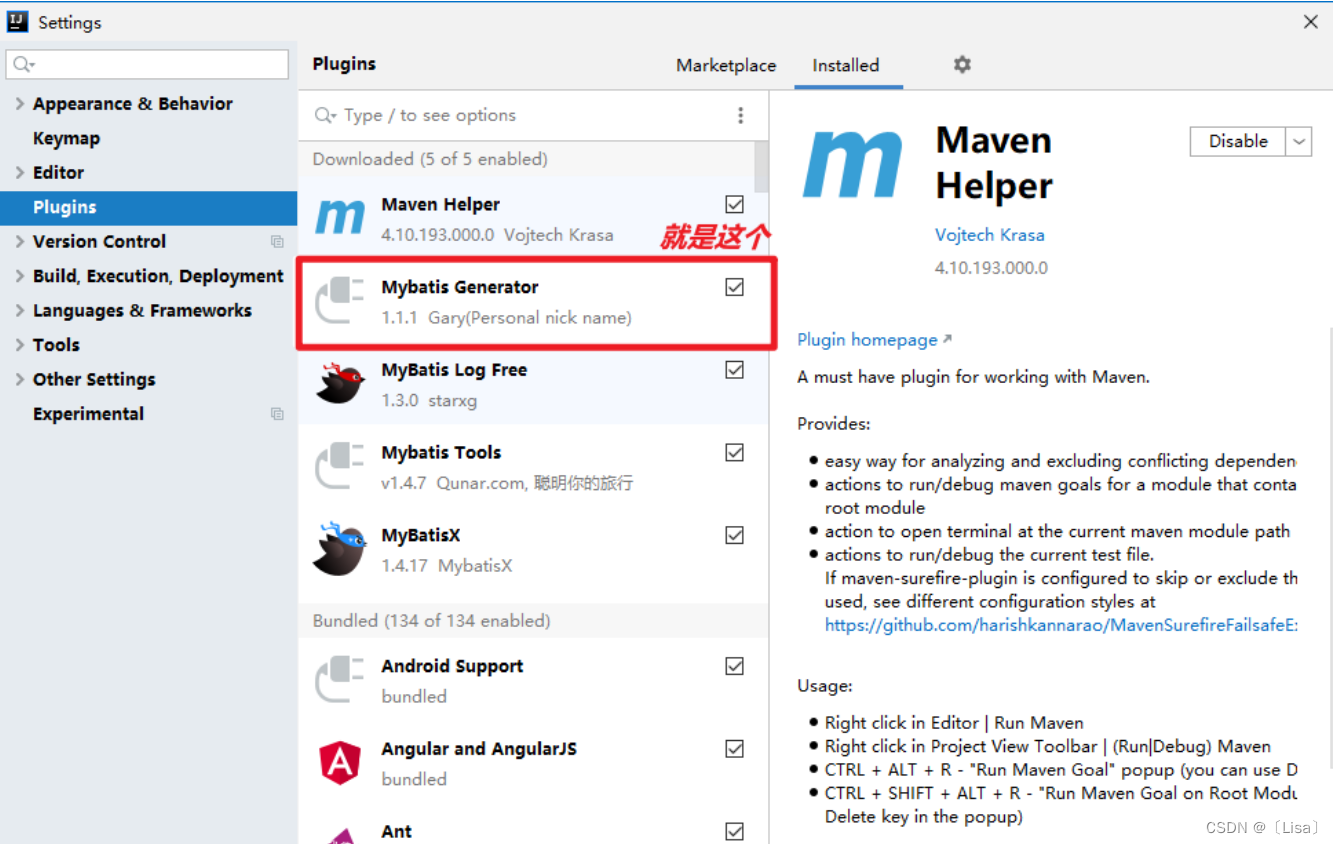
安装插件
三、Mybatis增删改查案例
1、SessionUtil.java
package com.lya.util;
import org.apache.ibatis.session.SqlSession;
import org.apache.ibatis.session.SqlSessionFactory;
import org.apache.ibatis.session.SqlSessionFactoryBuilder;
public class SessionUtil {
    private static SqlSessionFactory sessionFactory;
    private static ThreadLocal<SqlSession> threadLocal = new ThreadLocal<SqlSession>();
    static {
        sessionFactory = new SqlSessionFactoryBuilder().build(SessionUtil.class.getResourceAsStream("/mybatis.cfg.xml"));
    }
    public static SqlSession openSession() {
        SqlSession session = threadLocal.get();
        if (null == session) {
            session = sessionFactory.openSession();
            threadLocal.set(session);
        }
        return session;
    }
    public static void main(String[] args) {
        SqlSession session = openSession();
        System.out.println(session.getConnection());
        session.close();
//        System.out.println(session.getConnection());
    }
}
2、BookBiz
package com.lya.biz;
import com.lya.model.Book;
public interface BookBiz {
    int deleteByPrimaryKey(Integer bid);
    Book selectByPrimaryKey(Integer bid);
}
3、BookBizImpl
package com.lya.biz.impl;
import com.lya.biz.BookBiz;
import com.lya.mapper.BookMapper;
import com.lya.model.Book;
public class BookBizImpl implements BookBiz {
    private BookMapper bookMapper;
//    alt+insert 快速提供set/get/tostring/构造方法
//    alt+enter 快速构建实现类,填充代码的前半部分 ctrl+1
    public BookMapper getBookMapper() {
        return bookMapper;
    }
    public void setBookMapper(BookMapper bookMapper) {
        this.bookMapper = bookMapper;
    }
    @Override
    public int deleteByPrimaryKey(Integer bid) {
        return bookMapper.deleteByPrimaryKey(bid);
    }
    @Override
    public Book selectByPrimaryKey(Integer bid) {
        return bookMapper.selectByPrimaryKey(bid);
    }
}
4、log4j2.xml
<?xml version="1.0" encoding="UTF-8"?>
<!-- status : 指定log4j本身的打印日志的级别.ALL< Trace < DEBUG < INFO < WARN < ERROR
  < FATAL < OFF。 monitorInterval : 用于指定log4j自动重新配置的监测间隔时间,单位是s,最小是5s. -->
<Configuration status="WARN" monitorInterval="30">
  <Properties>
    <!-- 配置日志文件输出目录 ${sys:user.home} -->
    <Property name="LOG_HOME">/root/workspace/lucenedemo/logs</Property>
    <property name="ERROR_LOG_FILE_NAME">/root/workspace/lucenedemo/logs/error</property>
    <property name="WARN_LOG_FILE_NAME">/root/workspace/lucenedemo/logs/warn</property>
    <property name="PATTERN">%d{yyyy-MM-dd HH:mm:ss.SSS} [%t-%L] %-5level %logger{36} - %msg%n</property>
  </Properties>
  <Appenders>
    <!--这个输出控制台的配置 -->
    <Console name="Console" target="SYSTEM_OUT">
      <!-- 控制台只输出level及以上级别的信息(onMatch),其他的直接拒绝(onMismatch) -->
      <ThresholdFilter level="trace" onMatch="ACCEPT"
        onMismatch="DENY" />
      <!-- 输出日志的格式 -->
      <!-- %d{yyyy-MM-dd HH:mm:ss, SSS} : 日志生产时间 %p : 日志输出格式 %c : logger的名称
        %m : 日志内容,即 logger.info("message") %n : 换行符 %C : Java类名 %L : 日志输出所在行数 %M
        : 日志输出所在方法名 hostName : 本地机器名 hostAddress : 本地ip地址 -->
      <PatternLayout pattern="${PATTERN}" />
    </Console>
    <!--文件会打印出所有信息,这个log每次运行程序会自动清空,由append属性决定,这个也挺有用的,适合临时测试用 -->
    <!--append为TRUE表示消息增加到指定文件中,false表示消息覆盖指定的文件内容,默认值是true -->
    <File name="log" fileName="logs/test.log" append="false">
      <PatternLayout
        pattern="%d{yyyy-MM-dd HH:mm:ss.SSS} [%t] %-5level %logger{36} - %msg%n" />
    </File>
    <!-- 这个会打印出所有的info及以下级别的信息,每次大小超过size, 则这size大小的日志会自动存入按年份-月份建立的文件夹下面并进行压缩,作为存档 -->
    <RollingFile name="RollingFileInfo" fileName="${LOG_HOME}/info.log"
      filePattern="${LOG_HOME}/$${date:yyyy-MM}/info-%d{yyyy-MM-dd}-%i.log">
      <!--控制台只输出level及以上级别的信息(onMatch),其他的直接拒绝(onMismatch) -->
      <ThresholdFilter level="info" onMatch="ACCEPT"
        onMismatch="DENY" />
      <PatternLayout
        pattern="%d{yyyy-MM-dd HH:mm:ss.SSS} [%t] %-5level %logger{36} - %msg%n" />
      <Policies>
        <!-- 基于时间的滚动策略,interval属性用来指定多久滚动一次,默认是1 hour。 modulate=true用来调整时间:比如现在是早上3am,interval是4,那么第一次滚动是在4am,接着是8am,12am...而不是7am. -->
        <!-- 关键点在于 filePattern后的日期格式,以及TimeBasedTriggeringPolicy的interval, 日期格式精确到哪一位,interval也精确到哪一个单位 -->
        <!-- log4j2的按天分日志文件 : info-%d{yyyy-MM-dd}-%i.log -->
        <TimeBasedTriggeringPolicy interval="1"
          modulate="true" />
        <!-- SizeBasedTriggeringPolicy:Policies子节点, 基于指定文件大小的滚动策略,size属性用来定义每个日志文件的大小. -->
        <!-- <SizeBasedTriggeringPolicy size="2 kB" /> -->
      </Policies>
    </RollingFile>
    <RollingFile name="RollingFileWarn" fileName="${WARN_LOG_FILE_NAME}/warn.log"
      filePattern="${WARN_LOG_FILE_NAME}/$${date:yyyy-MM}/warn-%d{yyyy-MM-dd}-%i.log">
      <ThresholdFilter level="warn" onMatch="ACCEPT"
        onMismatch="DENY" />
      <PatternLayout
        pattern="%d{yyyy-MM-dd HH:mm:ss.SSS} [%t] %-5level %logger{36} - %msg%n" />
      <Policies>
        <TimeBasedTriggeringPolicy />
        <SizeBasedTriggeringPolicy size="2 kB" />
      </Policies>
      <!-- DefaultRolloverStrategy属性如不设置,则默认为最多同一文件夹下7个文件,这里设置了20 -->
      <DefaultRolloverStrategy max="20" />
    </RollingFile>
    <RollingFile name="RollingFileError" fileName="${ERROR_LOG_FILE_NAME}/error.log"
      filePattern="${ERROR_LOG_FILE_NAME}/$${date:yyyy-MM}/error-%d{yyyy-MM-dd-HH-mm}-%i.log">
      <ThresholdFilter level="error" onMatch="ACCEPT"
        onMismatch="DENY" />
      <PatternLayout
        pattern="%d{yyyy-MM-dd HH:mm:ss.SSS} [%t] %-5level %logger{36} - %msg%n" />
      <Policies>
        <!-- log4j2的按分钟 分日志文件 : warn-%d{yyyy-MM-dd-HH-mm}-%i.log -->
        <TimeBasedTriggeringPolicy interval="1"
          modulate="true" />
        <!-- <SizeBasedTriggeringPolicy size="10 MB" /> -->
      </Policies>
    </RollingFile>
  </Appenders>
  <!--然后定义logger,只有定义了logger并引入的appender,appender才会生效 -->
  <Loggers>
    <!--过滤掉spring和mybatis的一些无用的DEBUG信息 -->
    <logger name="org.springframework" level="INFO"></logger>
    <logger name="org.mybatis" level="INFO"></logger>
    <!-- 第三方日志系统 -->
    <logger name="org.springframework" level="ERROR" />
    <logger name="org.hibernate" level="ERROR" />
    <logger name="org.apache.struts2" level="ERROR" />
    <logger name="com.opensymphony.xwork2" level="ERROR" />
    <logger name="org.jboss" level="ERROR" />
    <!-- 配置日志的根节点 -->
    <root level="all">
      <appender-ref ref="Console" />
      <appender-ref ref="RollingFileInfo" />
      <appender-ref ref="RollingFileWarn" />
      <appender-ref ref="RollingFileError" />
    </root>
  </Loggers>
</Configuration>