Vite 的发布又改了发布方式 😭😭😭😭😭😭,不过其实也不用太担心,改来改去,发布的核心逻辑都是不变的,大家看的时候就参考参考就行了。 这个故事告诉我们,要等代码稳定了之后再写文章 😭😭😭😭😭😭 该文章讲解的 vite 版本
前言
最近在做 monorepo 的 npm 包发布,参考(照抄)了 Vite 的发布方式。然而当我写完的第二天,Vite 重构了它的发布脚本(2022/2/11)😭😭😭 于是,我又再次的修改了我的项目,并写一篇文章来专门介绍一下。
本文将分两个部分:
- 从用户的角度看 Vite 发布
- Vite 发布的实现方式
从用户的角度看 Vite 发布
Vite 的发布重构之后,用户可以通过一个可视化的界面,对 Vite 进行发布。
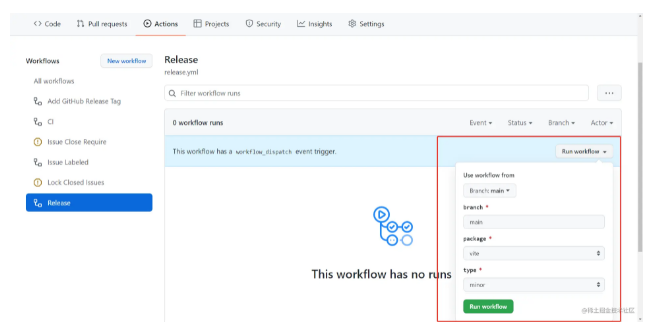
下图是 GitHub Action 界面,通过手动触发 GitHub Action 的方式对 vite 及一些官方的 vite 插件进行发布。
值得注意的是,只有项目成员才能看到并执行 release 工作流。如果我们需要体验运行该工作流,需要先 fork vite 仓库,再到 Action 界面执行
其中 package 和 type 是可选的,分别对应要发布的 npm 包及版本号的生成方式(如仅增加 minior 修订版本号)
运行之后,就会自动执行工作流,发布 vite 到 npm。
Vite 发布的实现方式
github 的工作流程配置文件,都存储在仓库的 .github/workflows 下。
我们运行的是 release 工作流程,因此我们需要看 .github/workflows/release.yml 的配置
release.yml
我们将 release.yml 拆成几部分来看:
- 定义用户可以选择的参数
- 运行 job,发布到 npm
定义用户的可选参数
可选参数有:
- 运行发布的分支,默认为 main 分支
- 需要发布的 npm 包,默认是 vite
- 版本号生成方式
name: Release
on:
  workflow_dispatch:
    inputs:
      branch:
        description: "branch"
        required: true
        type: string
        default: "main"
      package:
        description: "package"
        required: true
        type: choice
        options:
          - vite
          - plugin-legacy
          - plugin-vue
          - plugin-vue-jsx
          - plugin-react
          - create-vite
      type:
        description: "type"
        required: true
        type: choice
        options:
          - next
          - stable
          - minor-beta
          - major-beta
          - minor
          - major
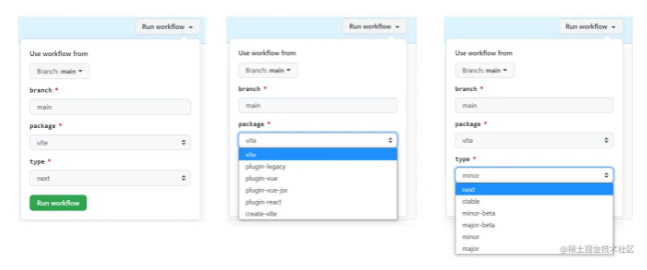
效果如下:
表单项 Use workflow from,并没有在 release.yml 中定义,它是 GitHub 运行工作流程时自带的选项。
它的作用是,读取哪个分支的 release.yml ,因为不同分支的 release.yml 可能是不一样的。
如果选择的分支没有 release.yml 文件,则不会再有这三个选项,且流水线不能运行。
运行 job,发布到 npm
主要有以下几个步骤:
- 使用 Ubuntu 镜像进行构建
- 拉取 git 仓库代码,拉取选中分支
- 使用 node 16
- 安装 pnpm
- pnpm install,如果有缓存,则利用缓存进行加速安装
- 在需要发布的包的项目,执行
pnpm run release
jobs:
  release:
    # prevents this action from running on forks
    # 避免 fork 的仓库运行该工作流
    if: github.repository == 'vitejs/vite'
    name: Release
    runs-on: ${{ matrix.os }}
    environment: Release
    strategy:
      matrix:
        # pseudo-matrix for convenience, NEVER use more than a single combination
        # 伪矩阵,为了方便(可能是 vite 的开发者从别处拷贝的代码做了少量改动),不要使用一个以上的组合
        # 意思是使用最新的 ubuntu 系统以及使用 node 16 运行 job
        node: [16]
        os: [ubuntu-latest]
    steps:
      # 拉取 git 代码
      - name: checkout
        uses: actions/checkout@v2
        with:
      # 拉取对应的分支
          ref: ${{ github.event.inputs.branch }}
          # fetch-depth 设置为 0,可以获取 git 的所有 commit 历史和 tag。不设置的话默认是只获取最新的一个 commit 信息。
          # 获取所有 git commit 是为了生成 changelog
          fetch-depth: 0
        # 使用前面定义的 node 16 版本
      - uses: actions/setup-node@v2
        with:
          node-version: ${{ matrix.node }}
      # 设置 git user,后面会用该 user 提交代码
      - run: git config user.name vitebot
      - run: git config user.email vitejs.bot@gmail.com
      # 安装 pnpm 和 yarn,pnpm 用于安装依赖,yarn 用于发布 npm 包
      - run: npm i -g pnpm@6
      - run: npm i -g yarn # even if the repo is using pnpm, Vite still uses yarn v1 for publishing
      - run: yarn config set registry https://registry.npmjs.org # Yarn's default registry proxy doesn't work in CI
      # 使用 node 16,再次使用是为了指定使用缓存(之前没有安装 pnpm)
      # cache 使用方式详情见:https://github.com/actions/setup-node#caching-packages-dependencies
      - uses: actions/setup-node@v2
        with:
          node-version: ${{ matrix.node }}
          cache: "pnpm"
          cache-dependency-path: "**/pnpm-lock.yaml"
      # 安装依赖
      - name: install
        run: pnpm install --frozen-lockfile --prefer-offline
      # 创建 .npmrc,用于存储 npm 发布的秘钥,发布时能够自动读取 .npmrc 的秘钥,避免输入密码等用户交互
      - name: Creating .npmrc
        run: |
          cat << EOF > "$HOME/.npmrc"
            //registry.npmjs.org/:_authToken=$NPM_TOKEN
          EOF
        env:
          NPM_TOKEN: ${{ secrets.NPM_TOKEN }}
      # 运行【packages/需要发布的包】目录下 package.json 中的 release 脚本,并传入参数
      # --quiet 跳过命令行交互的流程,流水线无法进行交互
      # --type 传入版本号的生成方式
      - name: Release
        run: pnpm --dir packages/${{ github.event.inputs.package }} release -- --quiet --type ${{ github.event.inputs.type }}
        env:
          GITHUB_TOKEN: ${{ secrets.GITHUB_TOKEN }}
          NPM_TOKEN: ${{ secrets.NPM_TOKEN }}
release 脚本
每个包目录下有一个 package.json,且里面都有一个 release 脚本,例如 vite:
// 节选自 /packages/vite/package.json
{
  "name": "vite",
  "version": "2.8.1",
  "author": "Evan You",
  "scripts": {
    "release": "ts-node ../../scripts/release.ts"
  }
}
实际上是执行了 vite 仓库根目录 scripts 目录下的 release.ts。vite 仓库下的所有包,都是用该脚本进行发布
该文件共 250 行,不多,我们先看看大概结构:
async function main(): Promise<void> {
  // 暂时省略
}
main().catch((err) => {
  console.error(err)
})
整个文件就是执行 main 函数,如果有错误则输出。
main 函数主要包括以下几个步骤:
- 生成新的版本号 targetVersion
- 二次确认是否发布
- 更新 package.json 版本号
- 执行构建
- 生成 changelog
- 发布 npm 包
- 提交到 GitHub
生成新的版本号
如果执行脚本时,没有指定版本号,则生成新的版本号
生成的规则,是根据命令行参数 --type 生成。行数比较多,其实大部分都是一些错误处理及提示,不必细究。需要知道的是,生成版本号,使用的是 semver 这个 npm 包。
const currentVersion = '1.0.0'
const inc: (i: ReleaseType) => string = (i) =>
  semver.inc(currentVersion, i, 'beta')!
inc('major')      // 2.0.0,如果第二个参数不是 preXXX(premajor等),则第三个参数会被忽略
inc('premajor')   // 2.0.0-beta.0
inc('minor')    // 1.1.0
inc('preminor')   // 1.1.0-beta.0
inc('patch')    // 1.0.1
inc('prepatch')   // 1.0.1-beta.0
inc('prerelease') // 1.0.1-beta.0
如果没有传入 --type,则通过命令行交互,选择版本类型。这种情况发生在手动在项目中调用 pnpm run release,这也是发布重构前的发布方式。命令行交互方式如下:
下面是代码:
// args 是使用命令行执行该脚本时,传入的参数
// 将第一个参数作为 targetVersion
let targetVersion: string | undefined = args._[0]
// 如果没有传入 targetVersion,则自动生成
if (!targetVersion) {
  // 从命令行中读取 type 参数, --type xxx
  const type: string | undefined = args.type
  // 根据 type 生成版本号
  if (type) {
    const currentBeta = currentVersion.includes('beta')
    if (type === 'next') {
      targetVersion = inc(currentBeta ? 'prerelease' : 'patch')
    } else if (type === 'stable') {
      // Out of beta
      if (!currentBeta) {
        throw new Error(
          `Current version: ${currentVersion} isn't a beta, stable can't be used`
        )
      }
      targetVersion = inc('patch')
    } else if (type === 'minor-beta') {
      if (currentBeta) {
        throw new Error(
          `Current version: ${currentVersion} is already a beta, minor-beta can't be used`
        )
      }
      targetVersion = inc('preminor')
    } else if (type === 'major-beta') {
      if (currentBeta) {
        throw new Error(
          `Current version: ${currentVersion} is already a beta, major-beta can't be used`
        )
      }
      targetVersion = inc('premajor')
    } else if (type === 'minor') {
      if (currentBeta) {
        throw new Error(
          `Current version: ${currentVersion} is a beta, use stable to release it first`
        )
      }
      targetVersion = inc('minor')
    } else if (type === 'major') {
      if (currentBeta) {
        throw new Error(
          `Current version: ${currentVersion} is a beta, use stable to release it first`
        )
      }
      targetVersion = inc('major')
    } else {
      throw new Error(
        `type: ${type} isn't a valid type. Use stable, minor-beta, major-beta, or next`
      )
    }
  } else {
    // no explicit version or type, offer suggestions
    const { release }: { release: string } = await prompts({
      type: 'select',
      name: 'release',
      message: 'Select release type',
      choices: versionIncrements
        .map((i) => `${i} (${inc(i)})`)
        .concat(['custom'])
        .map((i) => ({ value: i, title: i }))
    })
    if (release === 'custom') {
      const res: { version: string } = await prompts({
        type: 'text',
        name: 'version',
        message: 'Input custom version',
        initial: currentVersion
      })
      targetVersion = res.version
    } else {
      targetVersion = release.match(/\((.*)\)/)![1]
    }
  }
}
二次确认是否发布
二次确认是否发布,beta 版本需要再次确认。
如果传了 --quiet 参数,则跳过,这个用在 GitHub CI 工作流程执行时,执行脚本会主动传入 --quiet。
if (!args.quiet) {
  if (targetVersion.includes('beta') && !args.tag) {
    const { tagBeta }: { tagBeta: boolean } = await prompts({
      type: 'confirm',
      name: 'tagBeta',
      message: `Publish under dist-tag "beta"?`
    })
    if (tagBeta) args.tag = 'beta'
  }
  const { yes }: { yes: boolean } = await prompts({
    type: 'confirm',
    name: 'yes',
    message: `Releasing ${tag}. Confirm?`
  })
  if (!yes) {
    return
  }
} else {
  if (targetVersion.includes('beta') && !args.tag) {
    args.tag = 'beta'
  }
}
更新 package.json 版本号
step('\nUpdating package version...')
updateVersion(targetVersion)
updateVersion 如下,就是覆盖原有的 package.json
function updateVersion(version: string): void {
  const pkg = JSON.parse(readFileSync(pkgPath, 'utf-8'))
  pkg.version = version
  writeFileSync(pkgPath, JSON.stringify(pkg, null, 2) + '\n')
}
执行构建
执行 pnpm run build
step('\nBuilding package...')
if (!skipBuild && !isDryRun) {
  await run('pnpm', ['run', 'build'])
} else {
  console.log(`(skipped)`)
}
如果传入参数
--dry,则表示当次运行是dry run空运行(又称为试运行),常用于脚本调试在 release.ts 的
dry run,则不会执行构建和上传 npm 包,但会在命令行打印出将要执行的命令行语句
生成 changelog
执行 pnpm run changelog,由于篇幅有限,changelog 怎么生成,该文章不做讲解。
step('\nGenerating changelog...')
await run('pnpm', ['run', 'changelog'])
发布 npm 包
step('\nPublishing package...')
await publishPackage(targetVersion, runIfNotDry)
publishPackage 的实现如下:
async function publishPackage(
  version: string,
  runIfNotDry: RunFn | DryRunFn
): Promise<void> {
  // yarn publish 的参数
  const publicArgs = [
    'publish',
    '--no-git-tag-version',
    '--new-version',
    version,
    '--access',
    'public'
  ]
  if (args.tag) {
    publicArgs.push(`--tag`, args.tag)
  }
  try {
    // important: we still use Yarn 1 to publish since we rely on its specific
    // behavior
    // 目前仍然是用 yarn 1 进行发布,还没优化
    await runIfNotDry('yarn', publicArgs, {
      stdio: 'pipe'
    })
    console.log(colors.green(`Successfully published ${pkgName}@${version}`))
  } catch (e: any) {
    if (e.stderr.match(/previously published/)) {
      console.log(colors.red(`Skipping already published: ${pkgName}`))
    } else {
      throw e
    }
  }
}
runIfNotDry 的实现:
// 运行命令行
const run: RunFn = (bin, args, opts = {}) =>
  execa(bin, args, { stdio: 'inherit', ...opts })
type DryRunFn = (bin: string, args: string[], opts?: any) => void
// dry run 模式下,只是输出命令行语句
const dryRun: DryRunFn = (bin, args, opts: any) =>
  console.log(colors.blue(`[dryrun] ${bin} ${args.join(' ')}`), opts)
const runIfNotDry = isDryRun ? dryRun : run
runIfNotDry 在 dry run 模式下,只是输出命令行语句,不执行,仅用于本地调试。
提交到 GitHub
const tag = pkgName === 'vite' ? `v${targetVersion}` : `${pkgName}@${targetVersion}`
const { stdout } = await run('git', ['diff'], { stdio: 'pipe' })
// 如果有 git 差异,则提交 commit,并打上标签
// 如果版本号被修改,则 package.json 就会被修改
if (stdout) {
  step('\nCommitting changes...')
  await runIfNotDry('git', ['add', '-A'])
  await runIfNotDry('git', ['commit', '-m', `release: ${tag}`])
  await runIfNotDry('git', ['tag', tag])
} else {
  console.log('No changes to commit.')
}
step('\nPushing to GitHub...')
await runIfNotDry('git', ['push', 'origin', `refs/tags/${tag}`])
await runIfNotDry('git', ['push'])
if (isDryRun) {
  console.log(`\nDry run finished - run git diff to see package changes.`)
}
tag 的生成规则:
以 targetVersion 是 1.0.1 为例,如果发布的包是 vite,则 tag 为 v1.0.1。如果发布的包是其他的,如 plugin-vue,则 tag 为 plugin-vue@1.0.1
总结
我们看源码,需要有个目的,例如这次,就是学习 vite 源码的发布方式。这样带着一个目的去看源码,你会发现源码其实并没有多难;切忌对着源码仓库从头到尾看,看不懂,而且很容易会丧失掉学习的耐心和信心。
细心的你,可能会发现,其实很多时候源码也不是十分完美的
- 就例如,release.yml 的注释就明确写明了伪矩阵是为了方便,估计就是从其他的配置文件中复制过来,做了少部分的修改。
- 也例如,发布 npm 包时,用的仍然是 yarn 1(注释中有标明),估计应该是 vite 仓库的包管理工具从 yarn 迁移 pnpm 后,发布方式还没有迁移。
一个开源库能够成为主流,必然有其出色的地方,但毕竟开发者的时间有限,不能做到每方面都是完美的,像这种发布流程,不影响核心代码,没有高的优先级进行优化处理,也是正常。
因此,我们更多的是要从开源代码中学到其精华,将其改进优化,运用到自己的项目中去。
果这篇文章对您有所帮助,请帮忙点个赞👍,您的鼓励是我创作路上的最大的动力


