「这是我参与2022首次更文挑战的第17天,活动详情查看:2022首次更文挑战」
前言
提及vue全家桶的时候不可忽视的就是vuex,而在我们的开发中,真正需要使用vuex的项目可能不多,至少对于我是这样的。但是这也不妨碍我们去了解下其实现原理。
原理简介
我们先来简单看看其原理
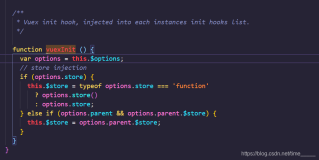
- 通过mixin在beforeCreate注入store属性
Vue.mixin({ beforeCreate: vuexInit })
复制代码
function vuexInit () {
  const options = this.$options
  // store injection
  if (options.store) {
    // 根实例直接使用store
    this.$store = typeof options.store === 'function'
      ? options.store()
      : options.store
  } else if (options.parent && options.parent.$store) {
    // 组件实例通过parent向上引用
    // 这样每个组件都会有store属性并且指向同一个Store实例
    this.$store = options.parent.$store
  }
}
复制代码
- 响应式数据实现的原理其实就是创建vue实例
store._vm = new Vue({
  data: {
    $$state: state
  },
  // getters
  computed
})
复制代码
访问state实际是访问vue实例数据
get state () {
  return this._vm._data.$$state
}
复制代码
之前有写过一篇文章组件通信BUS模式及原理分析了BUS模式的实现原理,现在一看和vuex的响应式实现有相似之处,都创建一个vue实例。
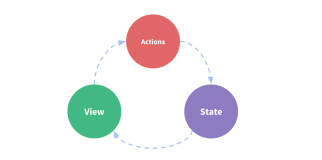
- 单向数据流
我们知道有个参数strict来控制是否可以在commit之外修改state,主要是为了控制数据的单向流动。其实现原理主要是watcher加私有属性判断。
在初始化的时候
// enable strict mode for new vm
if (store.strict) {
  enableStrictMode(store)
}
复制代码
实际就是通过vm实例创建watcher实例来监听state数据的修改
function enableStrictMode (store) {
  store._vm.$watch(function () { return this._data.$$state }, () => {
    if (__DEV__) {
      // 这边还会进行_committing的判断
      assert(store._committing, `do not mutate vuex store state outside mutation handlers.`)
    }
    // deep为true表示深度监听
  }, { deep: true, sync: true })
}
复制代码
在commit函数中实际会执行_withCommit
this._withCommit(() => {
  entry.forEach(function commitIterator (handler) {
    handler(payload)
  })
})
复制代码
而_withCommit主要就是暂时性修改_committing达到修改state不抛出警告,这样就解释了为什么仅仅可以在commit中修改数据。
_withCommit (fn) {
  const committing = this._committing
  this._committing = true
  fn()
  this._committing = committing
}
复制代码
目录结构
我们从目录结构开始,来简单分析下其实现逻辑。
│  helpers.js // 辅助函数
│  index.cjs.js // commonJS入口
│  index.js // 入口
│  index.mjs // esmodule入口
│  mixin.js // mixin store实现
│  store.js // store类实现
│  util.js // 工具函数
│
├─module
│      module-collection.js // 递归处理module
│      module.js // moudule类对于store配置的module
│
└─plugins // 插件实现
      devtool.js
      logger.js
复制代码
相对于我们分析的vue和vue-router结构,vuex结构简单许多
入口
我们来看看入口indexJS,就是进行模块化导入导出,定义vuex输出
export default {
  Store,
  install,
  version: '__VERSION__',
  mapState,
  mapMutations,
  mapGetters,
  mapActions,
  createNamespacedHelpers,
  createLogger
}
复制代码
安装
vue插件都是通过install方法实现安装的,我们来看看vuex中的install实现
export function install (_Vue) {
  // 防止重复安装
  if (Vue && _Vue === Vue) {
    if (__DEV__) {
      console.error(
        '[vuex] already installed. Vue.use(Vuex) should be called only once.'
      )
    }
    return
  }
  Vue = _Vue
  // 其实主要是applyMixin
  applyMixin(Vue)
}
复制代码
applyMixin的重点则在于利用Vue.mixin在beforeCreate中注入store
// applyMixin
Vue.mixin({ beforeCreate: vuexInit })
复制代码
function vuexInit () {
  const options = this.$options
  // store injection
  if (options.store) {
    this.$store = typeof options.store === 'function'
      ? options.store()
      : options.store
  } else if (options.parent && options.parent.$store) {
    this.$store = options.parent.$store
  }
}
复制代码
Store实现
我们在注入store之前,会先执行new Store来生成store实例。而Store是vuex中核心实现,我们来简单梳理下其实现。
我们执行实例化的时候肯定是先执行构造函数的
constructor (options = {}) {
  // 在非模块化开发中会自动执行安装,不需要执行Vue.install
  if (!Vue && typeof window !== 'undefined' && window.Vue) {
    install(window.Vue)
  }
  // 实例化store的限定条件可以了解下
  if (__DEV__) {
    assert(Vue, `must call Vue.use(Vuex) before creating a store instance.`)
    assert(typeof Promise !== 'undefined', `vuex requires a Promise polyfill in this browser.`)
    assert(this instanceof Store, `store must be called with the new operator.`)
  }
  const {
    plugins = [],
    strict = false
  } = options
  // 一大堆相关变量
  // store internal state
  this._committing = false
  this._actions = Object.create(null)
  this._actionSubscribers = []
  this._mutations = Object.create(null)
  this._wrappedGetters = Object.create(null)
  // 核心实现1 将options下的module进行递归处理,生成moduleTree,其中store配置被定义为root
  this._modules = new ModuleCollection(options)
  this._modulesNamespaceMap = Object.create(null)
  this._subscribers = []
  this._watcherVM = new Vue()
  this._makeLocalGettersCache = Object.create(null)
  // 使用call函数绑定action和mutation的this为store
  // bind commit and dispatch to self
  const store = this
  const { dispatch, commit } = this
  this.dispatch = function boundDispatch (type, payload) {
    return dispatch.call(store, type, payload)
  }
  this.commit = function boundCommit (type, payload, options) {
    return commit.call(store, type, payload, options)
  }
  // strict mode
  this.strict = strict
  // state对于到options下的第一层state
  const state = this._modules.root.state
  // 核心实现2 进行模块的注册安装
  // init root module.
  // this also recursively registers all sub-modules
  // and collects all module getters inside this._wrappedGetters
  installModule(this, state, [], this._modules.root)
  // 核心实现3 创建vue实例来代理state
  // initialize the store vm, which is responsible for the reactivity
  // (also registers _wrappedGetters as computed properties)
  resetStoreVM(this, state)
  // vuex插件初始化
  // apply plugins
  plugins.forEach(plugin => plugin(this))
  const useDevtools = options.devtools !== undefined ? options.devtools : Vue.config.devtools
  if (useDevtools) {
    devtoolPlugin(this)
  }
}
复制代码
构造函数的执行实际覆盖了vuex中的大部分核心逻辑,我们上面列出了三处核心实现,下面我们对其进行进一步分析。
ModuleCollection实现
this._modules = new ModuleCollection(options)
复制代码
ModuleCollection实现在于将options进行递归处理,将module根据键名注册为Module树,其中顶层为{root: Module}
constructor (rawRootModule) {
  // register root module (Vuex.Store options)
  this.register([], rawRootModule, false)
}
复制代码
register (path, rawModule, runtime = true) {
  if (__DEV__) {
    assertRawModule(path, rawModule)
  }
  // 将module配置传入生成Module实例
  const newModule = new Module(rawModule, runtime)
  if (path.length === 0) {
    // 将root定义为根module
    this.root = newModule
  } else {
    // 如果不是根module则会通过path来寻找父module
    // 并且将其添加为module
    const parent = this.get(path.slice(0, -1))
    parent.addChild(path[path.length - 1], newModule)
  }
  // 遍历子模块进行module注册
  // register nested modules
  if (rawModule.modules) {
    forEachValue(rawModule.modules, (rawChildModule, key) => {
      this.register(path.concat(key), rawChildModule, runtime)
    })
  }
}
复制代码
Module的实现比较简单,就是描述了模块及添加一些实例方法用于辅助父子模块的处理。这边就不展开进行分析了。
我们来看看ModuleCollection的输入输出
const store = new Vuex.Store({
  state: {
    count: 0
  },
  mutations: {
    increment (state) {
      state.count += 1
    }
  },
  getters: {
    getCount: (state) => {
      return state.count
    }
  },
  modules: {
    moduleA: {
      namespaced: true,
      state: {
        age: 1
      },
      getters: {
        getAge: (state) => {
          return state.age
        }
      },
      mutations: {
        incrementAge (state) {
          state.age += 1
        }
      }
    }
  }
})
复制代码
输出
{
  root: {
    runtime: false,
    _children: {
      moduleA: {
        runtime: false,
        _children: { },
        _rawModule: {
          namespaced: true,
          state: {
            age: 1
          },
          getters: { },
          mutations: { }
        },
        state: {
          age: 1
        }
      }
    },
    _rawModule: {
      state: {
        count: 0
      },
      mutations: { },
      getters: { },
      modules: {
        moduleA: {
          namespaced: true,
          state: {
            age: 1
          },
          getters: { },
          mutations: { }
        }
      }
    },
    state: {
      count: 0
    }
  }
}
复制代码
通过输入输出的对比可以发现,ModuleCollection将配置处理为module实例,主要暴露了state数据,并将其它数据放入_rawModule中,而子模块嵌套在_children对象中。
installModule实现
installModule的处理会复杂一些,我们同样分析代码再给出实例。
const state = this._modules.root.state
installModule(store, state, [], store._modules.root, true)
复制代码
function installModule (store, rootState, path, module, hot) {
  const isRoot = !path.length
  // 通过getNamespace取得当前路径命名空间
  // 例如['moduleA', 'moduleAa'] => moduleA/moduleAa
  const namespace = store._modules.getNamespace(path)
  // 防重限制
  // register in namespace map
  if (module.namespaced) {
    if (store._modulesNamespaceMap[namespace] && __DEV__) {
      console.error(`[vuex] duplicate namespace ${namespace} for the namespaced module ${path.join('/')}`)
    }
    store._modulesNamespaceMap[namespace] = module
  }
  // set state
  if (!isRoot && !hot) {
    // getNestedState实际将取到rootSatte
    // 所以对于state来说
    // 会将模块的state通通添加为顶层state的属性
    const parentState = getNestedState(rootState, path.slice(0, -1))
    const moduleName = path[path.length - 1]
    // _withCommit将允许修改state设置为true
    // 此时可以修改state而不触发警告
    store._withCommit(() => {
      if (__DEV__) {
        if (moduleName in parentState) {
          console.warn(
            `[vuex] state field "${moduleName}" was overridden by a module with the same name at "${path.join('.')}"`
          )
        }
      }
      // 使用setAPI动态添加属性
      // 为什么需要set?
      // 因为在动态注册新模块的时候也会执行installModule
      // 此时state在初始化(后面的步骤)中已经设置为响应式数据
      // 所以再添加需要使用setAPI
      Vue.set(parentState, moduleName, module.state)
    })
  }
  // makeLocalContext是利用namespace取得各个模块下得局部数据
  const local = module.context = makeLocalContext(store, namespace, path)
  // 对于mutation来说
  // registerMutation将type=namespace+key作为键保存在store._mutations[type]中
  module.forEachMutation((mutation, key) => {
    const namespacedType = namespace + key
    registerMutation(store, namespacedType, mutation, local)
  })
  // 对于actions的逻辑和mutation差不多
  module.forEachAction((action, key) => {
    const type = action.root ? key : namespace + key
    const handler = action.handler || action
    registerAction(store, type, handler, local)
  })
  // registerGetter则主要将getters注册到_wrappedGetters中
  module.forEachGetter((getter, key) => {
    const namespacedType = namespace + key
    registerGetter(store, namespacedType, getter, local)
  })
  // 递归子模块进行installModule
  module.forEachChild((child, key) => {
    installModule(store, rootState, path.concat(key), child, hot)
  })
}
复制代码
对于installModule的分析已经基本完成,我们梳理下主要的几点
- 将模块state添加到顶层state下,键名为模块名称
- 使用makeLocalContext获取模块局部数据,将其传递给registerMutation进行方法注册等
- 递归子模块进行注册
在installModule处理之后,我们的store更新如下,重点的几个数据已经圈出

resetStoreVM实现
我们再来看看最后一个关键逻辑resetStoreVM的实现吧
我们前面的处理实际已经将options进行了初始化,并且根据命名空间进行一系列的处理。现在差的实际是响应式数据的实现。
function resetStoreVM (store, state, hot) {
  const oldVm = store._vm
  // bind store public getters
  store.getters = {}
  // reset local getters cache
  store._makeLocalGettersCache = Object.create(null)
  const wrappedGetters = store._wrappedGetters
  const computed = {}
  // 将上步骤创建的store._wrappedGetters进行遍历
  forEachValue(wrappedGetters, (fn, key) => {
    // 将getters作为computed函数
    computed[key] = partial(fn, store)
    // 同时用getters代理store._vm
    // 这时我们再访问this.store.getters.xxx就会访问到store._vm[xxx]
    // 根据vue实例特性可知会访问到其中的computed函数
    Object.defineProperty(store.getters, key, {
      get: () => store._vm[key],
      enumerable: true // for local getters
    })
  })
  // use a Vue instance to store the state tree
  // suppress warnings just in case the user has added
  // some funky global mixins
  const silent = Vue.config.silent
  Vue.config.silent = true
  // 关键步骤将rootState作为data进行vue实例化
  store._vm = new Vue({
    data: {
      $$state: state
    },
    computed
  })
  Vue.config.silent = silent
  // enable strict mode for new vm
  // 对vm._data.$$state创建watcher实例进行监听修改
  // 如果不在commit中修改提示警告
  if (store.strict) {
    enableStrictMode(store)
  }
  if (oldVm) {
    if (hot) {
      // dispatch changes in all subscribed watchers
      // to force getter re-evaluation for hot reloading.
      store._withCommit(() => {
        oldVm._data.$$state = null
      })
    }
    Vue.nextTick(() => oldVm.$destroy())
  }
}
复制代码
后话
记得很早之前看过vuex的实现原理,但是后面忘光了,再后来心态比较躺平就很畏惧源码了。其实vuex的原理并不复杂,主要是通过vue实例来创建响应式state。而其比较复杂的逻辑在于modules的处理,主要是执行了一系列的递归生成或处理树结构。