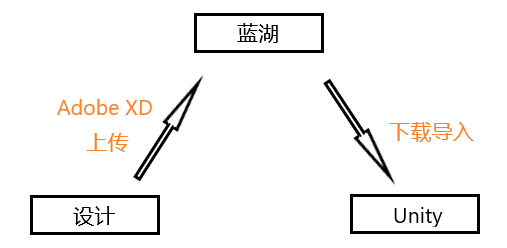
我们Unity项目关于UI界面制作的工作流是这样的,UI设计人员将设计好的UI界面在Adobe XD中上传至蓝湖,Unity程序猿从蓝湖中下载切图资源包导入项目工程中,根据蓝湖中的效果图、样式信息进行界面的搭建:

例如这张首页UI中的第一个按钮,其图层名称为"组646",位置为(209px,605px),大小为(225px,76px)
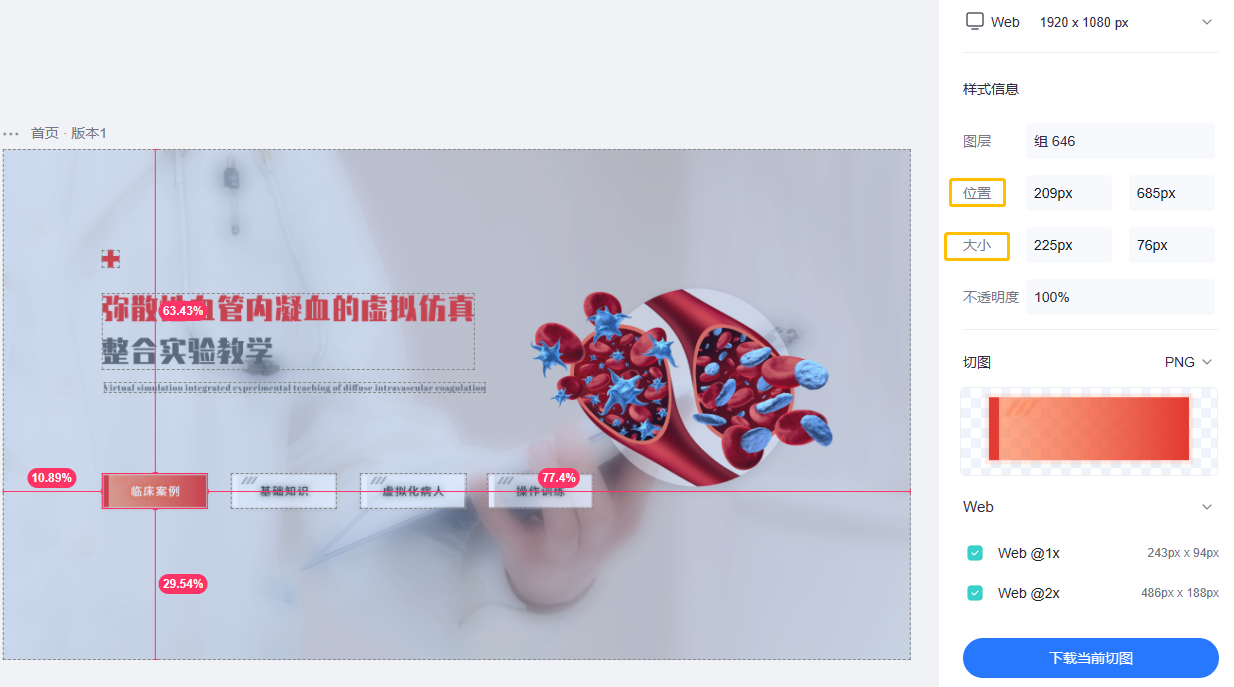

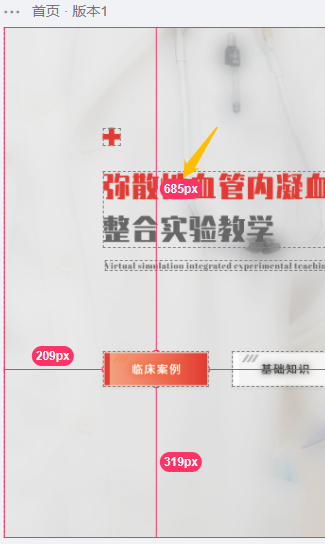
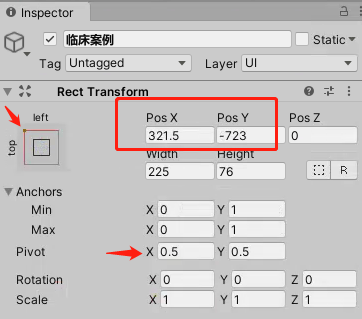
首先可以看到位置信息中的685px是指这个图层到顶部的像素大小,可以判断其位置信息是在以左上角为原点的坐标系中的,而且在Unity中RectTransform组件以(0.5,0.5)为默认的轴心点,因此在考虑横坐标时需要计算上该图层宽度的一半,考虑纵坐标时需要计算上该图层高度的一半:

以这个按钮图层为例,在Unity中我们将其RectTransform组件中的锚点设为左上角,Pivot轴心点使用默认的(0.5,0.5),则其横坐标则是209+225 * 0.5,纵坐标则是-(685 + 76 * 0.5),计算出结果为(321.5,-723):


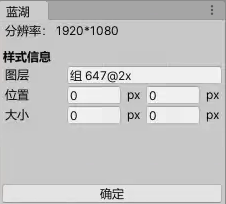
有了这样的换算关系后,基于能偷懒则偷懒的原则,我开始思考将其转化为自动化的过程,于是写了这样一个工具,只需要在工具中输入蓝湖中该图层的位置及大小信息,点击确定即可将该按钮设置正确的位置及大小:

代码如下:
usingUnityEngine;
usingUnityEditor;
usingUnityEngine.UI;
namespaceSK.Framework{
publicclassLanHu : EditorWindow    {
        [MenuItem("SKFramework/Tools/Lan Hu")]
privatestaticvoidOpen()
        {
GetWindow<LanHu>("蓝湖").Show();
        }
privateconstfloatlabelWidth=60f;
privatefloatx;
privatefloaty;
privatefloatwidth;
privatefloatheight;
privatevoidOnGUI()
        {
//如果未选中任何物体 returnif (Selection.activeTransform==null) return;
RectTransformrt=Selection.activeTransform.GetComponent<RectTransform>();
//如果选中的物体不是UI元素 returnif (rt==null) return;
GUILayout.Label("分辨率: 1920*1080");
EditorGUILayout.Space();
GUILayout.Label("样式信息", "BoldLabel");
GUILayout.BeginHorizontal();
GUILayout.Label("图层", GUILayout.Width(labelWidth));
varimage=rt.GetComponent<Image>();
if (image!=null&&image.sprite!=null) EditorGUILayout.TextField(image.sprite.name);
elseEditorGUILayout.HelpBox("未发现任何图层", MessageType.Warning);
GUILayout.EndHorizontal();
GUILayout.BeginHorizontal();
GUILayout.Label("位置", GUILayout.Width(labelWidth));
x=EditorGUILayout.FloatField(x);
GUILayout.Label("px");
y=EditorGUILayout.FloatField(y);
GUILayout.Label("px");
GUILayout.EndHorizontal();
GUILayout.BeginHorizontal();
GUILayout.Label("大小", GUILayout.Width(labelWidth));
width=EditorGUILayout.FloatField(width);
GUILayout.Label("px");
height=EditorGUILayout.FloatField(height);
GUILayout.Label("px");
GUILayout.EndHorizontal();
GUILayout.FlexibleSpace();
if (GUILayout.Button("确定"))
            {
//调整位置及大小rt.anchorMin=newVector2(0, 1);
rt.anchorMax=newVector2(0, 1);
rt.pivot=Vector2.one* .5f;
rt.SetSizeWithCurrentAnchors(RectTransform.Axis.Horizontal, width);
rt.SetSizeWithCurrentAnchors(RectTransform.Axis.Vertical, height);
rt.anchoredPosition=newVector2(x+width/2f, -(y+height/2f));
//调整完成后自动设置锚点RectTransformprt=rt.parentasRectTransform;
Vector2anchorMin=newVector2(
rt.anchorMin.x+rt.offsetMin.x/prt.rect.width,
rt.anchorMin.y+rt.offsetMin.y/prt.rect.height);
Vector2anchorMax=newVector2(
rt.anchorMax.x+rt.offsetMax.x/prt.rect.width,
rt.anchorMax.y+rt.offsetMax.y/prt.rect.height);
rt.anchorMin=anchorMin;
rt.anchorMax=anchorMax;
rt.offsetMin=rt.offsetMax=Vector2.zero;
EditorUtility.SetDirty(rt);
            }
        }
privatevoidOnSelectionChange()
        {
Repaint();
        }
    }
}

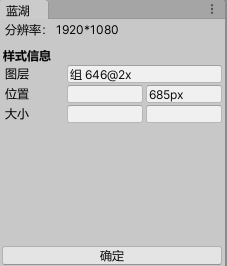
以上是在这条偷懒路上的第一个产物,它依然需要手动输入图层的位置、大小信息,随后发现了蓝湖中的这些样式信息是可以点击复制的:

于是我开始思考将float类型的输入框改为string类型的输入框,将复制来的信息直接粘贴到输入框中,只需要将字符串的最后两个字符px移除,再将其转化为float类型即可,于是有了第二个产物:

代码如下:
usingUnityEngine;
usingUnityEditor;
usingUnityEngine.UI;
namespaceSK.Framework{
publicclassLanHu : EditorWindow    {
        [MenuItem("SKFramework/Tools/Lan Hu")]
privatestaticvoidOpen()
        {
GetWindow<LanHu>("蓝湖").Show();
        }
privateconstfloatlabelWidth=60f;
privatestringx;
privatestringy;
privatestringw;
privatestringh;
privatevoidOnGUI()
        {
//如果未选中任何物体 returnif (Selection.activeTransform==null) return;
RectTransformrt=Selection.activeTransform.GetComponent<RectTransform>();
//如果选中的物体不是UI元素 returnif (rt==null) return;
GUILayout.Label("分辨率: 1920*1080");
EditorGUILayout.Space();
GUILayout.Label("样式信息", "BoldLabel");
GUILayout.BeginHorizontal();
GUILayout.Label("图层", GUILayout.Width(labelWidth));
varimage=rt.GetComponent<Image>();
if (image!=null&&image.sprite!=null) EditorGUILayout.TextField(image.sprite.name);
elseEditorGUILayout.HelpBox("未发现任何图层", MessageType.Warning);
GUILayout.EndHorizontal();
GUILayout.BeginHorizontal();
GUILayout.Label("位置", GUILayout.Width(labelWidth));
x=EditorGUILayout.TextField(x);
y=EditorGUILayout.TextField(y);
GUILayout.EndHorizontal();
GUILayout.BeginHorizontal();
GUILayout.Label("大小", GUILayout.Width(labelWidth));
w=EditorGUILayout.TextField(w);
h=EditorGUILayout.TextField(h);
GUILayout.EndHorizontal();
GUILayout.FlexibleSpace();
if (GUILayout.Button("确定"))
            {
float.TryParse(x.Replace(x.Substring(x.Length-2, 2), string.Empty), outfloatxValue);
float.TryParse(y.Replace(y.Substring(y.Length-2, 2), string.Empty), outfloatyValue);
float.TryParse(w.Replace(w.Substring(w.Length-2, 2), string.Empty), outfloatwValue);
float.TryParse(h.Replace(h.Substring(h.Length-2, 2), string.Empty), outfloathValue);
//调整位置及大小rt.anchorMin=newVector2(0, 1);
rt.anchorMax=newVector2(0, 1);
rt.pivot=Vector2.one* .5f;
rt.SetSizeWithCurrentAnchors(RectTransform.Axis.Horizontal, wValue);
rt.SetSizeWithCurrentAnchors(RectTransform.Axis.Vertical, hValue);
rt.anchoredPosition=newVector2(xValue+wValue/2f, -(yValue+hValue/2f));
//调整完成后自动设置锚点RectTransformprt=rt.parentasRectTransform;
Vector2anchorMin=newVector2(
rt.anchorMin.x+rt.offsetMin.x/prt.rect.width,
rt.anchorMin.y+rt.offsetMin.y/prt.rect.height);
Vector2anchorMax=newVector2(
rt.anchorMax.x+rt.offsetMax.x/prt.rect.width,
rt.anchorMax.y+rt.offsetMax.y/prt.rect.height);
rt.anchorMin=anchorMin;
rt.anchorMax=anchorMax;
rt.offsetMin=rt.offsetMax=Vector2.zero;
EditorUtility.SetDirty(rt);
            }
        }
privatevoidOnSelectionChange()
        {
Repaint();
        }
    }
}

有了上面的工具后,我又开始了这样的思考,如果我们可以直接拿到一个界面中所有图层的样式信息,包括图层名称、位置信息、大小信息,这些信息形成一个Json数据或其他序列化数据文件,那么便可以通过编写工具一键生成这个界面的Prefab预制体。那么我们只需要定义这样一个数据结构,通过数据反序列化得到这些信息:
publicclassElement{
//图层名称publicstringname;
//横坐标publicstringx;
//纵坐标publicstringy;
//宽度publicstringwidth;
//高度publicstringheight;
//不透明度publicstringalpha;
}

于是我开始向UI设计的同事咨询,他们从设计到上传蓝湖有没有中间产物生成,能不能从中间产物中获取一些有用的信息,但是同事回应说是通过插件直接从Adobe XD上传至蓝湖,因此这条路便行不通了。但是后来我觉得既然能有上传蓝湖这样的插件,那么编写一个生成数据文件的插件完全有可能吧,只不过没人去做这件事,所以我还是觉得这个想法是行得通的,奈何自己做不来。随后我又从前端着手,咨询了一些朋友,能否在蓝湖页面中获取这些信息,最后也是不了了之。
最终只能在Unity中去着手,将更多的工作量通过自动化去完成,于是又有了这样的思路:记录切图所在的文件夹的路径,从蓝湖中复制粘贴界面中所有图层的样式信息,点击生成,通过图层的名称在切图所在的文件夹中加载该切图,创建一个Image物体,通过图层的位置、大小信息去设置该物体的Rect Transform组件属性,最终生成prefab预制体: 

代码如下:
usingSystem;
usingUnityEngine;
usingUnityEditor;
usingUnityEngine.UI;
usingSystem.Collections.Generic;
namespaceSK.Framework{
publicclassLanHu : EditorWindow    {
        [MenuItem("SKFramework/Tools/Lan Hu")]
privatestaticvoidOpen()
        {
GetWindow<LanHu>("蓝湖").Show();
        }
privateclassElement        {
publicstringname;
publicstringx;
publicstringy;
publicstringwidth;
publicstringheight;
publicstringalpha;
        }
privatestringpath;
privateList<Element>elements;
privateconstfloatlabelWidth=60f;
privateVector2scroll;
privatevoidOnEnable()
        {
elements=newList<Element>();
scroll=Vector2.zero;
        }
privatevoidOnDisable()
        {
elements.Clear();
elements=null;
        }
privatevoidOnGUI()
        {
GUILayout.BeginHorizontal();
GUILayout.Label("切图文件夹路径:", GUILayout.Width(100f));
EditorGUILayout.TextField(path);
if(GUILayout.Button("浏览", GUILayout.Width(40f)))
            {
//Assets相对路径path=EditorUtility.OpenFolderPanel("选择切图文件夹", "", "").Replace(Application.dataPath, "Assets");
            }
GUILayout.EndHorizontal();
scroll=EditorGUILayout.BeginScrollView(scroll);
for (inti=0; i<elements.Count; i++)
            {
varelement=elements[i];
GUILayout.BeginVertical("Box");
GUILayout.BeginHorizontal();
GUILayout.Label("图层", GUILayout.Width(labelWidth));
element.name=EditorGUILayout.TextField(element.name);
if (GUILayout.Button("-", GUILayout.Width(20f)))
                {
elements.RemoveAt(i);
Repaint();
                }
GUILayout.EndHorizontal();
GUILayout.BeginHorizontal();
GUILayout.Label("位置", GUILayout.Width(labelWidth));
element.x=EditorGUILayout.TextField(element.x);
element.y=EditorGUILayout.TextField(element.y);
GUILayout.EndHorizontal();
GUILayout.BeginHorizontal();
GUILayout.Label("大小", GUILayout.Width(labelWidth));
element.width=EditorGUILayout.TextField(element.width);
element.height=EditorGUILayout.TextField(element.height);
GUILayout.EndHorizontal();
GUILayout.BeginHorizontal();
GUILayout.Label("透明", GUILayout.Width(labelWidth));
element.alpha=EditorGUILayout.TextField(element.alpha);
GUILayout.EndHorizontal();
GUILayout.EndVertical();
            }
EditorGUILayout.EndScrollView();
GUILayout.FlexibleSpace();
GUILayout.BeginHorizontal();
if (GUILayout.Button("添加"))
            {
elements.Add(newElement());
            }
if (GUILayout.Button("生成"))
            {
//Canvasvararray=path.Split('/');
varcanvas=newGameObject(array[array.Length-1]).AddComponent<Canvas>();
canvas.renderMode=RenderMode.ScreenSpaceCamera;
varcanvasScaler=canvas.gameObject.AddComponent<CanvasScaler>();
canvasScaler.uiScaleMode=CanvasScaler.ScaleMode.ScaleWithScreenSize;
canvasScaler.referenceResolution=newVector2(1920f, 1080f);
for (inti=0; i<elements.Count; i++)
                {
varelement=elements[i];
stringspritePath=path+"/"+element.name+"@2x.png";
varobj=AssetDatabase.LoadAssetAtPath<Sprite>(spritePath);
if (obj!=null)
                    {
varimage=newGameObject(obj.name).AddComponent<Image>();
image.transform.SetParent(canvas.transform, false);
image.sprite=obj;
RectTransformrt=image.transformasRectTransform;
float.TryParse(element.x.Replace(element.x.Substring(element.x.Length-2, 2), string.Empty), outfloatxValue);
float.TryParse(element.y.Replace(element.y.Substring(element.y.Length-2, 2), string.Empty), outfloatyValue);
float.TryParse(element.width.Replace(element.width.Substring(element.width.Length-2, 2), string.Empty), outfloatwValue);
float.TryParse(element.height.Replace(element.height.Substring(element.height.Length-2, 2), string.Empty), outfloathValue);
//调整位置及大小rt.anchorMin=newVector2(0, 1);
rt.anchorMax=newVector2(0, 1);
rt.pivot=Vector2.one* .5f;
rt.SetSizeWithCurrentAnchors(RectTransform.Axis.Horizontal, wValue);
rt.SetSizeWithCurrentAnchors(RectTransform.Axis.Vertical, hValue);
rt.anchoredPosition=newVector2(xValue+wValue/2f, -(yValue+hValue/2f));
//调整完成后自动设置锚点RectTransformprt=rt.parentasRectTransform;
Vector2anchorMin=newVector2(
rt.anchorMin.x+rt.offsetMin.x/prt.rect.width,
rt.anchorMin.y+rt.offsetMin.y/prt.rect.height);
Vector2anchorMax=newVector2(
rt.anchorMax.x+rt.offsetMax.x/prt.rect.width,
rt.anchorMax.y+rt.offsetMax.y/prt.rect.height);
rt.anchorMin=anchorMin;
rt.anchorMax=anchorMax;
rt.offsetMin=rt.offsetMax=Vector2.zero;
                    }
else                    {
Debug.Log($"<color=yellow>加载切图失败 {spritePath}</color>");
                    }
                }
varprefab=PrefabUtility.SaveAsPrefabAsset(canvas.gameObject, $"Assets/{canvas.name}.prefab", outboolresult);
if (!result)
                {
Debug.Log($"<color=yellow>生成预制体失败 {canvas.name}</color>");
                }
else                {
EditorGUIUtility.PingObject(prefab);
                }
            }
GUILayout.EndHorizontal();
        }
    }
}

