个人技术文章记录
能力说明:
了解变量作用域、Java类的结构,能够创建带main方法可执行的java应用,从命令行运行java程序;能够使用Java基本数据类型、运算符和控制结构、数组、循环结构书写和运行简单的Java程序。
暂时未有相关云产品技术能力~
阿里云技能认证
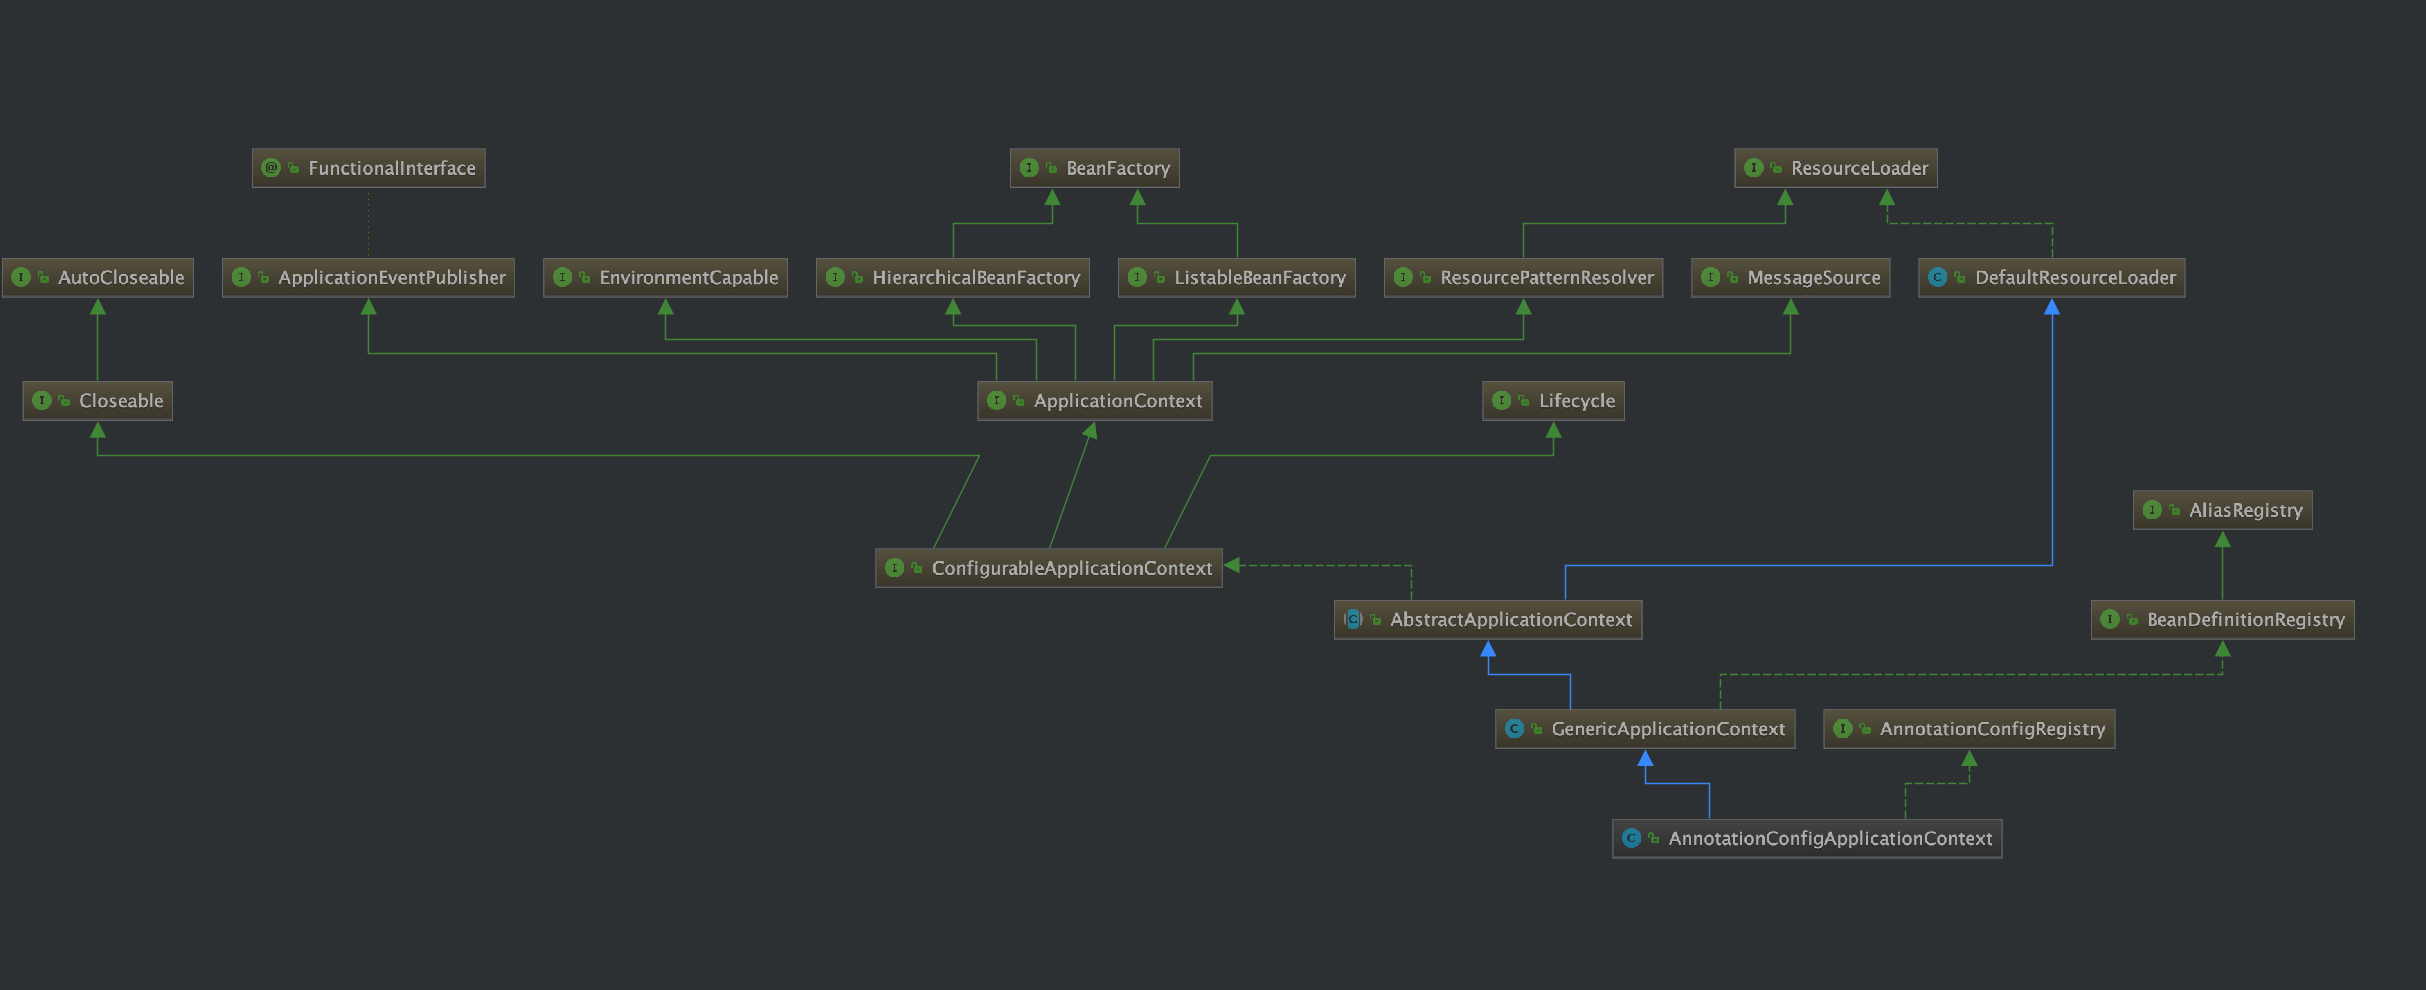
详细说明基本概念 AOP 是面向切面|面向方面编程的简称,Aspect-Oriented Programming。 Aspect 是一种模块化机制,是用来描述分散在对象,类,函数中的横切关注点。从关注点分离出横切关注点是面向切面的程序设计的核心概念。分离关注点使解决特定领域问题的代码从业务逻辑中独立出来,业务逻辑的代码中不在含有针对特定领域问题的代码调用,业务逻辑和特定领域的问题的关系通过切面来封装,维护,这样原本分散在整个程序中的变动就可以很好的管理起来了。 基础: 待增强对象或者目标对象 切面: 包含对基础的增强应用 配置: 可以看成一种编织,通过在AOP体系中提供这个配置环境,将基础和切面结合起来,从而完成切面对目标对象的编织实现 Advice(通知): 定义在连接点做什么,为切面增强提供织入接口。在Spring AOP 中,它主要描述Spring AOP 围绕方法调用而注入的切面行为。 Pointcut(切点):决定Advice通知应该作用于哪个连接点,也就是说通过Pointcut来定义需要增强的方法集合。 Advisor(通知器):完成对目标方法的切面增强设计(advice)和关注点的设计以后,需要一个对象把它们结合起来,完成这个作用的就是Advisor(通知器)。通过Advisor ,可以定义应该使用那个通知并在哪个关注点使用它。 源码分析 ### 启动过程 在Sprint Boot 启动类上加入 注解 @EnableAspectJAutoProxy(proxyTargetClass = true) ,注解源码为: @Target({ElementType.TYPE}) @Retention(RetentionPolicy.RUNTIME) @Documented @Import({AspectJAutoProxyRegistrar.class}) public @interface EnableAspectJAutoProxy { boolean proxyTargetClass() default false; boolean exposeProxy() default false; } 该注解使用 @Import 注解引入 AspectJAutoProxyRegistrar , 跟踪 AspectJAutoProxyRegistrar 类: class AspectJAutoProxyRegistrar implements ImportBeanDefinitionRegistrar { /** * Register, escalate, and configure the AspectJ auto proxy creator based on the value * of the @{@link EnableAspectJAutoProxy#proxyTargetClass()} attribute on the importing * {@code @Configuration} class. */ @Override public void registerBeanDefinitions(AnnotationMetadata importingClassMetadata , BeanDefinitionRegistry registry) { /* 往容器中注入AnnotationAwareAspectJAutoProxyCreator类,bean名称为 org.springframework.aop.config.internalAutoProxyCreator */ AopConfigUtils.registerAspectJAnnotationAutoProxyCreatorIfNecessary(registry); /* 读取主配置类的 EnableAspectJAutoProxy的注解的属性 */ AnnotationAttributes enableAspectJAutoProxy = AnnotationConfigUtils.attributesFor(importingClassMetadata, EnableAspectJAutoProxy.class); if (enableAspectJAutoProxy != null) { if (enableAspectJAutoProxy.getBoolean("proxyTargetClass")) { AopConfigUtils.forceAutoProxyCreatorToUseClassProxying(registry); } if (enableAspectJAutoProxy.getBoolean("exposeProxy")) { AopConfigUtils.forceAutoProxyCreatorToExposeProxy(registry); } } } } 通过源码发现,AspectJAutoProxyRegistrar 类 实现了ImportBeanDefinitionRegistrar 接口,在容器启动的时候会调用所有实现ImportBeanDefinitionRegistrar的 bean 的registerBeanDefinitions 方法。在方法内部:1.调用 org.springframework.aop.config.AopConfigUtils#registerAspectJAnnotationAutoProxyCreatorIfNecessary(org.springframework.beans.factory.support.BeanDefinitionRegistry) a. 在`registerAspectJAnnotationAutoProxyCreatorIfNecessary` 方法内部: public static BeanDefinition registerAspectJAnnotationAutoProxyCreatorIfNecessary(BeanDefinitionRegistry registry) { return registerAspectJAnnotationAutoProxyCreatorIfNecessary(registry, (Object)null); } 最终调用 org.springframework.aop.config.AopConfigUtils#registerOrEscalateApcAsRequired 方法, 参数cls 为 AnnotationAwareAspectJAutoProxyCreator.class private static BeanDefinition registerOrEscalateApcAsRequired(Class<?> cls, BeanDefinitionRegistry registry, @Nullable Object source) { Assert.notNull(registry, "BeanDefinitionRegistry must not be null"); if (registry.containsBeanDefinition( "org.springframework.aop.config.internalAutoProxyCreator")) { BeanDefinition apcDefinition = registry.getBeanDefinition( "org.springframework.aop.config.internalAutoProxyCreator"); if (!cls.getName().equals(apcDefinition.getBeanClassName())) { int currentPriority = findPriorityForClass( apcDefinition.getBeanClassName()); int requiredPriority = findPriorityForClass(cls); if (currentPriority < requiredPriority) { apcDefinition.setBeanClassName(cls.getName()); } } return null; } else { RootBeanDefinition beanDefinition = new RootBeanDefinition(cls); beanDefinition.setSource(source); beanDefinition.getPropertyValues().add("order", -2147483648); beanDefinition.setRole(2); registry.registerBeanDefinition( "org.springframework.aop.config.internalAutoProxyCreator", beanDefinition); return beanDefinition; } } 在方法内部, 首先检查容器中是否包含名称为 org.springframework.aop.config.internalAutoProxyCreator 的bean ,容器第一次启动总不包含该bean,进入else 逻辑,创建一个 AnnotationAwareAspectJAutoProxyCreator.class的bean定义,并且注册bean的名称为AnnotationAwareAspectJAutoProxyCreator.class 2.调用org.springframework.context.annotation.AnnotationConfigUtils#attributesFor(org.springframework.core.type.AnnotatedTypeMetadata, java.lang.Class<?>) 该类主要完成 读取主配置类的 EnableAspectJAutoProxy的注解的属性。 主要检查 proxyTargetClass 和 exposeProxy 属性的值 AnnotationAwareAspectJAutoProxyCreator 在容器启动的过程中, AOP 向容器中注入了一个 AnnotationAwareAspectJAutoProxyCreator 的 bean , 我们来分析一下这个bean 。 类的继承体系 :通过 类的继承体系,我们发现 AnnotationAwareAspectJAutoProxyCreator 实现了 BeanFactoryAware ,BeanClassLoaderAware, SmartInstantiationAwareBeanPostProcessor,InstantiationAwareBeanPostProcessor , BeanPostProcessor , BeanClassLoaderAware 等接口 来介入容器启动过程容Bean的生命周期。类的接口实现: 在 AnnotationAwareAspectJAutoProxyCreator的接口实现中: BeanFactoryAware接口:定义了setBeanFactory 接口, 在容器启动的时候调用org.springframework.aop.framework.autoproxy.AbstractAdvisorAutoProxyCreator#setBeanFactory: @Override public void setBeanFactory(BeanFactory beanFactory) { // 设置容器 super.setBeanFactory(beanFactory); if (!(beanFactory instanceof ConfigurableListableBeanFactory)) { throw new IllegalArgumentException( "AdvisorAutoProxyCreator requires a ConfigurableListableBeanFactory: " + beanFactory); } initBeanFactory((ConfigurableListableBeanFactory) beanFactory); } protected void initBeanFactory(ConfigurableListableBeanFactory beanFactory) { // 创建增强器探索工具 this.advisorRetrievalHelper = new BeanFactoryAdvisorRetrievalHelperAdapter(beanFactory); } 其中initBeanFactory 最终调用org.springframework.aop.aspectj.annotation.AnnotationAwareAspectJAutoProxyCreator#initBeanFactory: @Override protected void initBeanFactory(ConfigurableListableBeanFactory beanFactory) { // 调用父类的initBeanFactory方法 super.initBeanFactory(beanFactory); if (this.aspectJAdvisorFactory == null) { // 创建Aspect增强器工厂 this.aspectJAdvisorFactory = new ReflectiveAspectJAdvisorFactory(beanFactory); } // 创建一个增强器的构建器 this.aspectJAdvisorsBuilder = new BeanFactoryAspectJAdvisorsBuilderAdapter(beanFactory, this.aspectJAdvisorFactory); } InstantiationAwareBeanPostProcessor接口:我们知道在spring 容器创建任意一个bean的过程中。在 org.springframework.beans.factory.support.AbstractAutowireCapableBeanFactory#createBean的方法中: @Override protected Object createBean(String beanName, RootBeanDefinition mbd, @Nullable Object[] args) throws BeanCreationException { // ... 省略代码 try { // Give BeanPostProcessors a chance to return a proxy instead of the target bean instance. Object bean = resolveBeforeInstantiation(beanName, mbdToUse); if (bean != null) { return bean; } } catch (Throwable ex) { throw new BeanCreationException(mbdToUse.getResourceDescription(), beanName, "BeanPostProcessor before instantiation of bean failed", ex); } Object beanInstance = doCreateBean(beanName, mbdToUse, args); //... 省略代码 } 在调用真正创建bean的方法doCreateBean 之前, 先调用了 resolveBeforeInstantiation方法。 我们跟踪org.springframework.beans.factory.support.AbstractAutowireCapableBeanFactory#resolveBeforeInstantiation 方法: protected Object resolveBeforeInstantiation(String beanName, RootBeanDefinition mbd) { Object bean = null; if (!Boolean.FALSE.equals(mbd.beforeInstantiationResolved)) { // Make sure bean class is actually resolved at this point. // 当容器中存在InstantiationAwareBeanPostProcessors 时,调用InstantiationAwareBeanPostProcessors 的 postProcessBeforeInstantiation 方法和 postProcessAfterInitialization 方法 if (!mbd.isSynthetic() && hasInstantiationAwareBeanPostProcessors()) { Class<?> targetType = determineTargetType(beanName, mbd); if (targetType != null) { bean = applyBeanPostProcessorsBeforeInstantiation(targetType, beanName); if (bean != null) { bean = applyBeanPostProcessorsAfterInitialization(bean, beanName); } } } mbd.beforeInstantiationResolved = (bean != null); } return bean; } 当容器中存在InstantiationAwareBeanPostProcessors的bean时 1.先调用applyBeanPostProcessorsBeforeInstantiation方法,2.然后在调用applyBeanPostProcessorsAfterInitialization 方法跟踪 applyBeanPostProcessorsBeforeInstantiation 方法 protected Object applyBeanPostProcessorsBeforeInstantiation(Class<?> beanClass, String beanName) { // 获取容器中所有BeanPostProcessor, 若BeanPostProcessor 是InstantiationAwareBeanPostProcessor ,则调用其 postProcessBeforeInstantiation 方法 for (BeanPostProcessor bp : getBeanPostProcessors()) { if (bp instanceof InstantiationAwareBeanPostProcessor) { InstantiationAwareBeanPostProcessor ibp = (InstantiationAwareBeanPostProcessor) bp; Object result = ibp.postProcessBeforeInstantiation(beanClass, beanName); if (result != null) { return result; } } } return null; } 在applyBeanPostProcessorsBeforeInstantiation 方法内部,首先获取容器中所有BeanPostProcessor, 若BeanPostProcessor 是InstantiationAwareBeanPostProcessor , 则调用其 postProcessBeforeInstantiation 方法 。 然后我们在容器启动的时候,在容器中注册了AnnotationAwareAspectJAutoProxyCreator 并且这个bean 实现的InstantiationAwareBeanPostProcessor接口,所以在容器创建bean的时候,会触发AnnotationAwareAspectJAutoProxyCreator的applyBeanPostProcessorsBeforeInstantiation方法。 这个是Spring AOP 的真正入口。 接下来我们详细分析: org.springframework.aop.framework.autoproxy.AbstractAutoProxyCreator#postProcessBeforeInstantiation (AnnotationAwareAspectJAutoProxyCreator 继承了 AbstractAutoProxyCreator ) postProcessBeforeInstantiation 调用链: 详细分析:在postProcessBeforeInstantiation 中查找所有的增强器org.springframework.aop.framework.autoproxy.AbstractAutoProxyCreator#postProcessBeforeInstantiation的源码如下,在容器创建任何一个bean的时候触发: public Object postProcessBeforeInstantiation(Class<?> beanClass, String beanName) { //1.先获取 bean的key Object cacheKey = getCacheKey(beanClass, beanName); //2. 判断bean是否已经处理过,处理过的bean被放入targetSourcedBeans 集合中。 if (!StringUtils.hasLength(beanName) || !this.targetSourcedBeans.contains(beanName)) { //3.判断是否已经包含bean的增强器 if (this.advisedBeans.containsKey(cacheKey)) { return null; } //4.判断bean类型 和 是否应该跳过 if (isInfrastructureClass(beanClass) || shouldSkip(beanClass, beanName)) { this.advisedBeans.put(cacheKey, Boolean.FALSE); return null; } } // Create proxy here if we have a custom TargetSource. // Suppresses unnecessary default instantiation of the target bean: // The TargetSource will handle target instances in a custom fashion. TargetSource targetSource = getCustomTargetSource(beanClass, beanName); if (targetSource != null) { if (StringUtils.hasLength(beanName)) { this.targetSourcedBeans.add(beanName); } Object[] specificInterceptors = getAdvicesAndAdvisorsForBean(beanClass, beanName, targetSource); // 创建代理bean Object proxy = createProxy(beanClass, beanName, specificInterceptors, targetSource); this.proxyTypes.put(cacheKey, proxy.getClass()); return proxy; } return null; } 1.先获取 bean的key2.判断bean是否已经处理过,处理过的bean被放入targetSourcedBeans 集合中。3.判断是否已经包含bean的增强器4.判断是否是需要增强的bean a.判断bean的类型是否为基础类:Advice,Pointcut,Advisor,AopInfrastructureBean进入isInfrastructureClass源码: protected boolean isInfrastructureClass(Class<?> beanClass) { boolean retVal = Advice.class.isAssignableFrom(beanClass) || Pointcut.class.isAssignableFrom(beanClass) || Advisor.class.isAssignableFrom(beanClass) || AopInfrastructureBean.class.isAssignableFrom(beanClass); if (retVal && logger.isTraceEnabled()) { logger.trace(""); } return retVal; } b.判断是否跳过处理,进入shouldSkip方法源码 @Override protected boolean shouldSkip(Class<?> beanClass, String beanName) { // 查找容器中所有的候选的增强器列表 List<Advisor> candidateAdvisors = findCandidateAdvisors(); // 若列表中包含当前bean的增强器,返回true for (Advisor advisor : candidateAdvisors) { if (advisor instanceof AspectJPointcutAdvisor && ((AspectJPointcutAdvisor) advisor).getAspectName().equals(beanName)) { return true; } } return super.shouldSkip(beanClass, beanName); } 跟踪findCandidateAdvisors 方法内部: @Override protected List<Advisor> findCandidateAdvisors() { // Add all the Spring advisors found according to superclass rules. // 容器中所有实现Advisor接口的bean组件,熟悉 Spring 事物的都知道,Advisor接口是为Spring事务服务的 List<Advisor> advisors = super.findCandidateAdvisors(); // Build Advisors for all AspectJ aspects in the bean factory. // 查找容器是标注@Aspect 组件的bean ,并解析bean的标注 @Before, @After, @AfterReturning, @AfterThrowing 的方法,即查找增强器。并加入缓存中。 if (this.aspectJAdvisorsBuilder != null) { advisors.addAll(this.aspectJAdvisorsBuilder.buildAspectJAdvisors()); } return advisors; } 5.后续第一次执行不到 postProcessAfterInitialization 调用链:详细过程:跟踪org.springframework.aop.framework.autoproxy.AbstractAutoProxyCreator#postProcessAfterInitialization源码: @Override public Object postProcessAfterInitialization(@Nullable Object bean, String beanName) { if (bean != null) { Object cacheKey = getCacheKey(bean.getClass(), beanName); if (this.earlyProxyReferences.remove(cacheKey) != bean) { // 必要的话,包装代理对象 return wrapIfNecessary(bean, beanName, cacheKey); } } return bean; } 进入wrapIfNecessary方法: protected Object wrapIfNecessary(Object bean, String beanName, Object cacheKey) { if (StringUtils.hasLength(beanName) && this.targetSourcedBeans.contains(beanName)) { return bean; } if (Boolean.FALSE.equals(this.advisedBeans.get(cacheKey))) { return bean; } // 判断是否生成代理对象 if (isInfrastructureClass(bean.getClass()) || shouldSkip(bean.getClass(), beanName)) { this.advisedBeans.put(cacheKey, Boolean.FALSE); return bean; } // 获取通知和增强器 // Create proxy if we have advice. Object[] specificInterceptors = getAdvicesAndAdvisorsForBean(bean.getClass(), beanName, null); if (specificInterceptors != DO_NOT_PROXY) { this.advisedBeans.put(cacheKey, Boolean.TRUE); // 创建代理对象 Object proxy = createProxy( bean.getClass(), beanName, specificInterceptors, new SingletonTargetSource(bean)); this.proxyTypes.put(cacheKey, proxy.getClass()); return proxy; } this.advisedBeans.put(cacheKey, Boolean.FALSE); return bean; } 跟踪getAdvicesAndAdvisorsForBean()方法最终调用:org.springframework.aop.framework.autoproxy.AbstractAdvisorAutoProxyCreator#findEligibleAdvisors: protected List<Advisor> findEligibleAdvisors(Class<?> beanClass, String beanName) { // 找到候选的增强器 List<Advisor> candidateAdvisors = findCandidateAdvisors(); // 筛选可用的增强器 List<Advisor> eligibleAdvisors = findAdvisorsThatCanApply(candidateAdvisors, beanClass, beanName); // 扩展 extendAdvisors(eligibleAdvisors); if (!eligibleAdvisors.isEmpty()) { // 排序 eligibleAdvisors = sortAdvisors(eligibleAdvisors); } return eligibleAdvisors; } 跟踪: findCandidateAdvisors(): @Override protected List<Advisor> findCandidateAdvisors() { // Add all the Spring advisors found according to superclass rules. // 查找所有 实现Advisor的接口的增强器 List<Advisor> advisors = super.findCandidateAdvisors(); // Build Advisors for all AspectJ aspects in the bean factory. if (this.aspectJAdvisorsBuilder != null) { // 查找所有Aspect ,查找容器是标注@Aspect 组件的bean ,并解析bean的标注 @Before, @After, @AfterReturning, @AfterThrowing 的方法,即查找增强器。并加入缓存中。 advisors.addAll(this.aspectJAdvisorsBuilder.buildAspectJAdvisors()); } return advisors; } 跟踪:findAdvisorsThatCanApply 并最终调用:org.springframework.aop.support.AopUtils#findAdvisorsThatCanApply public static List<Advisor> findAdvisorsThatCanApply(List<Advisor> candidateAdvisors, Class<?> clazz) { if (candidateAdvisors.isEmpty()) { return candidateAdvisors; } List<Advisor> eligibleAdvisors = new ArrayList<>(); for (Advisor candidate : candidateAdvisors) { if (candidate instanceof IntroductionAdvisor && canApply(candidate, clazz)) { eligibleAdvisors.add(candidate); } } boolean hasIntroductions = !eligibleAdvisors.isEmpty(); for (Advisor candidate : candidateAdvisors) { if (candidate instanceof IntroductionAdvisor) { // already processed continue; } if (canApply(candidate, clazz, hasIntroductions)) { eligibleAdvisors.add(candidate); } } return eligibleAdvisors; } 进入 canApply方法: 最终调用:org.springframework.aop.support.AopUtils#canApply(org.springframework.aop.Pointcut, java.lang.Class<?>, boolean)方法: public static boolean canApply(Pointcut pc, Class<?> targetClass, boolean hasIntroductions) { Assert.notNull(pc, "Pointcut must not be null"); if (!pc.getClassFilter().matches(targetClass)) { return false; } MethodMatcher methodMatcher = pc.getMethodMatcher(); if (methodMatcher == MethodMatcher.TRUE) { // No need to iterate the methods if we're matching any method anyway... return true; } // 创建方法匹配器 IntroductionAwareMethodMatcher introductionAwareMethodMatcher = null; if (methodMatcher instanceof IntroductionAwareMethodMatcher) { introductionAwareMethodMatcher = (IntroductionAwareMethodMatcher) methodMatcher; } Set<Class<?>> classes = new LinkedHashSet<>(); if (!Proxy.isProxyClass(targetClass)) { classes.add(ClassUtils.getUserClass(targetClass)); } classes.addAll(ClassUtils.getAllInterfacesForClassAsSet(targetClass)); for (Class<?> clazz : classes) { Method[] methods = ReflectionUtils.getAllDeclaredMethods(clazz); for (Method method : methods) { if (introductionAwareMethodMatcher != null ? introductionAwareMethodMatcher.matches(method, targetClass, hasIntroductions) : // 匹配切面的方法 methodMatcher.matches(method, targetClass)) { return true; } } } return false; } getAdvicesAndAdvisorsForBean 方法逻辑分析结束。 跟踪createProxy 方法:org.springframework.aop.framework.autoproxy.AbstractAutoProxyCreator#createProxy protected Object createProxy(Class<?> beanClass, @Nullable String beanName, @Nullable Object[] specificInterceptors, TargetSource targetSource) { if (this.beanFactory instanceof ConfigurableListableBeanFactory) { AutoProxyUtils.exposeTargetClass((ConfigurableListableBeanFactory) this.beanFactory, beanName, beanClass); } // 创建代理工厂 ProxyFactory proxyFactory = new ProxyFactory(); proxyFactory.copyFrom(this); // 设置使用JDK代理还是使用CGLIB代理 if (!proxyFactory.isProxyTargetClass()) { if (shouldProxyTargetClass(beanClass, beanName)) { proxyFactory.setProxyTargetClass(true); } else { evaluateProxyInterfaces(beanClass, proxyFactory); } } // 织入增强器 Advisor[] advisors = buildAdvisors(beanName, specificInterceptors); proxyFactory.addAdvisors(advisors); proxyFactory.setTargetSource(targetSource); customizeProxyFactory(proxyFactory); proxyFactory.setFrozen(this.freezeProxy); if (advisorsPreFiltered()) { proxyFactory.setPreFiltered(true); } // 创建代理对象, 代理对象持有 增强器。 return proxyFactory.getProxy(getProxyClassLoader()); } 这样 postProcessAfterInitialization 的逻辑就分析。 总结 在分析了Spring AOP的启动过程,总结一下总体过程: 1.setBeanFacotry 接口,在容器启动的时候,创建了 BeanFactoryAdvisorRetrievalHelperAdapter 增强器探索更具和BeanFactoryAspectJAdvisorsBuilderAdapter 增强器的构建器 2.postProcessBeforeInstantiation 接口: 查找所有的切面和Advisor,并将切面的通知解析,构建成初步的增强器,加入到缓存中来。 3.postProcessAfterInitialization 接口,从缓存取出所有的将所有的增强器,创建代理工厂,并织入增强器,创建代理对象 调用过程: 待更新...
安装 brew install node 验证 node node -v 验证 npm npm -v
首先tap一个仓库 brew tap mongodb/brew 安装社区版,4.2 版本 brew install mongodb-community@4.2 启动 brew services start mongodb-community 验证 ps aux | grep -v grep | grep mongod 关闭 brew services stop mongodb-community 相关目录 安装目录:/usr/local/opt/mongodb-community 配置文件:/usr/local/etc/mongod.conf 日志目录路径:/usr/local/var/log/mongodb 数据目录路径:/usr/local/var/mongodb
Hibernate-Redis集成 GitHub地址 介绍 在Spring Boot 中,以JPA为ORM框架的微服务,默认是二级缓存是关闭的。因为在分布式集群架构下,本地的二级缓存必然会带来多个微服务实例缓存不一致问题。将二级缓存移交给第三方中间件可以很好的解决缓存不一致问题。并且Redis一款高性能的K-V存储中间件,在保证缓存一致性的同时,还能提供高性能,高可用的特性。本篇文章就是基于开源框架hibernate-redisGitHub地址,将redis集成到微服务中作为JPA中作为二级缓存存储中间件。 ###集成 在hibernate-redisConfiguration官方给很多种集成方式,针对于不同redis模式(redis单体模式,主从模式,哨兵模式,集群模式)给出了不同配置说明,本文为以最简单redis单体模式,将redis集成到服务中。 0. redis安装启动 将redis安装并启动,本文redis的地址为:127.0.0.1:6379 1. 引入pom <dependency> <groupId>com.github.debop</groupId> <artifactId>hibernate-redis</artifactId> <version>2.4.0</version> </dependency> <dependency> <groupId>org.redisson</groupId> <artifactId>redisson</artifactId> <version>2.5.1</version> </dependency> <dependency> <groupId>de.ruedigermoeller</groupId> <artifactId>fst</artifactId> <version>2.48</version> </dependency> <dependency> <groupId>org.xerial.snappy</groupId> <artifactId>snappy-java</artifactId> <version>1.1.7.3</version> </dependency> 2 . 配置 A . 在 src/main/resources/application.yml 配置数据源和开启二级缓存 spring: application: name: jps-redis-demo datasource: username: root password: ***** url: jdbc:mysql://localhost:3306/tenant-center?&useUnicode=true&characterEncoding=UTF-8&useSSL=false driver-class-name: com.mysql.cj.jdbc.Driver type: com.alibaba.druid.pool.DruidDataSource jpa: hibernate: naming: physical-strategy: org.springframework.boot.orm.jpa.hibernate.SpringPhysicalNamingStrategy ddl-auto: update database-platform: org.hibernate.dialect.MySQL5InnoDBDialect properties: ## 缓存策略,总是缓存 javax: persistence: sharedCache: mode: ALL ##二级缓存配置 hibernate: cache: ## 开启二级缓存 use_second_level_cache: true ## 查询缓存 use_query_cache: true ## RedisRegionFactory region: factory_class: org.hibernate.cache.redis.hibernate52.SingletonRedisRegionFactory ## 缓存标示前缀 region_prefix: hibernate ## 结构化缓存实体 use_structured_entries: true ## 配置文件路径 provider_configuration_file_resource_path: classpath:conf/hibernate-redis.properties redisson-config: classpath:conf/redisson.yaml redis: expiryInSeconds: default: 120 hibernate: common: 0 account: 1200 show-sql: true 缓存模式 javax.persistence.shared.Cache.mode 官方解释:SharedCacheMode 文本以ALL 表示:所有实体都缓存 B . 在 src/main/resources/创建 conf目录存放hibernate-redis的配置文件,并创建hibernate-redis.properties 和 redisson.yaml 配置文件 hibernate-redis.properties 配置文件: redisson-config=classpath:conf/redisson.yaml # # Cache Expiry settings # 'hibernate' is second cache prefix # 'common', 'account' is actual region name # # default = 120 seconds (2 minutes) (see RedisCacheUtil.DEFAULT_EXPIRY_IN_SECONDS) # redis.expiryInSeconds.default=360 redis.expiryInSeconds.hibernate.common=0 redis.expiryInSeconds.hibernate.account=1200 redisson.yaml 配置文件: singleServerConfig: ## If pooled connection not used for a timeout time and current connections amount bigger than minimum idle connections pool size, then it will closed and removed from pool. Value in milliseconds. idleConnectionTimeout: 10000 ## Timeout during connecting to any Redis server. connectTimeout: 10000 ## Redis server response timeout. Starts to countdown when Redis command was succesfully sent. Value in milliseconds. timeout: 3000 ## Error will be thrown if Redis command can't be sended to Redis server after retryAttempts. But if it sent succesfully then timeout will be started. retryAttempts: 3 ## Time interval after which another one attempt to send Redis command will be executed. Value in milliseconds retryInterval: 1500 ## Password for Redis server authentication password: null ## Subscriptions per subscribe connection limit. Used by RTopic, RPatternTopic, RLock, RSemaphore, RCountDownLatch, RClusteredLocalCachedMap, RClusteredLocalCachedMapCache, RLocalCachedMap, RLocalCachedMapCache objects and Hibernate READ_WRITE cache strategy. subscriptionsPerConnection: 5 ## Name of client connection clientName: null ## Redis server address in host:port format. Use rediss:// protocol for SSL connection. address: - "redis://127.0.0.1:6379" ## Minimum idle Redis subscription connection amount. subscriptionConnectionMinimumIdleSize: 1 ## Redis subscription connection maximum pool size. subscriptionConnectionPoolSize: 50 ## Minimum idle Redis connection amount. connectionMinimumIdleSize: 24 ## Redis connection maximum pool size. connectionPoolSize: 64 ## Database index used for Redis connection database: 0 ## DNS change monitoring interval. Applications must ensure the JVM DNS cache TTL is low enough to support this. Set -1 to disable. Multiple IP bindings for single hostname supported in Proxy mode. dnsMonitoringInterval: 5000 threads: 16 ## Threads amount shared between all redis clients used by Redisson. Netty threads used in Redis response decoding and command sending. nettyThreads: 32 ## Redis data codec. Used during read and write Redis data. Several implementations are available: codec: !<org.redisson.codec.FstCodec> {} ## Available values: default TransportMode.NIO #TransportMode.NIO, #TransportMode.EPOLL - requires netty-transport-native-epoll lib in classpath #TransportMode.KQUEUE - requires netty-transport-native-kqueue lib in classpath ## transportMode: "NIO" 配置文件中都有关于配置的官方说明,其中transportMode:"NIO" 为默认配置,可以不配置,配置会导致文件格式解析问题。 3 . 注解启动 在启动类上加入缓存启动注解 @SpringBootApplication @EnableCaching public class JpaRedisDemoApplication { public static void main(String[] args) { SpringApplication.run(JpaRedisDemoApplication.class, args);} } 3 . 创建实体测试 创建相应的实体测试二级缓存是否生效。 就这样简单四个步骤就可以将hibernate-redis集成到JPA中 版本说明 hibernate-redis 官方发布的版本为2.3.2 ,可以支持hibernate (4.x, 5.1.x, 5.2.x) ,但是本文在集成该hibernate-core-5.2.11.Final版本, 出现问题: 官方的问题列表中也存在这个问题,并且说明在hibernate-redis-2.4.0 版本中解决,但2.4.0 版本还未发布,需要手动下载jar,并安装到本地仓库中去下载地址:hibernate-redis-2.4.0安装命令: mvn install:install-file -Dfile=hibernate-redis-2.4.0.jar -DgroupId=com.github.debop -DartifactId=hibernate-redis -Dversion=2.4.0 -Dpackaging=jar 源代码实例 本篇源代码实例:jpa-redis-demo
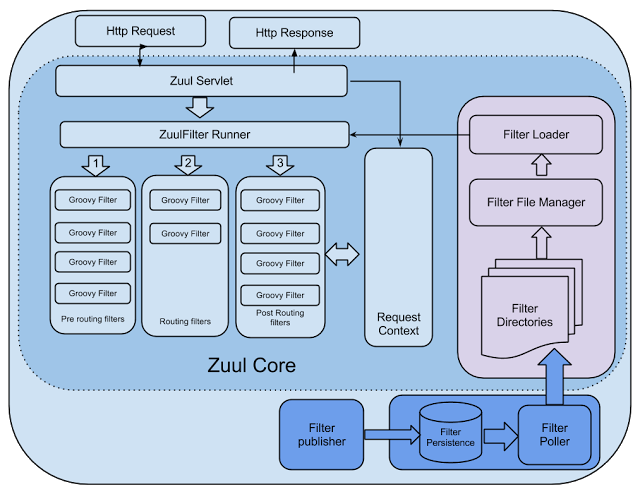
Zuul 架构图 Zuul的官方文档中的架构图从架构图中可以看到 Zuul 通过Zuul Servlet 和 一系列 Zuul Filter 来完成智能路由和过滤器的功能。 Zuul 工作原理概述(转) 在Zuul中,整个请求的过程是这样的,首先将请求给 ZuulServlet 处理,ZuulServlet中有一个ZuulRunner对象,该对象中初始化了RequestContext, RequestContext 作为整个请求的上下文,封装了请求的一些数据,并被所有的ZuulFilter共享。ZuulRunner 中还有 FilterProcessor ,FilterProcessor作为执行所有的ZuulFilter的管理器。FilterProcessor从 FilterLoader 中获取ZuulFilter,而ZuulFilter是被FilterFileManager所加载,并支持groovy热加载,采用了轮询的方式热加载。 有了这些Filter之后,ZuulServlet首先执行的pre类型的过滤器,再执行route类型的过滤器,最后执行的是post 类型的过滤器。 如果在执行这些过滤器有错误的时候则会执行error类型的过滤器。执行完这些过滤器,最终将请求的结果返回给客户端。 Zuul 启动—源码分析 在程序的启动类上加@EnableZuulProxy 注解,我们可以使用Zuul 提供的功能了,该注解的源码为: @Target({ElementType.TYPE}) @Retention(RetentionPolicy.RUNTIME) @Import({ZuulProxyMarkerConfiguration.class}) public @interface EnableZuulProxy { } 源码中,@EnableZuulProxy 引入了ZuulProxyMarkerConfiguration 配置类,跟踪ZuulProxyMarkerConfiguration 类: public class ZuulProxyMarkerConfiguration { public ZuulProxyMarkerConfiguration() { } @Bean public ZuulProxyMarkerConfiguration.Marker zuulProxyMarkerBean() { return new ZuulProxyMarkerConfiguration.Marker(); } class Marker { Marker() { } } } 在ZuulProxyMarkerConfiguration 配置类中,发现只是注册了一个ZuulProxyMarkerConfiguration.Marker的bean。我们通过分析应该会有依赖这个bean的配置类。然后我们找到了 ZuulProxyAutoConfiguration 依赖了ZuulProxyMarkerConfiguration.Marker的bean。跟踪 ZuulProxyAutoConfiguration : @Configuration @Import({RestClientRibbonConfiguration.class, OkHttpRibbonConfiguration.class, HttpClientRibbonConfiguration.class, HttpClientConfiguration.class}) @ConditionalOnBean({Marker.class}) public class ZuulProxyAutoConfiguration extends ZuulServerAutoConfiguration { @Bean @ConditionalOnMissingBean({DiscoveryClientRouteLocator.class}) public DiscoveryClientRouteLocator discoveryRouteLocator() { return new DiscoveryClientRouteLocator(this.server.getServlet().getContextPath(), this.discovery, this.zuulProperties, this.serviceRouteMapper, this.registration); } @Bean @ConditionalOnMissingBean({PreDecorationFilter.class}) public PreDecorationFilter preDecorationFilter(RouteLocator routeLocator, ProxyRequestHelper proxyRequestHelper) { return new PreDecorationFilter(routeLocator, this.server.getServlet().getContextPath(), this.zuulProperties, proxyRequestHelper); } @Bean @ConditionalOnMissingBean({RibbonRoutingFilter.class}) public RibbonRoutingFilter ribbonRoutingFilter(ProxyRequestHelper helper, RibbonCommandFactory<?> ribbonCommandFactory) { RibbonRoutingFilter filter = new RibbonRoutingFilter(helper, ribbonCommandFactory, this.requestCustomizers); return filter; } @Bean @ConditionalOnMissingBean({SimpleHostRoutingFilter.class, CloseableHttpClient.class}) public SimpleHostRoutingFilter simpleHostRoutingFilter(ProxyRequestHelper helper, ZuulProperties zuulProperties, ApacheHttpClientConnectionManagerFactory connectionManagerFactory, ApacheHttpClientFactory httpClientFactory) { return new SimpleHostRoutingFilter(helper, zuulProperties, connectionManagerFactory, httpClientFactory); } @Bean @ConditionalOnMissingBean({SimpleHostRoutingFilter.class}) public SimpleHostRoutingFilter simpleHostRoutingFilter2(ProxyRequestHelper helper, ZuulProperties zuulProperties, CloseableHttpClient httpClient) { return new SimpleHostRoutingFilter(helper, zuulProperties, httpClient); } @Bean @ConditionalOnMissingBean({ServiceRouteMapper.class}) public ServiceRouteMapper serviceRouteMapper() { return new SimpleServiceRouteMapper(); } } 我们发现在类ZuulProxyAutoConfiguration中,引入了RestClientRibbonConfiguration, OkHttpRibbonConfiguration, HttpClientRibbonConfiguration, HttpClientConfiguration,Zuul默认是用HttpClientRibbonConfiguration做负载均衡配置, 注入了DiscoveryClient、RibbonConfiguration用作负载均衡相关。注入了一些列的Filter,pre类型: PreDecorationFilter ; // 装饰 Requestroute类型: RibbonRoutingFilter , SimpleHostRoutingFilter ; // 路由Filter在ZuulProxyAutoConfiguration 的父类ZuulServerAutoConfiguration中,也引入了一些配置信息: @EnableConfigurationProperties({ZuulProperties.class}) @ConditionalOnClass({ZuulServlet.class, ZuulServletFilter.class}) @ConditionalOnBean({Marker.class}) public class ZuulServerAutoConfiguration { // 在缺失`ZuulServlet`的情况下注入`ZuulServlet` @Bean @ConditionalOnMissingBean( name = {"zuulServlet"} ) @ConditionalOnProperty( name = {"zuul.use-filter"}, havingValue = "false", matchIfMissing = true ) public ServletRegistrationBean zuulServlet() { ServletRegistrationBean<ZuulServlet> servlet = new ServletRegistrationBean(new ZuulServlet(), new String[]{this.zuulProperties.getServletPattern()}); servlet.addInitParameter("buffer-requests", "false"); return servlet; } // 在缺失`ZuulServletFilter`的情况下注入`ZuulServletFilter` @Bean @ConditionalOnMissingBean( name = {"zuulServletFilter"} ) @ConditionalOnProperty( name = {"zuul.use-filter"}, havingValue = "true", matchIfMissing = false ) public FilterRegistrationBean zuulServletFilter() { FilterRegistrationBean<ZuulServletFilter> filterRegistration = new FilterRegistrationBean(); filterRegistration.setUrlPatterns(Collections.singleton(this.zuulProperties.getServletPattern())); filterRegistration.setFilter(new ZuulServletFilter()); filterRegistration.setOrder(2147483647); filterRegistration.addInitParameter("buffer-requests", "false"); return filterRegistration; } // 注入 `ServletDetectionFilter` @Bean public ServletDetectionFilter servletDetectionFilter() { return new ServletDetectionFilter(); } // 注入 `FormBodyWrapperFilter` @Bean public FormBodyWrapperFilter formBodyWrapperFilter() { return new FormBodyWrapperFilter(); } // 注入 `DebugFilter` @Bean public DebugFilter debugFilter() { return new DebugFilter(); } // 注入 `Servlet30WrapperFilter` @Bean public Servlet30WrapperFilter servlet30WrapperFilter() { return new Servlet30WrapperFilter(); } // 注入 `SendResponseFilter` @Bean public SendResponseFilter sendResponseFilter(ZuulProperties properties) { return new SendResponseFilter(this.zuulProperties); } // 注入 `SendErrorFilter` @Bean public SendErrorFilter sendErrorFilter() { return new SendErrorFilter(); } // 注入 `SendForwardFilter` @Bean public SendForwardFilter sendForwardFilter() { return new SendForwardFilter(); } @Configuration protected static class ZuulFilterConfiguration { @Autowired private Map<String, ZuulFilter> filters; protected ZuulFilterConfiguration() { } // ZuulFilterInitializer,在初始化类中将Filter向FilterRegistry注册 @Bean public ZuulFilterInitializer zuulFilterInitializer(CounterFactory counterFactory, TracerFactory tracerFactory) { FilterLoader filterLoader = FilterLoader.getInstance(); FilterRegistry filterRegistry = FilterRegistry.instance(); return new ZuulFilterInitializer(this.filters, counterFactory, tracerFactory, filterLoader, filterRegistry); } } } 父类ZuulServerAutoConfiguration中,在缺失ZuulServlet ,ZuulServletFilter的bean的情况下,注入ZuulServlet ,ZuulServletFilter。同时也注入了其他的过滤器,pre类型: ServletDetectionFilter,DebugFilter ,Servlet30WrapperFilter ;post类型: SendResponseFilter ; // 响应处理Filterroute类型: SendForwardFilter ; // 重定向处理Filtererror类型 : SendErrorFilter ; // 错误处理Filter 初始化ZuulFilterInitializer类,通过FilterLoader 将所有的Filter 向FilterRegistry注册。我们看一下ZuulFilterInitializer类中部分代码 public class ZuulFilterInitializer { // 初始化完成后注册所有的Filter @PostConstruct public void contextInitialized() { log.info("Starting filter initializer"); TracerFactory.initialize(this.tracerFactory); CounterFactory.initialize(this.counterFactory); Iterator var1 = this.filters.entrySet().iterator(); while(var1.hasNext()) { Entry<String, ZuulFilter> entry = (Entry)var1.next(); this.filterRegistry.put((String)entry.getKey(), (ZuulFilter)entry.getValue()); } } // 销毁前移除所有注册所有的Filter @PreDestroy public void contextDestroyed() { log.info("Stopping filter initializer"); Iterator var1 = this.filters.entrySet().iterator(); while(var1.hasNext()) { Entry<String, ZuulFilter> entry = (Entry)var1.next(); this.filterRegistry.remove((String)entry.getKey()); } this.clearLoaderCache(); TracerFactory.initialize((TracerFactory)null); CounterFactory.initialize((CounterFactory)null); } } Zuul 路由-源码分析 Filter 的执行 我们站在了源码的角度分析了 Zuul启动过程。接下来我们通过源码来分析,我们注入的Filter在 Zuul 在一次路由的过程是怎样的执行的。在上部分内容,我们介绍了Zuul的核心类 ZuulServlet是所有请求的入口,我们来进入 ZuulServlet的源码: public class ZuulServlet extends HttpServlet { public ZuulServlet() { } // 在初始化方法里初始化了ZuulRunner public void init(ServletConfig config) throws ServletException { super.init(config); String bufferReqsStr = config.getInitParameter("buffer-requests"); boolean bufferReqs = bufferReqsStr != null && bufferReqsStr.equals("true"); this.zuulRunner = new ZuulRunner(bufferReqs); } // 标准的Servlet的service方法 public void service(ServletRequest servletRequest, ServletResponse servletResponse) throws ServletException, IOException { try { // 调用ZuulRunner的init方法 this.init((HttpServletRequest)servletRequest, (HttpServletResponse)servletResponse); RequestContext context = RequestContext.getCurrentContext(); context.setZuulEngineRan(); try { // 调用ZuulRunner的preRoute方法 this.preRoute(); } catch (ZuulException var12) { this.error(var12); // 调用ZuulRunner的postRoute方法 this.postRoute(); return; } try { this.route(); } catch (ZuulException var13) { this.error(var13); this.postRoute(); return; } try { this.postRoute(); } catch (ZuulException var11) { this.error(var11); } } catch (Throwable var14) { this.error(new ZuulException(var14, 500, "UNHANDLED_EXCEPTION_" + var14.getClass().getName())); } finally { RequestContext.getCurrentContext().unset(); } } } 在 ZuulServlet 源码中, service方法调用 this.init(request,response) , 跟进 init(request,response)方法: void init(HttpServletRequest servletRequest, HttpServletResponse servletResponse) { this.zuulRunner.init(servletRequest, servletResponse); } 发现调用的是 ZuulServlet 持有的 ZuulRunner的 init方法,进入 ZuulRunner的 init方法: public void init(HttpServletRequest servletRequest, HttpServletResponse servletResponse) { RequestContext ctx = RequestContext.getCurrentContext(); if (this.bufferRequests) { ctx.setRequest(new HttpServletRequestWrapper(servletRequest)); } else { ctx.setRequest(servletRequest); } ctx.setResponse(new HttpServletResponseWrapper(servletResponse)); } 在 ZuulRunner的 init方法中,我们发现只是对Request,Response进行了有条件的包装。我们回退到 ZuulServlet 的方法中,在执行完 init 方法后,调用 this.preRoute() , 跟进preRoute()方法: void preRoute() throws ZuulException { this.zuulRunner.preRoute(); } 调用了 ZuulRunner的 preRoute()方法, 进入ZuulRunner.preRoute() : public void preRoute() throws ZuulException { FilterProcessor.getInstance().preRoute(); } ZuulRunner.preRoute() 中获取了一个FilterProcessor的实例并且执行了其preRoute() 方法,进入FilterProcessor.preRoute()方法: public void preRoute() throws ZuulException { try { this.runFilters("pre"); } catch (ZuulException var2) { throw var2; } catch (Throwable var3) { throw new ZuulException(var3, 500, "UNCAUGHT_EXCEPTION_IN_PRE_FILTER_" + var3.getClass().getName()); } } FilterProcessor.preRoute()方法中,执行this.runFilters()方法并且传入参数pre,进入this.runFilters()方法中: public Object runFilters(String sType) throws Throwable { if (RequestContext.getCurrentContext().debugRouting()) { Debug.addRoutingDebug("Invoking {" + sType + "} type filters"); } boolean bResult = false; //通过FilterLoader的实例获取所有pre的Filter List<ZuulFilter> list = FilterLoader.getInstance().getFiltersByType(sType); if (list != null) { for(int i = 0; i < list.size(); ++i) { ZuulFilter zuulFilter = (ZuulFilter)list.get(i); // 执行Filter Object result = this.processZuulFilter(zuulFilter); if (result != null && result instanceof Boolean) { bResult |= (Boolean)result; } } } return bResult; } this.runFilters()方法中通过FilterLoader的实例获取所有pre类型的Filter,并调用this.processZuulFilte(Filter) 执行所有pre类型的Filter。上述分析过程中我们了解了pre类型的Filter在一次路由中优先执行,我们通过一个简单的图了加深一下这个过程这就是一个完整的Filter的执行过程,route 和 post 类型的Filter执行过程也是一致的。 Filter 路由 上部分内容我们了解Filter的执行入口,这部分内容我们来了解Zuul是怎么选择路由和负载均衡的。 在第一部分Zuul的启动过程中,Zuul 注入了pre类型的Filter,有PreDecorationFilter通过名字我们可以猜测,这个PreDecorationFilter是起到装饰Filter的作用,我们进入PreDecorationFilter.run()源码: public Object run() { RequestContext ctx = RequestContext.getCurrentContext(); String requestURI = this.urlPathHelper.getPathWithinApplication(ctx.getRequest()); // 获取请求路径匹配的路由信息 Route route = this.routeLocator.getMatchingRoute(requestURI); String location; if (route != null) { location = route.getLocation(); if (location != null) { // 在RequextContext中放入请求路径,路由的标识 ctx.put("requestURI", route.getPath()); ctx.put("proxy", route.getId()); if (!route.isCustomSensitiveHeaders()) { this.proxyRequestHelper.addIgnoredHeaders((String[])this.properties.getSensitiveHeaders().toArray(new String[0])); } else { this.proxyRequestHelper.addIgnoredHeaders((String[])route.getSensitiveHeaders().toArray(new String[0])); } //在RequextContext中放入该请求是否是可重试的标识 if (route.getRetryable() != null) { ctx.put("retryable", route.getRetryable()); } if (!location.startsWith("http:") && !location.startsWith("https:")) { if (location.startsWith("forward:")) { ctx.set("forward.to", StringUtils.cleanPath(location.substring("forward:".length()) + route.getPath())); ctx.setRouteHost((URL)null); return null; } //设置路由配置的ServiceId ctx.set("serviceId", location); ctx.setRouteHost((URL)null); ctx.addOriginResponseHeader("X-Zuul-ServiceId", location); } else { ctx.setRouteHost(this.getUrl(location)); ctx.addOriginResponseHeader("X-Zuul-Service", location); } } } else { log.warn("No route found for uri: " + requestURI); location = this.getForwardUri(requestURI); ctx.set("forward.to", location); } return null; } 在run方法中,获取和当前路径匹配的路由信息,将路由相关信息放入RequestContenxt中,路由信息是读取配置文件中的配置。并且放入了一个很重要的标识retryable这个就是决定我们这次请求是否可重试的开关,而这个读取配置文件中的zuul.retryable来决定的。 那Zuul到底是怎么进行负载均衡的呢? 我们知道Zuul负载均衡底层是通过Ribbon来实现的,并且在启动Zuul的时候,我们注入了一个RibbonRoutingFilter的过滤器。这个类很重要,它主要是完成请求的路由转发。接下来我们看下他的 run方法 public Object run() { RequestContext context = RequestContext.getCurrentContext(); this.helper.addIgnoredHeaders(new String[0]); try { RibbonCommandContext commandContext = this.buildCommandContext(context); ClientHttpResponse response = this.forward(commandContext); this.setResponse(response); return response; } catch (ZuulException var4) { throw new ZuulRuntimeException(var4); } catch (Exception var5) { throw new ZuulRuntimeException(var5); } } 在 run中 可以看到,先构建了一个 RibbonCommandContext 然后通过forward()方法转发的,进入forward方法: protected ClientHttpResponse forward(RibbonCommandContext context) throws Exception { Map<String, Object> info = this.helper.debug(context.getMethod(), context.getUri(), context.getHeaders(), context.getParams(), context.getRequestEntity()); RibbonCommand command = this.ribbonCommandFactory.create(context); try { ClientHttpResponse response = (ClientHttpResponse)command.execute(); this.helper.appendDebug(info, response.getRawStatusCode(), response.getHeaders()); return response; } catch (HystrixRuntimeException var5) { return this.handleException(info, var5); } } 在 forward中 可以看到,通过 RibbonCommandFactory 创建一个RibbonCommand,然后执行RibbonCommand的execute方法,这个 RibbonCommandFactory 是什么时候注入的呢?在Zuul启动的时候,在 ZuulProxyAutoConfiguration 配置类引入了HttpClientRibbonConfiguration 配置类 @Configuration @Import({RestClientRibbonConfiguration.class, OkHttpRibbonConfiguration.class, HttpClientRibbonConfiguration.class, HttpClientConfiguration.class}) @ConditionalOnBean({Marker.class}) public class ZuulProxyAutoConfiguration extends ZuulServerAutoConfiguration { } 在HttpClientRibbonConfiguration 中注入了 RibbonCommandFactory ,源码如下: @Configuration @RibbonCommandFactoryConfiguration.ConditionalOnRibbonHttpClient protected static class HttpClientRibbonConfiguration { @Autowired( required = false ) private Set<FallbackProvider> zuulFallbackProviders = Collections.emptySet(); protected HttpClientRibbonConfiguration() { } @Bean @ConditionalOnMissingBean public RibbonCommandFactory<?> ribbonCommandFactory(SpringClientFactory clientFactory, ZuulProperties zuulProperties) { return new HttpClientRibbonCommandFactory(clientFactory, zuulProperties, this.zuulFallbackProviders); } } 这个时候我们就明白了 RibbonCommandFactory 是何时注入的了,然后我们在看一下 RibbonCommandFactory.create() 创建RibbonCommand的方法: Zuul 默认使用HttpClientRibbonCommandFactory,进入到create()方法: public HttpClientRibbonCommand create(final RibbonCommandContext context) { /** *服务降级 */ FallbackProvider zuulFallbackProvider = this.getFallbackProvider(context.getServiceId()); String serviceId = context.getServiceId(); /** *负载均衡类,处理请求转发类 */ RibbonLoadBalancingHttpClient client = (RibbonLoadBalancingHttpClient)this.clientFactory.getClient(serviceId, RibbonLoadBalancingHttpClient.class); client.setLoadBalancer(this.clientFactory.getLoadBalancer(serviceId)); /** *将降级、负载,请求转发类、以及其他一些内容 *包装成HttpClientRibbonCommand(这个类继承了HystrixCommand) */ return new HttpClientRibbonCommand(serviceId, client, context, this.zuulProperties, zuulFallbackProvider, this.clientFactory.getClientConfig(serviceId)); } 在 create 方法中,分别创建了FallbackProvider ,RibbonLoadBalancingHttpClient ,从命名上我们就可以知道, FallbackProvider和熔断相关,RibbonLoadBalancingHttpClient和负载均衡相关。然后将这些作为参数创建了HttpClientRibbonCommand 。我们看一下HttpClientRibbonCommand的继承关系。从类继承关系可以看出HttpClientRibbonCommand继承了AbstractRibbonCommand,并且AbstractRibbonCommand继承了HystrixCommand这样我们就了解到HystrixCommand是如何集成进来的了。在HystrixCommand中定义了run抽象接口,并且在AbstractRibbonCommand中实现了该接口。我们回退到RibbonRoutingFilter中 protected ClientHttpResponse forward(RibbonCommandContext context) throws Exception { Map<String, Object> info = this.helper.debug(context.getMethod(), context.getUri(), context.getHeaders(), context.getParams(), context.getRequestEntity()); RibbonCommand command = this.ribbonCommandFactory.create(context); try { ClientHttpResponse response = (ClientHttpResponse)command.execute(); this.helper.appendDebug(info, response.getRawStatusCode(), response.getHeaders()); return response; } catch (HystrixRuntimeException var5) { return this.handleException(info, var5); } } 当完成了RibbonCommand 创建工作后,执行的command.execute() 方法,通过刚刚的分析我们知道了command其实指的是HttpClientRibbonCommand,同时我们也知道HttpClientRibbonCommand继承了HystrixCommand,所以当执行command.execute()时,其实执行的是HttpClientRibbonCommand的run方法。查看源码我们并没有发现run方法,但是其父类AbstractRibbonCommand实现了run方法。所以其实执行的是AbstractRibbonCommand的run方法,进入AbstractRibbonCommand的run方法: protected ClientHttpResponse run() throws Exception { RequestContext context = RequestContext.getCurrentContext(); RQ request = this.createRequest(); boolean retryableClient = this.client instanceof AbstractLoadBalancingClient && ((AbstractLoadBalancingClient)this.client).isClientRetryable((ContextAwareRequest)request); HttpResponse response; if (retryableClient) { response = (HttpResponse)this.client.execute(request, this.config); } else { response = (HttpResponse)this.client.executeWithLoadBalancer(request, this.config); } context.set("ribbonResponse", response); if (this.isResponseTimedOut() && response != null) { response.close(); } return new RibbonHttpResponse(response); } 在run 方法中,先判断是否是重试的client,通过分析,第一次执行的时候,client 为RibbonLoadBalancingHttpClient 从而会调用executeWithLoadBalancer() 方法,但是RibbonLoadBalancingHttpClient并没有executeWithLoadBalancer() 方法,查看而类继承关系图, 其父类AbstractLoadBalancerAwareClient实现了executeWithLoadBalancer() ,进入AbstractLoadBalancerAwareClient.executeWithLoadBalancer()方法: public T executeWithLoadBalancer(final S request, final IClientConfig requestConfig) throws ClientException { LoadBalancerCommand command = this.buildLoadBalancerCommand(request, requestConfig); try { return (IResponse)command.submit(new ServerOperation<T>() { public Observable<T> call(Server server) { URI finalUri = AbstractLoadBalancerAwareClient.this.reconstructURIWithServer(server, request.getUri()); ClientRequest requestForServer = request.replaceUri(finalUri); try { return Observable.just(AbstractLoadBalancerAwareClient.this.execute(requestForServer, requestConfig)); } catch (Exception var5) { return Observable.error(var5); } } }).toBlocking().single(); } catch (Exception var6) { Throwable t = var6.getCause(); if (t instanceof ClientException) { throw (ClientException)t; } else { throw new ClientException(var6); } } } 在executeWithLoadBalancer 方法中,首先进入buildLoadBalancerCommand() 方法: protected LoadBalancerCommand<T> buildLoadBalancerCommand(S request, IClientConfig config) { /** * 创建一个RetryHandler,这个很重要它是用来 * 决定利用RxJava的Observable是否进行重试的标准。 */ RequestSpecificRetryHandler handler = this.getRequestSpecificRetryHandler(request, config); Builder<T> builder = LoadBalancerCommand.builder().withLoadBalancerContext(this).withRetryHandler(handler).withLoadBalancerURI(request.getUri()); this.customizeLoadBalancerCommandBuilder(request, config, builder); return builder.build(); } 在buildLoadBalancerCommand() 中通过了 getRequestSpecificRetryHandler()获取 RequestSpecificRetryHandler 的处理类,这个是个抽象方法,在子类AbstractLoadBalancingClient中实现 public RequestSpecificRetryHandler getRequestSpecificRetryHandler(final S request, final IClientConfig requestConfig) { if (this.okToRetryOnAllOperations) { return new RequestSpecificRetryHandler(true, true, this.getRetryHandler(), requestConfig); } else { return !request.getContext().getMethod().equals("GET") ? new RequestSpecificRetryHandler(true, false, this.getRetryHandler(), requestConfig) : new RequestSpecificRetryHandler(true, true, this.getRetryHandler(), requestConfig); } } 在方法中我们可以看到重试的默认机制。若不配置ribbon.OkToRetryOnAllOperations=true, 默认只是连接失败和GET请求失败才会发生重试。回到executeWithLoadBalancer()方法中: public T executeWithLoadBalancer(final S request, final IClientConfig requestConfig) throws ClientException { LoadBalancerCommand command = this.buildLoadBalancerCommand(request, requestConfig); try { return (IResponse)command.submit(new ServerOperation<T>() { public Observable<T> call(Server server) { URI finalUri = AbstractLoadBalancerAwareClient.this.reconstructURIWithServer(server, request.getUri()); ClientRequest requestForServer = request.replaceUri(finalUri); try { return Observable.just(AbstractLoadBalancerAwareClient.this.execute(requestForServer, requestConfig)); } catch (Exception var5) { return Observable.error(var5); } } }).toBlocking().single(); } catch (Exception var6) { Throwable t = var6.getCause(); if (t instanceof ClientException) { throw (ClientException)t; } else { throw new ClientException(var6); } } } 调用command.submit() ,创建了一个Observable (RxJava)并且最终会调用AbstractLoadBalancerAwareClient.execute ()方法 public RibbonApacheHttpResponse execute(RibbonApacheHttpRequest request, final IClientConfig configOverride) throws Exception { IClientConfig config = configOverride != null ? configOverride : this.config; RibbonProperties ribbon = RibbonProperties.from(config); RequestConfig requestConfig = RequestConfig.custom().setConnectTimeout(ribbon.connectTimeout(this.connectTimeout)).setSocketTimeout(ribbon.readTimeout(this.readTimeout)).setRedirectsEnabled(ribbon.isFollowRedirects(this.followRedirects)).setContentCompressionEnabled(ribbon.isGZipPayload(this.gzipPayload)).build(); request = this.getSecureRequest(request, configOverride); HttpUriRequest httpUriRequest = request.toRequest(requestConfig); HttpResponse httpResponse = ((CloseableHttpClient)this.delegate).execute(httpUriRequest); return new RibbonApacheHttpResponse(httpResponse, httpUriRequest.getURI()); } 在execute()方法中,我们看到创建连接并且发送了http请求并将结果返回。回退到submit()方法中,创建了Observable 会监听execute()的执行状态从而决定是否重试请求: public Observable<T> submit(final ServerOperation<T> operation) { final LoadBalancerCommand<T>.ExecutionInfoContext context = new LoadBalancerCommand.ExecutionInfoContext(); if (this.listenerInvoker != null) { try { this.listenerInvoker.onExecutionStart(); } catch (AbortExecutionException var6) { return Observable.error(var6); } } /** * 相同server重试次数,去除首次 */ final int maxRetrysSame = this.retryHandler.getMaxRetriesOnSameServer(); /** * 集群内其他server重试次数 **/ final int maxRetrysNext = this.retryHandler.getMaxRetriesOnNextServer(); /** * 创建一个Observable(RxJava) **/ Observable<T> o = (this.server == null ? this.selectServer() : Observable.just(this.server)).concatMap(new Func1<Server, Observable<T>>() { public Observable<T> call(Server server) { context.setServer(server); final ServerStats stats = LoadBalancerCommand.this.loadBalancerContext.getServerStats(server); Observable<T> o = Observable.just(server).concatMap(new Func1<Server, Observable<T>>() { public Observable<T> call(final Server server) { context.incAttemptCount(); LoadBalancerCommand.this.loadBalancerContext.noteOpenConnection(stats); if (LoadBalancerCommand.this.listenerInvoker != null) { try { LoadBalancerCommand.this.listenerInvoker.onStartWithServer(context.toExecutionInfo()); } catch (AbortExecutionException var3) { return Observable.error(var3); } } final Stopwatch tracer = LoadBalancerCommand.this.loadBalancerContext.getExecuteTracer().start(); return operation.call(server).doOnEach(new Observer<T>() { private T entity; public void onCompleted() { this.recordStats(tracer, stats, this.entity, (Throwable)null); } public void onError(Throwable e) { this.recordStats(tracer, stats, (Object)null, e); LoadBalancerCommand.logger.debug("Got error {} when executed on server {}", e, server); if (LoadBalancerCommand.this.listenerInvoker != null) { LoadBalancerCommand.this.listenerInvoker.onExceptionWithServer(e, context.toExecutionInfo()); } } public void onNext(T entity) { this.entity = entity; if (LoadBalancerCommand.this.listenerInvoker != null) { LoadBalancerCommand.this.listenerInvoker.onExecutionSuccess(entity, context.toExecutionInfo()); } } private void recordStats(Stopwatch tracerx, ServerStats statsx, Object entity, Throwable exception) { tracerx.stop(); LoadBalancerCommand.this.loadBalancerContext.noteRequestCompletion(statsx, entity, exception, tracerx.getDuration(TimeUnit.MILLISECONDS), LoadBalancerCommand.this.retryHandler); } }); } }); if (maxRetrysSame > 0) { o = o.retry(LoadBalancerCommand.this.retryPolicy(maxRetrysSame, true)); } return o; } }); if (maxRetrysNext > 0 && this.server == null) { o = o.retry(this.retryPolicy(maxRetrysNext, false)); } return o.onErrorResumeNext(new Func1<Throwable, Observable<T>>() { public Observable<T> call(Throwable e) { if (context.getAttemptCount() > 0) { if (maxRetrysNext > 0 && context.getServerAttemptCount() == maxRetrysNext + 1) { e = new ClientException(ErrorType.NUMBEROF_RETRIES_NEXTSERVER_EXCEEDED, "Number of retries on next server exceeded max " + maxRetrysNext + " retries, while making a call for: " + context.getServer(), (Throwable)e); } else if (maxRetrysSame > 0 && context.getAttemptCount() == maxRetrysSame + 1) { e = new ClientException(ErrorType.NUMBEROF_RETRIES_EXEEDED, "Number of retries exceeded max " + maxRetrysSame + " retries, while making a call for: " + context.getServer(), (Throwable)e); } } if (LoadBalancerCommand.this.listenerInvoker != null) { LoadBalancerCommand.this.listenerInvoker.onExecutionFailed((Throwable)e, context.toFinalExecutionInfo()); } return Observable.error((Throwable)e); } }); } 讲到这里,就是一次完整的路由过程了。我们大致回顾一下这个路由过程。 A.Zuul的转发是通过RibbonRoutingFilter这个Filter进行操作的。B. 在转发之前,Zuul包装请求为RibbonCommand,并且RibbonCommand继承了HystrixCommand,并且持有RibbonLoadBalancingHttpClient 和 FallbackProvider,正应为这样才使得Zuul具有了服务降级(Fallback),和负载均衡的功能,同时HystrixCommand是具备超时时间的(默认是1s)。而且Zuul默认采用的隔离级别是信号量模式。C.在RibbonCommand的内部Zuul再次将请求包装成一个Observable,(有关RxJava的知识请参照其官方文档)。并且为Observable设置了重试次数,默认只对GET请求失败 和连接失败重试。
替换现有上游(中科大镜像) # brew 程序本身,Homebrew/Linuxbrew 相同 git -C "$(brew --repo)" remote set-url origin https://mirrors.tuna.tsinghua.edu.cn/git/homebrew/brew.git # 以下针对 mac OS 系统上的 Homebrew git -C "$(brew --repo homebrew/core)" remote set-url origin https://mirrors.tuna.tsinghua.edu.cn/git/homebrew/homebrew-core.git git -C "$(brew --repo homebrew/cask)" remote set-url origin https://mirrors.tuna.tsinghua.edu.cn/git/homebrew/homebrew-cask.git git -C "$(brew --repo homebrew/cask-fonts)" remote set-url origin https://mirrors.tuna.tsinghua.edu.cn/git/homebrew/homebrew-cask-fonts.git git -C "$(brew --repo homebrew/cask-drivers)" remote set-url origin https://mirrors.tuna.tsinghua.edu.cn/git/homebrew/homebrew-cask-drivers.git # 以下针对 Linux 系统上的 Linuxbrew git -C "$(brew --repo homebrew/core)" remote set-url origin https://mirrors.tuna.tsinghua.edu.cn/git/homebrew/linuxbrew-core.git # 更换后测试工作是否正常 brew update 复原 # brew 程序本身,Homebrew/Linuxbrew 相同 git -C "$(brew --repo)" remote set-url origin https://github.com/Homebrew/brew.git # 以下针对 mac OS 系统上的 Homebrew git -C "$(brew --repo homebrew/core)" remote set-url origin https://github.com/Homebrew/homebrew-core.git git -C "$(brew --repo homebrew/cask)" remote set-url origin https://github.com/Homebrew/homebrew-cask.git git -C "$(brew --repo homebrew/cask-fonts)" remote set-url origin https://github.com/Homebrew/homebrew-cask-fonts.git git -C "$(brew --repo homebrew/cask-drivers)" remote set-url origin https://github.com/Homebrew/homebrew-cask-drivers.git # 以下针对 Linux 系统上的 Linuxbrew git -C "$(brew --repo homebrew/core)" remote set-url origin https://github.com/Homebrew/linuxbrew-core.git # 更换后测试工作是否正常 brew update
一:RocketMQ 简介 RocketMQ 是一款分布式、队列模型的消息中间件,具有以下特点: 能够保证严格的消息顺序。 提供丰富的消息拉取模式。 高效的订阅者水平扩展能力。 实时的消息订阅机制。 亿级消息堆积能力。 二:RocketMQ的安装1.下载RocketMQ源码 下载地址 rocketmq-4.4.0 2.解压 , 进入解压目录 unzip rocketmq-all-4.2.0-source-release.zip cd rocketmq-all-4.4.0 3.执行安装命令 mvn -Prelease-all -DskipTests clean install -U 4.安装完成后进入启动文件所在目录 cd distribution/target/apache-rocketmq 5.启动服务器, 查看启动日志 nohup sh bin/mqnamesrv & tail -f ~/logs/rocketmqlogs/namesrv.log 6.启动broker , 查看broker启动日志 nohup sh bin/mqbroker -n localhost:9876 & tail -f ~/logs/rocketmqlogs/broker.log 7.查看是否启动成功jps 8.停止服务,停止broker sh bin/mqshutdown broker sh bin/mqshutdown namesrv 8.常见问题 JAVA_HOME 环境变量未配置,可设置RocketMQ的JDK环境 , 打开bin目录下 runserver.sh 和 runbroker.sh, 将设置JAVA_HOME的第二三行注释掉,在第一行设置JDK的安装目录。如下所示: [ ! -e "$JAVA_HOME/bin/java" ] && JAVA_HOME=/Library/Java/JavaVirtualMachines/jdk1.8.0_181.jdk/Contents/Home #[ ! -e "$JAVA_HOME/bin/java" ] && JAVA_HOME=/usr/java #[ ! -e "$JAVA_HOME/bin/java" ] && error_exit "Please set the JAVA_HOME variable in your environment, We need java(x64)!
- 微服务的发展 微服务倡导将复杂的单体应用拆分为若干个功能简单,松耦合的服务。这样可以降低开发难度、增强扩展性、便于敏捷开发,当前被越来越多的开发者推崇。很多互联网行业巨头、开源社区等都开始了微服务的讨论和实践。当前微服务的开发框架也非常多,比较著名的有Dubbo、SpringCloud、thrift 、grpc等。 - 微服务落地存在的问题 目前存在的主要困难有如下几方面: 单体应用拆分为分布式系统后,进程之间的通讯机制和故障处理措施变得更加复杂。 系统微服务化后,一个看似简单的功能,内部可能需要调用多个服务并操纵多个数据库来实现,服务间的调用导致分布式事务问题变得非常突出。 微服务数量众多,其测试,部署,监控等都变得更加困难。 随着RPC框架的成熟,第一个问题已经逐步得到解决。例如Dubbo支持多种通讯协议,Spring Cloud下的Ribbon,Feign等很好的支持Restful调用。对于第三个问题,随着docker、devops技术的发展以及各公有云paas平台自动化运维工具的推出,微服务的测试、部署与运维会变得越来越容易。而对于第二个问题,现在还没有通用方案很好的解决微服务产生的事务问题。分布式事务已经成为微服务落地最大的阻碍,也是最具挑战性的一个技术难题。 - 分布式事务 数据库事务 数据库的事务介绍参见博客:事务及事务的隔离级别 分布式事务 分布式事务是指事务的参与者、支持事务的服务器、资源服务器以及事务管理器分别位于不同的分布式系统的不同节点之上。 分布式理论CAP理论: C: 一致性(Consistency),在分布式系统中的所有数据备份,在同一时刻是否同样的值。 A: 可用性(Availability),在集群中一部分节点故障后,集群整体是否还能响应客户端的读写请求。 P: 分区容错性(Partition Tolerance),以实际效果而言,分区相当于对通信的时限要求。系统如果不能在时限内达成数据一致性,就意味着发生了分区的情况,必须就当前操作在C和A之间做出选择。三者不可同时满足,而服务化中,更多的是提升A以及P,在这个过程中不可避免的会降低对C的要求。 分布式事务的解决方案 基于XA协议的两阶段提交方案 TCC方案 基于消息的最终一致性方案
一. Spring Cloud 简介 Spring Cloud 为开发者提供了快熟构建分布式系统的一些工具,包括配置管理,服务发现,断路器,路由,微代理,事件总线,全局锁,决策竞选,分布式会话,集群状态等。协调分布式系统导致样板模式,并且Spring Cloud的开发人员可以快速建立实现这些模式的服务和应用程序。他们适用于任何分布式环境,包括开发人员的笔记本,裸机数据中心和Cloud Foundry等托管平台。此外Spring Cloud基于Spring Boot,需要对Spring Boot 有一定的了解,可参见SpringBoot非官方教程link。 二. Eureka 简介Eureka 是Spring Cloud Netflix微服务套件中的一部分,易于和Spring Boot 构建的微服务整合起来。 Eureka包含了服务端和客户端组件。服务端也被称作为服务注册中心,用于提供服务的注册和发现。Eureka支持高可用的配置,当集群中有分片出现故障时,Eureka就会转入自动保护模式,它允许分片故障期间继续提供服务的发现和注册,当故障分片恢复正常时,集群中其他分片会把他们的状态再次同步回来。客户端组件包含服务消费者与服务提供者。在应用程序运行时,Eureka客户端向注册中心注册自身提供的服务并周期性的发送心跳来更新它的服务租约。同时也可以从服务端查询当前注册的服务信息并把他们缓存到本地并周期性的刷新服务状态。 三. 构建服务注册中心 创建主maven工程 首先创建一个主Maven工程,在其pom文件引入依赖,Spring Boot版本为2.1.3.RELEASE,Spring Cloud版本为Greenwich.RELEASE。这个pom文件作为父pom文件,起到依赖版本控制的作用,其他module工程继承该pom。这一系列文章全部采用这种模式。主pom代码如下: <project xmlns="http://maven.apache.org/POM/4.0.0" xmlns:xsi="http://www.w3.org/2001/XMLSchema-instance" xsi:schemaLocation="http://maven.apache.org/POM/4.0.0 http://maven.apache.org/xsd/maven-4.0.0.xsd"> <modelVersion>4.0.0</modelVersion> <parent> <groupId>org.springframework.boot</groupId> <artifactId>spring-boot-starter-parent</artifactId> <version>2.1.3.RELEASE</version> <relativePath/> <!-- lookup parent from repository --> </parent> <groupId>com.kimframework</groupId> <artifactId>eureka-cloud</artifactId> <version>1.0-SNAPSHOT</version> <modules> <module>eureka-server</module> <module>eureka-client</module> </modules> <properties> <java.version>1.8</java.version> <spring-cloud.version>Greenwich.SR1</spring-cloud.version> </properties> <dependencies> <dependency> <groupId>org.springframework.cloud</groupId> <artifactId>spring-cloud-starter-netflix-eureka-server</artifactId> </dependency> <dependency> <groupId>org.springframework.boot</groupId> <artifactId>spring-boot-starter-test</artifactId> <scope>test</scope> </dependency> </dependencies> <dependencyManagement> <dependencies> <dependency> <groupId>org.springframework.cloud</groupId> <artifactId>spring-cloud-dependencies</artifactId> <version>${spring-cloud.version}</version> <type>pom</type> <scope>import</scope> </dependency> </dependencies> </dependencyManagement> <build> <plugins> <plugin> <groupId>org.springframework.boot</groupId> <artifactId>spring-boot-maven-plugin</artifactId> </plugin> </plugins> </build> </project> 创建Eureka Server 创建一个Eureka Server 为服务注册中心 右键工程-->New Module-->Spring Initializr 如下图: 下一步-->Cloud Discovery-->Eureka Server-->下一步 创建完成后的Module(eureka-server) 其 pom继承主pom 文件,并引入spring-cloud-starter-netflix-eureka-server, pom文件如下: <?xml version="1.0" encoding="UTF-8"?> <project xmlns="http://maven.apache.org/POM/4.0.0" xmlns:xsi="http://www.w3.org/2001/XMLSchema-instance" xsi:schemaLocation="http://maven.apache.org/POM/4.0.0 http://maven.apache.org/xsd/maven-4.0.0.xsd"> <modelVersion>4.0.0</modelVersion> <parent> <groupId>com.kimframework</groupId> <artifactId>eureka-cloud</artifactId> <version>1.0-SNAPSHOT</version> <relativePath/> <!-- lookup parent from repository --> </parent> <groupId>com.kimframework</groupId> <artifactId>eureka-server</artifactId> <version>0.0.1-SNAPSHOT</version> <name>eureka-server</name> <description>Eureka Server</description> <properties> <java.version>1.8</java.version> <spring-cloud.version>Greenwich.SR1</spring-cloud.version> </properties> <dependencies> <dependency> <groupId>org.springframework.cloud</groupId> <artifactId>spring-cloud-starter-netflix-eureka-server</artifactId> </dependency> </dependencies> </project> 在eureka-server的启动类上添加注解@EnableEurekaServer,开启服务注册中心的功能,代码如下: @SpringBootApplication @EnableEurekaServer public class EurekaServerApplication { public static void main(String[] args) { SpringApplication.run(EurekaServerApplication.class, args); } } 配置application.yml server: port: 8000 spring: application: name: eureka-server eureka: instance: hostname: localhost client: fetch-registry: false register-with-eureka: false service-url: defaultZone: http://${eureka.instance.hostname}:${server.port}/eureka/ 在默认情况下,服务注册中心也会把自己当做是一个服务,将自己注册进服务注册中心,所以我们可以通过配置来禁用他的客户端注册行为。配置说明:server.port : 服务端口spring.application.name : 应用名称eureka.instance.hostname: eureka服务实例名称eureka.client.fetch-registry : 禁用客户端服务检索功能eureka.client.register-with-eureka: 表示不向服务注册中心注册自己eureka.client.service-ur.defaultZone: 指定服务注册中心的地址 启动工程,浏览器访问eureka-server的主界面:http://localhost:8000/ 界面如下:No application available 没有服务被发现 ……,因为还没有服务注册,所以暂时没有服务信息 - 创建Eureka Client 当client向server注册时,它会提供一些元数据,例如主机和端口,URL,主页等。Eureka server 从每个client实例接收心跳消息。 如果心跳超时,则通常将该实例从注册server中删除。 创建一个Module(eureka-client),创建过程通eureka-server相同, 选择引入Eureka Discovery 和Web 其pom文件如下: <?xml version="1.0" encoding="UTF-8"?> <project xmlns="http://maven.apache.org/POM/4.0.0" xmlns:xsi="http://www.w3.org/2001/XMLSchema-instance" xsi:schemaLocation="http://maven.apache.org/POM/4.0.0 http://maven.apache.org/xsd/maven-4.0.0.xsd"> <modelVersion>4.0.0</modelVersion> <parent> <groupId>com.kimframework</groupId> <artifactId>eureka-cloud</artifactId> <version>1.0-SNAPSHOT</version> <relativePath/> <!-- lookup parent from repository --> </parent> <groupId>com.kimframework</groupId> <artifactId>eureka-client</artifactId> <version>0.0.1-SNAPSHOT</version> <name>eureka-client</name> <description>Eureka Client</description> <dependencies> <dependency> <groupId>org.springframework.boot</groupId> <artifactId>spring-boot-starter-web</artifactId> </dependency> <dependency> <groupId>org.springframework.cloud</groupId> <artifactId>spring-cloud-starter-netflix-eureka-client</artifactId> </dependency> </dependencies> </project> 配置eureka-client的启动类,配置@EnableEurekaClient注解 @SpringBootApplication @EnableEurekaClient public class EurekaClientApplication { public static void main(String[] args) { SpringApplication.run(EurekaClientApplication.class, args); } } application.yml : server: port: 8001 spring: application: name: eureka-client eureka: client: service-url: defaultZone: http://localhost:8000/eureka # 服务注册中心地址 需要指明spring.application.name,这个很重要,这在以后的服务与服务之间相互调用一般都是根据这个name 。启动eureka-client工程,打开http://localhost:8000 ,即eureka server 的网址: 发现eureka-client已经注册在服务注册中心了。服务名为:EUREKA-CLIENT 端口为:8001 该警告就是发出了Eureka的自我保护机制!服务注册到Eureka服务器后,会向其发送心跳,Eureka在运行期间,会统计心跳失败的比率在15分钟是否低于85%,如果低于,Eureka服务器会将这些服务保护起来,不会剔除。 四: 参考资料 https://blog.csdn.net/forezp/article/details/81040925 https://blog.csdn.net/qq_27046951/article/details/82880609
2020年05月
2020年04月
2020年03月