暂时未有相关云产品技术能力~
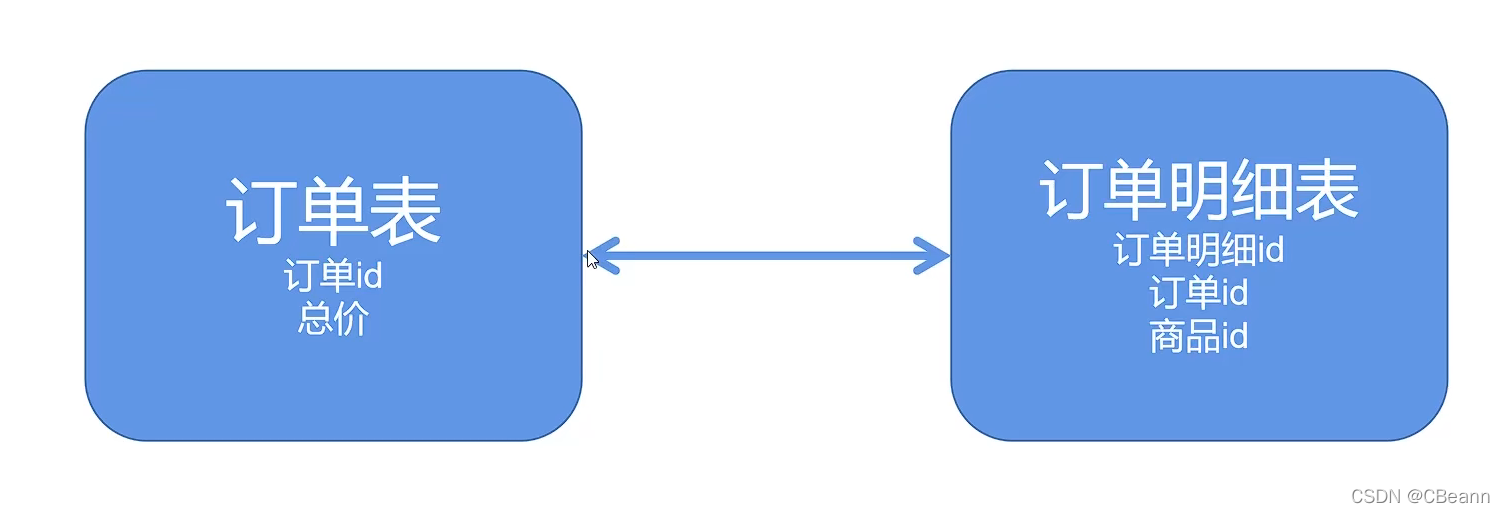
阿里JAVA规范不得使用外键与级联,一切外键概念必须在应用层解决。外键的优缺点缺点:每次做DELETE或者UPDATE都必须考虑外键约束,会导致开发时很痛苦,测试数据极为不方便。优点:保证数据的完整性和一致性,级联操作方便,数据的一致性交给数据库,代码量小。外键案例分析如下图所示,订单表有订单id和其他属性,订单明细表有订单明细id、订单id(外键)和其他属性。1.性能问题额外的数据一致性校验查询。当每一次向订单明细表添加数据时,会检查订单表里是否存在对于的外键约束数据id是否存。2. 并发问题**外键约束会启用行级锁,主表写入时会进入阻塞。**每一次在订单明细表插入数据会检查订单明细表的记录,此时会给该订单id添加一个读锁。在并发条件下,如果此时甭管什么原因,此时有个请求需要修改订单表的订单 ID ,此时订单表就会开启一个写锁。那么此时订单明细表就会进入一个阻塞的状态,就行进行一个线程的挤压,进而引发系统崩溃。3.级联删除问题多层级联删除会让数据变得不可控,触发器也严格被禁用。数据关系如下图所示,订单表里有订单类型的外键,订单明细表里有订单表的外键。如果此时我们想删除订单类型,应为订单表与订单类型表存在外键约束关系,那么对于的订单表里的此类型的订单都将会被删除,订单明细表的明细也将会删除。如果存在更多的外键约束关系,则会删除一连串的数据,此时就会变得不可控。这好比一个树,订单类型表是树根,订单表是树枝,订单明细表是树叶,如果删除树根,则树枝和树叶也会被删除,那结果太可怕了。这些操作都是在数据库层面发生的,都是无法追溯的,是一件很麻烦的事。所以在实际开发中数据库层面的外键约束是严令禁止的。4.数据耦合和迁移数据库层面数据关系产生耦合,数据迁移维护困难。如果某一天,订单明细表的数据量过大,基于 MySQL 本身的性能应用已经不足以支持相对应的业务需求。此时计划将订单明细数据迁移到 HBASE 这样的大数据数据库进行存储。那么此时是不是需要将原有的主外键约束关系给去掉,之后又如何保证数据的一致性问题呢,此时只能通过程序层面进行约束,这是不是又回到了应用层面。在实际的项目经验过程中,随着业务发展,有些业务数据就会非常大,因为MySQL关系型数据库本身的性能问题,此时有些数据就会进行一些迁移,这是非常常见的,而此时就需要在应用层面确保数据的一致性,所以也就是有些公司为什么不推荐使用外键约束的原因。
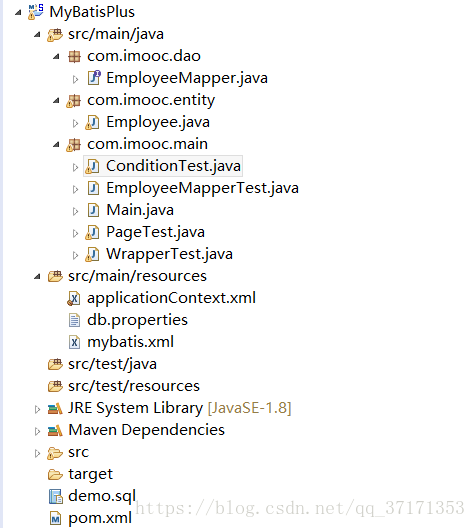
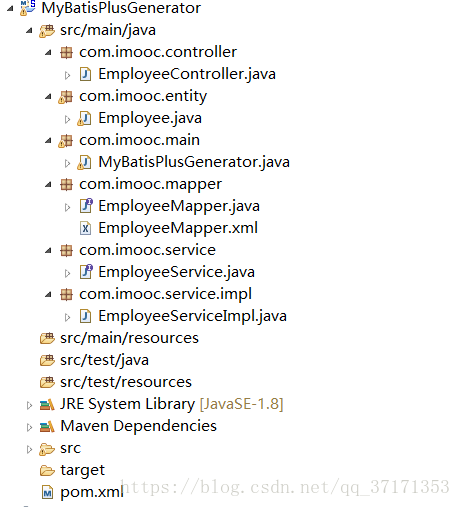
简介官方文档:苞米豆MyBatis-Plus(简称MP)是一个 MyBatis 的增强工具,在 Mybatis 的基础上只做增强不做改变,为简化开发、提高效率而生。特性●无侵入:Mybatis-Plus 在 Mybatis 的基础上进行扩展,只做增强不做改变,引入 Mybatis-Plus 不会对您现有的 Mybatis 构架产生任何影响,而且 MP 支持所有 Mybatis 原生的特性●依赖少:仅仅依赖 Mybatis 以及 Mybatis-Spring●损耗小:启动即会自动注入基本CURD,性能基本无损耗,直接面向对象操作●预防Sql注入:内置Sql注入剥离器,有效预防Sql注入攻击●通用CRUD操作:内置通用 Mapper、通用 Service,仅仅通过少量配置即可实现单表大部分 CRUD 操作,更有强大的条件构造器,满足各类使用需求●多种主键策略:支持多达4种主键策略(内含分布式唯一ID生成器),可自由配置,完美解决主键问题●支持ActiveRecord:支持 ActiveRecord 形式调用,实体类只需继承 Model 类即可实现基本 CRUD 操作●支持代码生成:采用代码或者 Maven 插件可快速生成 Mapper 、 Model 、 Service 、 Controller 层代码,支持模板引擎,更有超多自定义配置等您来使用(P.S. 比 Mybatis 官方的 Generator 更加强大!)●支持自定义全局通用操作:支持全局通用方法注入( Write once, use anywhere )●支持关键词自动转义:支持数据库关键词(order、key……)自动转义,还可自定义关键词●内置分页插件:基于Mybatis物理分页,开发者无需关心具体操作,配置好插件之后,写分页等同于普通List查询●内置性能分析插件:可输出Sql语句以及其执行时间,建议开发测试时启用该功能,能有效解决慢查询●内置全局拦截插件:提供全表 delete 、 update 操作智能分析阻断,预防误操作我认为:和MyBatis的逆向工程相比,MP可生成service,controller等等注意1 )不要重复生成xxxMapper.xml,如果你有一个字段写错了,请把生成的Mapper.xml删除,别的会自动覆盖,这个Mapper.xml是个坑2)自动生成的代码要自己测试一下,自己测试一下项目构建添加依赖<project xmlns="http://maven.apache.org/POM/4.0.0" xmlns:xsi="http://www.w3.org/2001/XMLSchema-instance" xsi:schemaLocation="http://maven.apache.org/POM/4.0.0 http://maven.apache.org/xsd/maven-4.0.0.xsd"> <modelVersion>4.0.0</modelVersion> <groupId>com.imooc</groupId> <artifactId>MyBatisPlusGenerator</artifactId> <version>0.0.1-SNAPSHOT</version> <dependencies> <dependency> <groupId>com.baomidou</groupId> <artifactId>mybatis-plus</artifactId> <version>2.3</version> </dependency> <!-- 单元测试 --> <dependency> <groupId>junit</groupId> <artifactId>junit</artifactId> <version>4.11</version> <scope>test</scope> </dependency> <!-- 日志 --> <!-- 实现slf4j接口并整合 --> <dependency> <groupId>ch.qos.logback</groupId> <artifactId>logback-classic</artifactId> <version>1.1.1</version> </dependency> <!-- 数据库 --> <dependency> <groupId>mysql</groupId> <artifactId>mysql-connector-java</artifactId> <version>5.1.39</version> </dependency> <!-- c3p0 --> <dependency> <groupId>com.mchange</groupId> <artifactId>c3p0</artifactId> <version>0.9.5.2</version> </dependency> <!-- Spring --> <dependency> <groupId>org.springframework</groupId> <artifactId>spring-core</artifactId> <version>4.3.10.RELEASE</version> </dependency> <dependency> <groupId>org.springframework</groupId> <artifactId>spring-beans</artifactId> <version>4.3.10.RELEASE</version> </dependency> <dependency> <groupId>org.springframework</groupId> <artifactId>spring-webmvc</artifactId> <version>4.3.10.RELEASE</version> </dependency> <dependency> <groupId>org.springframework</groupId> <artifactId>spring-jdbc</artifactId> <version>4.3.10.RELEASE</version> </dependency> <!-- MP 代码生成工具需要的依赖1 velocity-engine-core 2 slf4j-api 3slf4j-log4j12 --> <!-- Apache velocity --> <dependency> <groupId>org.apache.velocity</groupId> <artifactId>velocity-engine-core</artifactId> <version>2.0</version> </dependency> <!-- sfl4j --> <dependency> <groupId>org.slf4j</groupId> <artifactId>slf4j-api</artifactId> <version>1.7.7</version> </dependency> <dependency> <groupId>org.slf4j</groupId> <artifactId>slf4j-log4j12</artifactId> <version>1.7.7</version> </dependency> </dependencies> </project>创建配置类并且运行注意:1.创建数据库和实体类的时候最好一致2.数据库表和实体类的名称一致3.驼峰命名规则和下划线直接的转换package com.imooc.main; import java.sql.SQLException; import javax.sql.DataSource; import org.springframework.context.support.ClassPathXmlApplicationContext; import com.baomidou.mybatisplus.enums.IdType; import com.baomidou.mybatisplus.generator.AutoGenerator; import com.baomidou.mybatisplus.generator.config.DataSourceConfig; import com.baomidou.mybatisplus.generator.config.GlobalConfig; import com.baomidou.mybatisplus.generator.config.PackageConfig; import com.baomidou.mybatisplus.generator.config.StrategyConfig; import com.baomidou.mybatisplus.generator.config.rules.DbType; import com.baomidou.mybatisplus.generator.config.rules.NamingStrategy; public class MyBatisPlusGenerator { public static void main(String[] args) throws SQLException { //1. 全局配置 GlobalConfig config = new GlobalConfig(); config.setActiveRecord(true) // 是否支持AR模式 .setAuthor("Bean") // 作者 //.setOutputDir("D:\\workspace_mp\\mp03\\src\\main\\java") // 生成路径 .setOutputDir("F:\\stsworkspace\\MyBatisPlusGenerator\\src\\main\\java") // 生成路径 .setFileOverride(true) // 文件覆盖 .setIdType(IdType.AUTO) // 主键策略 .setServiceName("%sService") // 设置生成的service接口的名字的首字母是否为I // IEmployeeService .setBaseResultMap(true)//生成基本的resultMap .setBaseColumnList(true);//生成基本的SQL片段 //2. 数据源配置 DataSourceConfig dsConfig = new DataSourceConfig(); dsConfig.setDbType(DbType.MYSQL) // 设置数据库类型 .setDriverName("com.mysql.jdbc.Driver") .setUrl("jdbc:mysql://localhost:3306/demo") .setUsername("root") .setPassword("123456"); //3. 策略配置globalConfiguration中 StrategyConfig stConfig = new StrategyConfig(); stConfig.setCapitalMode(true) //全局大写命名 .setDbColumnUnderline(true) // 指定表名 字段名是否使用下划线 .setNaming(NamingStrategy.underline_to_camel) // 数据库表映射到实体的命名策略 //.setTablePrefix("tbl_") .setInclude("employee"); // 生成的表 //4. 包名策略配置 PackageConfig pkConfig = new PackageConfig(); pkConfig.setParent("com.imooc") .setMapper("mapper")//dao .setService("service")//servcie .setController("controller")//controller .setEntity("entity") .setXml("mapper");//mapper.xml //5. 整合配置 AutoGenerator ag = new AutoGenerator(); ag.setGlobalConfig(config) .setDataSource(dsConfig) .setStrategy(stConfig) .setPackageInfo(pkConfig); //6. 执行 ag.execute(); } }结果展示
接下来以 餐厅、套餐、菜品进行举例。比如你想加盟XX火锅店,你需要像区域经理申请开店。经理说 你开一个 牛肉火锅(prouductId = 1) 自营店(type =1)。经理让李四 开一个 羊肉火锅(prouductId = 2) 自营店(type =1)。经理让王五 开一个 羊肉火锅(prouductId = 2) 旗舰店(type =2)。。。。。。那么针对不同的场景(product && type),需要走的审批流程不一样。●牛肉火锅(prouductId = 1) 自营店(type =1)开店规则:需要审批菜品,审批通过后套餐自动审批通过,套餐都审批通过后 餐厅自动审批通过,审批通过后即可运营。●羊肉火锅(prouductId = 2) 自营店(type =1)开店规则:只审批餐厅,审批通过后即可运营。●羊肉火锅(prouductId = 2) 旗舰店(type =2)开店规则:只审批餐厅,审批通过后即可运营。但是菜品也可以申请,审批通过后套餐自动审批通过,审批通过的套餐可以每天赠送100份。那么问题来了,如果你作为审批流程客服工作人员,当一个开店的审批工单来了以后,总有人问你为什么他的工单还在审批中,你怎么办呢?最好的方式就是你告诉他你的工单是菜品、套餐、餐厅没审批通过,请找相关同学咨询。源码下载Gitee (亲测可用,真实有效)启动方法和工程目录如下java规则引擎easy-rules简单使用以上面的牛肉火锅(prouductId = 1) 自营店(type =1) 为例正常情况下可以写代码判断 int productId = 1; int type = 1; if(productId == 1 && type ==1){ System.out.println("牛肉火锅自营店。请从【餐品】开始进行向上申请"); }如果这样的规则能通过配置的方式进行实现,那简直无敌。下面先写一个demo版本 Canteen canteen = new Canteen().setProductId(1).setType(1); // define rules 定义规则 Rule canteenRule = new RuleBuilder() .name("牛肉火锅自营店") // 规则名称 .description("productId = 1 && type =1 。文案:牛肉火锅自营店。请从【餐品】开始进行向上申请") // 规则描述 .when(facts -> facts.get("productId").equals(1) && facts.get("type").equals(1)) // 规则条件 .then(facts -> System.out.println("牛肉火锅自营店。请从【餐品】开始进行向上申请")) // 命中规则后的操作 .build(); // 定义规则集合 Rules rules = new Rules(); rules.register(canteenRule); // fire rules on known facts 创建执行引擎 RulesEngine rulesEngine = new DefaultRulesEngine(); // define facts 定义需要验证的参数 Facts facts = new Facts(); facts.put("productId", canteen.getProductId()); facts.put("type", canteen.getType()); // 进行规则校验 rulesEngine.fire(rules, facts);看打印结果上面还存在以下问题●规则还是手动通过代码定义的,如果通过配置文件定义那就最好了●命中的规则后结果只能打印,我想获取规则的一些信息比如规则描述description应该怎么办最佳落地实践注意:部分代码没有展示,可以去仓库查看全部源码通过配置文件定义规则 canteenRule.yml--- name: "牛肉火锅自营店" description: "prouductId = 1 && type = 1 " condition: "canteen.productId==1&&canteen.type==1" priority: 1 actions: - "System.out.println(1);" --- name: "牛肉火锅旗舰店" description: "prouductId = 1 && type = 2" condition: "canteen.productId == 2 && canteen.type == 1" priority: 2 actions: - "System.out.println(2);"创建规则引擎工厂类RulesEngineFactory目的:上述例子中,规则引擎不可能只为 餐厅 服务,还需要为 套餐、菜品服务。因此肯定是有不同的规则和规则引擎的。因此这里需要一个工厂。package com.example.demo.rulesEngine.listener; import com.example.demo.rulesEngine.common.RuleCommonInterface; import lombok.Data; import org.jeasy.rules.api.Facts; import org.jeasy.rules.api.Rules; import org.jeasy.rules.core.DefaultRulesEngine; import org.jeasy.rules.mvel.MVELRuleFactory; import org.jeasy.rules.support.YamlRuleDefinitionReader; import java.io.FileReader; /** * @author chaird * @create 2022-11-26 13:02 */ public class RulesEngineFactory { /** * 构建食堂规则。特殊 * * @return */ public static BizRuleEngine buildRuleEngine4Canteen() { String entityType = "canteen"; String reulePath = "D:\\work\\IntelliJ IDEA 2018.2.4Workspace\\Demooo\\springboot-easu-rules-demo\\src\\main\\resources\\canteenRule.yml"; return buildRuleEngine(entityType, reulePath); } // 可以有N个 public static BizRuleEngine buildRuleEngine4MealGroup() { String entityType = "mealGroup"; String reulePath = "xxxxx"; // return buildRuleEngine(entityType, reulePath); return null; } private static BizRuleEngine buildRuleEngine(String entityType, String rulePath) { BizRuleEngine bizRuleEngine = new BizRuleEngine(entityType, rulePath); return bizRuleEngine; } @Data public static class BizRuleEngine { private String entityType; private MVELRuleFactory ruleFactory; private DefaultRulesEngine rulesEngine; private Rules rules; public BizRuleEngine(String entityType, String rulePath) { try { this.entityType = entityType; ruleFactory = new MVELRuleFactory(new YamlRuleDefinitionReader()); rules = ruleFactory.createRules(new FileReader(rulePath)); rulesEngine = new DefaultRulesEngine(); rulesEngine.registerRuleListener(new YmlRulesListener(entityType)); } catch (Exception e) { e.printStackTrace(); } } public void fire(RuleCommonInterface input) { Facts facts = new Facts(); facts.put(entityType, input); rulesEngine.fire(rules, facts); } } } 这样我就可以针对餐厅这样一个特殊的实例创建自己独有的规则引擎RulesEngineFactory.BizRuleEngine canteenRuleEngine = RulesEngineFactory.buildRuleEngine4Canteen(); Canteen canteen = new Canteen().setName("西餐厅").setProductId(1).setType(1); //todo创建监听器YmlRulesListener目的:其实有有的时候命中规则后我们要做一些事情,比如取到规则的一些描述等信息好组织文案package com.example.demo.rulesEngine.listener; import com.example.demo.rulesEngine.common.RuleCommonInterface; import org.jeasy.rules.api.Facts; import org.jeasy.rules.api.Rule; import org.jeasy.rules.api.RuleListener; /** * @author chaird * @create 2022-11-26 1:54 */ public class YmlRulesListener implements RuleListener { private String entityType ; @Override public boolean beforeEvaluate(Rule rule, Facts facts) { return true; } @Override public void afterEvaluate(Rule rule, Facts facts, boolean evaluationResult) { } @Override public void beforeExecute(Rule rule, Facts facts) { } @Override public void onSuccess(Rule rule, Facts facts) { //获取需要验证的对象,比如 【餐厅、套餐、菜品 implement RuleCommonInterface】 RuleCommonInterface ruleCommon = facts.get(entityType); //把规则信息进行一个赋值 ruleCommon.setDescription(rule.getDescription()); } @Override public void onFailure(Rule rule, Facts facts, Exception exception) { } public YmlRulesListener(){ } public YmlRulesListener(String entityType) { this.entityType = entityType; } } 可以直接通过规则action进行赋值有的时候会有转换操作,针对本文提出的案例。我想让productId =2的时候和productId = 9527的后续流程一样,可以在actions中使用下面的命令name: "牛肉火锅旗舰店" description: "prouductId = 1 && type = 2" condition: "canteen.productId == 2 && canteen.type == 1" priority: 2 actions: - "canteen.productId = 9527;"总结●这样的一个工具案例其实写文章还挺难组织思路的,代码贴的多显示不出核心思路。代码贴的少大家又看不太懂。●百度了一些文章,其实有些都没有跑通,所以自己写一篇文章。●其实单场景下对一个实体类进行规则校验那很简单,本文通过工厂模式设计的是对多实体类进行规则校验。总体还是有难度的。
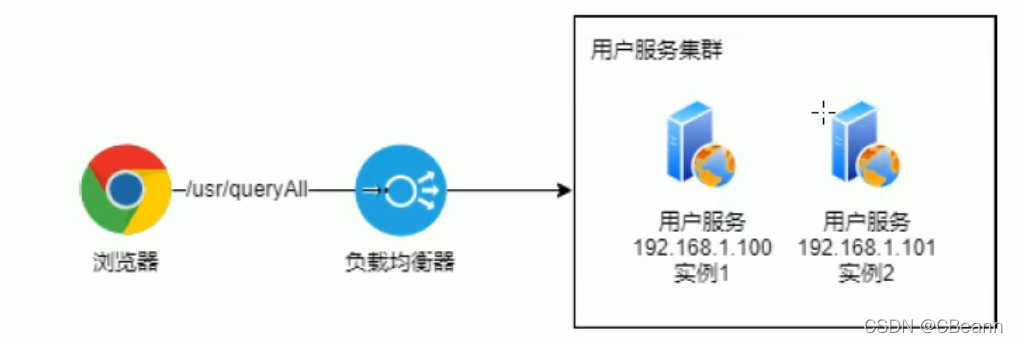
什么是SkywalkingSkywalking是apache基金会下面的一个开源APM项目,为微服务架构和云原生架构系统设计。它通过探针自动收集所需的指标,并进行分布式追踪。通过这些调用链路以及指标,Skywalking APM会感知应用间关系和服务间关系,并进行响应的指标统计。Skywalking支持链路追踪和监控应用组件基本涵盖主流框架和容器,如国产RPC Dubbo和motan等,国际化的spring boot,spring cloud。Skywalking提供分布式链路追踪、服务网格(Service Mesh)遥测分析、度量(Metric)聚合和可视化一体解决方案。下面是几大特点:●多语言自动探针,Java,.NET Core和Node.JS●多种监控手段,语言探针和service mesh。●轻量高效。不需要额外搭建大数据平台。●模块化架构。UI、存储、集群管理多种机制可选。●支持告警。●优秀的可视化效果。Skywaiking的主要概念使用如下案例进行Skywalking的主要概念的介绍。Skywaiking主要概念包含:服务(Service)端点(Endpoint)实例(Instance)如上图所示,客户端通过接口/usr/query/all访问写的SpringBoot的服务,其实SpringBoot被部署在两个服务器上。接口/usr/query/all就是端点,SpringBoot项目就是服务,部署在两个服务上,就是两个实例。Skywalking环境搭建(单机版)前提及版本skywalking版本:6.5.0安装步骤解压对压缩包进行解压,解压后如图所示修改数据库此处使用默认的内置数据库h2(不需要任何配置,内置)。修改前端访问的端口修改apache-skywalking-apm-bin\webapp\webapp.yml,此处修改一个随意的端口,用于前端web的访问启动服务apache-skywalking-apm-bin/bin下的startup.sh此时目录下就会出现logs文件夹,里面有日志,可以查看启动的日志用于排查问题访问前端页面打开端口(上面配置的9010端口)/sbin/iptables -I INPUT -p tcp --dport 9010 -j ACCEPT访问http://ip:9010/Skywalking监控SpringBoot其中springboot-demo-0.0.1-SNAPSHOT.jar是我自己的服务,skywalking-agent.jar是解压目录中的jarjava -javaagent:/apache-skywalking-apm-bin/agent/skywalking-agent.jar -jar springboot-demo-0.0.1-SNAPSHOT.jar &访问自己服务中的接口,然后刷新SkyWalking页面就会监控到SpringBoot服务,如下图所示
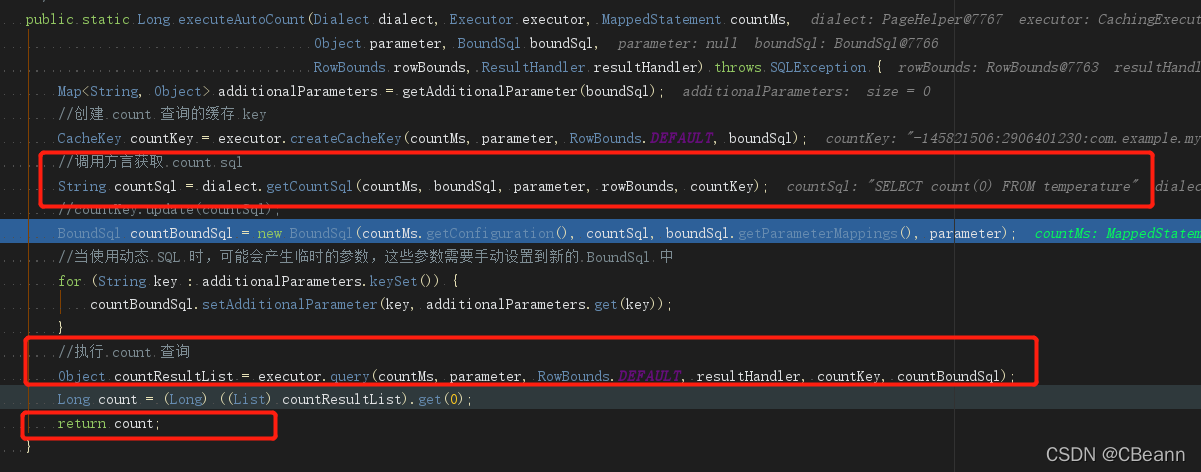
场景复现数据库初始化有9条记录。当我通过分页插件去查询数据库时,查询第2页,每页10条记录时,查询的结果竟然有9条数据。结果显然不合理,因为我查询第2页,按照逻辑应该查询第11-20条记录,因此不存在,所以返回为空,但是现在却返回9条记录。疑问如下:为什么返回数据???为什么返回9条数据???解决办法pagehelper: # helperDialect: mysql reasonable: false # 禁用合理化时,如果pageNum<1或pageNum>pages会返回空数据源码分析源码跟踪直接定位到PageInterceptor的intercept方法(为什么直接定位到这?)@Override public Object intercept(Invocation invocation) throws Throwable { try { //省略内容,省略内容,省略内容 List resultList; //步骤1:调用方法判断是否需要进行分页,如果不需要,直接返回结果 if (!dialect.skip(ms, parameter, rowBounds)) { //判断是否需要进行 count 查询 if (dialect.beforeCount(ms, parameter, rowBounds)) { //步骤2:查询总条数 Long count = count(executor, ms, parameter, rowBounds, resultHandler, boundSql); //处理查询总数,返回 true 时继续分页查询,false 时直接返回 //步骤3:保存总条数 if (!dialect.afterCount(count, parameter, rowBounds)) { //当查询总数为 0 时,直接返回空的结果 return dialect.afterPage(new ArrayList(), parameter, rowBounds); } } //步骤4:执行分页查询 resultList = ExecutorUtil.pageQuery(dialect, executor, ms, parameter, rowBounds, resultHandler, boundSql, cacheKey); } else { //rowBounds用参数值,不使用分页插件处理时,仍然支持默认的内存分页 resultList = executor.query(ms, parameter, rowBounds, resultHandler, cacheKey, boundSql); } //步骤5:封装结果 return dialect.afterPage(resultList, parameter, rowBounds); } finally { if(dialect != null){ dialect.afterAll(); } } }我们看步骤3,保存总条数,总条数会保存到ThreadLocal的Page对象中,如图代码所示//AbstractHelperDialect的afterCount方法 public boolean afterCount(long count, Object parameterObject, RowBounds rowBounds) { Page page = getLocalPage(); //(重点,重点,重点)把count保存到page对象中 page.setTotal(count); if (rowBounds instanceof PageRowBounds) { ((PageRowBounds) rowBounds).setTotal(count); } //pageSize < 0 的时候,不执行分页查询 //pageSize = 0 的时候,还需要执行后续查询,但是不会分页 if (page.getPageSize() < 0) { return false; } return count > ((page.getPageNum() - 1) * page.getPageSize()); }重点来了,我们跟进Page的setTotal方法//Page###setTotal public void setTotal(long total) { this.total = total; if (total == -1) { pages = 1; return; } if (pageSize > 0) { pages = (int) (total / pageSize + ((total % pageSize == 0) ? 0 : 1)); } else { pages = 0; } //分页合理化,针对不合理的页码自动处理 if ((reasonable != null && reasonable) && pageNum > pages) { if(pages!=0){ //把pageNum设置为最后一页,震惊 //把pageNum设置为最后一页,震惊 //把pageNum设置为最后一页,震惊 pageNum = pages; } calculateStartAndEndRow(); } }问题解析为什么返回数据???因为我查询的页数(pageNum = 2)大于总页数(pages = 1),因此把pages赋值给pageNum,查询最后一页肯定有数据===!为什么返回9条数据???因为我查询的页数(pageNum = 2)大于总页数(pages = 1),因此把pages赋值给pageNum,查询最后一页根据分析就是9条===!
猜测当我执行下面代码时,主题不存在,那么什么时候创建的主题"TopicTest202112151152"呢? Message msg = new Message("TopicTest202112151152" /* Topic */, "TagA" /* Tag */, ("Hello RocketMQ " +i).getBytes(RemotingHelper.DEFAULT_CHARSET) /* Message body */); SendResult sendResult = producer.send(msg,1000000000);其实我当时猜测的是可能发现主题不存在时先给服务器发个消息,让其创建主题,然后再发送消息。结果是:发送消息的时候创建主题问题1:client发送消息,主题不存在给谁发?源码跟踪以下面一段代码为例,要给“TopicTest202112151154”主题发送消息,发送的内容是时间字符串,跟producer.send方法// Instantiate with a producer group name. DefaultMQProducer producer = new DefaultMQProducer("please_rename_unique_group_name"); // Specify name server addresses. producer.setNamesrvAddr("localhost:9876"); // Launch the instance. producer.start(); // Create a message instance, specifying topic, tag and message body. Message msg = new Message( "TopicTest202112151154", "TagA", (LocalDateTime.now().toString()).getBytes(RemotingHelper.DEFAULT_CHARSET)); // Call send message to deliver message to one of brokers. SendResult sendResult = producer.send(msg, 1000000000); System.out.printf("%s%n", sendResult); // Shut down once the producer instance is not longer in use. producer.shutdown();跟到DefaultMQProducerImpl###sendDefaultImpl方法private SendResult sendDefaultImpl( Message msg, final CommunicationMode communicationMode, final SendCallback sendCallback, final long timeout ) throws MQClientException, RemotingException, MQBrokerException, InterruptedException { //... TopicPublishInfo topicPublishInfo = this.tryToFindTopicPublishInfo(msg.getTopic()); //.... //...发送消息 }跟到DefaultMQProducerImpl###tryToFindTopicPublishInfo方法private TopicPublishInfo tryToFindTopicPublishInfo(final String topic) { //首先从本地缓存中获取,因为主题不存在,所以返回null TopicPublishInfo topicPublishInfo = this.topicPublishInfoTable.get(topic); if (null == topicPublishInfo || !topicPublishInfo.ok()) { this.topicPublishInfoTable.putIfAbsent(topic, new TopicPublishInfo()); //然后从NameServer获取,因为主题不存在,所以返回一个不Ok的TopicPublishInfo this.mQClientFactory.updateTopicRouteInfoFromNameServer(topic); topicPublishInfo = this.topicPublishInfoTable.get(topic); } //因为TopicPublishInfo不Ok if (topicPublishInfo.isHaveTopicRouterInfo() || topicPublishInfo.ok()) { return topicPublishInfo; } else { //重新获取主题,该方法是重点,跟进去 this.mQClientFactory.updateTopicRouteInfoFromNameServer(topic, true, this.defaultMQProducer); topicPublishInfo = this.topicPublishInfoTable.get(topic); return topicPublishInfo; } }跟到MQClientInstance###updateTopicRouteInfoFromNameServer方法在该方法中获取默认的主题“TBW102”主题在NameServer的路由信息,把新主题的路由信息参考“TBW102”复制一份,此时在客户端上已经认为新主题已经创建好,不过在服务器端是没有创建好改主题的。 public boolean updateTopicRouteInfoFromNameServer(final String topic, boolean isDefault, DefaultMQProducer defaultMQProducer) { TopicRouteData topicRouteData; if (isDefault && defaultMQProducer != null) { //获取默认主题defaultMQProducer.getCreateTopicKey(),即TBW102的路由信息 topicRouteData = this.mQClientAPIImpl.getDefaultTopicRouteInfoFromNameServer(defaultMQProducer.getCreateTopicKey(), 1000 * 3); //省略。。。 } //然后按照TBW102的topicRouteData把新主题的topicRouteData创建出来,此时客户端就有了新主题的路由信息(实际是TBW102的路由信息) return false; } 此时客户端就有新主题的路由信息了,但是路由信息对应的broker上是没有该主题的信息的,不过客户端此时已经知道把消息发给哪个IP了。问题回答客户端如果获取的主题信息不存在,会根据“TBW102”主题的信息创建新主题,然后把该新主题的信息存储到客户端本地,此时客户端知道给哪个IP发数据了,然后客户端就会和那个IP的Netty建立连接,然后发数据,Ok了。问题2:broker收到消息后发现主题不存在,什么时候创建?从哪开始打断点首先你要会Netty,这样按照常理你就能知道逻辑在SimpleChannelInboundHandler里。那么去哪找SimpleChannelInboundHandler呢,应该先找到NettyServer。NettyServer应该在Broker的启动源码里去找。BrokerController###start方法里有下面的代码if (this.remotingServer != null) { this.remotingServer.start(); }remotingServer的实现类选择NettyRemotingServer,里面的start方法里有如下代码 ServerBootstrap childHandler = this.serverBootstrap.group(this.eventLoopGroupBoss, this.eventLoopGroupSelector) .channel(useEpoll() ? EpollServerSocketChannel.class : NioServerSocketChannel.class) .option(ChannelOption.SO_BACKLOG, 1024) .option(ChannelOption.SO_REUSEADDR, true) .option(ChannelOption.SO_KEEPALIVE, false) .childOption(ChannelOption.TCP_NODELAY, true) .childOption(ChannelOption.SO_SNDBUF, nettyServerConfig.getServerSocketSndBufSize()) .childOption(ChannelOption.SO_RCVBUF, nettyServerConfig.getServerSocketRcvBufSize()) .localAddress(new InetSocketAddress(this.nettyServerConfig.getListenPort())) .childHandler(new ChannelInitializer<SocketChannel>() { @Override public void initChannel(SocketChannel ch) throws Exception { ch.pipeline() .addLast(defaultEventExecutorGroup, HANDSHAKE_HANDLER_NAME, handshakeHandler) .addLast(defaultEventExecutorGroup, encoder, new NettyDecoder(), new IdleStateHandler(0, 0, nettyServerConfig.getServerChannelMaxIdleTimeSeconds()), connectionManageHandler, serverHandler ); } });其中serverHandler就是MQ自定义的方法,顺藤摸瓜,就找到了NettyServerHandler的channelRead0方法NettyRemotingAbstract###processMessageReceived方法,在processRequestCommand里打条件多线程断,条件是cmd.code == 310(RequestCode.SEND_MESSAGE_V2 = 310) public void processMessageReceived(ChannelHandlerContext ctx, RemotingCommand msg) throws Exception { final RemotingCommand cmd = msg; if (cmd != null) { switch (cmd.getType()) { case REQUEST_COMMAND: processRequestCommand(ctx, cmd); break; case RESPONSE_COMMAND: processResponseCommand(ctx, cmd); break; default: break; } } }开始跟源码当客户端发送消息时,broker的断点会停在下面的processRequestCommand这一行NettyRemotingAbstract###processMessageReceived方法,在processRequestCommand里打条件多线程断,条件是cmd.code == 310(RequestCode.SEND_MESSAGE_V2 = 310) public void processMessageReceived(ChannelHandlerContext ctx, RemotingCommand msg) throws Exception { final RemotingCommand cmd = msg; if (cmd != null) { switch (cmd.getType()) { case REQUEST_COMMAND: processRequestCommand(ctx, cmd); break; case RESPONSE_COMMAND: processResponseCommand(ctx, cmd); break; default: break; } } } NettyRemotingAbstract###processRequestCommand方法RequestTask requestTask = new RequestTask(run, ctx.channel(), cmd)把任务提交,会到下面代码里的run匿名类里public void processRequestCommand(final ChannelHandlerContext ctx, final RemotingCommand cmd) { final Pair<NettyRequestProcessor, ExecutorService> matched = this.processorTable.get(cmd.getCode()); final Pair<NettyRequestProcessor, ExecutorService> pair = null == matched ? this.defaultRequestProcessor : matched; final int opaque = cmd.getOpaque(); if (pair != null) { Runnable run = new Runnable() { @Override public void run() { try { doBeforeRpcHooks(RemotingHelper.parseChannelRemoteAddr(ctx.channel()), cmd); final RemotingResponseCallback callback = new RemotingResponseCallback() { @Override public void callback(RemotingCommand response) { doAfterRpcHooks( RemotingHelper.parseChannelRemoteAddr(ctx.channel()), cmd, response); if (!cmd.isOnewayRPC()) { if (response != null) { response.setOpaque(opaque); response.markResponseType(); try { System.out.println(response); ctx.writeAndFlush(response); } catch (Throwable e) { log.error("process request over, but response failed", e); log.error(cmd.toString()); log.error(response.toString()); } } else { } } } }; if (pair.getObject1() instanceof AsyncNettyRequestProcessor) { AsyncNettyRequestProcessor processor = (AsyncNettyRequestProcessor) pair.getObject1(); processor.asyncProcessRequest(ctx, cmd, callback); } else { NettyRequestProcessor processor = pair.getObject1(); RemotingCommand response = processor.processRequest(ctx, cmd); callback.callback(response); } } catch (Throwable e) { log.error("process request exception", e); log.error(cmd.toString()); if (!cmd.isOnewayRPC()) { final RemotingCommand response = RemotingCommand.createResponseCommand( RemotingSysResponseCode.SYSTEM_ERROR, RemotingHelper.exceptionSimpleDesc(e)); response.setOpaque(opaque); ctx.writeAndFlush(response); } } } }; if (pair.getObject1().rejectRequest()) { final RemotingCommand response = RemotingCommand.createResponseCommand(RemotingSysResponseCode.SYSTEM_BUSY, "[REJECTREQUEST]system busy, start flow control for a while"); response.setOpaque(opaque); ctx.writeAndFlush(response); return; } try { //使用线程池把任务提交 final RequestTask requestTask = new RequestTask(run, ctx.channel(), cmd); pair.getObject2().submit(requestTask); } catch (RejectedExecutionException e) { }然后跟SendMessageProcessor###asyncProcessRequest方法public void asyncProcessRequest(ChannelHandlerContext ctx, RemotingCommand request, RemotingResponseCallback responseCallback) throws Exception { asyncProcessRequest(ctx, request).thenAcceptAsync(responseCallback::callback, this.brokerController.getSendMessageExecutor()); }然后跟SendMessageProcessor###asyncProcessRequest方法public CompletableFuture<RemotingCommand> asyncProcessRequest(ChannelHandlerContext ctx, RemotingCommand request) throws RemotingCommandException { final SendMessageContext mqtraceContext; switch (request.getCode()) { case RequestCode.CONSUMER_SEND_MSG_BACK: return this.asyncConsumerSendMsgBack(ctx, request); default: SendMessageRequestHeader requestHeader = parseRequestHeader(request); if (requestHeader == null) { return CompletableFuture.completedFuture(null); } mqtraceContext = buildMsgContext(ctx, requestHeader); this.executeSendMessageHookBefore(ctx, request, mqtraceContext); if (requestHeader.isBatch()) { return this.asyncSendBatchMessage(ctx, request, mqtraceContext, requestHeader); } else { //走这个分支 return this.asyncSendMessage(ctx, request, mqtraceContext, requestHeader); } } }然后跟SendMessageProcessor###asyncSendMessage方法方法里有一个preSend方法private CompletableFuture<RemotingCommand> asyncSendMessage(ChannelHandlerContext ctx, RemotingCommand request, SendMessageContext mqtraceContext, SendMessageRequestHeader requestHeader) { final RemotingCommand response = preSend(ctx, request, requestHeader); //省略 }然后跟SendMessageProcessor###asyncSendMessage方法private RemotingCommand preSend(ChannelHandlerContext ctx, RemotingCommand request, SendMessageRequestHeader requestHeader) { //省略 //检查主题的问题 super.msgCheck(ctx, requestHeader, response); //省略 }跟进AbstractSendMessageProcessor###msgCheck方法 protected RemotingCommand msgCheck(final ChannelHandlerContext ctx, final SendMessageRequestHeader requestHeader, final RemotingCommand response) { //省略 //broker上创建主题,跟进去 topicConfig = this.brokerController.getTopicConfigManager().createTopicInSendMessageMethod( requestHeader.getTopic(), requestHeader.getDefaultTopic(), RemotingHelper.parseChannelRemoteAddr(ctx.channel()), requestHeader.getDefaultTopicQueueNums(), topicSysFlag); //省略 } TopicConfigManager###createTopicInSendMessageMethod该方法会创建主题并且持久化,此时主题在broker中存在但是NameServer不存在public TopicConfig createTopicInSendMessageMethod(final String topic, final String defaultTopic, final String remoteAddress, final int clientDefaultTopicQueueNums, final int topicSysFlag) { if (PermName.isInherited(defaultTopicConfig.getPerm())) { //创建新主题的topic信息 topicConfig = new TopicConfig(topic); int queueNums = Math.min(clientDefaultTopicQueueNums, defaultTopicConfig.getWriteQueueNums()); if (queueNums < 0) { queueNums = 0; } topicConfig.setReadQueueNums(queueNums); topicConfig.setWriteQueueNums(queueNums); int perm = defaultTopicConfig.getPerm(); perm &= ~PermName.PERM_INHERIT; topicConfig.setPerm(perm); topicConfig.setTopicSysFlag(topicSysFlag); topicConfig.setTopicFilterType(defaultTopicConfig.getTopicFilterType()); } } if (topicConfig != null) { //持久化 this.persist(); } } return topicConfig; }###ConfigManager###persist方法public synchronized void persist() { String jsonString = this.encode(true); if (jsonString != null) { //我的值是C:\Users\25682\store\config\topics.json String fileName = this.configFilePath(); try { MixAll.string2File(jsonString, fileName); } catch (IOException e) { log.error("persist file " + fileName + " exception", e); } } }MixAll###string2File//str为最新的全部topic信息 public static void string2File(final String str, final String fileName) throws IOException { //先把str存到topics.json.tmp里 String tmpFile = fileName + ".tmp"; string2FileNotSafe(str, tmpFile); //把topics.json里的数据存储到topics.json.bk里 String bakFile = fileName + ".bak"; String prevContent = file2String(fileName); if (prevContent != null) { string2FileNotSafe(prevContent, bakFile); } //删除topics.json File file = new File(fileName); file.delete(); //把topics.json.tmp重命名为topics.json file = new File(tmpFile); file.renameTo(new File(fileName)); }TBW102主题的作用Producer 在发送消息时,默认情况下,不需要提前创建好 Topic,如果 Topic 不存在,Broker 会自动创建 Topic。但是新创建的 Topic 它的权限是什么?读写队列数是多少呢?这个时候就需要用到TBW102了,RocketMQ 会基于该 Topic 的配置创建新的 Topic。
查看Pod里容器的名称初始化一个包含两个容器的Pod(tomcat和nginx),其中文件名为ini-pod.yamlapiVersion: v1 kind: Pod metadata: name: myapp-pod labels: app: myapp spec: containers: - name: myapp-tomcat image: tomcat - name: myapp-nginx image: nginxkubectl create -f ini-pod.yaml查看Pod里业务容器的命令kubectl get pods myapp-pod -o jsonpath={.spec.containers[*].name}其中 myapp-pod为pod的名称,其它不变查看Pod里初始化容器的命令kubectl get pods myapp-pod -o jsonpath={.spec.initContainers[*].name}其中 myapp-pod为pod的名称,其它不变Pause容器存在的意义和证明一个Pod里的容器之间访问可以通过localhost去访问,即一个pod里的所有容器是共享一个网络的,那怎么才能实现一个Pod里的多个容器共享一个网络IP呢?Pause容器的存在也即解决了这个问题。学docker的时候有一个知识点是docker的网络模式【https://www.jianshu.com/p/22a7032bb7bd】,里面是有一个是container模式的,其实也完全可以理解。当我创建一个pod的时候,我可以给pod里的一个容器配置ip,其他的容器网络都link到这个配置有ip的容器上,那这样的话就实现了一个pod里的多个容器共用一个ip,也即一个Pod里的容器之间访问可以通过localhost去访问。证明Pod里存在pause容器的证据如下图所示, 按照上面的例子,其实我在pod里创建了2个容器(tomcat和nginx),但是我查询出来的却是3个。docker ps |grep myapp-pod注意全文中 myapp-pod为pod的名称
源码下载ChaiRongD/Demooo - Gitee.comChaiRongD/Demooo - Gitee.com设计模式工厂设计模式Spring使用工厂模式可以通过 ApplicationContext 创建和获取 bean 对象。其实这里就有一个问题,ApplicationContext和BeanFactory有什么关系呢?其实这个问题可以从源码中看出来。下面是获取ioc容器的context,根据名称获取Bean,这段代码大家都比较熟悉 AnnotationConfigApplicationContext context = new AnnotationConfigApplicationContext(App.class); Student bean = (Student) context.getBean("student"); bean.speak();其实你跟跟进去getBean方法,你就会大吃一惊,是核心还是beanFactory。@Override public Object getBean(String name) throws BeansException { assertBeanFactoryActive(); return getBeanFactory().getBean(name); }单例设计模式 Spring中Bean默认都是单例的,既然是单例的,那存在哪呢,其实是存在一个map里。其实一共使用了三个map,又称作三级缓存。//DefaultSingletonBeanRegistry /** 三级缓存(存放的是可以使用的Bean) */ private final Map<String, Object> singletonObjects = new ConcurrentHashMap<>(256); /** 一级缓存(存放的是BeanFacory对象) */ private final Map<String, ObjectFactory<?>> singletonFactories = new HashMap<>(16); /** 二级缓存(存放的是经过代理的获取不需要代理的对象,此时对象的属性还有部分没有被填充) */ private final Map<String, Object> earlySingletonObjects = new HashMap<>(16); protected Object getSingleton(String beanName, boolean allowEarlyReference) { //从三级缓存冲获取 Object singletonObject = this.singletonObjects.get(beanName); if (singletonObject == null && isSingletonCurrentlyInCreation(beanName)) { synchronized (this.singletonObjects) { //从二级缓存中获取 singletonObject = this.earlySingletonObjects.get(beanName); if (singletonObject == null && allowEarlyReference) { //从一级缓存中获取 ObjectFactory<?> singletonFactory = this.singletonFactories.get(beanName); if (singletonFactory != null) { singletonObject = singletonFactory.getObject(); this.earlySingletonObjects.put(beanName, singletonObject); this.singletonFactories.remove(beanName); } } } } return singletonObject; }虽然Bean是单例的,但是也存在线程不安全的情况。如下面代码所示。@Controller public class HelloController { int num = 0; @GetMapping("add") public void add(){ num++; } }代理设计模式 Spring中代理模式中使用的最经典的是AOP,这里跟源码就比较麻烦了,其实这里的知识点有jdk动态代理和cglib代理,这俩有什么区别,经典题。1 jdk代理的类要有接口,cglib代理则不需要2 cglib代理的时候生成的代理类生成速度慢,但是调用速度快,jdk反之。模板方法模式 在获取context的地方有一个refresh()方法,这个地方就是模版方法模式AnnotationConfigApplicationContext context = new AnnotationConfigApplicationContext(App.class);public AnnotationConfigApplicationContext(Class<?>... annotatedClasses) { this(); register(annotatedClasses); refresh(); } 观察者模式观察者模式的一个落地实现是listener,Spring也有Listener适配器模式 SpringMVC中有一个核心的servlet就是DispatcherServlet,该方法里有一个Servlet有一个方式是doDispatch,先获取HanderMethod(就是有@GetMapping的方法),然后在获取适配器Adapter,这说明有好几种HanderMethod,其实实现controller有三种方式 protected void doDispatch(HttpServletRequest request, HttpServletResponse response) throws Exception { HttpServletRequest processedRequest = request; HandlerExecutionChain mappedHandler = null; boolean multipartRequestParsed = false; WebAsyncManager asyncManager = WebAsyncUtils.getAsyncManager(request); try { ModelAndView mv = null; Exception dispatchException = null; try { processedRequest = checkMultipart(request); multipartRequestParsed = (processedRequest != request); // 获取handlerMethod,就是我们自己写个@GetMapper的方法 mappedHandler = getHandler(processedRequest); if (mappedHandler == null) { noHandlerFound(processedRequest, response); return; } // 获取handlerMethod 的是适配器Adapter HandlerAdapter ha = getHandlerAdapter(mappedHandler.getHandler()); // Process last-modified header, if supported by the handler. String method = request.getMethod(); boolean isGet = "GET".equals(method); if (isGet || "HEAD".equals(method)) { long lastModified = ha.getLastModified(request, mappedHandler.getHandler()); if (new ServletWebRequest(request, response).checkNotModified(lastModified) && isGet) { return; } } if (!mappedHandler.applyPreHandle(processedRequest, response)) { return; } // Actually invoke the handler. mv = ha.handle(processedRequest, response, mappedHandler.getHandler()); if (asyncManager.isConcurrentHandlingStarted()) { return; } applyDefaultViewName(processedRequest, mv); mappedHandler.applyPostHandle(processedRequest, response, mv); } catch (Exception ex) { } catch (Throwable err) { } catch (Exception ex) { } catch (Throwable err) { } finally { } } 装饰者模式其实我看源码没有看到,主要原因是自己水平还有待提高,所以有些看不太懂,这里找了一篇文章,做为补充。
需求 最近自己玩发现MyBatisPlus还是挺好用的,但是忽然发现对于一个持久层框架来说支持拼接复杂的SQL也是一个优势,对一个持久层框架拼接SQL来说,or比and更难拼,所以此处用案例来实现MybatisPlus中or和and的简单使用。代码下载(内含数据库)ChaiRongD/Demooo - Gitee.comand和or的使用案例1:AandB@GetMapping("/AandB") public Object AandB(){ //SELECT id,name,age,sex FROM student WHERE (name = ? AND age = ?) List<Student> list = studentService.lambdaQuery().eq(Student::getName, "1").eq(Student::getAge, 1).list(); return list; }案例2:AorB @GetMapping("/AorB") public Object AorB(){ //SELECT id,name,age,sex FROM student WHERE (name = ? OR age = ?) List<Student> list = studentService.lambdaQuery().eq(Student::getName, "1").or().eq(Student::getAge, 12).list(); return list; }案例3:A or(C and D)@GetMapping("/A_or_CandD") public Object A_or_CandD() { //SELECT id,name,age,sex FROM student WHERE (name = ? OR (name = ? AND age = ?)) List<Student> list = studentService .lambdaQuery() .eq(Student::getName, "1") .or(wp -> wp.eq(Student::getName, "1").eq(Student::getAge, 12)) .list(); return list;案例4:(AandB)or(CandD)@GetMapping("/AandB_or_CandD") public Object AandB_or_CandD() { // SELECT id,name,age,sex FROM student WHERE ((name = ? AND age = ?) OR (name = ? AND age = ?)) List<Student> list = studentService .lambdaQuery() .and(wp -> wp.eq(Student::getName, "1").eq(Student::getAge, 12)) .or(wp -> wp.eq(Student::getName, "1").eq(Student::getAge, 12)) .list(); return list; }案例5:A or (B and ( C or D))@GetMapping("/complex") public Object complex() { // SELECT * FROM student WHERE ((name <> 1) OR (name = 1 AND (age IS NULL OR age >= 11))) List<Student> list = studentService .lambdaQuery() .and(wp -> wp.ne(Student::getName, "1")) .or( wp -> wp.eq(Student::getName, "1") .and(wpp -> wpp.isNull(Student::getAge).or().ge(Student::getAge, 11))) .list(); return list; }总结1 你可以让他打印SQL语句,这样你就知道知道的SQL了2 我遇到的情况是不报错,不打印SQL,那只能DEBUG3 手写SQL在mapper中也行
Java对象的内存结构对象内存结构在64位操作系统下,MarkWord(下图_mark)占64位KlassWord(下图_klass)占32位 64位系统的Klass Word不是32位,默认64位,开启指针压缩后为32(感谢评论老哥的指出)64位系统的Klass Word不是32位,默认64位,开启指针压缩后为32_lengh(只有数据对象才有,不考虑)实例数据(下图instance data)看参数的类型,int就占32位(4byte)补齐(padding)是JVM规定java对象内存必须是8byte的倍数,如果实例数据占2byte,那么(64bit的Markword+32bit的Klassword+实例数据32bit)=128bit=16byte是8byte的倍数,所以padding部分为0。查看对象内存结构JDK8 <dependency> <groupId>org.openjdk.jol</groupId> <artifactId>jol-core</artifactId> <version>0.9</version> </dependency>public class SynchronizedDemo { public static void main(String[] args) { Dog dog = new Dog(); System.out.println(ClassLayout.parseInstance(dog).toPrintable()); } } class Dog { char age; }如上图所示,对象头中的MarkWord占8byte,KlassWord占4个byte,实例属性age是char类型占2个byte,那么此时加起来为14byte,为了满足是8的倍数,要补充2个byte。下图是当Dog对象里的age变为int时打印的结果,请自行对比。对象头下图是引自《深入理解Java虚拟机:JVM高级特性与最佳实践(第3版) 周志明》中的一个图,下图是32操作系统下的对象头中的Mark Word(32位),Klass Word(32位),一共是64位。64操作系统下,Mark Word的长度是64,在加Klass Word(32位),一共是96位,其实对象头长什么样其实不是本文的重点,本文的重点是验证锁升级的过程,所以我们只需要关注对象头中Mark Word的最后3位即可,如下图中的后3位。锁升级的过程前提由于大小端引起的问题,使得这里展示的高低位相反,如下图所示,所以我要关注的就是⑧位置的最后3位足矣。无锁状态public class SynchronizedDemo { public static void main(String[] args) { Dog dog = new Dog(); System.out.println(ClassLayout.parseInstance(dog).toPrintable()); } }如下图所示,001表示的无锁状态并且不允许偏向 (其实默认是开启偏向的,只不过虚拟机后在运行后几秒才开启偏向锁)使用下面的参数,如下图所示 ,会发现状态为101,表示无锁状态-XX:BiasedLockingStartupDelay=0由无锁状态---->偏向锁状态单线程访问锁的时候,锁由无锁状态变为偏向锁状态。// -XX:BiasedLockingStartupDelay=0 public class SynchronizedDemo { public static void main(String[] args) { Dog dog = new Dog(); System.out.println(ClassLayout.parseInstance(dog).toPrintable()); //上锁 synchronized (dog){ System.out.println(ClassLayout.parseInstance(dog).toPrintable()); } System.out.println(ClassLayout.parseInstance(dog).toPrintable()); } } class Dog { int age; }如上图所示,开始状态为101,为可偏向,无锁状态上锁后状态是101,为可偏向,有锁状态 解锁后:状态为101,为可偏向,有锁状态区别为:当线程给无锁状态的lock加锁时,会把线程ID存储到MarkWord中,即锁偏向于该ID的线程,偏向锁不会自动释放。上面表格中2->3的过程。偏向锁状态---->轻量级锁状态多线程使用锁(不竞争,错开时间访问),锁由偏向锁状态变为轻量级锁状态// -XX:BiasedLockingStartupDelay=0 public class SynchronizedDemo { public static void main(String[] args) { Dog dog = new Dog(); System.out.println("初始状态:"); System.out.println(ClassLayout.parseInstance(dog).toPrintable()); new Thread( () -> { synchronized (dog) { System.out.println("hello world"); } }, "t1") .start(); System.out.println("线程1释放锁后:"); System.out.println(ClassLayout.parseInstance(dog).toPrintable()); try { TimeUnit.SECONDS.sleep(3); } catch (Exception e) { e.printStackTrace(); } finally { } new Thread( () -> { synchronized (dog) { System.out.println("线程2上锁:"); System.out.println(ClassLayout.parseInstance(dog).toPrintable()); } System.out.println("线程2释放锁:"); System.out.println(ClassLayout.parseInstance(dog).toPrintable()); }, "t2") .start(); } } class Dog { int age; }初始状态为101,为可偏向,并且为无锁状态线程1释放锁后,状态为101,并且存储了线程ID,为偏向锁状态,偏向于线程1线程2上锁,上锁后,状态为00,轻量级锁状态线程2释放锁后,状态为001,此时为不可偏向的无锁状态。重量级锁状态// -XX:BiasedLockingStartupDelay=0 public class SynchronizedDemo { public static void main(String[] args) { Dog dog = new Dog(); System.out.println("初始状态:"); System.out.println(ClassLayout.parseInstance(dog).toPrintable()); new Thread( () -> { synchronized (dog) { System.out.println(""); try { TimeUnit.SECONDS.sleep(3); } catch (Exception e) { e.printStackTrace(); } finally { } } }, "t1") .start(); new Thread( () -> { synchronized (dog) { System.out.println("线程2上锁"); System.out.println(ClassLayout.parseInstance(dog).toPrintable()); try { TimeUnit.SECONDS.sleep(3); } catch (Exception e) { e.printStackTrace(); } finally { } } System.out.println("线程2释放锁"); System.out.println(ClassLayout.parseInstance(dog).toPrintable()); }, "t2") .start(); } } class Dog { int age; }如上图所示,锁初始状态为101,可偏向无锁状态当线程1在使用锁,而线程2去上锁的时候,状态已经变为010,不可偏向重量级锁。总结单线程使用锁的时候为偏向锁。多线程无竞争(错峰使用锁)的时候为轻量级锁。有竞争的时候为重量级锁。
需求现在有服务器134,135,137,138 四台服务器,134能上外网,其他的不能上外网,需要解决其他不能上外网的问题前提 1)2个centos7服务器,其中192.168.129.221能上网,192.168.129.222不能上网2)互相能ping通实现在221上安装tinyproxy软件安装tinyproxywget https://dl.fedoraproject.org/pub/epel/epel-release-latest-7.noarch.rpmsudo rpm -Uvh epel-release-latest-7*.rpmyum install tinyproxy修改tinyproxy配置文件vim /etc/tinyproxy/tinyproxy.conf下图为端口,不需要修改,默认为8888 下图为修改后,箭头处修改的规则为:所有的IP都可以实用开放8888端口firewall-cmd --zone=public --add-port=8888/tcp --permanentfirewall-cmd --reload # 配置立即生效启动tinyproxy服务service tinyproxy start service tinyproxy stop service tinyproxy restart检测服务是否启动netstat -anp | grep 8888本机测试其中IP为221,IP为tinyproxy中curl -x 192.168.129.221:8888 www.baidu.com在222上关联代理修改/etc/profile配置文件在最后添加http_proxy=http://192.168.129.221:8888 #ip为能上网的221,端口为默认的8888 https_proxy=$http_proxy export http_proxy export https_proxy使配置生效source /etc/profile测试curl www.baidu.com未解决的问题curl www.baidu.com可以,但是ping 不通
前提(1)三台能联网的虚拟机(2)操作系统 CentOS7 64位集群中所有服务器之间可以网络互通,访问外网禁止swap分区安装步骤环境配置关闭防火墙(master221,slave223,slave224)systemctl stop firewalld systemctl disable firewalld关闭selinux(master221,slave223,slave224)sed -i 's/enforcing/disabled/' /etc/selinux/config # 永久 setenforce 0 # 临时关闭swap (master221,slave223,slave224)swapoff -a # 临时 sed -ri 's/.*swap.*/#&/' /etc/fstab # 永久根据规划设置主机名(根据自己的命名,去每一台执行自己的命令)hostnamectl set-hostname master221 #在221结点执行 hostnamectl set-hostname slave222 #在222结点执行 hostnamectl set-hostname slave223 #在223结点执行在master添加hosts(master221,slave223,slave224)cat >> /etc/hosts << EOF 192.168.129.221 master221 192.168.129.223 slave223 192.168.129.224 slave224 EOF将桥接的IPv4流量传递到iptables的链(master221,slave223,slave224)cat > /etc/sysctl.d/k8s.conf << EOF net.bridge.bridge-nf-call-ip6tables = 1 net.bridge.bridge-nf-call-iptables = 1 EOFsysctl --system #生效时间与windows同步 yum install ntpdate -y ntpdate time.windows.com安装Docker(master221,slave223,slave224)安装Docker#下载指定版本docker wget https://mirrors.aliyun.com/docker-ce/linux/centos/docker-ce.repo -O /etc/yum.repos.d/docker-ce.repo #安装docker yum -y install docker-ce-18.06.1.ce-3.el7 #开启docker服务 systemctl enable docker && systemctl start docker #查看docker版本 docker --version #查看docker信息 docker info设置docker仓库为阿里镜像仓库cat > /etc/docker/daemon.json << EOF { "registry-mirrors": ["https://b9pmyelo.mirror.aliyuncs.com"] } EOF # 重启docker systemctl restart docker # 查看仓库是否加入成功 docker info 添加阿里云YUM软件源cat > /etc/yum.repos.d/kubernetes.repo << EOF [kubernetes] name=Kubernetes baseurl=https://mirrors.aliyun.com/kubernetes/yum/repos/kubernetes-el7-x86_64 enabled=1 gpgcheck=0 repo_gpgcheck=0 gpgkey=https://mirrors.aliyun.com/kubernetes/yum/doc/yum-key.gpg https://mirrors.aliyun.com/kubernetes/yum/doc/rpm-package-key.gpg EOF安装kubeadm、kubelet、kubectl(master221,slave223,slave224)yum install -y kubelet-1.18.0 kubeadm-1.18.0 kubectl-1.18.0 systemctl enable kubelet 部署k8s master、加入node在192.168.129.221(master221)上执行注意:apiserver-advertise-address属性值为master221的ipkubeadm init \ --apiserver-advertise-address=192.168.129.221 \ --image-repository registry.aliyuncs.com/google_containers \ --kubernetes-version v1.18.0 \ --service-cidr=10.96.0.0/12 \ --pod-network-cidr=10.244.0.0/16按照上图输入的日志在master执行方框1里面的内容(master221)mkdir -p $HOME/.kube sudo cp -i /etc/kubernetes/admin.conf $HOME/.kube/config sudo chown $(id -u):$(id -g) $HOME/.kube/config查询节点(master221)kubectl get nodesslave结点加入集群(slave223,slave224)注意:下面内容为上上图上方框中的内容kubeadm join 192.168.129.221:6443 --token un45uv.6l06g4q8alkcgelb \ --discovery-token-ca-cert-hash sha256:46617920d7a26a52d5d1330ab07f6af778e59db921c691c04d7679c0dab0eacc 查询结点(master221,slave223,slave224)kubectl get nodes注意:此时在slave223,slave223中执行上面遇见可能会出现下面情况,解决情况如下:export KUBECONFIG=/etc/kubernetes/admin.conf 最后是admin.conf文件,你要看看你的文件叫什么名字,我的文件叫kubelet.conf部署CNI网络插件在主结点部署CNI(master221)注意:如果出现连接失败,多执行几次kubectl apply -f https://raw.githubusercontent.com/coreos/flannel/master/Documentation/kube-flannel.yml 查看pod的状态kubectl get pods -n kube-system稍等片刻再次执行,上面的命令,直到上图中所有的STATUS为runing查询结点(master221,slave223,slave224)kubectl get nodes此时所有的结点状态为Ready状态测试集群在Kubernetes集群中创建一个nginx pod,验证是否正常运行#创建pod kubectl create deployment nginx --image=nginx #暴露端口 kubectl expose deployment nginx --port=80 --type=NodePort #查看pod,service信息 kubectl get pod,svchttp://192.168.129.221:32373/ 就访问到nginx
项目简介●springboot●redis●@ApiIdempotentAnn注解 + 拦截器对请求进行拦截●压测工具: jmeter实现思路 为需要保证幂等性的每一次请求创建一个唯一标识token, 先获取token, 并将此token存入redis, 请求接口时, 将此token放到header或者作为请求参数请求接口, 后端接口判断redis中是否存在此token:●如果存在, 正常处理业务逻辑, 并从redis中删除此token, 那么, 如果是重复请求, 由于token已被删除, 则不能通过校验, 返回重复提交●如果不存在, 说明参数不合法或者是重复请求, 返回提示即可请求流程当页面加载的时候通过接口获取token当访问接口时,会经过拦截器,如果发现该接口有自定义的幂等性注解,说明该接口需要验证幂等性(查看请求头里是否有key=token的值,如果有,并且删除成功,那么接口就访问成功,否则为重复提交);如果发现该接口没有自定义的幂等性注解,放行。代码pom依赖添加redis依赖<dependency> <groupId>org.springframework.boot</groupId> <artifactId>spring-boot-starter-data-redis</artifactId> </dependency>自定义注解即添加了该注解的接口要实现幂等性验证@Target({ElementType.TYPE, ElementType.METHOD}) @Retention(RetentionPolicy.RUNTIME) @Documented public @interface ApiIdempotentAnn { boolean value() default true; }幂等性拦截器package com.example.springbootdemointerfacemideng.intceptor; import com.example.springbootdemointerfacemideng.annotation.ApiIdempotentAnn; import org.springframework.beans.factory.annotation.Autowired; import org.springframework.data.redis.core.StringRedisTemplate; import org.springframework.stereotype.Component; import org.springframework.web.method.HandlerMethod; import org.springframework.web.servlet.ModelAndView; import org.springframework.web.servlet.handler.HandlerInterceptorAdapter; import javax.servlet.http.HttpServletRequest; import javax.servlet.http.HttpServletResponse; import java.io.PrintWriter; import java.lang.reflect.Method; /** * @author CBeann * @create 2020-07-04 18:06 */ @Component public class ApiIdempotentInceptor extends HandlerInterceptorAdapter { @Autowired private StringRedisTemplate stringRedisTemplate; @Override public boolean preHandle(HttpServletRequest request, HttpServletResponse response, Object handler) throws Exception { if (!(handler instanceof HandlerMethod)) { return true; } final HandlerMethod handlerMethod = (HandlerMethod) handler; final Method method = handlerMethod.getMethod(); // 有这个注解 boolean methodAnn = method.isAnnotationPresent(ApiIdempotentAnn.class); if (methodAnn && method.getAnnotation(ApiIdempotentAnn.class).value()) { // 需要实现接口幂等性 boolean result = checkToken(request); if (result) { return super.preHandle(request, response, handler); } else { response.setContentType("application/json; charset=utf-8"); PrintWriter writer = response.getWriter(); writer.print("重复调用"); writer.close(); response.flushBuffer(); return false; } } return super.preHandle(request, response, handler); } @Override public void postHandle( HttpServletRequest request, HttpServletResponse response, Object handler, ModelAndView modelAndView) throws Exception { super.postHandle(request, response, handler, modelAndView); } private boolean checkToken(HttpServletRequest request) { String token = request.getHeader("token"); if (null == token || "".equals(token)) { // 没有token,说明重复调用或者 return false; } // 返回是否删除成功 return stringRedisTemplate.delete(token); } }MVC配置文件/** * @author chaird * @create 2020-09-23 16:13 */ @Configuration public class MVCConfig extends WebMvcConfigurerAdapter { @Autowired private ApiIdempotentInceptor apiIdempotentInceptor; @Override public void addInterceptors(InterceptorRegistry registry) { // 获取http请求拦截器 registry.addInterceptor(apiIdempotentInceptor).addPathPatterns("/*"); } }接口层package com.example.springbootdemointerfacemideng.controller; import com.example.springbootdemointerfacemideng.annotation.ApiIdempotentAnn; import org.springframework.beans.factory.annotation.Autowired; import org.springframework.data.redis.core.StringRedisTemplate; import org.springframework.web.bind.annotation.GetMapping; import org.springframework.web.bind.annotation.RestController; import java.util.UUID; import java.util.concurrent.atomic.AtomicInteger; /** * @author chaird * @create 2020-09-23 15:47 */ @RestController public class ApiController { AtomicInteger num = new AtomicInteger(100); @Autowired private StringRedisTemplate stringRedisTemplate; /** * 前端获取token,然后把该token放入请求的header中 * * @return */ @GetMapping("/getToken") public String getToken() { String token = UUID.randomUUID().toString().substring(1, 9); stringRedisTemplate.opsForValue().set(token, "1"); return token; } /** * 主业务逻辑,num--,并且加了自定义接口 * * @return */ @GetMapping("/submit") @ApiIdempotentAnn public String rushB() { // num-- num.decrementAndGet(); return "success"; } /** * 查看num的值 * * @return */ @GetMapping("/getNum") public String getNum() { return String.valueOf(num.get()); } }测试 (1)首先调用http://localhost:8080/getToken 获取token(2)用JMeter测试配置一百个线程在1秒内访问(3)分析结果说明只成功调用了一次http://localhost:8080/submit 接口代码下载Demooo/springboot-demo-interface-mideng at master · cbeann/Demooo · GitHub
IDEA连接Docker安装docker插件配置docker仓库URL搭建项目代码下载Demooo/springboot-demo-docker at master · cbeann/Demooo · GitHub创建SpringBoot项目并且创建一个接口@GetMapping("/hello") public String hello() { String s = LocalDateTime.now().toString(); return s; }修改pom.xml<properties> <!--设置时间戳--> <maven.build.timestamp.format>yyyyMMddHHmmss</maven.build.timestamp.format> <!--设置docker image 前缀--> <docker.prefix>mydocker</docker.prefix> </properties> <!-- docker插件 --> <plugin> <groupId>com.spotify</groupId> <artifactId>docker-maven-plugin</artifactId> <version>1.0.0</version> <!--将插件绑定在某个phase执行--> <executions> <execution> <id>build-image</id> <!--将插件绑定在package这个phase上。也就是说,用户只需执行mvn package ,就会自动执行mvn docker:build--> <phase>package</phase> <goals> <goal>build</goal> </goals> </execution> </executions> <configuration> <!--设置镜像名称--> <imageName>${docker.prefix}/${project.artifactId}_${maven.build.timestamp}</imageName> <!-- docker远程服务器地址 --> <dockerHost>http://127.0.0.1:2375</dockerHost> <!--设置目录,该目录下放dockerfike--> <dockerDirectory>${project.basedir}/src/main/docker</dockerDirectory> <resources> <resource> <targetPath>/</targetPath> <directory>${project.build.directory}</directory> <include>${project.build.finalName}.jar</include> </resource> </resources> </configuration> </plugin>编写dockerfile在/src/main/docker目录下,该位置在pom中已经设置#指定基础镜像,在其上进行定制 FROM java:8 #维护者信息 MAINTAINER cbeann <cbeann@163.com> #这里的 /tmp 目录就会在运行时自动挂载为匿名卷,任何向 /tmp 中写入的信息都不会记录进容器存储层 VOLUME /tmp #复制上下文目录下的target/springboot-demo-docker-0.0.1-SNAPSHOT.jar 到容器里 COPY springboot-demo-docker-0.0.1-SNAPSHOT.jar demo-1.0.0.jar #声明运行时容器提供服务端口,这只是一个声明,在运行时并不会因为这个声明应用就会开启这个端口的服务 EXPOSE 8080 #指定容器启动程序及参数 <ENTRYPOINT> "<CMD>" ENTRYPOINT ["java","-jar","demo-1.0.0.jar"]运行maven的package此处已经在pom中把bulid image与mvn package做了关联,即运行package也运行构建镜像命令 运行结果遇到的坑IEDA连接远程docker仓库失败0)确保2375端口开放1)修改/usr/lib/systemd/system/docker.servic2)修改ExecStart行为下面内容ExecStart=/usr/bin/dockerd -H tcp://0.0.0.0:2375 -H unix://var/run/docker.sock3)加载docker守护线程systemctl daemon-reload 4)重启dockersystemctl restart docker
解决循环依赖假设有一种下面的情况,A中有B,B中有A@Data public class A { private B b; public A() {System.out.println("A 无参构造器。。。");} public void speak() {System.out.println("------AAA---------");} } @Data public class B { public B() {System.out.println("B 无参构造器。。。");} private A a; public void speak() {System.out.println("------BBB---------");} }图片分析代码分析在创建的A的时候调用doCreateBean方法1)调用A无参构造方法创建Bean2)把该bean对象添加到三级缓存中(在下面的代码中有注释)3)Bean的属性赋值,A的里面引用了B,所以此时会调用doCteateBean(B)//AbstractAutowireCapableBeanFactory protected Object doCreateBean(final String beanName, final RootBeanDefinition mbd, final @Nullable Object[] args) throws BeanCreationException { { // Instantiate the bean. BeanWrapper instanceWrapper = null; if (mbd.isSingleton()) { //省略 } if (instanceWrapper == null) { //1)调用无参构造方法创建Bean instanceWrapper = createBeanInstance(beanName, mbd, args); } final Object bean = instanceWrapper.getWrappedInstance(); Class<?> beanType = instanceWrapper.getWrappedClass(); if (beanType != NullBean.class) { mbd.resolvedTargetType = beanType; } synchronized (mbd.postProcessingLock) { //省略 } boolean earlySingletonExposure = (mbd.isSingleton() && this.allowCircularReferences && isSingletonCurrentlyInCreation(beanName)); if (earlySingletonExposure) { if (logger.isTraceEnabled()) { //省略 } //2)把该bean对象添加到三级缓存中,注意getEarlyBeanReference方法,特别有用 addSingletonFactory(beanName, () -> getEarlyBeanReference(beanName, mbd, bean)); } // Initialize the bean instance. Object exposedObject = bean; try { //3)Bean的属性赋值 populateBean(beanName, mbd, instanceWrapper); //4)处理aware接口、applyBeanPostProcessorsBeforeInitialization、initMethod exposedObject = initializeBean(beanName, exposedObject, mbd); } catch (Throwable ex) { if (ex instanceof BeanCreationException && beanName.equals(((BeanCreationException) ex).getBeanName())) { //省略 } else { //省略 } } if (earlySingletonExposure) { //省略 } // Register bean as disposable. try { registerDisposableBeanIfNecessary(beanName, bean, mbd); } catch (BeanDefinitionValidationException ex) { //省略 } return exposedObject; } } 此时在创建B的时候调用getBean(A),然后会走到下面代码的地方,从三级缓存中获取到A(B=null),返回该不完整的A的地址,然后B创建成功,然后继续创建A,然后A也创建成功。-------------------------源码1//DefaultSingletonBeanRegistry protected Object getSingleton(String beanName, boolean allowEarlyReference) { //从一级缓存中获取,即IOC容器,即完整的Bean对象 Object singletonObject = this.singletonObjects.get(beanName); if (singletonObject == null && isSingletonCurrentlyInCreation(beanName)) { synchronized (this.singletonObjects) { //从二级缓存中获取 singletonObject = this.earlySingletonObjects.get(beanName); if (singletonObject == null && allowEarlyReference) { //从三级缓存中获取 ObjectFactory<?> singletonFactory = this.singletonFactories.get(beanName); if (singletonFactory != null) { singletonObject = singletonFactory.getObject(); this.earlySingletonObjects.put(beanName, singletonObject); this.singletonFactories.remove(beanName); } } } } return singletonObject; }循环依赖总结 (1)创建A的时候调用A的无参构造方法,然后在把得到的地址A(B=null)放入到三级缓存中,然后填充自己的属性B,也就会创建B; (2)当创建B的时候,填充自己的属性A,从三级缓存中拿到A(B=null)地址,然后B创建成功; (3)此时回到(1),此时拿到B,然后完善A,创建A成功。 (4)因为在(2)中拿到的是A的地址,所以在(3)中完善A在B中是一个。 三级缓存疑问个人感觉二级缓存足矣,为什么还要三级缓存?反驳疑问假设下面的场景:只有singletonObject(第一级缓存)和singletonFactory (第三级缓存),即没有earlySingletonObjects(第二级缓存)如果有这么一种情况A(B),B(A),还有一个AOP是关注A的某个方法此时的逻辑为:1)创建A2)把A(B=null)的地址(abc)存入singletonFactory缓存中3)创建B4)B在赋值a属性的时候,在singletonFactory缓存中拿出A的地址(abc)并且赋值给属性a(左边这句话是错的)(这就是三级缓存的关键), 4.1)没有AOP的时候,确实是存的a的地址,没错,返回的也是a的地址。 4.2)如果有AOP,确实存进去的是a的地址,但是返回的已经不是A的地址了,是A的代理对象地址(看源码2,3,4)。总结:此时就出现问题了,如果没有earlySingletonObjects(第二级缓存),那么每次在singletonFactory (第三级缓存)中拿到的A对象都会创建创建一个代理对象,即每次向依赖A的对象中赋的值都是不同的代理对象,那么就不符合单例模式了。-------------------------源码2protected Object getEarlyBeanReference(String beanName, RootBeanDefinition mbd, Object bean) { Object exposedObject = bean; if (!mbd.isSynthetic() && hasInstantiationAwareBeanPostProcessors()) { for (BeanPostProcessor bp : getBeanPostProcessors()) { if (bp instanceof SmartInstantiationAwareBeanPostProcessor) { SmartInstantiationAwareBeanPostProcessor ibp = (SmartInstantiationAwareBeanPostProcessor) bp; exposedObject = ibp.getEarlyBeanReference(exposedObject, beanName); } } } return exposedObject; }-------------------------源码3 //AbstractAutoProxyCreator @Override public Object getEarlyBeanReference(Object bean, String beanName) { Object cacheKey = getCacheKey(bean.getClass(), beanName); this.earlyProxyReferences.put(cacheKey, bean); //跟进去 return wrapIfNecessary(bean, beanName, cacheKey); }-------------------------源码4//AbstractAutoProxyCreator protected Object wrapIfNecessary(Object bean, String beanName, Object cacheKey) { if (StringUtils.hasLength(beanName) && this.targetSourcedBeans.contains(beanName)) { return bean; } if (Boolean.FALSE.equals(this.advisedBeans.get(cacheKey))) { return bean; } if (isInfrastructureClass(bean.getClass()) || shouldSkip(bean.getClass(), beanName)) { this.advisedBeans.put(cacheKey, Boolean.FALSE); return bean; } // Create proxy if we have advice. Object[] specificInterceptors = getAdvicesAndAdvisorsForBean(bean.getClass(), beanName, null); if (specificInterceptors != DO_NOT_PROXY) { this.advisedBeans.put(cacheKey, Boolean.TRUE); //返回了一个新对象,新地址 //返回了一个新对象,新地址 //返回了一个新对象,新地址 Object proxy = createProxy( bean.getClass(), beanName, specificInterceptors, new SingletonTargetSource(bean)); this.proxyTypes.put(cacheKey, proxy.getClass()); return proxy; } this.advisedBeans.put(cacheKey, Boolean.FALSE); return bean; }总结1)在没有AOP的情况下二级缓存足矣解决循环依赖,三级缓存更能解决问题。2)三级缓存其实也是解决循环依赖的,是解决带AOP的循环依赖的,如上文中举的例子。如果您查的三级缓存资料没有说AOP,个人感觉这篇文章写的不是很充实。 本文没有回答的疑问疑问1上问中反驳二级缓存不能解决带AOP的循环依赖问题时,是把earlySingletonObjects(第二级缓存)去掉;如果我说我去掉singletonFactory (第三级缓存),那该如何反驳二级缓存不能解决带AOP的循环依赖问题呢???疑问2就拿上问中举的例字来说,A依赖B,B依赖A,有一个关注A的AOP。下面是创建Bean声明周期的一段代码,以创建A为例//AbstractAutowireCapableBeanFactory protected Object doCreateBean{ //创建A Object exposedObject = bean; try { //初始化A,因为A中有属性B,此时去创建B,然后把A的代理对象存入earlySingletonObjects缓存中,B创建完毕,然后又回到此处继续初始化A populateBean(beanName, mbd, instanceWrapper); //为非代理对象A执行aware接口等等 exposedObject = initializeBean(beanName, exposedObject, mbd); } catch (Throwable ex) { //省略 } } if (earlySingletonExposure) { //在earlySingletonObjects中拿到代理对象A Object earlySingletonReference = getSingleton(beanName, false); if (earlySingletonReference != null) { if (exposedObject == bean) { //把exposedObject由指向非代理对象A变为指向代理对象A,那么 //exposedObject = initializeBean(beanName, exposedObject, mbd); //我认为是白做了,我不清楚这个地方??????????????? exposedObject = earlySingletonReference; } else if (!this.allowRawInjectionDespiteWrapping && hasDependentBean(beanName)) { String[] dependentBeans = getDependentBeans(beanName); Set<String> actualDependentBeans = new LinkedHashSet<>(dependentBeans.length); for (String dependentBean : dependentBeans) { if (!removeSingletonIfCreatedForTypeCheckOnly(dependentBean)) { actualDependentBeans.add(dependentBean); } } if (!actualDependentBeans.isEmpty()) { throw new BeanCurrentlyInCreationException(beanName, "Bean with name '" + beanName + "' has been injected into other beans [" + StringUtils.collectionToCommaDelimitedString(actualDependentBeans) + "] in its raw version as part of a circular reference, but has eventually been " + "wrapped. This means that said other beans do not use the final version of the " + "bean. This is often the result of over-eager type matching - consider using " + "'getBeanNamesOfType' with the 'allowEagerInit' flag turned off, for example."); } } } }如果有知道上面两个问题答案的,可以在下问中评论,一起学习,共同进步
思路(1)自信满满一开始我想简单啊,在项目里的URL添加自己阿里云的一个sout接口,选择Merge requet events,点击Add webhook。如下图所示,这不就OK了吗?因为我自己没事整 本地push到github然后触发jenkins自动构建项目也是这么简单啊。(2)备受挫折1)创建merge请求2)修改merge请求3)撤销merge请求4)重新打开merge请求5)同意merge请求都触发我的请求,我哪知道哪种是哪种,而且我想要合并到master的请求,现在dev1合并到dev2也给触发,很乱。(3)受人指点但是我就发现其实有很多操作是会调用这个上面钩子程序的URL的,然后就在这个时候,一位叫胜哥的给我指了条明路,看文档,就是上图中的箭头,从此就解决了很多疑惑。然后在文档中找到如下图所示的内容,这不就是我想要的东西吗?(3)获取请求体里的内容百度了一段代码,获取了上图中的请求体(要亲自试,你才会明白里面参数的含义) @RequestMapping("/email") @ResponseBody public String sendEmail(HttpServletRequest request) { InputStream is = null; try { is = request.getInputStream(); StringBuilder sb = new StringBuilder(); byte[] b = new byte[4096]; for (int n; (n = is.read(b)) != -1; ) { sb.append(new String(b, 0, n)); } System.out.println("----------------------->"); System.out.println(sb); } catch (IOException e) { e.printStackTrace(); } finally { if (null != is) { try { is.close(); } catch (IOException e) { e.printStackTrace(); } } } // 发送邮件 //emailService.sendSimpleMail(); return "success";(4)分析请求体我有五份请求体,正如步骤(3)中的5种情况。分析他们的不同,其实就是看他们有什么区别这里用到了超级好用 json 格式化网站 json工具 - 在线工具因为我的需求是我要合并请求并且合并到master分支的才进行业务逻辑,所以就在网站里分析。打开两个格式化json的网页,当你在这两个页面之间来回切换你就能发现他们的不同(除了时间)(5)分析出不同的参数,写代码 import io.swagger.annotations.Api; import lombok.Data; import org.springframework.web.bind.annotation.RequestBody; import org.springframework.web.bind.annotation.RequestMapping; import org.springframework.web.bind.annotation.RequestMethod; import org.springframework.web.bind.annotation.RestController; import java.util.ArrayList; import java.util.List; /** * @author chaird * @create 2020-06-18 23:22 */ @Api("分支合并到master钩子接口") @RestController @RequestMapping("/admin/webhook") public class WebHookController { /** merge请求状态 */ private final String MERGE_STATUS = "can_be_merged"; /** merge操作状态 */ private final String STATUS = "merged"; /** 目标分支,即要合并到的分支 */ private final String TARGET_BRANCH = "master"; @RequestMapping(value = "/invokeMergeHook", method = RequestMethod.POST) public Object invokeMergeHook(@RequestBody GLWHRootInfo glwhRootInfo) { String result; try { // 获取项目名称 String projectName = glwhRootInfo.getProject().getName(); // 获取gitlab触发此次请求的操作类型,比如提交、同意、撤销合并分支请求 String merge_status = glwhRootInfo.getObject_attributes().getMerge_status(); String state = glwhRootInfo.getObject_attributes().getState(); // 获取source分支和获取target分支 String target_branch = glwhRootInfo.getObject_attributes().getTarget_branch(); String source_branch = glwhRootInfo.getObject_attributes().getSource_branch(); // 获取操作用户邮箱 String user_email = glwhRootInfo.getObject_attributes().getLast_commit().getAuthor().getEmail(); // 如果merge_status为D0_MERGE 并且目标分支是master分支 if (MERGE_STATUS.equals(merge_status) && STATUS.equals(state) && TARGET_BRANCH.equals(target_branch)) { System.out.println("--------------->发邮件"); String msg = "此邮件为测试邮件:" + "此邮件为测试邮件" + "\n" + "projectName:" + projectName + "\n" + "target_branch:" + target_branch + "\n" + "source_branch:" + source_branch + "\n" + "user_email:" + user_email; // 发送邮箱 System.out.println("-------------------------------------------------------"); result = "分支合并成功并且符合发送邮箱要求"; } else { result = "不符合发送邮箱要求"; } } catch (Exception e) { return "非gitlab发送的请求"; } return result; } } /** Gitlab触发webhook中的RequestBody对应的实体类 */ @Data class GLWHRootInfo { private String object_kind; private User user; private Project project; private Object_attributes object_attributes; List<String> labels = new ArrayList<>(); private Changes changes; private Repository repository; } @Data class State { private String previous; private String current; } @Data class Author { private String name; private String email; } @Data class Changes { private State state; private Updated_at updated_at; private Total_time_spent total_time_spent; } @Data class Last_commit { private String id; private String message; private String timestamp; private String url; private Author author; } @Data class Merge_params { private String force_remove_source_branch; } @Data class Object_attributes { private String assignee_id; private int author_id; private String created_at; private String description; private String head_pipeline_id; private int id; private int iid; private String last_edited_at; private String last_edited_by_id; private String merge_commit_sha; private String merge_error; private Merge_params merge_params; private String merge_status; private String merge_user_id; private boolean merge_when_pipeline_succeeds; private String milestone_id; private String source_branch; private Integer source_project_id; private String state; private String target_branch; private Integer target_project_id; private Integer time_estimate; private String title; private String updated_at; private String updated_by_id; private String url; private Source source; private Target target; private Last_commit last_commit; private boolean work_in_progress; private Integer total_time_spent; private String human_total_time_spent; private String human_time_estimate; private String action; } @Data class Project { private int id; private String name; private String description; private String web_url; private String avatar_url; private String git_ssh_url; private String git_http_url; private String namespace; private int visibility_level; private String path_with_namespace; private String default_branch; private String ci_config_path; private String homepage; private String url; private String ssh_url; private String http_url; } @Data class Repository { private String name; private String url; private String description; private String homepage; } @Data class Source { private int id; private String name; private String description; private String web_url; private String avatar_url; private String git_ssh_url; private String git_http_url; private String namespace; private Integer visibility_level; private String path_with_namespace; private String default_branch; private String ci_config_path; private String homepage; private String url; private String ssh_url; private String http_url; } @Data class Target { private int id; private String name; private String description; private String web_url; private String avatar_url; private String git_ssh_url; private String git_http_url; private String namespace; private int visibility_level; private String path_with_namespace; private String default_branch; private String ci_config_path; private String homepage; private String url; private String ssh_url; private String http_url; } @Data class Total_time_spent { private String previous; private Integer current; } @Data class Updated_at { private String previous; private String current; } @Data class User { private String name; private String username; private String avatar_url; }(6)蓦然回首文档上都说了啥时候触发请求,我没用看到,我自己试出来的,然后有什么用呢,不看文档的人会吃亏的。总结1)看文档,看官方文档(虽然我还没有做到),这是技术人员的必经之路。2)其实我我没有感觉做出来多少厉害,我只是感觉从解决问题的过程中学到解决问题的思路以及看请求体的重要性。3)有人指导,这确实是一看运气
MySQL隔离级别测试隔离级别数据库准备数据库如下图所示,所有字段都是int(方便测试),id为主键索引,name为普通索引(唯一索引),age没有索引Read Uncommitted(读取未提交内容)打开两个mysql终端,都设置session级别的隔离级别为读取未提交内容(本次会话有效)set session transaction isolation level read uncommitted;如下表所示,事务B在第4步进行了修改(还没有提交或者回滚),事务A在第5步就已经可以读取到修改(未提交或者回滚)的内容,出现了(脏读)事务B在第6步回滚了, 撤销了修改操作,那么第5步读的就不正确了Read Committed(读取提交内容)打开两个mysql终端,都设置session级别的隔离级别为读取提交内容(本次会话有效)set session transaction isolation level read committed;如下表所示,事务B在步骤4修改了数据事务A在步骤5读取数据,(解决了脏读问题)事务B在步骤6提交了修改内容事务A在步骤7读取的数据和步骤5读取的数据不一样(出现了不可重复读问题)Repeatable Read(可重读)打开两个mysql终端,都设置session级别的隔离级别为可重读(本次会话有效)set session transaction isolation level repeatable read;下面的例子有点不恰当,下面的例子有点不恰当,下面的例子有点不恰当如下表所示,事务A在步骤3和步骤6读取的数据一样(解决了不可重复度)事务B在步骤4插入主键为4的数据事务A在步骤7插入主键为4的数据报错 (出现了幻读)Serializable(可串行化)打开两个mysql终端,都设置session级别的隔离级别为串行化(本次会话有效)set session transaction isolation level serializable;如下表所示,事务B在步骤5遇到了阻塞,性能差 MySQL的锁innodb行锁,锁的是什么?答:锁的是索引。有索引时锁索引,没有索引的时候锁表。如下表所示,id有主键索引,name有唯一索引,age无索引乐观锁和悲观锁乐观锁乐观锁与数据库无关如下表所示,有一个字段是verison 版本号###伪代码,无竞争逻辑 student = select * from student where id = 1; currentVersion = student.version update student set age = 11 , version = version + 1 where id = 1 and version = currentVersion ; ###伪代码,有竞争逻辑 student = select * from student where id = 1; currentVersion = student.version //此时中间有另一个客户端又修改了这条记录,version+1了 update student set age = 11 , version = version + 1 where id = 1 and version = currentVersion ;//这条修改失败,因为currentVersion已经过时,不存在悲观锁说到这里,由悲观锁涉及到的另外两个锁概念就出来了,它们就是共享锁与排它锁。共享锁和排它锁是悲观锁的不同的实现,它俩都属于悲观锁的范畴。共享锁和排它锁共享锁select * from student WHERE id = 1 lock in share mode;排它锁增、删、改默认添加的是排它锁。select * from student WHERE id = 1 for update;给一条记录上了排它锁后,其他事务不能给改条记录上共享锁和排它锁。意向锁意向锁是表级别锁,意向锁不是人为的,是数据库自动的。以意向排它锁为例,当事务A给记录1上锁时,先获取表的意向排它锁,然后在给记录1上锁;此时事务B给表上表锁,先获取表的意向排它锁,然后在锁表,但是此时意向排它锁在被事务A获取,所示事务B锁表失败。
获取本机的外网地址 如果下面正确,请留下您宝贵的赞package untils; import java.io.BufferedReader; import java.io.IOException; import java.io.InputStreamReader; import java.net.*; import java.util.Enumeration; import java.util.regex.Matcher; import java.util.regex.Pattern; /** * @author CBeann * @create 2020-04-13 1:31 */ public class IPUntils { public static void main(String[] args) throws Exception { System.out.println(IPUntils.getInterIP1()); System.out.println(IPUntils.getInterIP2()); System.out.println(IPUntils.getOutIPV4()); } public static String getInterIP1() throws Exception { return InetAddress.getLocalHost().getHostAddress(); } public static String getInterIP2() throws SocketException { String localip = null;// 本地IP,如果没有配置外网IP则返回它 String netip = null;// 外网IP Enumeration<NetworkInterface> netInterfaces; netInterfaces = NetworkInterface.getNetworkInterfaces(); InetAddress ip = null; boolean finded = false;// 是否找到外网IP while (netInterfaces.hasMoreElements() && !finded) { NetworkInterface ni = netInterfaces.nextElement(); Enumeration<InetAddress> address = ni.getInetAddresses(); while (address.hasMoreElements()) { ip = address.nextElement(); if (!ip.isSiteLocalAddress() && !ip.isLoopbackAddress() && ip.getHostAddress().indexOf(":") == -1) {// 外网IP netip = ip.getHostAddress(); finded = true; break; } else if (ip.isSiteLocalAddress() && !ip.isLoopbackAddress() && ip.getHostAddress().indexOf(":") == -1) {// 内网IP localip = ip.getHostAddress(); } } } if (netip != null && !"".equals(netip)) { return netip; } else { return localip; } } public static String getOutIPV4() { String ip = ""; String chinaz = "http://ip.chinaz.com"; StringBuilder inputLine = new StringBuilder(); String read = ""; URL url = null; HttpURLConnection urlConnection = null; BufferedReader in = null; try { url = new URL(chinaz); urlConnection = (HttpURLConnection) url.openConnection(); in = new BufferedReader(new InputStreamReader(urlConnection.getInputStream(), "UTF-8")); while ((read = in.readLine()) != null) { inputLine.append(read + "\r\n"); } } catch (MalformedURLException e) { e.printStackTrace(); } catch (IOException e) { e.printStackTrace(); } finally { if (in != null) { try { in.close(); } catch (IOException e) { e.printStackTrace(); } } } Pattern p = Pattern.compile("\\<dd class\\=\"fz24\">(.*?)\\<\\/dd>"); Matcher m = p.matcher(inputLine.toString()); if (m.find()) { String ipstr = m.group(1); ip = ipstr; } return ip; } }
Nacos简介Nacos是一个更易于构建云原生应用的动态服务发现、配置管理和服务管理平台。Nacos=Eureka+config+busNaco是服务注册中心和服务配置中心Nacos安装(单机&集群)前提JDK1.8+(包括1.8)下面的项目是 SpringBoot2.2.2 + springcloud-alibaba 2.1.0window安装Nacos在 https://github.com/alibaba/nacos/tags (https://github.com/alibaba/nacos/releases/tag/1.1.4)上选择版本然后下载 nacos-server-1.1.4.zip 解压后进入nacos-server-1.1.4\nacos\bin 目录下 启动nacos-server启动成功后访问 http://localhost:8848/nacos 如下图所示,账号密码都为 nacosLinux安装单机版Nacos步骤在 https://github.com/alibaba/nacos/tags (https://github.com/alibaba/nacos/releases/tag/1.1.4)上选择版本然后下载 nacos-server-1.1.4.tar.gz 解压压缩包tar -zxvf nacos-server-1.1.4.tar.gz在解压后的bin 目录下运作 startup.sh ,并且添加单机版参数./startup.sh -m standalone遇到的问题 如果不添加参数 -m standalone,如下面代码所示./startup.sh系统会启动会遇到异常,所以运行成功后你可以查看一下 日志 /logs/start.outLinux安装Nacos集群(伪集群)此标题下 修改 startup.sh脚本 亲测可用, 后面的启动集群测试没有通过,勿看通过修改startup.sh脚本,使其能配置端口,从而在一台服务器上开多个Nacos节点,然后在通过nginx进行代理转发。左图是修改前,右图是修改后下面中上图是修改前,下图是修改后 测试nacos启动脚本是否正确,指定端口为3344的单机版nacos./startup.sh -p 3344 -m standalone后面的启动集群测试没有通过,勿看,勿看,勿看在startup.sh无误的情况下在解压后的conf目录下的cluster.conf.example 复制一份并且重命名 为cluster.conf修改cluster.conf,添加3台机器的IP和Nacos端口启动三个节点进行测试./startup.sh -p 3333 ./startup.sh -p 4444 ./startup.sh -p 5555Nacos持久化如果启动多个默认的Nacos节点,那么节点可能存在不一致的情况,因为每一个Nacos节点是使用内嵌的derby数据库。为了解决这个问题,Nacos采用集中式存储的方式来支持集群化部署,目前只支持MySQL(原来自己存自己的,现在大家用一个数据库保持一致性)持久化配置在解压后的 conf下有一个nacos-mysql.sql 数据库文件在MySQL创建名称为nacos_config的数据库并执行此文件 修改conf下的application.properties,添加下面的配置spring.datasource.platform=mysql db.num=1 db.url.0=jdbc:mysql://127.0.0.1:3306/nacos_config?characterEncoding=utf8&connectTimeout=1000&socketTimeout=3000&autoReconnect=true db.user=root db.password=root在解压后的bin 目录下运作 startup.sh ,(如果是单机版添加单机版参数)服务提供者案例代码下载 https://github.com/cbeann/share/tree/master/springcloud-Nacos-demo在springboot+web的基础之上进行如下操作添加依赖<!-- SpringCloud alibaba nacos --> <dependency> <groupId>com.alibaba.cloud</groupId> <artifactId>spring-cloud-starter-alibaba-nacos-discovery</artifactId> <version>2.1.0.RELEASE</version> </dependency>修改yml文件server: port: 8001 spring: application: name: provider cloud: ###nocos注册中心 nacos: discovery: server-addr: localhost:8848 management: endpoints: web: exposure: include: "*"修改主启动类@EnableDiscoveryClient 添加一个controller@RestController public class HelloController { @Value("${server.port}") private String serverPort; @GetMapping(value = "/provider/get/{id}") public String getPayment(@PathVariable("id") Integer id) { return "nacos registry, serverPort: " + serverPort + "\t id" + id; } }测试本服务http://localhost:8001/provider/get/1 可以正常请求并且Nacos注册中心有此服务服务消费者案例代码下载 https://github.com/cbeann/share/tree/master/springcloud-Nacos-demo在springboot+web的基础之上进行如下操作添加依赖<!-- SpringCloud alibaba nacos --> <dependency> <groupId>com.alibaba.cloud</groupId> <artifactId>spring-cloud-starter-alibaba-nacos-discovery</artifactId> <version>2.1.0.RELEASE</version> </dependency>修改yml文件server: port: 80 spring: application: name: consumer cloud: nacos: discovery: server-addr: localhost:8848修改主启动类@EnableDiscoveryClient 添加一个controller@RestController public class HelloController { @Bean @LoadBalanced public RestTemplate getRestTemplate() { return new RestTemplate(); } @Autowired private RestTemplate restTemplate; //请求的服务名称 private String serverURL = "http://provider"; @GetMapping("/consumer/get/{id}") public String paymentInfo(@PathVariable("id") Long id) { return restTemplate.getForObject(serverURL + "/provider/get/" + id, String.class); } } 测试本服务http://localhost/consumer/get/1可以正常请求并且Nacos注册中心有此服务Nacos服务配置中心案例(注意文中yml和yaml)在springboot+web的基础之上进行如下操作添加依赖<!-- nacos config --> <dependency> <groupId>com.alibaba.cloud</groupId> <artifactId>spring-cloud-starter-alibaba-nacos-config</artifactId> <version>2.1.0.RELEASE</version> </dependency> <!-- SpringCloud alibaba nacos --> <dependency> <groupId>com.alibaba.cloud</groupId> <artifactId>spring-cloud-starter-alibaba-nacos-discovery</artifactId> <version>2.1.0.RELEASE</version> </dependency> 修改bootstrap.yml文件(☆☆☆☆☆)注意:下面的配置中 file-extension的值yaml server: port: 3377 spring: application: name: config-nacos-client profiles: active: dev cloud: nacos: discovery: server-addr: localhost:8848 #Nacos服务注册中心地址 config: server-addr: localhost:8848 #Nacos服务配置中心地址 file-extension: yaml #指定yml格式的配置 # ${spring.application.name}-${spring.profile.active}.${spring.cloud.nacos.config.file-extension} # config-nacos-clientt-dev.yaml 修改启动类@EnableDiscoveryClient添加业务逻辑controller其中注解@RefreshScope很重要3@RestController @RefreshScope//支持Nacos的动态刷新 public class ConfigClientController { @Value("${config.info}") private String configInfo; @GetMapping("/config/info") public String getConfigInfo() { return configInfo; } } 在Nacos可视化界面中添加配置其中命名规则为bootstrap.yml中值得拼接# ${spring.application.name}-${spring.profile.active}.${spring.cloud.nacos.config.file-extension} # config-nacos-clientt-dev.yaml参考nacos github:https://github.com/alibaba/Nacosnacos官网homenacos下载地址https://github.com/alibaba/nacos/tagsSpring Cloud Alibaba Reference Documentationhttps://spring-cloud-alibaba-group.github.io/github-pages/greenwich/spring-cloud-alibaba.html
问题提出:在redis中存的key有空格,存后空格会被取消掉,如图所示 String str = "2020-1-1 08"; stringRedisTemplate.opsForValue().set(str,str);//key:2020-1-1 08 value:2020-1-108 空格已经被消除解决办法:两边加一个引号的转义 String str1 = "\""+"2020-1-1 09"+"\""; stringRedisTemplate.opsForValue().set(str1,str1);总结redis中存的key可以带空格,但是value中的空格会被删除掉
Docker安装(1)里面有介绍用宝塔界面安装redis,安装docker也是如此,和手机应用宝一样简单(2)linux安装docker - 简书设置阿里云docker镜像加速 - 简书关闭防火墙 # 关闭防火墙 systemctl stop firewalld systemctl disable firewalld安装docker$ wget https://mirrors.aliyun.com/docker-ce/linux/centos/docker-ce.repo -O /etc/yum.repos.d/docker-ce.repo $ yum -y install docker-ce-18.06.1.ce-3.el7 $ systemctl enable docker && systemctl start docker $ docker --version $ docker info设置docker仓库为阿里镜像仓库$ cat > /etc/docker/daemon.json << EOF { "registry-mirrors": ["https://b9pmyelo.mirror.aliyuncs.com"] } EOF # 重启docker $ systemctl restart docker # 查看仓库是否加入成功 $ docker infoDocker常用命令image镜像命令查看本地镜像docker images查询镜像docker search 某个XXX镜像的名字拉取镜像到本地docker pull 某个XXX镜像的名字删除镜像imagedocker rmi -f 镜像ID容器命令查看正在运行的容器docker ps查看正在运行的容器+历史容器 docker ps -a启动容器docker start 容器ID重启容器docker restart 容器ID关闭容器docker stop 容器ID强制关闭容器docker kill 容器ID删除(已经停止的)容器docker rm 容器ID从容器内拷贝文件到主机上docker cp 容器ID:容器内路径 目的主机路径安装MySQL镜像(Demo)-p 3307:3306 指定端口映射,格式为:主机(宿主)端口:容器端口--name 容器的名称-e 参数-d 后台运行容器docker run -d -p 3307:3306 --name mysql01 -e MYSQL_ROOT_PASSWORD=123456 docker.io/mysql进入MySQL容器docker exec -it a88368f1be54 /bin/bash退出容器exit //容器关闭或者Ctrl+P+Q //容器不关闭Docker stop停止/remove删除所有容器$ docker ps // 查看所有正在运行容器 $ docker stop containerId // containerId 是容器的ID $ docker ps -a // 查看所有容器 $ docker ps -a -q // 查看所有容器ID $ docker stop $(docker ps -a -q) // stop停止所有容器 $ docker rm $(docker ps -a -q) // remove删除所有容器
问题介绍:到我们把SpringBoot项目打包到Linux服务器上,文件的上传和上传的文件的下载路径及其获取就是一个比较棘手的问题。通俗一点就是解决像下面demo.jar中访问到110.png图片的文件,比如在页面显示啊(图片很重要,图片很重要,图片很重要)解决问题思路:如果你用过kaptcha验证码插件,那你就应该猜到我的思路了,用流的方式请求URL返回到前端,而不能用 /abc/1123.jpg这种方式Demo介绍(路径见上图)demo代码下载在有图片上传的html上,将图片上传到上图中的位置,并且将图片的名称存到session中访问success跳转到success.html中,其实success.html中有一个像请求验证码图片一样但是处理你上传图片的urlindex.html上传图片表单<h1>图片上传</h1> <form action="upload" method="post" enctype="multipart/form-data"> <input type="file" name="file"/><input type="submit" value="submit"> </form>上传图片的Contoller将图片存到上面图片的位置中,没什么好解释的@RequestMapping("/upload") @ResponseBody public String upload(MultipartFile file,HttpSession session) throws Exception { // 打印文件的名称 System.out.println("FileName:" + file.getOriginalFilename()); //将名字存到session中 session.setAttribute("photoName", file.getOriginalFilename()); // 确定上传文件的位置 // 本地路径,测试确实能通过 // String path = "E:/temp/temp"; // Linux系统 String path = "/usr/CBeann/temp"; // 获取上传的位置(存放图片的文件夹),如果不存在,创建文件夹 File fileParent = new File(path); if (!fileParent.exists()) { fileParent.mkdirs(); } File newFile = new File(path + "/", file.getOriginalFilename()); // 如果不存在,创建一个副本 if (!newFile.exists()) { newFile.createNewFile(); } // 将io上传到副本中 file.transferTo(newFile); return "上传成功"; }跳转及其success.html注意:success中img的src为一个controller中的url,而不是绝对或者相对路径,类似验证码插件url的意思//跳转到success.html页面 @RequestMapping("/success") public String successHtml(){ return "success"; }<body> --------- <img alt="demo" src="showimage"/> --------------- </body>将图片以流的方式传到前端显示获得Linux服务上的图片文件的file,然后以流的方式写入response中,我这用的是session或者上传图片的值@RequestMapping("/showimage") public String showphoto(HttpServletRequest request, HttpServletResponse response, HttpSession session) throws Exception { response.setDateHeader("Expires", 0); response.setHeader("Cache-Control", "no-store, no-cache, must-revalidate"); response.addHeader("Cache-Control", "post-check=0, pre-check=0"); response.setHeader("Pragma", "no-cache"); response.setContentType("image/jpeg"); // 获得的系统的根目录 File fileParent = new File(File.separator); String photoName = (String) session.getAttribute("photoName"); // 获得/usr/CBeann目录 File file = new File(fileParent, "usr/CBeann/temp/" + photoName); BufferedImage bi = ImageIO.read(new FileInputStream(file)); ServletOutputStream out = response.getOutputStream(); ImageIO.write(bi, "jpg", out); try { out.flush(); } finally { out.close(); } return null; }
Druid介绍Druid是Java语言中最好的数据库连接池。Druid能够提供强大的监控和扩展功能。Druid是阿里巴巴开源平台上的一个项目,整个项目由数据库连接池、插件框架和SQL解析器组成。该项目主要是为了扩展JDBC的一些限制,可以让程序员实现一些特殊的需求,比如向密钥服务请求凭证、统计SQL信息、SQL性能收集、SQL注入检查、SQL翻译等,程序员可以通过定制来实现自己需要的功能。Druid首先是一个数据库连接池,但它不仅仅是一个数据库连接池,它还包含一个ProxyDriver,一系列内置的JDBC组件库,一个SQL Parser。Druid支持所有JDBC兼容的数据库,包括Oracle、MySql、Derby、Postgresql、SQL Server、H2等等。Druid针对Oracle和MySql做了特别优化,比如Oracle的PS Cache内存占用优化,MySql的ping检测优化首先,强大的监控特性,通过Druid提供的监控功能,可以清楚知道连接池和SQL的工作情况。●监控SQL的执行时间、ResultSet持有时间、返回行数、更新行数、错误次数、错误堆栈信息。●SQL执行日志,Druid提供了不同的LogFilter,能够支持Common-Logging、Log4j和JdkLog,你可以按需要选择相应的LogFilter,监控你应用的数据库访问情况。●SQL执行的耗时区间分布。什么是耗时区间分布呢?比如说,某个SQL执行了1000次,其中0~1毫秒区间50次,1~10毫秒800次,10~100毫秒100次,100~1000毫秒30次,1~10秒15次,10秒以上5次。通过耗时区间分布,能够非常清楚知道SQL的执行耗时情况。●监控连接池的物理连接创建和销毁次数、逻辑连接的申请和关闭次数、非空等待次数、PSCache命中率等。其次,方便扩展。Druid提供了Filter-Chain模式的扩展API,可以自己编写Filter拦截JDBC中的任何方法,可以在上面做任何事情,比如说性能监控、SQL审计、用户名密码加密、日志等等。Druid内置提供了用于监控的StatFilter、日志输出的Log系列Filter、防御SQL注入攻击的WallFilter。阿里巴巴内部实现了用于数据库密码加密的CirceFilter,以及和Web、Spring关联监控的DragoonStatFilter。第三,Druid集合了开源和商业数据库连接池的优秀特性,并结合阿里巴巴大规模苛刻生产环境的使用经验进行优化。●ExceptionSorter。当一个连接产生不可恢复的异常时,例如Oracle error_code_28 session has been killed,必须立刻从连接池中逐出,否则会产生大量错误。目前只有Druid和JBoss DataSource实现了ExceptionSorter。●PSCache内存占用优化对于支持游标的数据库(Oracle、SQL Server、DB2等,不包括MySql),PSCache可以大幅度提升SQL执行性能。一个PreparedStatement对应服务器一个游标,如果PreparedStatement被缓存起来重复执行,PreparedStatement没有被关闭,服务器端的游标就不会被关闭,性能提高非常显著。在类似“SELECT * FROM T WHERE ID = ?”这样的场景,性能可能是一个数量级的提升。但在Oracle JDBC Driver中,其他的数据库连接池(DBCP、JBossDataSource)会占用内存过多,极端情况可能大于1G。Druid调用OracleDriver提供管理PSCache内部API。●LRU是一个性能关键指标,特别Oracle,每个Connection对应数据库端的一个进程,如果数据库连接池遵从LRU,有助于数据库服务器优化,这是重要的指标。Druid、DBCP、Proxool、JBoss是遵守LRU的。BoneCP、C3P0则不是。BoneCP在mock环境下性能可能还好,但在真实环境中则就不好了。Druid提供了MySql、Oracle、Postgresql、SQL-92的SQL的完整支持,这是一个手写的高性能SQL Parser,支持Visitor模式,使得分析SQL的抽象语法树很方便。简单SQL语句用时10微秒以内,复杂SQL用时30微秒。通过Druid提供的SQL Parser可以在JDBC层拦截SQL做相应处理,比如说分库分表、审计等。Druid防御SQL注入攻击的WallFilter就是通过Druid的SQL Parser分析语义实现的。Druid的优势是在JDBC最低层进行拦截做判断,不会遗漏。运行结果展示http://localhost:8080/selectUser.action?id=1http://localhost:8080/druid/index.html 账号admin,密码admin,在代码中有体现的项目构建项目结构如图所示添加依赖<?xml version="1.0" encoding="UTF-8"?> <project xmlns="http://maven.apache.org/POM/4.0.0" xmlns:xsi="http://www.w3.org/2001/XMLSchema-instance" xsi:schemaLocation="http://maven.apache.org/POM/4.0.0 http://maven.apache.org/xsd/maven-4.0.0.xsd"> <modelVersion>4.0.0</modelVersion> <groupId>com.example</groupId> <artifactId>demo</artifactId> <version>0.0.1-SNAPSHOT</version> <packaging>jar</packaging> <name>SpringBoot_MyBatis_Diruid</name> <description>Demo project for Spring Boot</description> <parent> <groupId>org.springframework.boot</groupId> <artifactId>spring-boot-starter-parent</artifactId> <version>1.4.7.RELEASE</version> <relativePath /> <!-- lookup parent from repository --> </parent> <properties> <project.build.sourceEncoding>UTF-8</project.build.sourceEncoding> <project.reporting.outputEncoding>UTF-8</project.reporting.outputEncoding> <java.version>1.8</java.version> </properties> <dependencies> <!--热部署.jar --> <dependency> <groupId>org.springframework.boot</groupId> <artifactId>spring-boot-devtools</artifactId> </dependency> <!-- druid --> <dependency> <groupId>com.alibaba</groupId> <artifactId>druid</artifactId> <version>1.0.18</version> </dependency> <!-- thmleaf模板依赖. --> <dependency> <groupId>org.springframework.boot</groupId> <artifactId>spring-boot-starter-thymeleaf</artifactId> </dependency> <dependency> <groupId>org.mybatis.spring.boot</groupId> <artifactId>mybatis-spring-boot-starter</artifactId> <version>1.2.2</version> </dependency> <dependency> <groupId>org.springframework.boot</groupId> <artifactId>spring-boot-starter-web</artifactId> </dependency> <dependency> <groupId>mysql</groupId> <artifactId>mysql-connector-java</artifactId> <scope>runtime</scope> </dependency> <dependency> <groupId>org.springframework.boot</groupId> <artifactId>spring-boot-starter-test</artifactId> <scope>test</scope> </dependency> </dependencies> <build> <plugins> <plugin> <groupId>org.springframework.boot</groupId> <artifactId>spring-boot-maven-plugin</artifactId> </plugin> </plugins> </build> </project>修改配置文件properties###################################### ###spring datasource ###################################### spring.datasource.type=com.alibaba.druid.pool.DruidDataSource spring.datasource.url=jdbc:mysql://localhost:3306/springboot?useUnicode=true&characterEncoding=utf-8&useSSL=false spring.datasource.username=root spring.datasource.password=root spring.datasource.driver-class-name=com.mysql.jdbc.Driver ###############################下面Spring的配置文件基本就不用修改了 spring.datasource.initialSize=5 spring.datasource.minIdle=5 spring.datasource.maxActive=20 spring.datasource.maxWait=60000 spring.datasource.timeBetweenEvictionRunsMillis=60000 spring.datasource.minEvictableIdleTimeMillis=300000 spring.datasource.validationQuery=SELECT 1 FROM DUAL spring.datasource.testWhileIdle=true spring.datasource.testOnBorrow=false spring.datasource.testOnReturn=false spring.datasource.poolPreparedStatements=true spring.datasource.maxPoolPreparedStatementPerConnectionSize=20 spring.datasource.filters=stat,wall,log4j spring.datasource.connectionProperties=druid.stat.mergeSql=true;druid.stat.slowSqlMillis=5000 ###################################### ###spring thymeleaf ###################################### spring.thymeleaf.cache=false ###################################### ###MyBatis ###################################### mybatis.mapper-locations=classpath:mapper/*Mapper.xml DruidConfigBean(重点)(重点)(重点)druid有一个Servlet和Filter,这里采用编程注入的方式,package com.example.demo.configBean; import java.util.HashMap; import java.util.Map; import javax.sql.DataSource; import org.slf4j.Logger; import org.slf4j.LoggerFactory; import org.springframework.boot.context.properties.ConfigurationProperties; import org.springframework.boot.web.servlet.FilterRegistrationBean; import org.springframework.boot.web.servlet.ServletRegistrationBean; import org.springframework.context.annotation.Bean; import org.springframework.context.annotation.Configuration; import com.alibaba.druid.pool.DruidDataSource; import com.alibaba.druid.support.http.StatViewServlet; import com.alibaba.druid.support.http.WebStatFilter; @Configuration public class DruidConfiguration { private static final Logger log = LoggerFactory.getLogger(DruidConfiguration.class); @Bean public ServletRegistrationBean druidServlet() { log.info("init Druid Servlet Configuration "); ServletRegistrationBean servletRegistrationBean = new ServletRegistrationBean(); servletRegistrationBean.setServlet(new StatViewServlet()); servletRegistrationBean.addUrlMappings("/druid/*"); Map<String, String> initParameters = new HashMap<String, String>(); initParameters.put("loginUsername", "admin");// 用户名 initParameters.put("loginPassword", "admin");// 密码 initParameters.put("resetEnable", "false");// 禁用HTML页面上的“Reset All”功能 initParameters.put("allow", ""); // IP白名单 (没有配置或者为空,则允许所有访问) // initParameters.put("deny", "192.168.20.38");// IP黑名单 // (存在共同时,deny优先于allow) servletRegistrationBean.setInitParameters(initParameters); return servletRegistrationBean; } @Bean public FilterRegistrationBean filterRegistrationBean() { FilterRegistrationBean filterRegistrationBean = new FilterRegistrationBean(); filterRegistrationBean.setFilter(new WebStatFilter()); // 添加过滤规则 filterRegistrationBean.addUrlPatterns("/*"); // 添加不需要忽略的格式信息. filterRegistrationBean.addInitParameter("exclusions", "*.js,*.gif,*.jpg,*.png,*.css,*.ico,/druid/*"); return filterRegistrationBean; } @Bean @ConfigurationProperties(prefix = "spring.datasource") public DataSource druidDataSource() { return new DruidDataSource(); } }如果没有配置下面的Bean,它是不会监控到SQL语句的,就是不会有下面箭头指的地方@Bean @ConfigurationProperties(prefix = "spring.datasource") public DataSource druidDataSource() { return new DruidDataSource(); }daopackage com.example.demo.dao; import org.apache.ibatis.annotations.Mapper; import com.example.demo.entity.User; @Mapper public interface UserMapper { public User selectByPrimaryKey(Integer id); }entitypackage com.example.demo.entity; public class User { private Integer id; private String name; private String username; private String password; private Integer sign; public User() { } @Override public String toString() { return "User [id=" + id + ", name=" + name + ", username=" + username + ", password=" + password + ", sign=" + sign + "]"; } public Integer getId() { return id; } public void setId(Integer id) { this.id = id; } public String getName() { return name; } public void setName(String name) { this.name = name == null ? null : name.trim(); } public String getUsername() { return username; } public void setUsername(String username) { this.username = username == null ? null : username.trim(); } public String getPassword() { return password; } public void setPassword(String password) { this.password = password == null ? null : password.trim(); } public Integer getSign() { return sign; } public void setSign(Integer sign) { this.sign = sign; } }controllerpackage com.example.demo.handler; import java.util.Map; import org.springframework.beans.factory.annotation.Autowired; import org.springframework.stereotype.Controller; import org.springframework.web.bind.annotation.RequestMapping; import com.example.demo.dao.UserMapper; import com.example.demo.entity.User; @Controller public class HelloHandler { @Autowired private UserMapper userMapper; @RequestMapping("/selectUser.action") public String selectUser(int id,Map<String,Object> map){ User user=userMapper.selectByPrimaryKey(id); map.put("user", user); return "/success"; } }MyBatis中与dao对应的XML<?xml version="1.0" encoding="UTF-8" ?> <!DOCTYPE mapper PUBLIC "-//mybatis.org//DTD Mapper 3.0//EN" "http://mybatis.org/dtd/mybatis-3-mapper.dtd" > <mapper namespace="com.example.demo.dao.UserMapper" > <resultMap id="BaseResultMap" type="com.example.demo.entity.User" > <id column="id" property="id" jdbcType="INTEGER" /> <result column="name" property="name" jdbcType="VARCHAR" /> <result column="username" property="username" jdbcType="VARCHAR" /> <result column="password" property="password" jdbcType="VARCHAR" /> <result column="sign" property="sign" jdbcType="INTEGER" /> </resultMap> <sql id="Base_Column_List" > id, name, username, password, sign </sql> <select id="selectByPrimaryKey" resultMap="BaseResultMap" parameterType="java.lang.Integer" > select <include refid="Base_Column_List" /> from user where id = #{id,jdbcType=INTEGER} </select> </mapper>启动类package com.example.demo; import org.springframework.boot.SpringApplication; import org.springframework.boot.autoconfigure.SpringBootApplication; @SpringBootApplication public class SpringBootMyBatisDruidApplication { public static void main(String[] args) { SpringApplication.run(SpringBootMyBatisDruidApplication.class, args); } }
Druid介绍Druid是Java语言中最好的数据库连接池。Druid能够提供强大的监控和扩展功能。Druid是阿里巴巴开源平台上的一个项目,整个项目由数据库连接池、插件框架和SQL解析器组成。该项目主要是为了扩展JDBC的一些限制,可以让程序员实现一些特殊的需求,比如向密钥服务请求凭证、统计SQL信息、SQL性能收集、SQL注入检查、SQL翻译等,程序员可以通过定制来实现自己需要的功能。Druid首先是一个数据库连接池,但它不仅仅是一个数据库连接池,它还包含一个ProxyDriver,一系列内置的JDBC组件库,一个SQL Parser。Druid支持所有JDBC兼容的数据库,包括Oracle、MySql、Derby、Postgresql、SQL Server、H2等等。Druid针对Oracle和MySql做了特别优化,比如Oracle的PS Cache内存占用优化,MySql的ping检测优化首先,强大的监控特性,通过Druid提供的监控功能,可以清楚知道连接池和SQL的工作情况。●监控SQL的执行时间、ResultSet持有时间、返回行数、更新行数、错误次数、错误堆栈信息。●SQL执行日志,Druid提供了不同的LogFilter,能够支持Common-Logging、Log4j和JdkLog,你可以按需要选择相应的LogFilter,监控你应用的数据库访问情况。●SQL执行的耗时区间分布。什么是耗时区间分布呢?比如说,某个SQL执行了1000次,其中0~1毫秒区间50次,1~10毫秒800次,10~100毫秒100次,100~1000毫秒30次,1~10秒15次,10秒以上5次。通过耗时区间分布,能够非常清楚知道SQL的执行耗时情况。●监控连接池的物理连接创建和销毁次数、逻辑连接的申请和关闭次数、非空等待次数、PSCache命中率等。其次,方便扩展。Druid提供了Filter-Chain模式的扩展API,可以自己编写Filter拦截JDBC中的任何方法,可以在上面做任何事情,比如说性能监控、SQL审计、用户名密码加密、日志等等。Druid内置提供了用于监控的StatFilter、日志输出的Log系列Filter、防御SQL注入攻击的WallFilter。阿里巴巴内部实现了用于数据库密码加密的CirceFilter,以及和Web、Spring关联监控的DragoonStatFilter。第三,Druid集合了开源和商业数据库连接池的优秀特性,并结合阿里巴巴大规模苛刻生产环境的使用经验进行优化。●ExceptionSorter。当一个连接产生不可恢复的异常时,例如Oracle error_code_28 session has been killed,必须立刻从连接池中逐出,否则会产生大量错误。目前只有Druid和JBoss DataSource实现了ExceptionSorter。●PSCache内存占用优化对于支持游标的数据库(Oracle、SQL Server、DB2等,不包括MySql),PSCache可以大幅度提升SQL执行性能。一个PreparedStatement对应服务器一个游标,如果PreparedStatement被缓存起来重复执行,PreparedStatement没有被关闭,服务器端的游标就不会被关闭,性能提高非常显著。在类似“SELECT * FROM T WHERE ID = ?”这样的场景,性能可能是一个数量级的提升。但在Oracle JDBC Driver中,其他的数据库连接池(DBCP、JBossDataSource)会占用内存过多,极端情况可能大于1G。Druid调用OracleDriver提供管理PSCache内部API。●LRU是一个性能关键指标,特别Oracle,每个Connection对应数据库端的一个进程,如果数据库连接池遵从LRU,有助于数据库服务器优化,这是重要的指标。Druid、DBCP、Proxool、JBoss是遵守LRU的。BoneCP、C3P0则不是。BoneCP在mock环境下性能可能还好,但在真实环境中则就不好了。Druid提供了MySql、Oracle、Postgresql、SQL-92的SQL的完整支持,这是一个手写的高性能SQL Parser,支持Visitor模式,使得分析SQL的抽象语法树很方便。简单SQL语句用时10微秒以内,复杂SQL用时30微秒。通过Druid提供的SQL Parser可以在JDBC层拦截SQL做相应处理,比如说分库分表、审计等。Druid防御SQL注入攻击的WallFilter就是通过Druid的SQL Parser分析语义实现的。Druid的优势是在JDBC最低层进行拦截做判断,不会遗漏。项目介绍(能跑起来就好)创建一个登陆页面,输入username和password,如果和数据库对应,则跳转的success.jsp,否则跳转到error.jsp此项目是在我以前的SSM整合的代码该的,所以项目名称有些对不上,根据你tomcat下的名称就好项目下载项目运行展示http://localhost:8080/SSMMaven/druid/sql.html搭建(Maven)项目和Druid有关的配置:web.xml(添加一个Filter和servlet)修改pom.xml(添加Druid依赖)修改Spring的配置文件applicationContext.xml中的dataSource项目结构修改pom.xml<project xmlns="http://maven.apache.org/POM/4.0.0" xmlns:xsi="http://www.w3.org/2001/XMLSchema-instance" xsi:schemaLocation="http://maven.apache.org/POM/4.0.0 http://maven.apache.org/xsd/maven-4.0.0.xsd"> <modelVersion>4.0.0</modelVersion> <groupId>com.imooc</groupId> <artifactId>SSMMaven</artifactId> <version>0.0.1-SNAPSHOT</version> <packaging>war</packaging> <properties> <project.build.sourceEncoding>UTF-8</project.build.sourceEncoding> <project.reporting.outputEncoding>UTF-8</project.reporting.outputEncoding> <java.version>1.8</java.version> </properties> <dependencies> <!-- 单元测试 --> <dependency> <groupId>junit</groupId> <artifactId>junit</artifactId> <version>4.11</version> <scope>test</scope> </dependency> <!-- 日志 --> <!-- 实现slf4j接口并整合 --> <dependency> <groupId>ch.qos.logback</groupId> <artifactId>logback-classic</artifactId> <version>1.1.1</version> </dependency> <!-- io --> <dependency> <groupId>commons-io</groupId> <artifactId>commons-io</artifactId> <version>2.2</version> </dependency> <!-- Servlet web --> <dependency> <groupId>taglibs</groupId> <artifactId>standard</artifactId> <version>1.1.2</version> </dependency> <dependency> <groupId>jstl</groupId> <artifactId>jstl</artifactId> <version>1.2</version> <scope>compile</scope> </dependency> <dependency> <groupId>javax.servlet</groupId> <artifactId>javax.servlet-api</artifactId> <version>3.1.0</version> <scope>compile</scope> </dependency> <!-- 数据库 --> <dependency> <groupId>mysql</groupId> <artifactId>mysql-connector-java</artifactId> <version>5.1.39</version> </dependency> <!-- druid --> <dependency> <groupId>com.alibaba</groupId> <artifactId>druid</artifactId> <version>1.0.7</version> </dependency> <!-- 数据库连接池 c3p0 <dependency> <groupId>c3p0</groupId> <artifactId>c3p0</artifactId> <version>0.9.1.2</version> </dependency> --> <!-- Spring --> <dependency> <groupId>org.springframework</groupId> <artifactId>spring-core</artifactId> <version>4.3.10.RELEASE</version> </dependency> <dependency> <groupId>org.springframework</groupId> <artifactId>spring-beans</artifactId> <version>4.3.10.RELEASE</version> </dependency> <dependency> <groupId>org.springframework</groupId> <artifactId>spring-web</artifactId> <version>4.3.10.RELEASE</version> </dependency> <dependency> <groupId>org.springframework</groupId> <artifactId>spring-jdbc</artifactId> <version>4.3.10.RELEASE</version> </dependency> <!-- Spring MVC --> <dependency> <groupId>org.springframework</groupId> <artifactId>spring-webmvc</artifactId> <version>4.3.10.RELEASE</version> </dependency> <!-- MyBatis --> <dependency> <groupId>org.mybatis</groupId> <artifactId>mybatis</artifactId> <version>3.4.1</version> </dependency> <!-- MyBatis-Spring --> <dependency> <groupId>org.mybatis</groupId> <artifactId>mybatis-spring</artifactId> <version>1.3.0</version> </dependency> </dependencies> </project>添加Spring的配置文件<?xml version="1.0" encoding="UTF-8"?> <beans xmlns="http://www.springframework.org/schema/beans" xmlns:xsi="http://www.w3.org/2001/XMLSchema-instance" xmlns:context="http://www.springframework.org/schema/context" xmlns:tx="http://www.springframework.org/schema/tx" xmlns:aop="http://www.springframework.org/schema/aop" xsi:schemaLocation="http://www.springframework.org/schema/aop http://www.springframework.org/schema/aop/spring-aop-4.0.xsd http://www.springframework.org/schema/beans http://www.springframework.org/schema/beans/spring-beans.xsd http://www.springframework.org/schema/tx http://www.springframework.org/schema/tx/spring-tx-4.0.xsd http://www.springframework.org/schema/context http://www.springframework.org/schema/context/spring-context-4.0.xsd"> <!-- 配置自动扫描的包,使其自动注入到IOC容器 --> <context:component-scan base-package="com.imooc.service"></context:component-scan> <!-- 导入资源文件 --> <context:property-placeholder location="classpath:db.properties" /> <!-- 配置数据源 --> <bean id="dataSource" class="com.alibaba.druid.pool.DruidDataSource"> <property name="username" value="${jdbc.user}"></property> <property name="password" value="${jdbc.password}"></property> <property name="driverClassName" value="${jdbc.driverClass}"></property> <property name="url" value="${jdbc.jdbcUrl}"></property> <!-- 初始化连接大小 --> <property name="initialSize" value="0"></property> <!-- 连接池最大使用连接数量 --> <property name="maxActive" value="20"></property> <!-- 连接池最小空闲 --> <property name="minIdle" value="0" /> <!-- 获取连接最大等待时间 --> <property name="maxWait" value="60000" /> <property name="validationQuery"> <value>SELECT 1</value> </property> <property name="testOnBorrow" value="false" /> <property name="testOnReturn" value="false" /> <property name="testWhileIdle" value="true" /> <!-- 配置间隔多久才进行一次检测,检测需要关闭的空闲连接,单位是毫秒 --> <property name="timeBetweenEvictionRunsMillis" value="60000" /> <!-- 配置一个连接在池中最小生存的时间,单位是毫秒 --> <property name="minEvictableIdleTimeMillis" value="25200000" /> <!-- 打开removeAbandoned功能 --> <property name="removeAbandoned" value="true" /> <!-- 1800秒,也就是30分钟 --> <property name="removeAbandonedTimeout" value="1800" /> <!-- 关闭abanded连接时输出错误日志 --> <property name="logAbandoned" value="true" /> <!-- 监控数据库 --> <!-- <property name="filters" value="stat" /> --> <property name="filters" value="mergeStat" /> </bean> <!-- 配置MyBatis的SqlSession --> <bean id="sqlSessionFactory" class="org.mybatis.spring.SqlSessionFactoryBean"> <property name="dataSource" ref="dataSource" /> <!-- 配置MyBatis的配置的文件 --> <property name="configLocation" value="classpath:mybatis.xml"></property> </bean> <bean class="org.mybatis.spring.mapper.MapperScannerConfigurer"> <!-- 自动扫描 com.imooc.dao下的interface,并加入IOC容器 --> <property name="basePackage" value="com.imooc.dao" /> <property name="sqlSessionFactoryBeanName" value="sqlSessionFactory"></property> </bean> <!-- 开启事务 --> <bean id="transactionManager" class="org.springframework.jdbc.datasource.DataSourceTransactionManager"> <property name="dataSource" ref="dataSource" /> </bean> <!-- 可通过注解控制事务 --> <tx:annotation-driven transaction-manager="transactionManager" /> </beans>配置SpringMVC的配置文件<?xml version="1.0" encoding="UTF-8"?> <beans xmlns="http://www.springframework.org/schema/beans" xmlns:xsi="http://www.w3.org/2001/XMLSchema-instance" xmlns:context="http://www.springframework.org/schema/context" xmlns:tx="http://www.springframework.org/schema/tx" xmlns:aop="http://www.springframework.org/schema/aop" xmlns:mvc="http://www.springframework.org/schema/mvc" xsi:schemaLocation="http://www.springframework.org/schema/mvc http://www.springframework.org/schema/mvc/spring-mvc-4.3.xsd http://www.springframework.org/schema/beans http://www.springframework.org/schema/beans/spring-beans.xsd http://www.springframework.org/schema/context http://www.springframework.org/schema/context/spring-context-4.0.xsd http://www.springframework.org/schema/aop http://www.springframework.org/schema/aop/spring-aop-4.0.xsd http://www.springframework.org/schema/tx http://www.springframework.org/schema/tx/spring-tx-4.0.xsd"> <!-- 配置自动扫描的包,自动加入WebIoc容器中 --> <context:component-scan base-package="com.imooc.handler"></context:component-scan> <!-- 配置视图解析器, --> <bean class="org.springframework.web.servlet.view.InternalResourceViewResolver"> <property name="prefix" value="/WEB-INF/jsp/"></property> <property name="suffix" value=".jsp"></property> </bean> <!-- 处理静态资源文件,303校验等等(标配,必须写) --> <mvc:default-servlet-handler/> <mvc:annotation-driven></mvc:annotation-driven> </beans>MyBatis的配置文件<?xml version="1.0" encoding="UTF-8"?> <!DOCTYPE configuration PUBLIC "-//mybatis.org//DTD Config 3.0//EN" "http://mybatis.org/dtd/mybatis-3-config.dtd"> <configuration> <!-- =====>设置别名: 将com.imooc.entity.User设置为User 如果不设置别名<select id="selectDemo" resultType="com.imooc.entity.User"> ***</select> 设置别名 <select id="selectDemo" resultType="User">***</select> --> <typeAliases> <package name="com.imooc.entity"></package> </typeAliases> <mappers> <mapper resource="com/imooc/mapper/UserMapper.xml" /> </mappers> </configuration>数据库信息jdbc.user=root jdbc.password=root jdbc.driverClass=com.mysql.jdbc.Driver jdbc.jdbcUrl=jdbc:mysql://localhost:3306/text jdbc.initPoolSize=5 jdbc.maxPoolSize=10 #...修改web.xml<?xml version="1.0" encoding="UTF-8"?> <web-app xmlns:xsi="http://www.w3.org/2001/XMLSchema-instance" xmlns="http://java.sun.com/xml/ns/javaee" xsi:schemaLocation="http://java.sun.com/xml/ns/javaee http://java.sun.com/xml/ns/javaee/web-app_2_5.xsd" id="WebApp_ID" version="2.5"> <display-name>SSMMaven</display-name> <welcome-file-list> <welcome-file>index.jsp</welcome-file> </welcome-file-list> <!-- 设置字符过滤器,防止乱码 --> <filter> <filter-name>characterEncodingFilter</filter-name> <filter-class>org.springframework.web.filter.CharacterEncodingFilter</filter-class> <init-param> <param-name>encoding</param-name> <param-value>UTF-8</param-value> </init-param> <init-param> <param-name>forceEncoding</param-name> <param-value>true</param-value> </init-param> </filter> <filter-mapping> <filter-name>characterEncodingFilter</filter-name> <url-pattern>/*</url-pattern> </filter-mapping> <!-- SpringMVC --> <servlet> <servlet-name>springDispatcherServlet</servlet-name> <servlet-class>org.springframework.web.servlet.DispatcherServlet</servlet-class> <init-param> <param-name>contextConfigLocation</param-name> <param-value>classpath:applicationContext-mvc.xml</param-value> </init-param> <load-on-startup>1</load-on-startup> </servlet> <servlet-mapping> <servlet-name>springDispatcherServlet</servlet-name> <url-pattern>/</url-pattern> </servlet-mapping> <!-- Spring --> <context-param> <param-name>contextConfigLocation</param-name> <param-value>classpath:applicationContext.xml</param-value> </context-param> <listener> <listener-class>org.springframework.web.context.ContextLoaderListener</listener-class> </listener> <!-- 经常需要排除一些不必要的url,比如.js,/jslib/等等。配置在init-param中。比如 --> <filter> <filter-name>DruidWebStatFilter</filter-name> <filter-class>com.alibaba.druid.support.http.WebStatFilter</filter-class> <init-param> <param-name>exclusions</param-name> <param-value>*.js,*.gif,*.jpg,*.png,*.css,*.ico,/druid/*</param-value> </init-param> </filter> <filter-mapping> <filter-name>DruidWebStatFilter</filter-name> <url-pattern>/*</url-pattern> </filter-mapping> <!-- druid的Servlet --> <servlet> <servlet-name>DruidStatView</servlet-name> <servlet-class>com.alibaba.druid.support.http.StatViewServlet</servlet-class> </servlet> <servlet-mapping> <servlet-name>DruidStatView</servlet-name> <url-pattern>/druid/*</url-pattern> </servlet-mapping> </web-app>dao层package com.imooc.dao; public interface UserMapper { //传入username返回password String selectPassword(String username); }dao层的Mapper.xml<?xml version="1.0" encoding="UTF-8"?> <!DOCTYPE mapper PUBLIC "-//mybatis.org//DTD Mapper 3.0//EN" "http://mybatis.org/dtd/mybatis-3-mapper.dtd"> <mapper namespace="com.imooc.dao.UserMapper"> <select id="selectPassword" resultType="String"> select password from user where username = #{username} </select> </mapper>实体层package com.imooc.entity; public class User { private Integer id; private String username; private String password; public User() { super(); } public User(String username, String password) { super(); this.username = username; this.password = password; } /* * (non-Javadoc) * * @see java.lang.Object#toString() */ @Override public String toString() { return "User [id=" + id + ", username=" + username + ", password=" + password + "]"; } /** * @return the id */ public Integer getId() { return id; } /** * @param id * the id to set */ public void setId(Integer id) { this.id = id; } /** * @return the username */ public String getUsername() { return username; } /** * @param username * the username to set */ public void setUsername(String username) { this.username = username; } /** * @return the password */ public String getPassword() { return password; } /** * @param password * the password to set */ public void setPassword(String password) { this.password = password; } }控制层Controllerpackage com.imooc.handler; import org.springframework.beans.factory.annotation.Autowired; import org.springframework.stereotype.Controller; import org.springframework.web.bind.annotation.RequestMapping; import com.imooc.entity.User; import com.imooc.service.UserService; @Controller public class LoginHandler { @Autowired private UserService userService; @RequestMapping("/login.action") public String login(User user){ String password=userService.login(user.getUsername()); if(!user.getPassword().equals(password)){ return "error"; }else{ return "success"; } } /** * @return the userService */ public UserService getUserService() { return userService; } /** * @param userService the userService to set */ public void setUserService(UserService userService) { this.userService = userService; } public LoginHandler() { System.out.println("------------->LoginController"); } }service层package com.imooc.service; import org.springframework.beans.factory.annotation.Autowired; import org.springframework.stereotype.Service; import com.imooc.dao.UserMapper; @Service public class UserService { @Autowired private UserMapper userDao; public String login(String username){ return userDao.selectPassword(username); } public UserService() { super(); } /** * @return the userDao */ public UserMapper getUserDao() { return userDao; } /** * @param userDao the userDao to set */ public void setUserDao(UserMapper userDao) { this.userDao = userDao; } }index.jsp登录页面<%@ page language="java" contentType="text/html; charset=UTF-8" pageEncoding="UTF-8"%> <!DOCTYPE html PUBLIC "-//W3C//DTD HTML 4.01 Transitional//EN" "http://www.w3.org/TR/html4/loose.dtd"> <html> <head> <meta http-equiv="Content-Type" content="text/html; charset=UTF-8"> <title>Insert title here</title> </head> <body> <form action="login.action" method="post"> username<input type="text" name="username"><br/> password<input type="password" name="password"><br/> <input type="submit" value="Submit"> </form> </body> </html>success.jsp<%@ page language="java" contentType="text/html; charset=ISO-8859-1" pageEncoding="ISO-8859-1"%> <!DOCTYPE html PUBLIC "-//W3C//DTD HTML 4.01 Transitional//EN" "http://www.w3.org/TR/html4/loose.dtd"> <html> <head> <meta http-equiv="Content-Type" content="text/html; charset=ISO-8859-1"> <title>Insert title here</title> </head> <body> success.jsp </body> </html>error.jsp<%@ page language="java" contentType="text/html; charset=ISO-8859-1" pageEncoding="ISO-8859-1"%> <!DOCTYPE html PUBLIC "-//W3C//DTD HTML 4.01 Transitional//EN" "http://www.w3.org/TR/html4/loose.dtd"> <html> <head> <meta http-equiv="Content-Type" content="text/html; charset=ISO-8859-1"> <title>Insert title here</title> </head> <body> error.jsp </body> </html>
配置本地仓库的位置,根据自己的情况自己修改: <localRepository>E:\eclipse\RepMaven</localRepository>配置中央仓库镜像,下载jar包快: <mirror> <id>nexus-aliyun</id> <name>nexus-aliyun</name> <url>http://maven.aliyun.com/nexus/content/groups/public</url > <mirrorOf>central</mirrorOf> </mirror>配置JDK版本 <profile> <id>jdk-1.8</id> <activation> <activeByDefault>true</activeByDefault> <jdk>1.8</jdk> </activation> <properties> <maven.compiler.source>1.8</maven.compiler.source> <maven.compiler.target>1.8</maven.compiler.target> <maven.compiler.compilerVersion>1.8</maven.compiler.compilerVersion> </properties> </profile> <profile> <id>jdk-1.8</id> <activation> <activeByDefault>true</activeByDefault> <jdk>1.8</jdk> </activation> <properties> <maven.compiler.source>1.8</maven.compiler.source> <maven.compiler.target>1.8</maven.compiler.target> <maven.compiler.compilerVersion>1.8</maven.compiler.compilerVersion> </properties> </profile> setting.xml<?xml version="1.0" encoding="UTF-8"?> <!-- Licensed to the Apache Software Foundation (ASF) under one or more contributor license agreements. See the NOTICE file distributed with this work for additional information regarding copyright ownership. The ASF licenses this file to you under the Apache License, Version 2.0 (the "License"); you may not use this file except in compliance with the License. You may obtain a copy of the License at http://www.apache.org/licenses/LICENSE-2.0 Unless required by applicable law or agreed to in writing, software distributed under the License is distributed on an "AS IS" BASIS, WITHOUT WARRANTIES OR CONDITIONS OF ANY KIND, either express or implied. See the License for the specific language governing permissions and limitations under the License. --> <!-- | This is the configuration file for Maven. It can be specified at two levels: | | 1. User Level. This settings.xml file provides configuration for a single user, | and is normally provided in ${user.home}/.m2/settings.xml. | | NOTE: This location can be overridden with the CLI option: | | -s /path/to/user/settings.xml | | 2. Global Level. This settings.xml file provides configuration for all Maven | users on a machine (assuming they're all using the same Maven | installation). It's normally provided in | ${maven.home}/conf/settings.xml. | | NOTE: This location can be overridden with the CLI option: | | -gs /path/to/global/settings.xml | | The sections in this sample file are intended to give you a running start at | getting the most out of your Maven installation. Where appropriate, the default | values (values used when the setting is not specified) are provided. | |--> <settings xmlns="http://maven.apache.org/SETTINGS/1.0.0" xmlns:xsi="http://www.w3.org/2001/XMLSchema-instance" xsi:schemaLocation="http://maven.apache.org/SETTINGS/1.0.0 http://maven.apache.org/xsd/settings-1.0.0.xsd"> <!-- localRepository | The path to the local repository maven will use to store artifacts. | | Default: ${user.home}/.m2/repository <localRepository>/path/to/local/repo</localRepository> --> <localRepository>E:\eclipse\RepMaven</localRepository> <!-- interactiveMode | This will determine whether maven prompts you when it needs input. If set to false, | maven will use a sensible default value, perhaps based on some other setting, for | the parameter in question. | | Default: true <interactiveMode>true</interactiveMode> --> <!-- offline | Determines whether maven should attempt to connect to the network when executing a build. | This will have an effect on artifact downloads, artifact deployment, and others. | | Default: false <offline>false</offline> --> <!-- pluginGroups | This is a list of additional group identifiers that will be searched when resolving plugins by their prefix, i.e. | when invoking a command line like "mvn prefix:goal". Maven will automatically add the group identifiers | "org.apache.maven.plugins" and "org.codehaus.mojo" if these are not already contained in the list. |--> <pluginGroups> <!-- pluginGroup | Specifies a further group identifier to use for plugin lookup. <pluginGroup>com.your.plugins</pluginGroup> --> </pluginGroups> <!-- proxies | This is a list of proxies which can be used on this machine to connect to the network. | Unless otherwise specified (by system property or command-line switch), the first proxy | specification in this list marked as active will be used. |--> <proxies> <!-- proxy | Specification for one proxy, to be used in connecting to the network. | <proxy> <id>optional</id> <active>true</active> <protocol>http</protocol> <username>proxyuser</username> <password>proxypass</password> <host>proxy.host.net</host> <port>80</port> <nonProxyHosts>local.net|some.host.com</nonProxyHosts> </proxy> --> </proxies> <!-- servers | This is a list of authentication profiles, keyed by the server-id used within the system. | Authentication profiles can be used whenever maven must make a connection to a remote server. |--> <servers> <!-- server | Specifies the authentication information to use when connecting to a particular server, identified by | a unique name within the system (referred to by the 'id' attribute below). | | NOTE: You should either specify username/password OR privateKey/passphrase, since these pairings are | used together. | <server> <id>deploymentRepo</id> <username>repouser</username> <password>repopwd</password> </server> --> <!-- Another sample, using keys to authenticate. <server> <id>siteServer</id> <privateKey>/path/to/private/key</privateKey> <passphrase>optional; leave empty if not used.</passphrase> </server> --> </servers> <!-- mirrors | This is a list of mirrors to be used in downloading artifacts from remote repositories. | | It works like this: a POM may declare a repository to use in resolving certain artifacts. | However, this repository may have problems with heavy traffic at times, so people have mirrored | it to several places. | | That repository definition will have a unique id, so we can create a mirror reference for that | repository, to be used as an alternate download site. The mirror site will be the preferred | server for that repository. |--> <mirrors> <!-- mirror | Specifies a repository mirror site to use instead of a given repository. The repository that | this mirror serves has an ID that matches the mirrorOf element of this mirror. IDs are used | for inheritance and direct lookup purposes, and must be unique across the set of mirrors. | <mirror> <id>mirrorId</id> <mirrorOf>repositoryId</mirrorOf> <name>Human Readable Name for this Mirror.</name> <url>http://my.repository.com/repo/path</url> </mirror> --> <mirror> <id>nexus-aliyun</id> <name>nexus-aliyun</name> <url>http://maven.aliyun.com/nexus/content/groups/public</url > <mirrorOf>central</mirrorOf> </mirror> </mirrors> <!-- profiles | This is a list of profiles which can be activated in a variety of ways, and which can modify | the build process. Profiles provided in the settings.xml are intended to provide local machine- | specific paths and repository locations which allow the build to work in the local environment. | | For example, if you have an integration testing plugin - like cactus - that needs to know where | your Tomcat instance is installed, you can provide a variable here such that the variable is | dereferenced during the build process to configure the cactus plugin. | | As noted above, profiles can be activated in a variety of ways. One way - the activeProfiles | section of this document (settings.xml) - will be discussed later. Another way essentially | relies on the detection of a system property, either matching a particular value for the property, | or merely testing its existence. Profiles can also be activated by JDK version prefix, where a | value of '1.4' might activate a profile when the build is executed on a JDK version of '1.4.2_07'. | Finally, the list of active profiles can be specified directly from the command line. | | NOTE: For profiles defined in the settings.xml, you are restricted to specifying only artifact | repositories, plugin repositories, and free-form properties to be used as configuration | variables for plugins in the POM. | |--> <profiles> <profile> <id>jdk-1.8</id> <activation> <activeByDefault>true</activeByDefault> <jdk>1.8</jdk> </activation> <properties> <maven.compiler.source>1.8</maven.compiler.source> <maven.compiler.target>1.8</maven.compiler.target> <maven.compiler.compilerVersion>1.8</maven.compiler.compilerVersion> </properties> </profile> <!-- <profile> <id>jdk-1.7</id> <activation> <activeByDefault>true</activeByDefault> <jdk>1.7</jdk> </activation> <properties> <maven.compiler.source>1.7</maven.compiler.source> <maven.compiler.target>1.7</maven.compiler.target> <maven.compiler.compilerVersion>1.7</maven.compiler.compilerVersion> </properties> </profile> --> <!-- profile | Specifies a set of introductions to the build process, to be activated using one or more of the | mechanisms described above. For inheritance purposes, and to activate profiles via <activatedProfiles/> | or the command line, profiles have to have an ID that is unique. | | An encouraged best practice for profile identification is to use a consistent naming convention | for profiles, such as 'env-dev', 'env-test', 'env-production', 'user-jdcasey', 'user-brett', etc. | This will make it more intuitive to understand what the set of introduced profiles is attempting | to accomplish, particularly when you only have a list of profile id's for debug. | | This profile example uses the JDK version to trigger activation, and provides a JDK-specific repo. <profile> <id>jdk-1.4</id> <activation> <jdk>1.4</jdk> </activation> <repositories> <repository> <id>jdk14</id> <name>Repository for JDK 1.4 builds</name> <url>http://www.myhost.com/maven/jdk14</url> <layout>default</layout> <snapshotPolicy>always</snapshotPolicy> </repository> </repositories> </profile> --> <!-- | Here is another profile, activated by the system property 'target-env' with a value of 'dev', | which provides a specific path to the Tomcat instance. To use this, your plugin configuration | might hypothetically look like: | | ... | <plugin> | <groupId>org.myco.myplugins</groupId> | <artifactId>myplugin</artifactId> | | <configuration> | <tomcatLocation>${tomcatPath}</tomcatLocation> | </configuration> | </plugin> | ... | | NOTE: If you just wanted to inject this configuration whenever someone set 'target-env' to | anything, you could just leave off the <value/> inside the activation-property. | <profile> <id>env-dev</id> <activation> <property> <name>target-env</name> <value>dev</value> </property> </activation> <properties> <tomcatPath>/path/to/tomcat/instance</tomcatPath> </properties> </profile> --> </profiles> <!-- activeProfiles | List of profiles that are active for all builds. | <activeProfiles> <activeProfile>alwaysActiveProfile</activeProfile> <activeProfile>anotherAlwaysActiveProfile</activeProfile> </activeProfiles> --> </settings> <mirror> <id>nexus-aliyun</id> <name>nexus-aliyun</name> <url>http://maven.aliyun.com/nexus/content/groups/public</url > <mirrorOf>central</mirrorOf> </mirror> </mirrors> <!-- profiles | This is a list of profiles which can be activated in a variety of ways, and which can modify | the build process. Profiles provided in the settings.xml are intended to provide local machine- | specific paths and repository locations which allow the build to work in the local environment. | | For example, if you have an integration testing plugin - like cactus - that needs to know where | your Tomcat instance is installed, you can provide a variable here such that the variable is | dereferenced during the build process to configure the cactus plugin. | | As noted above, profiles can be activated in a variety of ways. One way - the activeProfiles | section of this document (settings.xml) - will be discussed later. Another way essentially | relies on the detection of a system property, either matching a particular value for the property, | or merely testing its existence. Profiles can also be activated by JDK version prefix, where a | value of '1.4' might activate a profile when the build is executed on a JDK version of '1.4.2_07'. | Finally, the list of active profiles can be specified directly from the command line. | | NOTE: For profiles defined in the settings.xml, you are restricted to specifying only artifact | repositories, plugin repositories, and free-form properties to be used as configuration | variables for plugins in the POM. | |--> <profiles> <profile> <id>jdk-1.8</id> <activation> <activeByDefault>true</activeByDefault> <jdk>1.8</jdk> </activation> <properties> <maven.compiler.source>1.8</maven.compiler.source> <maven.compiler.target>1.8</maven.compiler.target> <maven.compiler.compilerVersion>1.8</maven.compiler.compilerVersion> </properties> </profile> <!-- <profile> <id>jdk-1.7</id> <activation> <activeByDefault>true</activeByDefault> <jdk>1.7</jdk> </activation> <properties> <maven.compiler.source>1.7</maven.compiler.source> <maven.compiler.target>1.7</maven.compiler.target> <maven.compiler.compilerVersion>1.7</maven.compiler.compilerVersion> </properties> </profile> --> <!-- profile | Specifies a set of introductions to the build process, to be activated using one or more of the | mechanisms described above. For inheritance purposes, and to activate profiles via <activatedProfiles/> | or the command line, profiles have to have an ID that is unique. | | An encouraged best practice for profile identification is to use a consistent naming convention | for profiles, such as 'env-dev', 'env-test', 'env-production', 'user-jdcasey', 'user-brett', etc. | This will make it more intuitive to understand what the set of introduced profiles is attempting | to accomplish, particularly when you only have a list of profile id's for debug. | | This profile example uses the JDK version to trigger activation, and provides a JDK-specific repo. <profile> <id>jdk-1.4</id> <activation> <jdk>1.4</jdk> </activation> <repositories> <repository> <id>jdk14</id> <name>Repository for JDK 1.4 builds</name> <url>http://www.myhost.com/maven/jdk14</url> <layout>default</layout> <snapshotPolicy>always</snapshotPolicy> </repository> </repositories> </profile> --> <!-- | Here is another profile, activated by the system property 'target-env' with a value of 'dev', | which provides a specific path to the Tomcat instance. To use this, your plugin configuration | might hypothetically look like: | | ... | <plugin> | <groupId>org.myco.myplugins</groupId> | <artifactId>myplugin</artifactId> | | <configuration> | <tomcatLocation>${tomcatPath}</tomcatLocation> | </configuration> | </plugin> | ... | | NOTE: If you just wanted to inject this configuration whenever someone set 'target-env' to | anything, you could just leave off the <value/> inside the activation-property. | <profile> <id>env-dev</id> <activation> <property> <name>target-env</name> <value>dev</value> </property> </activation> <properties> <tomcatPath>/path/to/tomcat/instance</tomcatPath> </properties> </profile> --> </profiles> <!-- activeProfiles | List of profiles that are active for all builds. | <activeProfiles> <activeProfile>alwaysActiveProfile</activeProfile> <activeProfile>anotherAlwaysActiveProfile</activeProfile> </activeProfiles> --> </settings>
2023年02月