一、被监控的windows xp客户端的配置
1、安装NSClient++并安装
下载地址: http://sourceforge.net/projects/nscplus
NSClient++-0.3.8-Win32.msi
NSClient++-0.3.8-x64.msi
2、安装NSClient++
双击安装 -> next -> 同意 -> next -> next -> next -> 设置允许IP,设置密码(这里密码一般可以不设置),Modules to load (选前三个模块就可以了,第2个为chect_nt用于监控windows,第3个为checp_nrpe用于监控linux) -> next -> install -> finish
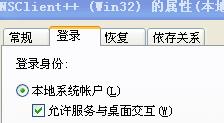
3、启动NSClientpp服务,并允许服务交互式
4、如果windows开启了自带的防火墙,那么必须设置让该程序通过
二、监控端主机的设置(Nagios服务器)
1、检查Nagios目录下的libexec子目录,一定要存在check_nt(例如:/usr/local/nagios/libexec/check_nt)
2、配置command.cfg文件(例如:/usr/local/nagios/etc/objects/command.cfg),增加如下几行(默认应该已经有了)
#/usr/local/nagios/etc/objects/command.cfg
# 'check_nt' command definition
define command{
command_name check_nt
command_line $USER1$/check_nt -H $HOSTADDRESS$ -p 12489 -v $ARG1$ $ARG2$
}
3、编译nagios.cfg文件
#/usr/local/nagios/etc/nagios.cfg,打开下面这一行
# Definitions for monitoring a Windows machine
cfg_file=/usr/local/nagios/etc/objects/windows.cfg
#vi /usr/local/nagios/etc/objects/windows.cfg,下面为配置主要的监控项目
#定义要被监控的windows主机名与主机的IP地址
define host{
use windows-server
host_name ruanxi
alias My Windows Server
address 192.168.0.5
}
#定义一个主机名组(可以不用管它)
define hostgroup{
hostgroup_name windows-servers
alias Windows Servers
}
#检查windows主机是否已经安装了NSClient++,及它的版本号
define service{
use generic-service
host_name ruanxi
service_description NSClient++ Version
check_command check_nt!CLIENTVERSION
}
#监控 windows 主机的开机运作时间
define service{
use generic-service
host_name ruanxi
service_description Uptime
check_command check_nt!UPTIME
}
#监控 windows 主机的 CPU 负载
define service{
use generic-service
host_name ruanxi
service_description CPU Load
check_command check_nt!CPULOAD!-l 5,80,90 #CPU如果到达80%则报警,到达90%则警笛
}
#监控 windows 主机的内存使用状况
define service{
use generic-service
host_name ruanxi
service_description Memory Usage
check_command check_nt!MEMUSE!-w 80 -c 90 #内存使用到达80%则warn,到达90%则Critical
}
#监控 windows 主机的 C:\ 的空间使用量
define service{
use generic-service
host_name ruanxi
service_description C:\ Drive Space
check_command check_nt!USEDDISKSPACE!-l c -w 80 -c 90
}
#监控 windows主机的W3SVC设置的动作状况
------>此服务为WEB服务器有关日志的服务程序
define service{
use generic-service
host_name ruanxi
service_description W3SVC
check_command check_nt!SERVICESTATE!-d SHOWALL -l W3SVC
}
#监控 windows 主机的 Explorer.exe 执行程序的运作状况,如程序终止了,则会发 CRITICA
define service{
use generic-service
host_name ruanxi
service_description Explorer
check_command check_nt!PROCSTATE!-d SHOWALL -l Explorer.exe
}
#监控 windows 主机的 MSSQLSERVER 服务的运作状况,如服务终止了,则会发 CRITICAL
define service{
use generic-service
host_name ruanxi
service_description MSSQL
check_command check_nt!SERVICESTATE!-d SHOWALL -l MSSQLSERVER
}
说明:如果有多台的windows xp客户端要监控,那么就以上述这样写多个就可以了
3、检查nagios.cfg文件有没有错误
#nagios -c nagios.cfg
4、重新启动一下nagios服务
#service nagios restart
5、访问页面进行查看
#elinks http://localhost/nagios/