虚拟键盘AI
网上有许多人写了原理,我就做重复工作了,唯一的愿望就是让后来者能无痛跑通代码
下面代码我下次更新会加上备注与层次说明,今天有点晚了
全部代码如下:
'''
1.链接摄像头
2.识别手势
3.绘制键盘
 3.1创建键盘字母List
 3.2通过循环绘制键盘
4.根据坐标,取得返回字母
 4.1 利用lmList[8]食指之间坐标,判断选中的字母
 4.2 利用食指与中指之间的距离,确认输入的字母
 5.扩展,修改键盘背景
 6.利用pynput模拟真实键盘输入
'''
import cv2
from cvzone.HandTrackingModule import HandDetector
from time import sleep
import numpy as np
import cvzone
from pynput.keyboard import Key,Controller
cap = cv2.VideoCapture(0)
cap.set(3,1280)
cap.set(4,720)
#识别手势
detector = HandDetector(detectionCon=1)
keyboard = Controller()
#键盘关键字
keys = [['Q','W','E','R','T','Y','U','I','O','P'],
        ['A','S','D','F','G','H','J','K','L',';'],
        ['Z','X','C','V','B','N','M',',','.','/']]
class Button():
    def __init__(self,pos,text,size = [50,50]):
        self.pos = pos
        self.text = text
        self.size = size
    # def draw(self,img):
    #     x,y = self.pos
    #     w,h = self.size
    #     cv2.rectangle(img, self.pos, (x+w,y+h), (255, 0, 255), cv2.FILLED)
    #     cv2.putText(img, self.text, (x+10,y+40),
    #                 cv2.FONT_HERSHEY_PLAIN, 3,(255, 255, 255), 2)
    #     return img
buttonList = []
finalText = ''
for j in range(len(keys)):
    for x,key in enumerate(keys[j]):
        #循环创建buttonList对象列表
        buttonList.append(Button([60*x+20,100+j*60],key))
#mybutton = Button([100,100],"Q")
def drawAll(img,buttonList):
    img1=img.copy()

    for button in buttonList:
        x, y = button.pos
        w, h = button.size
        cvzone.cornerRect(img1,(x,y,w,h),20,rt = 0)
        cv2.rectangle(img1, button.pos, (x + w, y + h), (255, 0, 255), cv2.FILLED)
        cv2.putText(img1, button.text, (x + 10, y + 40),
                    cv2.FONT_HERSHEY_PLAIN, 3, (255, 255, 255), 2)
    img=cv2.addWeighted(img,0.5,img1,0.5,0)
    return img

flag=True
prePress='0'#prePress和count都是为了控制按键的
count = 0

prex=0
prey=0
pretext='A'
while True:
    success,img = cap.read()
    #识别手势
    img = cv2.flip(img, 1)
    img = detector.findHands(img)
    lmList,bboxInfo = detector.findPosition(img)

    img = drawAll(img,buttonList )

    if lmList:
        for button in buttonList:
            x,y = button.pos
            w,h = button.size
            if x<lmList[8][0]<x+w and y<lmList[8][1]<y+h:
                cv2.rectangle(img, (x-5,y-5), (x + w + 5, y + h + 5), (175, 0, 175), cv2.FILLED)# 修改外矩形
                cv2.putText(img, button.text, (x + 10, y + 40),
                            cv2.FONT_HERSHEY_PLAIN, 3, (255, 255, 255), 2)
                l,_,_ = detector.findDistance(8,12,img,draw=False)
                #print('中指(12)和食指(8)之间的距离:',l)
                fingerUpList=detector.fingersUp()
                print(str(lmList[8][0]) + " " + str(lmList[8][1]))
                num=fingerUpList[0]+fingerUpList[1]+fingerUpList[2]+fingerUpList[3]+fingerUpList[4]
                if len(lmList)>8 and num<=2:

                    count+=1
                    num1=int(lmList[8][0])
                    num2=int(lmList[8][1])
                    if (num1-prex)*(num1-prex)+(num2-prey)*(num2-prey)>300:#如果上一按過這個鍵,那這一轮就不能摁
                        keyboard.press(button.text)
                        cv2.rectangle(img, button.pos, (x + w, y + h), (0, 255, 0), cv2.FILLED)
                        cv2.putText(img, button.text, (x + 10, y + 40),cv2.FONT_HERSHEY_PLAIN, 3, (255, 255, 255), 2)
                        finalText += button.text
                        print('当前选中的是:', button.text)

        prex = int(lmList[8][0])
        prey = int(lmList[8][1])

    cv2.rectangle(img, (20,350), (600, 400), (175, 0, 175), cv2.FILLED)
    cv2.putText(img, finalText, (20, 390),cv2.FONT_HERSHEY_PLAIN, 3, (255, 255, 255), 4)
    cv2.namedWindow("Image",cv2.WINDOW_FREERATIO)
    cv2.imshow("Image",img)
    if cv2.waitKey(1)==ord('q'):
        break
配置环境
pip install cvzone==1.4.1 -i https://pypi.tuna.tsinghua.edu.cn/simple/
得下载1.41版本,最新版本会报错
pip install Controller -i https://pypi.tuna.tsinghua.edu.cn/simple/
pip install pynput -i https://pypi.tuna.tsinghua.edu.cn/simple/
pip install mediapipe -i https://pypi.tuna.tsinghua.edu.cn/simple/
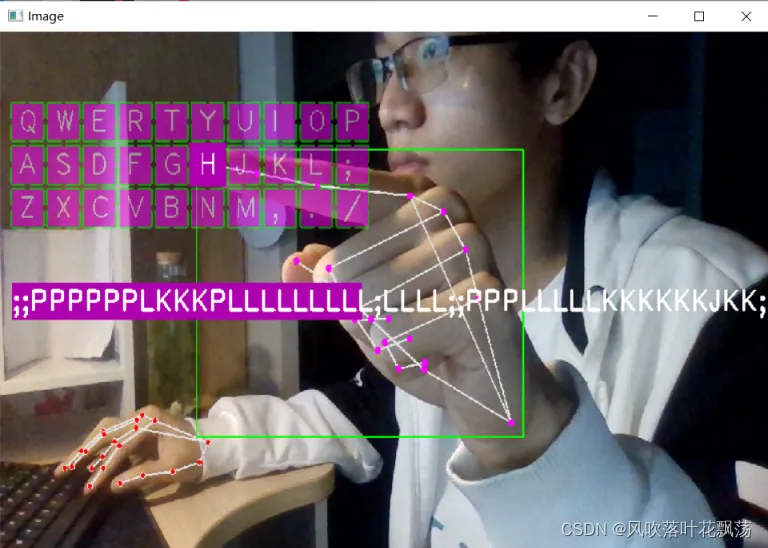
运行效果: