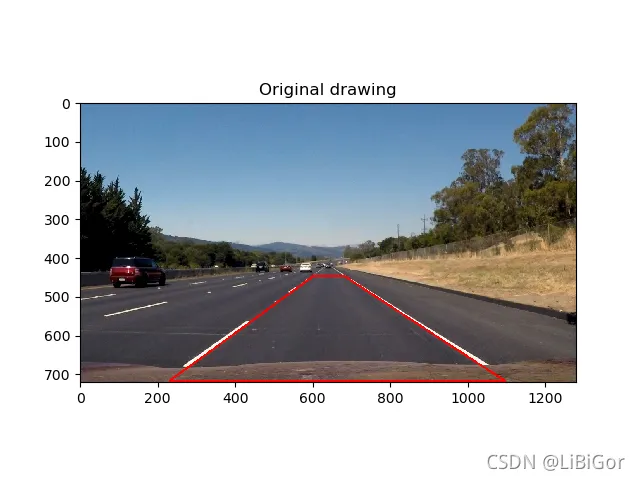
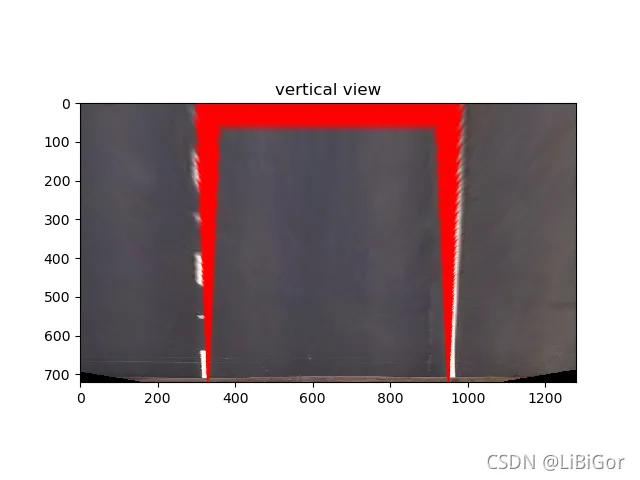
为了方便后续的直方图滑窗对车道线进行准确的定位,我们在这里利用透视变换将图像转换成俯视图,也可将俯视图恢复成原有的图像,代码如下:
计算透视变换所需的参数矩阵:
def cal_perspective_params(img, points):
    offset_x = 330
    offset_y = 0
    img_size = (img.shape[1], img.shape[0])
    src = np.float32(points)
    # 俯视图中四点的位置
    dst = np.float32([[offset_x, offset_y], [img_size[0] - offset_x, offset_y],
                      [offset_x, img_size[1] - offset_y],
                      [img_size[0] - offset_x, img_size[1] - offset_y]
                      ])
    # 从原始图像转换为俯视图的透视变换的参数矩阵
    M = cv2.getPerspectiveTransform(src, dst)
    # 从俯视图转换为原始图像的透视变换参数矩阵
    M_inverse = cv2.getPerspectiveTransform(dst, src)
    return M, M_inverse
透视变换:
def img_perspect_transform(img, M):
    img_size = (img.shape[1], img.shape[0])
    return cv2.warpPerspective(img, M, img_size)
下面我们调用上述两个方法看下透视变换的结果:
在原始图像中我们绘制道路检测的结果,然后通过透视变换转换为俯视图。
img = cv2.imread("./test/straight_lines2.jpg")
img = cv2.line(img, (601, 448), (683, 448), (0, 0, 255), 3)
img = cv2.line(img, (683, 448), (1097, 717), (0, 0, 255), 3)
img = cv2.line(img, (1097, 717), (230, 717), (0, 0, 255), 3)
img = cv2.line(img, (230, 717), (601, 448), (0, 0, 255), 3)
points = [[601, 448], [683, 448], [230, 717], [1097, 717]]
M, M_inverse = cal_perspective_params(img, points)
transform_img = img_perspect_transform(img, M)
plt.figure(figsize=(20,8))
plt.subplot(1,2,1)
plt.title('原始图像')
plt.imshow(img[:,:,::-1])
plt.subplot(1,2,2)
plt.title('俯视图')
plt.imshow(transform_img[:,:,::-1])
plt.show()
总结:
透视变换将检测结果转换为俯视图。
代码:
# encoding:utf-8
import cv2
import numpy as np
import matplotlib.pyplot as plt
#遍历文件夹
import glob
from moviepy.editor import VideoFileClip
import sys
reload(sys)
sys.setdefaultencoding('utf-8')
"""参数设置"""
nx = 9
ny = 6
#获取棋盘格数据
file_paths = glob.glob("./camera_cal/calibration*.jpg")
# 绘制对比图
def plot_contrast_image(origin_img, converted_img, origin_img_title="origin_img", converted_img_title="converted_img",
                        converted_img_gray=False):
    fig, (ax1, ax2) = plt.subplots(1, 2, figsize=(15, 20))
    ax1.set_title = origin_img_title
    ax1.imshow(origin_img)
    ax2.set_title = converted_img_title
    if converted_img_gray == True:
        ax2.imshow(converted_img, cmap="gray")
    else:
        ax2.imshow(converted_img)
    plt.show()
#相机矫正使用opencv封装好的api
#目的:得到内参、外参、畸变系数
def cal_calibrate_params(file_paths):
    #存储角点数据的坐标
    object_points = [] #角点在真实三维空间的位置
    image_points = [] #角点在图像空间中的位置
    #生成角点在真实世界中的位置
    objp = np.zeros((nx*ny,3),np.float32)
    #以棋盘格作为坐标,每相邻的黑白棋的相差1
    objp[:,:2] = np.mgrid[0:nx,0:ny].T.reshape(-1,2)
    #角点检测
    for file_path in file_paths:
        img = cv2.imread(file_path)
        #将图像灰度化
        gray = cv2.cvtColor(img,cv2.COLOR_BGR2GRAY)
        #角点检测
        rect,coners = cv2.findChessboardCorners(gray,(nx,ny),None)
        #若检测到角点,则进行保存 即得到了真实坐标和图像坐标
        if rect == True :
            object_points.append(objp)
            image_points.append(coners)
    # 相机较真
    ret, mtx, dist, rvecs, tvecs = cv2.calibrateCamera(object_points, image_points, gray.shape[::-1], None, None)
    return ret, mtx, dist, rvecs, tvecs
# 图像去畸变:利用相机校正的内参,畸变系数
def img_undistort(img, mtx, dist):
    dis = cv2.undistort(img, mtx, dist, None, mtx)
    return dis
#车道线提取
#颜色空间转换--》边缘检测--》颜色阈值--》并且使用L通道进行白色的区域进行抑制
def pipeline(img,s_thresh = (170,255),sx_thresh=(40,200)):
    # 复制原图像
    img = np.copy(img)
    # 颜色空间转换
    hls = cv2.cvtColor(img,cv2.COLOR_RGB2HLS).astype(np.float)
    l_chanel = hls[:,:,1]
    s_chanel = hls[:,:,2]
    #sobel边缘检测
    sobelx = cv2.Sobel(l_chanel,cv2.CV_64F,1,0)
    #求绝对值
    abs_sobelx = np.absolute(sobelx)
    #将其转换为8bit的整数
    scaled_sobel = np.uint8(255 * abs_sobelx / np.max(abs_sobelx))
    #对边缘提取的结果进行二值化
    sxbinary = np.zeros_like(scaled_sobel)
    #边缘位置赋值为1,非边缘位置赋值为0
    sxbinary[(scaled_sobel >= sx_thresh[0]) & (scaled_sobel <= sx_thresh[1])] = 1
    #对S通道进行阈值处理
    s_binary = np.zeros_like(s_chanel)
    s_binary[(s_chanel >= s_thresh[0]) & (s_chanel <= s_thresh[1])] = 1
    # 结合边缘提取结果和颜色通道的结果,
    color_binary = np.zeros_like(sxbinary)
    color_binary[((sxbinary == 1) | (s_binary == 1)) & (l_chanel > 100)] = 1
    return color_binary
#透视变换-->将检测结果转换为俯视图。
#获取透视变换的参数矩阵【二值图的四个点】
def cal_perspective_params(img,points):
    # x与y方向上的偏移
    offset_x = 330
    offset_y = 0
    #转换之后img的大小
    img_size = (img.shape[1],img.shape[0])
    src = np.float32(points)
    #设置俯视图中的对应的四个点 左上角 右上角 左下角 右下角
    dst = np.float32([[offset_x, offset_y], [img_size[0] - offset_x, offset_y],
                      [offset_x, img_size[1] - offset_y], [img_size[0] - offset_x, img_size[1] - offset_y]])
    ## 原图像转换到俯视图
    M = cv2.getPerspectiveTransform(src, dst)
    # 俯视图到原图像
    M_inverse = cv2.getPerspectiveTransform(dst, src)
    return M, M_inverse
#根据透视变化矩阵完成透视变换
def img_perspect_transform(img,M):
    #获取图像大小
    img_size = (img.shape[1],img.shape[0])
    #完成图像的透视变化
    return cv2.warpPerspective(img,M,img_size)
if __name__ == "__main__":
    #透视变换
    #获取原图的四个点
    img = cv2.imread('./test/straight_lines2.jpg')
    points = [[601, 448], [683, 448], [230, 717], [1097, 717]]
    #将四个点绘制到图像上 (文件,坐标起点,坐标终点,颜色,连接起来)
    img = cv2.line(img, (601, 448), (683, 448), (0, 0, 255), 3)
    img = cv2.line(img, (683, 448), (1097, 717), (0, 0, 255), 3)
    img = cv2.line(img, (1097, 717), (230, 717), (0, 0, 255), 3)
    img = cv2.line(img, (230, 717), (601, 448), (0, 0, 255), 3)
    plt.figure()
    #反转CV2中BGR 转化为matplotlib的RGB
    plt.imshow(img[:, :, ::-1])
    plt.title("Original drawing")
    plt.show()
    #透视变换
    M,M_inverse = cal_perspective_params(img,points)
    if np.all(M != None):
        trasform_img = img_perspect_transform(img, M)
        plt.figure()
        plt.imshow(trasform_img[:, :, ::-1])
        plt.title("vertical view")
        plt.show()
    else:
        print("failed")
效果图: