基于 Spring Framework v5.2.6.RELEASE
前情提要
上一篇分析到了创建 Bean 实例之前的部分,其中包括了 BeanDefinition 的获取和依赖 Bean 实例的创建。本文开始进入创建 Bean 实例的流程。
创建 Bean 实例
先看本文要分析的代码:
// Create bean instance.if (mbd.isSingleton()) {
sharedInstance=getSingleton(beanName, () -> {
try {
returncreateBean(beanName, mbd, args);
      }
catch (BeansExceptionex) {
// Explicitly remove instance from singleton cache: It might have been put there// eagerly by the creation process, to allow for circular reference resolution.// Also remove any beans that received a temporary reference to the bean.destroySingleton(beanName);
throwex;
      }
   });
bean=getObjectForBeanInstance(sharedInstance, name, beanName, mbd);
}
elseif (mbd.isPrototype()) {
// It's a prototype -> create a new instance.ObjectprototypeInstance=null;
try {
beforePrototypeCreation(beanName);
prototypeInstance=createBean(beanName, mbd, args);
   }
finally {
afterPrototypeCreation(beanName);
   }
bean=getObjectForBeanInstance(prototypeInstance, name, beanName, mbd);
}
else {
StringscopeName=mbd.getScope();
finalScopescope=this.scopes.get(scopeName);
if (scope==null) {
thrownewIllegalStateException("No Scope registered for scope name '"+scopeName+"'");
   }
try {
ObjectscopedInstance=scope.get(beanName, () -> {
beforePrototypeCreation(beanName);
try {
returncreateBean(beanName, mbd, args);
         }
finally {
afterPrototypeCreation(beanName);
         }
      });
bean=getObjectForBeanInstance(scopedInstance, name, beanName, mbd);
   }
catch (IllegalStateExceptionex) {
thrownewBeanCreationException(beanName,
"Scope '"+scopeName+"' is not active for the current thread; consider "+"defining a scoped proxy for this bean if you intend to refer to it from a singleton",
ex);
   }
}
进入到创建 Bean 实例的部分,首先,根据 Bean 的类型分别有三个不同的创建流程:单例 Bean 实例的创建、原型 Bean 实例的创建、其他 Bean 实例的创建。本文只分析单例 Bean 实例的创建,另外两种情况的过程类似,甚至更简单,感兴趣的话可以自己阅读源码。
把本文要分析的源码摘录出来,就是一下这部分:
sharedInstance=getSingleton(beanName, () -> {
try {
returncreateBean(beanName, mbd, args);
  }
catch (BeansExceptionex) {
// Explicitly remove instance from singleton cache: It might have been put there// eagerly by the creation process, to allow for circular reference resolution.// Also remove any beans that received a temporary reference to the bean.destroySingleton(beanName);
throwex;
  }
});
bean=getObjectForBeanInstance(sharedInstance, name, beanName, mbd);
先大致浏览一下逻辑,其实就两个步骤:
- 第一步,通过
getSingleton方法获取到sharedInstance实例,在调用getSingleton方法时,还传入了一个回调函数,其中包含了一个createBean方法,这个方法看起来很重要。 - 第二步,通过
getObjectForBeanInstance方法,将刚刚获取到的sharedInstance作为参数传入,得到最终的结果bean。
关于getObjectForBeanInstance方法的逻辑,如果看过之前的源码分析,应该很熟悉了。可以参考Spring 源码阅读 22:使用 FactoryBean 创建 Bean 实例对象 。
接下来,重点关注getSingleton和createBean两个方法。
getSingleton方法
进入getSingleton方法的内部。
// org/springframework/beans/factory/support/DefaultSingletonBeanRegistry.java:207publicObjectgetSingleton(StringbeanName, ObjectFactory<?>singletonFactory) {
Assert.notNull(beanName, "Bean name must not be null");
synchronized (this.singletonObjects) {
ObjectsingletonObject=this.singletonObjects.get(beanName);
if (singletonObject==null) {
if (this.singletonsCurrentlyInDestruction) {
thrownewBeanCreationNotAllowedException(beanName,
"Singleton bean creation not allowed while singletons of this factory are in destruction "+"(Do not request a bean from a BeanFactory in a destroy method implementation!)");
         }
if (logger.isDebugEnabled()) {
logger.debug("Creating shared instance of singleton bean '"+beanName+"'");
         }
beforeSingletonCreation(beanName);
booleannewSingleton=false;
booleanrecordSuppressedExceptions= (this.suppressedExceptions==null);
if (recordSuppressedExceptions) {
this.suppressedExceptions=newLinkedHashSet<>();
         }
try {
singletonObject=singletonFactory.getObject();
newSingleton=true;
         }
catch (IllegalStateExceptionex) {
// Has the singleton object implicitly appeared in the meantime ->// if yes, proceed with it since the exception indicates that state.singletonObject=this.singletonObjects.get(beanName);
if (singletonObject==null) {
throwex;
            }
         }
catch (BeanCreationExceptionex) {
if (recordSuppressedExceptions) {
for (ExceptionsuppressedException : this.suppressedExceptions) {
ex.addRelatedCause(suppressedException);
               }
            }
throwex;
         }
finally {
if (recordSuppressedExceptions) {
this.suppressedExceptions=null;
            }
afterSingletonCreation(beanName);
         }
if (newSingleton) {
addSingleton(beanName, singletonObject);
         }
      }
returnsingletonObject;
   }
}
虽然方法体重的代码量不少,但是仔细浏览一下就会发现,除去日志和异常处理的逻辑,关键的代码并不多。我先大概梳理一下,再做深入分析:
- 先尝试从
singletonObjects中获取,此处是为了应对并发的情况,如果获取到了实例,就直接返回。按照我们之前的分析逻辑,一般情况下,这里是获取不到的。 执行beforeSingletonCreation(beanName)方法。- 调用
singletonFactory.getObject()方法获取实例。 - 执行
afterSingletonCreation(beanName)方法。 - 执行
addSingleton(beanName, singletonObject)方法,将创建好的实例添加到缓存容器中。 - 返回结果。
这样来看逻辑还是很清晰的,接下来就分别看以上几个步骤。
首先把beforeSingletonCreation和afterSingletonCreation方法结合来看一下。
// org.springframework.beans.factory.support.DefaultSingletonBeanRegistry#beforeSingletonCreationprotectedvoidbeforeSingletonCreation(StringbeanName) {
if (!this.inCreationCheckExclusions.contains(beanName) &&!this.singletonsCurrentlyInCreation.add(beanName)) {
thrownewBeanCurrentlyInCreationException(beanName);
   }
}
// org.springframework.beans.factory.support.DefaultSingletonBeanRegistry#afterSingletonCreationprotectedvoidafterSingletonCreation(StringbeanName) {
if (!this.inCreationCheckExclusions.contains(beanName) &&!this.singletonsCurrentlyInCreation.remove(beanName)) {
thrownewIllegalStateException("Singleton '"+beanName+"' isn't currently in creation");
   }
}
这两个方法其实已经在Spring 源码阅读 22:使用 FactoryBean 创建 Bean 实例对象 这篇文章中的「使用 FactoryBean 获取 Bean 的对象实例」小结见过了,其实就是在容器中标记一下实例正在创建的状态,方便其他的代码逻辑中做判断。
另外,addSingleton方法的逻辑也比较简单,就是将创建好的实例添加到相关的缓存容器中。
// org.springframework.beans.factory.support.DefaultSingletonBeanRegistry#addSingletonprotectedvoidaddSingleton(StringbeanName, ObjectsingletonObject) {
synchronized (this.singletonObjects) {
this.singletonObjects.put(beanName, singletonObject);
this.singletonFactories.remove(beanName);
this.earlySingletonObjects.remove(beanName);
this.registeredSingletons.add(beanName);
   }
}
这里也不需要多做介绍了,下面重点关注一下singletonFactory.getObject(),方法返回的结果实例就是在这里被创建的。singletonFactory是方法的参数,类型是 ObjectFactory。还记得 Spring 容器的三级缓存吗,其中的第三级缓存singletonFactories中存放的就是 ObjectFactory 类型的值。可以参考:Spring 源码阅读 21:循环依赖和三级缓存 。
以下是 ObjectFactory 的定义,它是一个函数式接口。
publicinterfaceObjectFactory<T> { TgetObject() throwsBeansException; }
在getSingleton方法的singletonFactory.getObject()调用,执行的就是调用getSingleton方法是传入和回调函数,其中,最关键的一行代码就是调用了createBean方法。
回调方法和 createBean
方法的实现,可以在 AbstractAutowireCapableBeanFactory 中找到:
// org.springframework.beans.factory.support.AbstractAutowireCapableBeanFactory#createBean(java.lang.String, org.springframework.beans.factory.support.RootBeanDefinition, java.lang.Object[])protectedObjectcreateBean(StringbeanName, RootBeanDefinitionmbd, Object[] args) throwsBeanCreationException { if (logger.isTraceEnabled()) { logger.trace("Creating instance of bean '"+beanName+"'"); } RootBeanDefinitionmbdToUse=mbd; // Make sure bean class is actually resolved at this point, and// clone the bean definition in case of a dynamically resolved Class// which cannot be stored in the shared merged bean definition.Class<?>resolvedClass=resolveBeanClass(mbd, beanName); if (resolvedClass!=null&&!mbd.hasBeanClass() &&mbd.getBeanClassName() !=null) { mbdToUse=newRootBeanDefinition(mbd); mbdToUse.setBeanClass(resolvedClass); } // Prepare method overrides.try { mbdToUse.prepareMethodOverrides(); } catch (BeanDefinitionValidationExceptionex) { thrownewBeanDefinitionStoreException(mbdToUse.getResourceDescription(), beanName, "Validation of method overrides failed", ex); } try { // Give BeanPostProcessors a chance to return a proxy instead of the target bean instance.Objectbean=resolveBeforeInstantiation(beanName, mbdToUse); if (bean!=null) { returnbean; } } catch (Throwableex) { thrownewBeanCreationException(mbdToUse.getResourceDescription(), beanName, "BeanPostProcessor before instantiation of bean failed", ex); } try { ObjectbeanInstance=doCreateBean(beanName, mbdToUse, args); if (logger.isTraceEnabled()) { logger.trace("Finished creating instance of bean '"+beanName+"'"); } returnbeanInstance; } catch (BeanCreationException|ImplicitlyAppearedSingletonExceptionex) { // A previously detected exception with proper bean creation context already,// or illegal singleton state to be communicated up to DefaultSingletonBeanRegistry.throwex; } catch (Throwableex) { thrownewBeanCreationException( mbdToUse.getResourceDescription(), beanName, "Unexpected exception during bean creation", ex); } }
方法体中依然有很多日志和异常处理的逻辑,和前面一样,这里还是先把关键逻辑摘录出来再深入分析:
- 调用了
resolveBeanClass(mbd, beanName)方法,得到一个 Class 类型的结果,并执行了一些相关的判断和处理。 - 执行了
mbdToUse.prepareMethodOverrides()方法。 - 通过
resolveBeforeInstantiation(beanName, mbdToUse)方法,获取了一个实例,如果不为空,则作为结果返回。这里应该需要留意,因为这个方法会产生最终的结果。 - 通过
doCreateBean(beanName, mbdToUse, args)方法,获取一个实例并返回。从方法名来看, 这个方法才是创建 Bean 实例的核心逻辑。
首先看resolveBeanClass这部分的逻辑,resolveBeanClass方法的作用是获取到当前要创建的 Bean 实例的类型,得到的结果是一个 Class 对象,如果mbd中没有这部分信息,则添加进去,这里也算是一个准备工作。
接下来看prepareMethodOverrides方法的内容。
// org.springframework.beans.factory.support.BeanDefinitionValidationExceptionpublicvoidprepareMethodOverrides() throwsBeanDefinitionValidationException {
// Check that lookup methods exist and determine their overloaded status.if (hasMethodOverrides()) {
getMethodOverrides().getOverrides().forEach(this::prepareMethodOverride);
   }
}
// org.springframework.beans.factory.support.BeanDefinitionValidationExceptionprotectedvoidprepareMethodOverride(MethodOverridemo) throwsBeanDefinitionValidationException {
intcount=ClassUtils.getMethodCountForName(getBeanClass(), mo.getMethodName());
if (count==0) {
thrownewBeanDefinitionValidationException(
"Invalid method override: no method with name '"+mo.getMethodName() +"' on class ["+getBeanClassName() +"]");
   }
elseif (count==1) {
// Mark override as not overloaded, to avoid the overhead of arg type checking.mo.setOverloaded(false);
   }
}
这个方法其实在之前的流程中遇到过,如果你看过我之前的源码分析,在 Spring 容器初始化的过程中,会加载所有的 BeanDefinition 并注册到容器中,注册之前会对 BeanDefinition 执行一个验证操作,其中就会调用这里的prepareMethodOverrides方法。这里的作用主要是获取到所有的方法覆盖配置,通过方法名在类的信息中获取同名方法的数量,如果是 1,则代表类中没有同名的重载方法,此时执行setOverloaded(false)的操作,算是一个检查和优化。详细的分析,可以参考:Spring 源码阅读 09:加载 BeanDefinition 的过程(注册阶段) 中「注册前的检查」这小结。
后处理器 InstantiationAwareBeanPostProcessor
接下来是resolveBeforeInstantiation(beanName, mbdToUse)这部分,看代码:
// org.springframework.beans.factory.support.AbstractAutowireCapableBeanFactory#resolveBeforeInstantiationprotectedObjectresolveBeforeInstantiation(StringbeanName, RootBeanDefinitionmbd) { Objectbean=null; if (!Boolean.FALSE.equals(mbd.beforeInstantiationResolved)) { // Make sure bean class is actually resolved at this point.if (!mbd.isSynthetic() &&hasInstantiationAwareBeanPostProcessors()) { Class<?>targetType=determineTargetType(beanName, mbd); if (targetType!=null) { bean=applyBeanPostProcessorsBeforeInstantiation(targetType, beanName); if (bean!=null) { bean=applyBeanPostProcessorsAfterInitialization(bean, beanName); } } } mbd.beforeInstantiationResolved= (bean!=null); } returnbean; }
这里最开始的判断条件中,mbd.beforeInstantiationResolved默认是false,因此,整段代码都不会执行,这里会返回一个空的对象。不过,既然这里有可能会产生最终作为结果的bean实例,那么,我们可以凭兴趣看一下这里究竟做了什么。
能够产生bean实例的其实就是这两行代码:
bean=applyBeanPostProcessorsBeforeInstantiation(targetType, beanName);
bean=applyBeanPostProcessorsAfterInitialization(bean, beanName);
根据方法名,可以看出来是在执行后处理器。但是,我们之前介绍 BeanPostProcessor 时曾经说过,它是在 Bean 的实例被创建出来之后,在初始化流程的前后执行的,为什么这里会执行后处理器的操作呢,我们进入方法一探究竟。
// org.springframework.beans.factory.support.AbstractAutowireCapableBeanFactory#applyBeanPostProcessorsBeforeInstantiationprotectedObjectapplyBeanPostProcessorsBeforeInstantiation(Class<?>beanClass, StringbeanName) { for (BeanPostProcessorbp : getBeanPostProcessors()) { if (bpinstanceofInstantiationAwareBeanPostProcessor) { InstantiationAwareBeanPostProcessoribp= (InstantiationAwareBeanPostProcessor) bp; Objectresult=ibp.postProcessBeforeInstantiation(beanClass, beanName); if (result!=null) { returnresult; } } } returnnull; } // org.springframework.beans.factory.support.AbstractAutowireCapableBeanFactory#applyBeanPostProcessorsAfterInitializationpublicObjectapplyBeanPostProcessorsAfterInitialization(ObjectexistingBean, StringbeanName) throwsBeansException { Objectresult=existingBean; for (BeanPostProcessorprocessor : getBeanPostProcessors()) { Objectcurrent=processor.postProcessAfterInitialization(result, beanName); if (current==null) { returnresult; } result=current; } returnresult; }
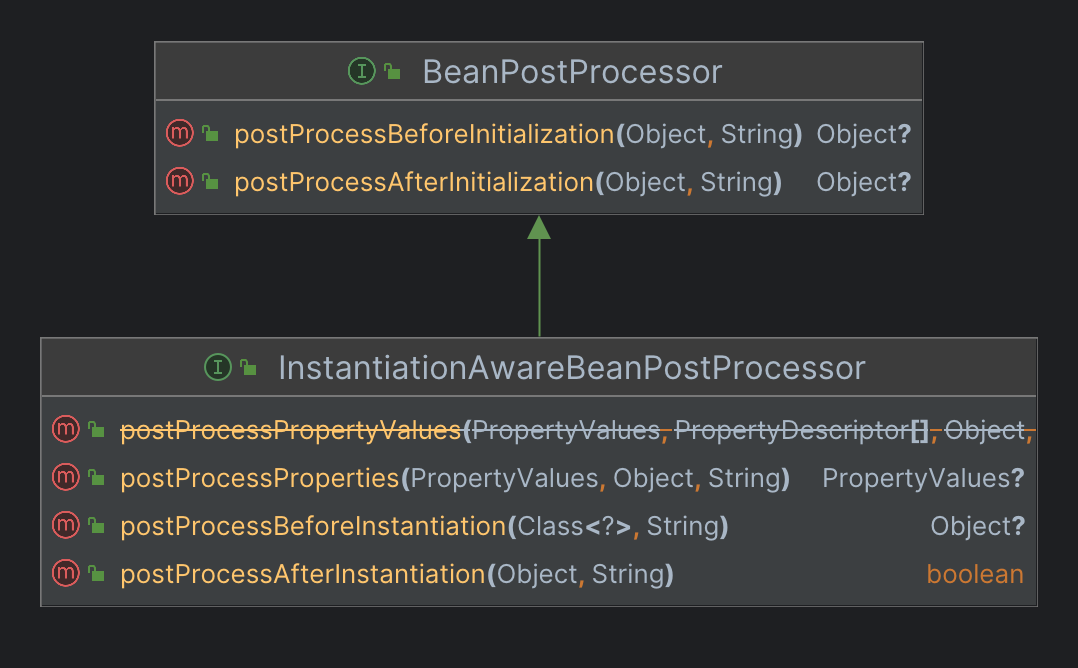
从两个方法中可以看到,这里确实是关于后处理器的操作,但并不是在初始化已经创建的 Bean 实例的前后,可以看到,这里的逻辑与 InstantiationAwareBeanPostProcessor 有关,因此,有必要分析一下。
可以看到,它其实是一个继承了 BeanPostProcessor 的接口,并在 BeanPostProcessor 的基础上添加了几个方法。
这里我们了解了其中的postProcessBeforeInstantiation和postProcessAfterInitialization两个方法的调用时机,并且postProcessBeforeInstantiation中可以实现 Bean 实例的创建逻辑,这里算是 Spring 提供的又一个可以绕开 Spring 本身创建 Bean 实例的逻辑的扩展点。
关于这个接口的其他方面内容,之后遇到了在做分析。
doCreateBean方法
回到主线中来。这里只剩doCreateBean方法了,根据 Spring 代码的习惯,这个方法就是创建 Bean 的核心逻辑了。经过之前的各种预处理和扩展点的执行,这里到了 Spring 自己通过默认的方式创建 Bean 实例并初始化的逻辑,这里创建的结果将作为最终的结果返回,流程比较多,留到下一篇继续分析。
总结
本文分析了 Spring 创建单例 Bean 实例的过程,由于创建之前还有一些与处理及扩展点处理的调用,至此还没有进入 Spring 通过默认的方式创建 Bean 实例的内容。不过,通过这部分分析,也了解到了 Spring 在创建实例之前还会执行那些工作,尤其是可以通过 InstantiationAwareBeanPostProcessor 来自定义 Bean 实例创建的流程。
