5.MyBatis简介
什么是MyBatis?
- mybatis是一款优秀的持久层框架,用于简化JDBC开发,几乎免除了所有JDBC代码以及设置参数和获取结果的工作
- Mybatis本是Apache的一款开源iBatis,2010年这个项目由apache software foundation迁移到了googel code,并且改名为MyBatis然后2013年11月迁移到了GitHub
- 官网:https://mybais.org/mybatis-3/index.html
- 持久层
- 负责将数据保存到数据库的一层代码
- JavaEE三层架构:表现层,业务层,持久层
- 框架
- 框架就是一个半成品软件,是一套可重用的,通用的,软件基础代码模型
- 在框架的基础上构建软件编写更加高效,规范,通用,可扩展
- JDBC缺点
- 硬编码:注册驱动,获取连接,sql语句
- 操作繁琐:手动设置参数,手动封装结果集
MyBatis快速入门
- 小Demo查询user表中所有数据
- 创建user表,添加数据
-- 创建数据库mybatis
createdatabase mybatis;
-- 使用数据库
user mybatis;
-- 判断删除user表并重新创建
droptableifexists tb_user;
-- 创建表user表
createtable tb_user
(
id intprimarykeyauto_increment,
username varchar(20),
passwordvarchar(20),
gender char(1),
addr varchar(30)
);
-- 添加数据
insertinto tb_user values(1,'小王','123','男','北京');
insertinto tb_user values(2,'李四','345','女','宜春');
insertinto tb_user values(3,'王五','11','男','南昌');
-- 查询数据
select * from tb_user;
- 创建模块,导入坐标
<!-- MyBatis 依赖-->
<dependencies>
<dependency>
<groupId>org.mybatis</groupId>
<artifactId>mybatis</artifactId>
<version>3.5.5</version>
</dependency>
<!-- Mysql 依赖-->
<dependency>
<groupId>mysql</groupId>
<artifactId>mysql-connector-java</artifactId>
<version>5.1.48</version>
</dependency>
<!-- junit 依赖 -->
<dependency>
<groupId>junit</groupId>
<artifactId>junit</artifactId>
<version>4.13.1</version>
<scope>test</scope>
</dependency>
<!-- 添加slf4j依赖-->
<dependency>
<groupId>org.slf4j</groupId>
<artifactId>slf4j-api</artifactId>
<version>1.7.5</version>
</dependency>
<!-- 添加logback-classic依赖-->
<dependency>
<groupId>ch.qos.logback</groupId>
<artifactId>logback-classic</artifactId>
<version>1.2.3</version>
</dependency>
<!-- 添加logback-core依赖-->
<dependency>
<groupId>ch.qos.logback</groupId>
<artifactId>logback-core</artifactId>
<version>1.2.3</version>
</dependency>
</dependencies>
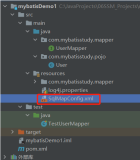
- 编写MyBatis核心配置文件>替换连接信息,解决编码问题
<?xmlversion="1.0" encoding="UTF-8" ?>
<!DOCTYPE configuration
PUBLIC "-//mybatis.org//DTD Config 3.0//EN"
"http://mybatis.org/dtd/mybatis-3-config.dtd">
<configuration>
<environmentsdefault="development">
<environmentid="development">
<transactionManagertype="JDBC"/>
<dataSourcetype="POOLED">
<!-- 数据库连接信息 -->
<propertyname="driver"value="com.mysql.jdbc.Driver"/>
<propertyname="url"value="jdbc:mysql:///mybatis?useSSL=false&serverTimezone=UTC"/>
<propertyname="username"value="root"/>
<propertyname="password"value="1234"/>
</dataSource>
</environment>
</environments>
<mappers>
<!-- 指定当前文件映射路径进行加载-->
<mapperresource="UserMapper.xml"/>
</mappers>
</configuration>
- 这里<mapper resource="UserMapper.xml"/>注意一下如果这里错误了就会报这样的错误
- 编写sql映射文件(取名UserMapper.xml)>统一管理sql语句,解决编码问题
<?xmlversion="1.0" encoding="UTF-8" ?>
<!DOCTYPE mapper
PUBLIC "-//mybatis.org//DTD Mapper 3.0//EN"
"http://mybatis.org/dtd/mybatis-3-mapper.dtd">
<!--需要写跟标签mapper里面有一个namespace名称空间(后面需要自己取名字)-->
<mappernamespace="text">
<selectid="selectAll"resultType="com.wang.pojo.User">
select * from tb_user;
</select>
</mapper>
- 编码
- 定义POJO类
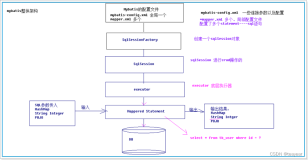
- 加载核心配置文件,获取sqlSessionFactory对象
- 获取SqlSession(就是用来执行sql语句)对象,执行sql语句
- 释放资源
- 代码出炉
publicclassMyBatisDemo1 {
publicstaticvoidmain(String[] args) throwsException {
//1.加载mybatis的核心配置文件,获取SqlSessionFactory
Stringresource="mybatis-config.xml";
InputStreaminputStream=Resources.getResourceAsStream(resource);
SqlSessionFactorysqlSessionFactory=newSqlSessionFactoryBuilder().build(inputStream);
//2.获取SqlSession对象,用它来执行sql
SqlSessionsqlSession=sqlSessionFactory.openSession();
//3.执行sql
List<User>users=sqlSession.selectList("test.selectAll");
System.out.println(users);
//释放资源
sqlSession.close();
}
}
Mapper代理开发
- 目的:解决原生方式中的硬编码问题也就是上面test.selectAll,也是为了简化后期执行sql
- 需要遵守3个规则
- 定义SQL映射文件同名的Mapper接口,并且将Mapper接口和SQL映射文件放置在同一目录下
- 设置SQL映射文件的namespace属性为Mapper接口全限定名
- 在Mapper接口中定义方法,方法名就是SQL映射文件中sql语句的id,并保存参数类型和返回值类型一致
<selectid="selectAll"resultType="com.wang.pojo.User">
- 类型一致
packagecom.wang.pojo.mapper;
importcom.wang.pojo.User;
publicinterfaceUserMapper {
List<User>selectAll();
}
- 然后<mapper resource="UserMapper.xml"/>这里路径改一下
- 编码
- 通过SqlSession的geMapper方法获取Mapper接口的代理对象
- 调用对应方法完成sql的执行
//2.获取SqlSession对象,用它来执行sql
SqlSessionsqlSession=sqlSessionFactory.openSession();
//3.获取UserMapper接口的代理对象
UserMapperuserMapper=sqlSession.getMapper(UserMapper.class);
List<User>users=userMapper.selectAll();
- 其实这里就是简化了上面这个地方需要输入路径的问题也更加通用
//2.获取SqlSession对象,用它来执行sql
SqlSessionsqlSession=sqlSessionFactory.openSession();
//3.执行sql
List<User>users=sqlSession.selectList("test.selectAll");
- 小细节:如果Mapper接口和SQL映射文件名称相同,并在同一目录下,则可以使用包扫描的方式简化SQL映射文件的加载
<!-- Mapper代理方式-->
<packagename="com.wang.mapper"/>
MyBatis核心配置文件
- MyBatis 的配置文件包含了会深深影响 MyBatis 行为的设置和属性信息。 配置文档的顶层结构如下:
- configuration(配置)
- properties(属性)
- settings(设置)
- typeAliases(类型别名)
- typeHandlers(类型处理器)
- objectFactory(对象工厂)
- plugins(插件)
- environments(环境配置)
- environment(环境变量)
- transactionManager(事务管理器)
- dataSource(数据源)
- 类型别名:
<typeAliases>
<packagename = "com.wang.pojo"/>
</typeAliases>
配置文件完成增删改查
准备环境
- 数据库表tb_brand
-- 删除tb_brand表
droptableifexists tb_brand;
-- 创建tb_brand表
createtable tb_brand
(
-- id主键
id intprimarykeyauto_increment,
-- 品牌名称
brand_name varchar(30),
-- 企业名称
company_name varchar(30),
-- 排序字段
ordered int,
-- 描述信息
description varchar(100),
-- 状态:0:禁用 1:启用
status int
);
-- 添加数据
insertinto tb_brand(brand_name,company_name,ordered,description,status) values('三只松鼠','三只松鼠股份有限公司',5,'好吃不上火',0),('华为','华为技术有限公司',100,'华为致力于把数字世界带入每个人,每个家庭',1),('小米','小米科技有限公司',50,'are you ok',1);
select * from tb_brand;
- 实体类Brand
packagecom.wang.pojo;
/**
* 品牌
*/
publicclassBrand {
// id主键
privateIntegerid;
// 品牌名称
privateStringbrandName;
// 企业名称
privateStringcompanyName;
// 排序字段
privateIntegerordered;
// 描述信息
privateStringdescription;
// 状态:0:禁用 1:启用
privateIntegerstatus=null;
publicIntegergetId() {
returnid;
}
publicvoidsetId(Integerid) {
this.id=id;
}
publicStringgetBrandName() {
returnbrandName;
}
publicvoidsetBrandName(StringbrandName) {
this.brandName=brandName;
}
publicStringgetCompanyName() {
returncompanyName;
}
publicvoidsetCompanyName(StringcompanyName) {
this.companyName=companyName;
}
publicIntegergetOrdered() {
returnordered;
}
publicvoidsetOrdered(Integerordered) {
this.ordered=ordered;
}
publicStringgetDescription() {
returndescription;
}
publicvoidsetDescription(Stringdescription) {
this.description=description;
}
publicIntegergetStatus() {
returnstatus;
}
publicvoidsetStatus(Integerstatus) {
this.status=status;
}
@Override
publicStringtoString() {
return"Brand{"+
"id="+id+
", brandName='"+brandName+'\''+
", companyName='"+companyName+'\''+
", ordered="+ordered+
", description='"+description+'\''+
", status="+status+
'}';
}
}
- 测试用例
- 安装MyBatisX:这个是基于idea的快速开发插件,为效率而生
- 他的主要功能
- XML和接口方法相互跳转
- 根据接口方法生成statement
- 安装
- 要完成的功能列表清单
- 查询
- 查询所有数据
<!-- 数据库表的字段名称和实体类的名称要一样,才可以自动封装数据-->
<!-- 法1起别名
缺点:每次查询都要定义一次别名
-->
<selectid="selectAll"resultType="brand">
select id, brand_name as brandName, company_name as companyName, ordered, description, status from tb_brand;
</select>
<!-- 法2 sql片段
缺点不灵活-->
<sqlid="brand_column">
id, brand_name as brandName, company_name as companyName, ordered, description, status from tb_brand
</sql>
<selectid="selectAll"resultType="brand">
select
<includerefid="brand_column"/>
from tb_brand;
</select>
<!--
id:唯一标识
type:映射类型
-->
<resultMapid="brandResultMap"type="brand">
<!--
id:完成主键字段的映射
column:表的列名
property:实体类的属性名
result:完成一段字段的映射
-->
<resultcolumn="brand_name"property="brandName"/>
<resultcolumn="company_name"property="brandName"/>
</resultMap>
<selectid="selectAll"resultMap="brandResultMap">
select * from tb_brand;
</select><resultMapid="brandResultMap"type="brand">
<resultcolumn="brand_name"property="brandName"/>
<resultcolumn="company_name"property="brandName"/>
</resultMap>
<selectid="selectAll"resultMap="brandResultMap">
select * from tb_brand;
</select>
- 这种以后用的最多
- 查看详情
<selectid="selectById"resultMap="brandResultMap">
select * from tb_brand where id = #{id};
</select>
参数占位符:
1.#{}:会将其替换为?为了防止sql注入
2.${}:拼sql,会存在sql注入问题
3.使用时机
参数传递的时候:#{}
表名或者列名不固定的情况下:${}会存在sql注入问题
特殊字符处理:例如<在xml中是不可以使用的
方式1:转义字符:<
方式2:CDATA区:<![CDATA[
<
]]
- 条件查询
- 多条件查询
<selectid="selectByCondition"resultMap="brandResultMap">
select * from tb_brand where status = #{status}
and company_name like #{companyName}
and brand_name like #{brandName}
</select>
/**
*条件查询
* *参数接收
* 1.散装参数:如果方法中有多个参数,需要使用@Param("SQL参数占位符名称")
* 2.对象参数
* 3.map集合参数
*/
List<Brand>selectByCondition(@Param("status")intstatus,@Param("companyName")StringcompanyName,@Param("brandName")StringbrandName);
List<Brand>selectByCondition(Brandbrand);
List<Brand>selectByCondition(Mapmap);
- 这种也有bug当只输入一个条件是查询出来的是全部为null那么我们应该怎么解决呢动态条件查询
- 动态 SQL 是 MyBatis 的强大特性之一。如果你使用过 JDBC 或其它类似的框架,你应该能理解根据不同条件拼接 SQL 语句有多痛苦,例如拼接时要确保不能忘记添加必要的空格,还要注意去掉列表最后一个列名的逗号。利用动态 SQL,可以彻底摆脱这种痛苦。
<!-- 动态条件查询-->
<selectid="selectByCondition"resultMap="brandResultMap">
select * from tb_brand
<where><iftest="status != null"> status = #{status}</if>
<iftest="companyName != null and companyName != ''"> and company_name like #{companyName}</if>
<iftest="brandName != null and brandName != ''"> and brand_name like {brandName}</if>
</where>
</select>
- 单条件查询
<!-- 单条件查询-->
<selectid="selectByCondition"resultMap="brandResultMap">
select * from tb_brand
<where>
<choose><!-- 相当于java里的switch-->
<whentest="status!=null"><!-- 相当于case-->
status = #{status}
</when>
<whentest="companyName!=null and companyName != ''"><!-- 相当于case-->
companyName = #{companyName}
</when>
<whentest="breadName!=null and oompanyName != ''"><!-- 相当于case-->
brandName = #{brandName}
</when>
</choose>
</where>
</select>
- 用来多个<where>标签是因为比较智能可以自动帮你操作
- 添加
<!--添加操作-->
<insertid="add">
insert into tb_brand(id, brand_name, company_name, ordered, description, status)
values (#{brandName},#{companyName}#{ordered}#{description}#{status});
</insert>
- 小知识学习返回添加数据的主键
<insert useGeneratedKeys = "true"keyProperty="id">
<!--添加操作-->
<insertid="add"useGeneratedKeys="true"keyProperty="id">
insert into tb_brand(id, brand_name, company_name, ordered, description, status)
values (#{brandName},#{companyName}#{ordered}#{description}#{status});
</insert>
- 修改
- 修改全部字段
<!-- 修改数据 -->
<updateid="upadate">
update tb_brand
set
brand_name = #{brandName},
company_name = #{companyName},
ordered = #{ordered},
description = #{description},
status = #{status}
where id = #{id};
</update>
- 修改动态字段
<!-- 动态修改数据 -->
<updateid="upadate">
update tb_brand
<set>
<iftest="brandName != null and brandName != ''">
brand_name = #{brandName},
</if>
<iftest="company_name != null and company_name != ''">
company_name = #{companyName},
</if>
<iftest="ordered != null">
ordered = #{ordered},
</if>
<iftest="description != null and description != ''">
description = #{description},
</if>
<iftest="status != null">
status = #{status}
</if>
where id = #{id};
</set>
</update>
- 删除
- 删除一个
<!-- 根据id删除-->
<deleteid="deleteById">
delete from tb_brand where id = #{id};
</delete>
- 批量删除
<!-- 动态删除
mybatis会将数组参数,封装为一个Map集合
小知识点1.默认:array = 数组
2.可以在接口上使用@Param注解改变map集合的默认key的名称
-->
<deleteid="deleteByIds">
delete from tb_brand where id
in(
<foreachcollection="array"item="id"separator=","open="("close=")">
#{id}
</foreach>
);
</delete>
- sperator是将数据以,分割开,open是开始拼接一个( close是结束拼接一个)
MYBatis参数传递
- MyBatis接口方法中可以接收各种各样的参数,MyBatis底层对于这些参数进行不同的封装处理方式
- 单个参数
- POJO类型:直接使用,属性名和参数占位符名称一致
- Map集合:直接使用,键名和参数占位符名称一致
- Collection:封装为Map集合 以后是Map集合就都全部使用@Param注,替换Map集合中默认的arg键名map.put("arg0",collection集合);map.put("collection",collection集合);
- List:封装为Map集合 以后是Map集合就都全部使用@Param注,替换Map集合中默认的arg键名map.put("arg0",List集合);map.put("collection",List集合);
map.put("List",List集合); - Array:封装为Map集合 以后是Map集合就都全部使用@Param注,替换Map集合中默认的arg键名map.put("arg0",数组);map.put("array",数组);
- 其他类型
- 多个参数:封装为Map集合map.put("arg0",参数值1);
map.put("param1",参数值1);
map.put("param2",参数值2);
map.put("arg1",参数值2);
如果不写下面那个Param注解那么就可以输入上面那种
User select(String username,@Param("password") String password);
注解完成增删改查
- 查询:@Select 例如@Select("select * from tb_user where id = #{id}")
- 添加:@Insert
- 修改:@Update
- 删除:@Detele
- 使用注解来映射简单语句会使代码显得更加简洁,但对于稍微复杂一点的语句,Java 注解不仅力不从心,还会让你本就复杂的 SQL 语句更加混乱不堪。 因此,如果你需要做一些很复杂的操作,最好用 XML 来映射语句。