1、Extensions to DrawTools
Author

Introduction
Alex Fr provided an excellent set of drawing tools in his DrawTools article and these tools serve as a basis for this article, which expands on the original toolset in the following ways:
- In addition to the basic Rectangle, Ellipse, Line and Scribble tools, this version adds PolyLine, Filled Ellipse, Filled Rectangle, Text and Image tools
- Multiple drawing Layers
- Zooming
- Panning
- Rotation
In this article, I will describe how Layers were implemented, as well as the Text and Image tools.
Background
See the original DrawTools article for details on how the basic application is built, class structure, etc.
It is also assumed that the reader has a working understanding of GDI+ fundamentals, including Matrices. For an excellent introduction to GDI+, see www.bobpowell.net.
Implementing Layers
Adding Layers to the application involved adding two classes, Layer and Layers, where Layer defines a single Layer and Layers defines the collection of Layers in an ArrayList.
Each Layer exposes the following properties:
private string _name;
private bool _isDirty;
private bool _visible; private bool _active; private GraphicsList _graphicsList;
Note that the Layer contains the GraphicsList - this is the key to the whole thing - each Layer contains its own list of drawing objects instead of DrawArea. DrawArea is modified to declare a Layers collection instead of a GraphicsList collection:
// Define the Layers collection
private Layers _layers;
When DrawArea is initialized, the Layers are initialized by creating the first Layer and setting it Active and Visible:
public DrawArea()
{
// create list of Layers, with one default active visible layer
_layers = new Layers();
_layers.CreateNewLayer("Default"); _panning = false; _panX = 0; _panY = 0; // This call is required by the Windows.Forms Form Designer. InitializeComponent(); }
In the Layers class, the CreateNewLayer() method actually creates the new Layer:
/// <summary>
/// Create a new layer at the head of the layers list and set it /// to Active and Visible. /// </summary> /// <param name="theName">The name to assign to the new layer</param> public void CreateNewLayer(string theName) { // Deactivate the currently active Layer if(layerList.Count > 0) ((Layer)layerList[ActiveLayerIndex]).IsActive = false; // Create new Layer, set it visible and active Layer l = new Layer(); l.IsVisible = true; l.IsActive = true; l.LayerName = theName; // Initialize empty GraphicsList for future objects l.Graphics = new GraphicsList(); // Add to Layers collection this.Add(l); }
Note that any one or all Layers can be visible at the same time, but only one Layer may be active at any time.
You can control the Layers in the sample application by clicking on the Current Layer: name at the bottom of the application window - Click on the name ("Default") to open the Layers dialog:
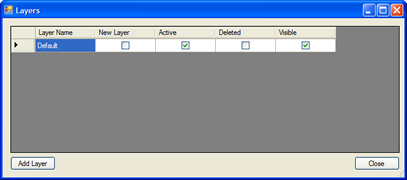
From this dialog, you can Add new Layers, change the names of the Layer(s), and change the Layer(s) visibility and which Layer is Active. The "New Layer" column is checked whenever you click the "Add Layer" button. To delete Layer(s), simply check the "Deleted" column and close the dialog with the "Close" button. Remember only one Layer may be active at any one time. You will be reminded of this if you attempt to have more than one Layer active. Also note the Active Layer must be Visible.
When the application runs, each object that is drawn is added to the GraphicsList maintained by the active Layer. Note this relationship is preserved through saving and re-opening a drawing file.
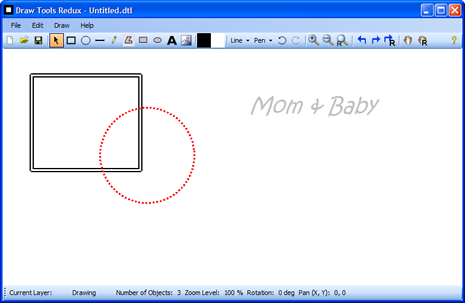
Layers come in very handy when you want to draw "on top of" another image. For example, the image at the top of this article contains two layers. The following image shows the same picture with the Background Layer turned off:
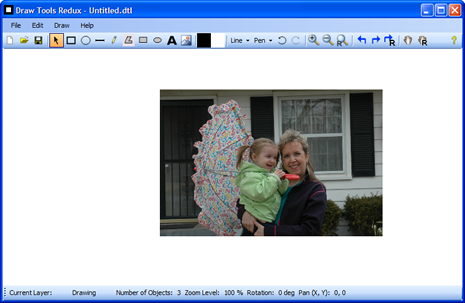
Here is the same drawing with the Drawing Layer invisible and the Background Layer visible:
Objects on Layers which are visible but not active cannot be selected, moved, deleted, etc.
Each drawing object is added to the correct Layer by the AddNewObject() method in the ToolObject class:
protected void AddNewObject(DrawArea drawArea, DrawObject o)
{
     int al = drawArea.TheLayers.ActiveLayerIndex;
     drawArea.TheLayers[al].Graphics.UnselectAll();
     o.Selected = true;
   o.Dirty = true;
   drawArea.TheLayers[al].Graphics.Add(o);
     drawArea.Capture = true; drawArea.Refresh(); }
Implementing Zooming, Panning, and Rotation
Zooming, Panning, and Rotation are implemented by adding a few variables and some code to the MainForm and DrawArea classes.
Zooming is controlled by buttons on the form, and also by the mouse wheel when Ctrl is held down.
Pan is controlled by the Hand button on the form, and can be cancelled by a right-click.
Rotation is controlled by buttons on the form - note Rotation affects the entire drawing.
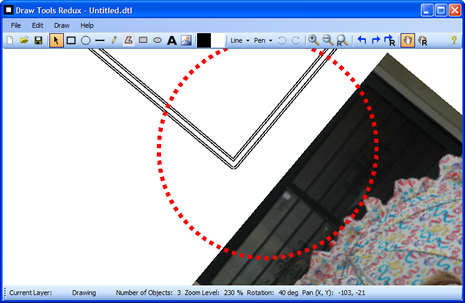
Here is an example of all three in use:
The heart of this code is the BackTrackMouse() method, which takes the "apparent" mouse position and converts it to a valid point based on the current Zoom level, Pan position, and Rotation:
/// <summary>
 /// Back Track the Mouse to return accurate coordinates regardless of /// zoom or pan effects. /// Courtesy of BobPowell.net <seealso cref="http://www.bobpowell.net/backtrack.htm"/> /// </summary> /// <param name="p">Point to backtrack</param> /// <returns>Backtracked point</returns> public Point BackTrackMouse(Point p) { // Backtrack the mouse... Point[] pts = new Point[] { p }; Matrix mx = new Matrix(); mx.Translate(-this.ClientSize.Width / 2, -this.ClientSize.Height / 2, MatrixOrder.Append); mx.Rotate(_rotation, MatrixOrder.Append); mx.Translate(this.ClientSize.Width / 2 + _panX, this.ClientSize.Height / 2 + _panY, MatrixOrder.Append); mx.Scale(_zoom, _zoom, MatrixOrder.Append); mx.Invert(); mx.TransformPoints(pts); return pts[0]; }
This routine comes from Bob Powell's excellent website. Through the use of the GDI+ Matrix class, the mouse point passed to this method is moved (Translate), Rotated, and Scaled based on the current PanX, PanY, Zoom, and Rotation values. The important thing to remember is that anytime you need to determine where the mouse pointer actually is in your drawing, you must call this method. You will see this method used throughout the program in the DrawArea class as well as others. An example of its usage is shown here:
private void DrawArea_MouseDown(object sender, System.Windows.Forms.MouseEventArgs e)
{
     lastPoint = BackTrackMouse(e.Location);
     if (e.Button == MouseButtons.Left)
         tools[(int)activeTool].OnMouseDown(this, e); else if (e.Button == MouseButtons.Right) { if (_panning == true) _panning = false; ActiveTool = DrawArea.DrawToolType.Pointer; } //OnContextMenu(e); }
The current zoom level is controlled by the following simple routine:
private void AdjustZoom(float _amount)
{
    drawArea.Zoom += _amount;
    if (drawArea.Zoom < .1f)
        drawArea.Zoom = .1f;
    if (drawArea.Zoom > 10) drawArea.Zoom = 10f; drawArea.Invalidate(); SetStateOfControls(); }
Then in the DrawArea.Paint() method, the zoom, pan, and rotation values are used to alter the way the canvas is painted:
private void DrawArea_Paint(object sender, System.Windows.Forms.PaintEventArgs e)
{
    Matrix mx = new Matrix();
    mx.Translate(-this.ClientSize.Width / 2, -this.ClientSize.Height / 2, MatrixOrder.Append); mx.Rotate(_rotation, MatrixOrder.Append); mx.Translate(this.ClientSize.Width / 2 + _panX, this.ClientSize.Height / 2 + _panY, MatrixOrder.Append); mx.Scale(_zoom, _zoom, MatrixOrder.Append); e.Graphics.Transform = mx; SolidBrush brush = new SolidBrush(Color.FromArgb(255, 255, 255)); e.Graphics.FillRectangle(brush, this.ClientRectangle); // Draw objects on each layer, in succession so we get the correct layering. // Only draw layers that are visible if (_layers != null) { int lc = _layers.Count; for (int i = 0; i < lc; i++) { if(_layers[i].IsVisible == true) if(_layers[i].Graphics != null) _layers[i].Graphics.Draw(e.Graphics); } } DrawNetSelection(e.Graphics); brush.Dispose(); }
Update - 8/25/2007 - Individual Object Rotation & Bug Fixes
The primary advancement in this update is the ability to rotate individual objects - when one or more objects are selected, clicking the Rotate tools will rotate those objects instead of the entire drawing surface.
There is one caveat, however - the selection rectangle for the rotated object is not rotated - if someone can help with this, I would greatly appreciate it!
This update also includes several small bug fixes reported by users - thanks to all for reporting!
History
- 3/6/2007
- Original article uploaded to The Code Project
- 3/6/2007
- Updated to include more information on zoom/pan/rotation
- 8/25/2007
- Updated Individual Object Rotation
- 9/27/2007
- Added the missing links to the new source code
- 12/23/2009
- Added Tooltip control which appears when mouse is over an object. Tooltip displays the Center coordinates of the object for
Rectangle,EllipseandImageobjects. For other objects, Tooltip displays starting and ending coordinates.Textobjects do not display Tooltip.
This was implemented adding the Tooltip control to theToolPointerclass. EachDrawObject fills theTipTextproperty and theMouseMoveevent inToolPointercontrols when the Tooltip is displayed and removed from the canvas. This implementation is not perfect, as the Tooltip flashes when displayed so is meant as an example of one way information about the object can be displayed.
Perhaps a better way to do this would be to display information about the object in a separate "Information Window" and then only when the object is selected. - See the new source code for details.
- Added Tooltip control which appears when mouse is over an object. Tooltip displays the Center coordinates of the object for
- 6/23/2010
- Updated project to include object ordering fix that corrects the way objects are stacked when a file is opened
- Updated project to Visual Studio 2010
- See the new source code for details
- 10/4/2011
- Corrected several issues with Layers and layering
2、DrawTools 2014
Author
Introduction
Current alternative is based on the CodeProject DrawTools 2005, built under Visual Studio C# 2010.
The main goal of this tip is to post and save the DrawTools project back to the community after some enhancements. The tip is short, as the improvements are minor.
A few improvements have been made, as follows:
- Add scroll bars to the draw area
- Handling of
AutoScrollPositionin the different tools provided by the original project - Export of the drawing with jpeg format
Background
Knowledge of C# is required, but this project shows the basics of UI programming under '.NET'.
Architecture
Dynamic handling for showing scroll bars
A dirty boolean is handled in GraphicsList, the canvas document, where it should be. To this Dirty property is associated a DocumentDirtyObserver interface.
public interface DocumentDirtyObserver
{
    void IsDirty(GraphicsList gList);
}
Every time the document is modified, look with the different draw tools, its Dirty property is set to true and any DocumentDirtyObserver is fired.
public bool Dirty
{
    get
    {
        return this.dirty;
    }
    set { this.dirty = value; if (this.dirty) { NotifyDirty(); } } }
The class DrawArea implements the DocumentDirtyObserver, and every time the document is 'dirty', it calls AdjustRendering, which in turn computes the bounding box of the canvas document (GraphicsList).
void AdjustRendering()
{
    Size docSize;

    if (this.GraphicsList != null)
    {
        docSize = this.GraphicsList.GetSize();
        docSize.Width += 20; docSize.Height += 20; AutoScrollMinSize = docSize; } else { AutoScrollMinSize = new Size(0, 0); } Invalidate(); }
This way, it implements the Mode/View/Controller design pattern, the GraphicsList being the model, DrawArea being the View and the draw Tools being the controller.
In the future, Dirty property should be handled in only one place (it is also handled in the DrawArea class).
Export the graph to JPEG format
The DrawTools 2014 architecture is good enough to be followed to implement a new menu strip option.
-
Add a menu item to the menu bar
Simply open the MainForm designer and add the option
-
Link the
MenuItemto aMainFormmethod to trigger theCommandExportToJpgHide Copy Codeprivate void CommandExportToJpg() { docManager.ExportToJpg(); } - Implement the user interface logic in the
DocManager ExportToJpgI let you look at the
DocManager.ExportToJpg - Subscribe
MainForm ExportEventmethod implementation toDocManagerevent.
docManager.ExportEvent += docManager_ExportEvent;
- Implement
MainFormlogic to actually transform image bitmap into JPEG file.All is in the source code, I don't copy it here as it is essentially technical stuff.
Result
The result is best shown by the following graph, obtained with a customized version of the DrawTools.
Points of Interest
Architecture is already well thought in the original project, please read the original document for insight about it.
There was a bug where the status bar was hiding the horizontal scroll bar, but after some thorough inspection of the code, it has been fixed.
History
- Added scroll bars to the draw area
- Added a status bar
- Fixed a bug on the context menu when the scroll bar position is not 0
- Export of the drawing with jpeg format
- Fixed an
OutOfMemoryExceptionwith JPEG format export
Special thank you to Alex, who originally posted the DrawTools project on CodeProject.
License
This article, along with any associated source code and files, is licensed under The Code Project Open License (CPOL)
