接着昨天的结构型设计模式写:
1、装饰器模式
意图:动态地给一个对象添加一些额外的职责,不控制原有的功能,就增加功能来说,装饰器模式.比生成子类更为灵活,而代理模式是把接口的功能给控制住了,在其他场景不会引用,只能由代理类操作。装饰者设计模式本质的类不会变,在同一个环境下可以使用两种。
主要解决:一般的,我们为了扩展一个类经常使用继承方式实现,由于继承为类引入静态特征,并且随着扩展功能的增多,子类会很膨胀。
使用场景:1、扩展一个类的功能。2、动态增加功能,动态撤销。
在Spring中是用BeanDefinitionDecorator bean定义装饰,用来将beandefinition装饰成beandefinitionHolder对象(封装了bean定义对象,bean名称 ,bean别名 ),然后用来进行bean注册使用。
提供一个规范的接口:
package com.weizhaoyang.decorate;/*** 业务接口*/public interface DemoService {/*** 业务服务demo*/public void demoo();}
提供一个实现类,代码如下:
package com.weizhaoyang.decorate;public class DemoServiceImpl implements DemoService {@Overridepublic void demoo() {System.out.println("我的房子需要装修下");}}
提供一个装饰类,而且提供一个被装饰的类,因为装饰类要依赖于主体-被装饰的类,代码如下:
package com.weizhaoyang.decorate;/*** 热插拔的效果* DemoService在装饰器模式中这个类可以在任何的地方使用,不受装饰器影响* 而在代理设计模式中这个DemoService被代理类完全控制*/public class DemoServiceDecorator implements DemoService {private DemoService demoService;public DemoServiceDecorator(DemoService demoService){this.demoService=demoService;}@Overridepublic void demoo() {demoService.demoo();System.out.println("房子已经装修成欧式风格了");}}
给个测试类:
package com.weizhaoyang.decorate;public class DemoTest {public static void main(String[] args) {//创建主对象DemoService demoService=new DemoServiceImpl();//创建装饰器DemoServiceDecorator decorator=new DemoServiceDecorator(demoService);decorator.demoo();}}
运行的结果如下:

好处:原有的结构不改变,给外面的调用方来说,就是给当前的DemoService做一个封装,封装就是保护当前的对象DemoService实例,这样就会减少破坏,对扩展开放,对修改关闭。如果是用继承的话将把DemoSerivice给改掉,行为被覆盖掉,动态修改父类里的方法的功能,就违背了开闭原则。
在io流中就是典型的装饰器模式来实现的,可以把上面的DemoService看作成InputStream,然而有多种InputStream,通过装饰器来装饰这个InputStram
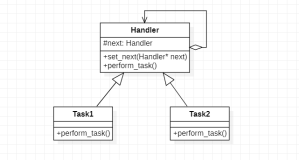
2、责任链模式:举个生活中的例子,分工到位和去医院看病,依赖于外界的环境
也就是代替了if-else的循环,可以动态的扩展。
在spring中扩展接口是比较常用的责任链模式:
BeanFactoryPostProcessor beanFactroy工厂后置处理器,列表循环执行
BeanPostProcessor bean初始化后置处理器,在bean初始化前和初始化后执行,也就是进行依赖注入前后自定义处理
InstantiationAwareBeanPostProcessor bean实例化后置处理器,在bean实例化前,实例化后执行,也就是在创建bean 实例,反射创建对象实例前后进行自定义处理,同时自定义进行属性设置
DestructionAwareBeanPostProcessor bean销毁后置处理器,在bean实例销毁前进行自定义处理
SmartInstantiationAwareBeanPostProcessor 获取bean 实例的提前引用,解决循环引用的问题(框架内部调用,一般不在外部进行扩展)
MergedBeanDefinitionPostProcessor 父bean和子bean定义自定来解决合并问题
BeanDefinitionRegistryPostProcessor bean注册后置处理器,在bean注册时候进行 BeanDefinitionRegistry注册自定义
(遵守了开闭原则,用来对扩展开放,修改关闭)
代码如下:1、创建一个病人类:
package com.weizhaoyang.chain;/*** 病人类*/public class BingUser {private String name;private String description; //病人描述public BingUser(String description) {this.description = description;}public String getName() {return name;}public void setName(String name) {this.name = name;}public String getDescription() {return description;}public void setDescription(String description) {this.description = description;}}
2、提供一个医生的接口
package com.weizhaoyang.chain;public interface DoctorChain {/*** 是否是我的病人*/public boolean isBingUser(BingUser bingUser);//去医治病人public void doTreat(BingUser bingUser);}
3、提供治疗脚痛的医生的代码如下:
package com.weizhaoyang.chain;/*** 治疗脚痛的*/public class WhyDoctor implements DoctorChain {@Overridepublic boolean isBingUser(BingUser bingUser) {if("J".equals(bingUser.getDescription())){return true;}return false;}@Overridepublic void doTreat( BingUser bingUser) {System.out.println("脚痛医生已经收到通知,开始治疗");}}
提供治疗头痛的医生的代码如下:
package com.weizhaoyang.chain;/*** 每一个医生属于一个科室,治疗头痛*/public class ZhaoDoctor implements DoctorChain {@Overridepublic boolean isBingUser(BingUser bingUser) {if("T".equals(bingUser.getDescription())){return true;}return false;}@Overridepublic void doTreat( BingUser bingUser) {System.out.println("头痛医生已经收到通知,开始治疗");}}
4、提供一个医院的入口:
package com.weizhaoyang.chain;import java.util.ArrayList;import java.util.List;/*** 医院入口类*/public class DoctorDoor {//将病人和医生联合起来,把所有的科室注册到医院里面去/*** 科室集合*/private static List<DoctorChain> chains=new ArrayList<DoctorChain>();/*** 添加科室责任链*/public void registerDoctor(DoctorChain doctorChain){chains.add(doctorChain);}/*** 添加科室责任链*/public void removeDoctor(DoctorChain doctorChain){chains.remove(doctorChain);}/*** 收纳病人进来*/public void receiveBingUser(BingUser bingUser) throws Exception {//1、收纳 病人成功System.out.println("收纳病人成功");//2、开始查找是哪一个科室进行处理if(chains!=null &&chains.size()>0){//3、寻找医生for(DoctorChain doctorChain:chains){if(doctorChain.isBingUser(bingUser)){doctorChain.doTreat(bingUser);return;}}}else{throw new Exception("医院并没有开科");}}}
写个测试类:
package com.weizhaoyang.chain;public class ChainTest {public static void main(String[] args) throws Exception {//1、创建医院对象DoctorDoor doctorDoor=new DoctorDoor();//2、科室医生DoctorChain chain=new WhyDoctor();DoctorChain chain1 =new ZhaoDoctor();doctorDoor.registerDoctor(chain);doctorDoor.registerDoctor(chain1);//3、需要病人BingUser bingUser = new BingUser("T");doctorDoor.receiveBingUser(bingUser);}}
运行的结果如下:

只要把责任链的设计模式,就会把springmvc的拦截器和servlet的过滤器就懂了。
3、适配器模式
本质:将不同的接口结合成相同的接口,主要用在项目上线之后,适用不用的环境中使用,mysql用的就是适配器模式,接口功能写死,新环境里面需要某个类增加新功能,同时这个功能已经存在,将这个新功能嫁接到原有功能上!
在spring中后置处理器用的是适配器模式:InstantiationAwareBeanPostProcessorAdapter bean后置处理器适配器抽象类,将所有的后置处理器接口处理成我们个性化需要的接口类型。
代码如下:1、提供一个接口:
package com.weizhaoyang.adapter;public interface DemoService {/*** 业务服务demo*/public void demo(String canFlag) throws Exception;}
2、提供一个实现类:
package com.weizhaoyang.adapter;/***这个已经是具体的环境* 统一的入口传不同的参数调用不同的方法,对参数没有修改,通过参数适配,适配不同的接口* 不影响原有的接口*/public class DemoServiceImpl implements DemoService {private DemoServiceAdapter demoServiceAdapter;@Overridepublic void demo(String canFlag) throws Exception {if("code".equals(canFlag)){System.out.println("我本来有写代码的能力");}else if("fly".equals(canFlag)){//传fly就进行适配,如果有多个适配就写多个适配接口demoServiceAdapter = new DemoServiceAdapter();demoServiceAdapter.demo(canFlag);}else{throw new Exception("能力不够");}}}
3、提供一个飞的接口:
package com.weizhaoyang.adapter;public interface FlyService {public void fly();}
4、提供一个实现类
package com.weizhaoyang.adapter;public class FlyServiceImpl implements FlyService {@Overridepublic void fly() {System.out.println("我能飞");}}
5、提供一个是适配器的类:
package com.weizhaoyang.adapter;/*** 适配谁就以谁为主,适配DemoService* 适配器一定要去实现主接口* 在类里面加一个适配器类就能够适配* 具体的环境,适配谁就以谁为主* 如果不用设计模式的话在DemoService接口里面添加新功能的话,会有代码冗余。* 适配器需要实现主接口*/public class DemoServiceAdapter implements DemoService{//依赖飞接口private FlyService flyService;public DemoServiceAdapter(){this.flyService= new FlyServiceImpl();}//fly的方法和demo的方法是不兼容的同时方法参数不一样,方法名不一样,这个时候接口demo需要适配。//如果方法名相同,这个时候不需要适配的//适配器用飞和code进行解耦public void demo(String canFlag) {if("fly".equals(canFlag)){flyService.fly();}}}
6、提供一个测试类:
package com.weizhaoyang.adapter;public class DemoTest {public static void main(String[] args) throws Exception {DemoService demoService = new DemoServiceImpl();demoService.demo("code");demoService.demo("fly");}}
运行的结果如下:

总结:装饰器的话,另外一个接口不存在,而适配器模式是两个接口存在,谁需要改变,就适配谁。对接口可以扩展,对调用不要修改,通一个过主体的参数返回一个新的功能