分子组成原子
目前为止,我们仅创建了 web 应用中最基本的元素,只是这样,它们是没有用的。我们可以在示例的基础上扩展构建一个简单的模态弹窗。
首先,我们定义了模态弹窗的组件类。
// design-system/Portal.js
import React, {Component} from 'react';
import ReactDOM from 'react-dom';
import {Box, Flex} from './layouts/Layouts';
import { Type, TextSize, TextAlign} from './type/Type';
import './portal.scss';
export class Portal extends React.Component {
    constructor(props) {
        super(props);
        this.el = document.createElement('div');
    }
    componentDidMount() {
        this.props.root.appendChild(this.el);
    }
    componentWillUnmount() {
        this.props.root.removeChild(this.el);
    }
    render() {
        return ReactDOM.createPortal(
            this.props.children,
            this.el,
        );
    }
}
export const Modal = ({ children, root, closeModal, header})
=> {
    return <Portal root={root} className="ds-modal">
        <div className="modal-wrapper">
        <Box>
        <Type tagName="h6" size={TextSize.lg}>{header}</Type>
    <Type className="close" onClick={closeModal}
align={TextAlign.right}>x</Type>
    </Box>
    <Box>
    {children}
    </Box>
    </div>
    </Portal>
}
接下来,我们为模态弹窗定义 CSS 样式。
#modal - root {
.modal - wrapper {
        background - color: white;
        border - radius: 10px;
        max - height: calc(100 % - 100px);
        max - width: 560px;
        width: 100 %;
        top: 35 %;
        left: 35 %;
        right: auto;
        bottom: auto;
        z - index: 990;
        position: absolute;
    }
> div {
        background - color: transparentize(black, .5);
        position: absolute;
        z - index: 980;
        top: 0;
        right: 0;
        left: 0;
        bottom: 0;
    }
.close {
        cursor: pointer;
    }
}
对于初学者来说,createPortal 除了会把子元素渲染在父组件之外的层级中,它和 render 方法类似。在 React 16 有详细介绍。
使用 Modal 组件
现在,组件已经定义好了,让我们看看如何在业务场景中使用它。
//src/App.js
import React, { Component } from 'react';
//...
import { Type, TextBold, TextSize } from './design_system/type/Type';
import { Modal } from './design_system/Portal';
class App extends Component {
    constructor() {
        super();
        this.state = {showModal: false}
    }
    toggleModal() {
        this.setState({ showModal: !this.state.showModal });
    }
    render() {
    <button onClick={this.toggleModal.bind(this)}>
        Show Alert
        </button>
        {this.state.showModal &&
        <Modal root={document.getElementById("modal-root")}
header="Test Modal"
closeModal={this.toggleModal.bind(this)}>
            Test rendering
        </Modal>}
            //....
        }
    }
我们可以在任何地方使用 modal,然后在调用的地方维护它的状态。很简单,对吧?但是,这有个 bug。关闭按钮无效。这是因为我们构建的所有组件都是一个封闭的系统。 它只会使用需要的 props,并且无视其他的。在当前的示例中,text 组件忽略了 onClick 事件。幸运的是,这很容易被修复。
// In  design-system/type/Type.js
export const Type = ({ tag = 'span', size= TextSize.default,
boldness = TextBold.default, children, className='',
align=TextAlign.default, ...rest}) => {
    const Tag = `${tag}`;
    const classNames = `ds-text ${size} ${boldness} ${align}
${className}`;
    return <Tag className={classNames} {...rest}>
        {children}
    </Tag>
};
ES6 可以很容易的把剩余的参数以数组的方式提取出来。使用这种方法,然后把参数传递给组件。
分享组件
随着团队的扩大,很难把有效的组件同步给每个人。Storybooks 是一种很好的分享组件的方法。让我们配置一个基础的 storybook。
开始:
npm i -g @storybook/cli
getstorybook
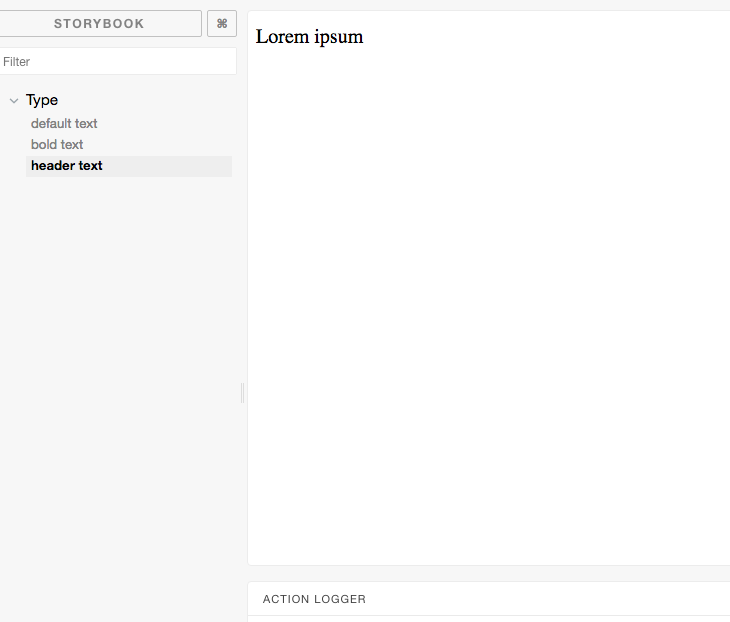
storybook 还需要一些必要的配置。从这里开启,剩下的设置都很简单。让我们添加一个简单的 story 代表 Type 不同的状态。
import React from 'react';
import { storiesOf } from '@storybook/react';
import { Type, TextSize, TextBold } from '../design_system/type/Type.js';
storiesOf('Type', module)
    .add('default text', () => (
        <Type>
            Lorem ipsum
        </Type>
    )).add('bold text', () => (
    <Type boldness={TextBold.semibold}>
        Lorem ipsum
    </Type>
)).add('header text', () => (
    <Type size={TextSize.lg}>
        Lorem ipsum
    </Type>
));
API 非常简单。storiesOf 定义了一个新的 story,一般就是你的组件。然后,通过 add 添加新的章节,为了展示组件不同的状态。
当然,这是非常基本的,但是 storybooks 有一些插件可以帮助你添加文档。我还注意到她们也支持 emoji?

