做过权限认证的朋友都清楚,SpringSecurity 的功能很强大,但是我们也都知道,它配置起来也着实让人头疼。N多个配置类还有N多个需要实现的接口,总是记不住和不知道为什么会有这么多,最近在学习这方面的东西,正好能够把学习到的东西分享出来给大家参考一下。
在目前网上的很多博文中,只是把配置文件贴出来,根本没告诉为什么这么配置,都需要配置哪些东西。其实我们在理解了一些远离之后,就能够笔记哦啊清晰的去记住这些配置文件。
1. Oauth2.0 的使用
简介
OAuth 2.0是用于授权的行业标准协议。OAuth 2.0为简化客户端开发提供了特定的授权流,包括Web应用、桌面应用、移动端应用等。
名词含义
- Resource owner(资源拥有者):拥有该资源的最终用户,他有访问资源的账号密码;
- Resource server(资源服务器):拥有受保护资源的服务器,如果请求包含正确的访问令牌,可以访问资源;
- Client(客户端):访问资源的客户端,会使用访问令牌去获取资源服务器的资源,可以是浏览器、移动设备或者服务器;
- Authorization server(认证服务器):用于认证用户的服务器,如果客户端认证通过,发放访问资源服务器的令牌。
授权模式
- Authorization Code(授权码模式):正宗的OAuth2的授权模式,客户端先将用户导向认证服务器,登录后获取授权码,然后进行授权,最后根据授权码获取访问令牌;
- Implicit(简化模式):和授权码模式相比,取消了获取授权码的过程,直接获取访问令牌;
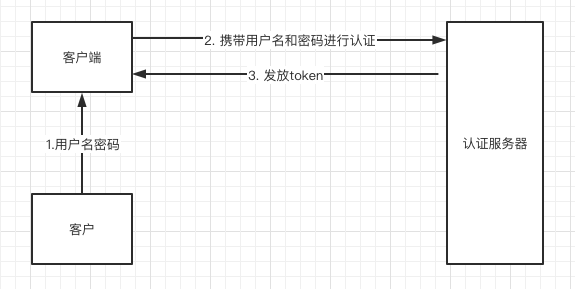
- Resource Owner Password Credentials(密码模式):客户端直接向用户获取用户名和密码,之后向认证服务器获取访问令牌;
- Client Credentials(客户端模式):客户端直接通过客户端认证(比如client_id和client_secret)从认证服务器获取访问令牌。
两种比较常用的授权模式
授权码模式

密码模式
使用
授权码的方式进行使用
应用场景:
为了理解OAuth的适用场合,让我举一个假设的例子。
有一个"云冲印"的网站,可以将用户储存在Google的照片,冲印出来。用户为了使用该服务,必须让"云冲印"读取自己储存在Google上的照片。
问题是只有得到用户的授权,Google才会同意"云冲印"读取这些照片。那么,"云冲印"怎样获得用户的授权呢?
传统方法是,用户将自己的Google用户名和密码,告诉"云冲印",后者就可以读取用户的照片了。这样的做法有以下几个严重的缺点。
(1)"云冲印"为了后续的服务,会保存用户的密码,这样很不安全。
(2)Google不得不部署密码登录,而我们知道,单纯的密码登录并不安全。
(3)"云冲印"拥有了获取用户储存在Google所有资料的权力,用户没法限制"云冲印"获得授权的范围和有效期。
(4)用户只有修改密码,才能收回赋予"云冲印"的权力。但是这样做,会使得其他所有获得用户授权的第三方应用程序全部失效。
(5)只要有一个第三方应用程序被破解,就会导致用户密码泄漏,以及所有被密码保护的数据泄漏。
OAuth就是为了解决上面这些问题而诞生的。
依赖:
<dependency>
            <groupId>org.springframework.boot</groupId>
            <artifactId>spring-boot-starter-security</artifactId>
        </dependency>
        <dependency>
            <groupId>org.springframework.cloud</groupId>
            <artifactId>spring-cloud-starter</artifactId>
        </dependency>

        <dependency>
            <groupId>org.projectlombok</groupId>
            <artifactId>lombok</artifactId>
            <optional>true</optional>
        </dependency>
        <dependency>
            <groupId>org.springframework.cloud</groupId>
            <artifactId>spring-cloud-starter-oauth2</artifactId>
        </dependency>
        <dependency>
            <groupId>org.springframework.boot</groupId>
            <artifactId>spring-boot-starter-web</artifactId>
        </dependency>
配置用户相关的service:
package com.macro.authdemo.service;

import org.springframework.beans.factory.annotation.Autowired;
import org.springframework.security.core.authority.AuthorityUtils;
import org.springframework.security.core.userdetails.User;
import org.springframework.security.core.userdetails.UserDetails;
import org.springframework.security.core.userdetails.UserDetailsService;
import org.springframework.security.core.userdetails.UsernameNotFoundException;
import org.springframework.security.crypto.password.PasswordEncoder;
import org.springframework.stereotype.Service;

import javax.annotation.PostConstruct;
import java.util.*;

@Service
public class UserService implements UserDetailsService {


    private List<User> users;
    @Autowired
    private PasswordEncoder passwordEncoder;

    @PostConstruct
    public void init() {


        users = new LinkedList<>();
        String password = passwordEncoder.encode("admin");
        users.add(new User("aaa", password, AuthorityUtils.commaSeparatedStringToAuthorityList("admin")));
        users.add(new User("bbb", password, AuthorityUtils.commaSeparatedStringToAuthorityList("client")));
        users.add(new User("ccc", password, AuthorityUtils.commaSeparatedStringToAuthorityList("client")));
    }

    @Override
    public UserDetails loadUserByUsername(String s) throws UsernameNotFoundException {


        for (User u : users) {


            if (Objects.equals(u.getUsername(), s)) {


                return u;
            }
        }
        throw new UsernameNotFoundException("用户名不存在");
    }
}
配置spring-security:
package com.macro.authdemo.config;

import org.springframework.context.annotation.Bean;
import org.springframework.context.annotation.Configuration;
import org.springframework.security.authentication.AuthenticationManager;
import org.springframework.security.config.annotation.web.builders.HttpSecurity;
import org.springframework.security.config.annotation.web.configuration.EnableWebSecurity;
import org.springframework.security.config.annotation.web.configuration.WebSecurityConfigurerAdapter;
import org.springframework.security.crypto.bcrypt.BCryptPasswordEncoder;
import org.springframework.security.crypto.password.PasswordEncoder;

@Configuration
@EnableWebSecurity
public class SpringSecurityConfig extends WebSecurityConfigurerAdapter {


    @Bean
    public PasswordEncoder passwordEncoder() {


        return new BCryptPasswordEncoder();
    }

    @Bean
    public AuthenticationManager authenticationManagerBean() throws Exception {


        return super.authenticationManagerBean();
    }

    @Override
    protected void configure(HttpSecurity http) throws Exception {


        http.csrf()
                .disable()
                .authorizeRequests()
                .antMatchers("/oauth/**", "/login/**", "/logout/**")
                .permitAll()
                .anyRequest()
                .authenticated()
                .and()
                .formLogin()
                .permitAll();
    }
}
配置资源服务器:
package com.macro.authdemo.config;

import org.springframework.context.annotation.Configuration;
import org.springframework.security.config.annotation.web.builders.HttpSecurity;
import org.springframework.security.oauth2.config.annotation.web.configuration.EnableResourceServer;
import org.springframework.security.oauth2.config.annotation.web.configuration.ResourceServerConfigurerAdapter;

@Configuration
@EnableResourceServer
public class ResourceServerConfig extends ResourceServerConfigurerAdapter {


    @Override
    public void configure(HttpSecurity http) throws Exception {


        http.authorizeRequests()
                .anyRequest()
                .authenticated()
                .and()
                .requestMatchers()
                .antMatchers("/user/**");//配置需要保护的资源路径
    }
}
Tips: 这里有一个问题,在spring-security的配置中,我们设置了资源的路径和权限,在资源服务器的配置中我们幼设置了一遍,这样的话,是不是重复了,我翻看了一些开源项目的单点登录相关的配置,里面鲜有对资源服务器的配置,这样的话也就是说可以只需要配置security的资源配置就能够达到效果。后面的工程应该是两个合成一个
认证服务的配置:
package com.macro.authdemo.config;

import com.macro.authdemo.service.UserService;
import org.springframework.beans.factory.annotation.Autowired;
import org.springframework.beans.factory.annotation.Qualifier;
import org.springframework.context.annotation.Configuration;
import org.springframework.security.authentication.AuthenticationManager;
import org.springframework.security.crypto.password.PasswordEncoder;
import org.springframework.security.oauth2.config.annotation.configurers.ClientDetailsServiceConfigurer;
import org.springframework.security.oauth2.config.annotation.web.configuration.AuthorizationServerConfigurerAdapter;
import org.springframework.security.oauth2.config.annotation.web.configuration.EnableAuthorizationServer;
import org.springframework.security.oauth2.config.annotation.web.configurers.AuthorizationServerEndpointsConfigurer;
import org.springframework.security.oauth2.config.annotation.web.configurers.AuthorizationServerSecurityConfigurer;
import org.springframework.security.oauth2.provider.token.TokenStore;
import org.springframework.security.oauth2.provider.token.store.JwtAccessTokenConverter;
import org.springframework.security.oauth2.provider.token.store.JwtTokenStore;

@Configuration
@EnableAuthorizationServer
public class AuthServerConfig extends AuthorizationServerConfigurerAdapter {


    @Autowired
    private PasswordEncoder passwordEncoder;

    @Autowired
    private UserService service;

    @Autowired
    private AuthenticationManager authenticationManager;


    @Override
    public void configure(ClientDetailsServiceConfigurer clients) throws Exception {


        clients.inMemory()
                .withClient("admin")
                .secret(passwordEncoder.encode("admin123"))
                .accessTokenValiditySeconds(3600)
                .refreshTokenValiditySeconds(86400)
                .redirectUris("http://www.baidu.com")
                .scopes("all")
                .authorizedGrantTypes("authorization_code", "password");
    }

    /**
     *  @author: ynzhang
     *  @Date: 2021/2/22 11:42 上午
     *  @Description: 密码的配置
     */
    @Override
    public void configure(AuthorizationServerEndpointsConfigurer endpoints) throws Exception {


        endpoints.authenticationManager(authenticationManager)
                .userDetailsService(service);
    }
}
测试接口:
package com.macro.authdemo.controller;

import org.springframework.security.core.Authentication;
import org.springframework.web.bind.annotation.GetMapping;
import org.springframework.web.bind.annotation.RequestMapping;
import org.springframework.web.bind.annotation.RestController;

@RestController
@RequestMapping("/user")
public class UserController {


    @GetMapping("getUser")
    public Object getUser(Authentication authentication) {


        return authentication.getPrincipal();
    }
}
进行登陆认证
输入用户名aaa密码admin之后
认证服务器会重定向到你设置的重定向地址www.baidu.com并且携带code参数
然后再根据返回的code去请求(POST请求)http://localhost:9401/oauth/token
请求参数
parameters.add("grant_type", "authorization_code");
        parameters.add("client_id", "portal-app");
        parameters.add("client_secret", "123456");
        parameters.add("code", code);
        parameters.add("redirect_uri", "www.baidu.com");
之后就会返回token。
密码模式登陆
直接访问(POST请求)http://localhost:9401/oauth/token
请求参数
                parameters.add("grant_type", "password");
        parameters.add("username", "aaa");
        parameters.add("password", "admin");
        parameters.add("scope", "all");
之后就会返回token
2. 配合Jwt的使用
其实根据上面的说法,token已经拿到了,但是认证服务的token存放在哪里了呢?答案是存放在内存中了,如果以后有多个用户,多个系统,多个角色,这种token都存在内存中,甚至说认证服务做分布式后,怎么办呢?存放在内存中就不合适了。这样的话Jwt就显得很必要了,我们可以根据生成的token和用户信息使用signature进行加密,等到客户端传递过来,采用signature进行解析就好了,完美解决了token需要存储的问题;当然,我们还可以配置把token放在redis中。
JWT简介
JWT是JSON WEB TOKEN的缩写,它是基于 RFC 7519 标准定义的一种可以安全传输的的JSON对象,由于使用了数字签名,所以是可信任和安全的。
JWT的组成
JWT token的格式:header.payload.signature;
header中用于存放签名的生成算法;
{


"alg": "HS256",
"typ": "JWT"
}
payload中用于存放数据,比如过期时间、用户名、用户所拥有的权限等;
{


"exp": 1572682831,
"user_name": "macro",
"authorities": [
  "admin"
],
"jti": "c1a0645a-28b5-4468-b4c7-9623131853af",
"client_id": "admin",
"scope": [
  "all"
]
}
signature为以header和payload生成的签名,一旦header和payload被篡改,验证将失败。
JWT实例
这是一个JWT的字符串:
eyJhbGciOiJIUzI1NiIsInR5cCI6IkpXVCJ9.eyJleHAiOjE1NzI2ODI4MzEsInVzZXJfbmFtZSI6Im1hY3JvIiwiYXV0aG9yaXRpZXMiOlsiYWRtaW4iXSwianRpIjoiYzFhMDY0NWEtMjhiNS00NDY4LWI0YzctOTYyMzEzMTg1M2FmIiwiY2xpZW50X2lkIjoiYWRtaW4iLCJzY29wZSI6WyJhbGwiXX0.x4i6sRN49R6JSjd5hd1Fr2DdEMBsYdC4KB6Uw1huXPgCopy to clipboardErrorCopied
- 可以在该网站上获得解析结果:https://jwt.io/
- 使用redis来存token(这种方式并没有对token进行加密)
配置文件中修改redis的信息
server.port=8080
spring.redis.host=39.102.83.104
spring.redis.port=6699
增加配置类:
package com.macro.authdemo.config;

import org.springframework.beans.factory.annotation.Autowired;
import org.springframework.context.annotation.Bean;
import org.springframework.context.annotation.Configuration;
import org.springframework.data.redis.connection.RedisConnectionFactory;
import org.springframework.security.oauth2.provider.token.TokenStore;
import org.springframework.security.oauth2.provider.token.store.redis.RedisTokenStore;

@Configuration
public class RedisTokenStoreConfig {


    @Autowired
    private RedisConnectionFactory connectionFactory;

    @Bean
    public TokenStore redisTokenStore() {


        return new RedisTokenStore(connectionFactory);
    }
}
认证服务中增加:
package com.macro.authdemo.config;

import com.macro.authdemo.service.UserService;
import org.springframework.beans.factory.annotation.Autowired;
import org.springframework.beans.factory.annotation.Qualifier;
import org.springframework.context.annotation.Configuration;
import org.springframework.security.authentication.AuthenticationManager;
import org.springframework.security.crypto.password.PasswordEncoder;
import org.springframework.security.oauth2.config.annotation.configurers.ClientDetailsServiceConfigurer;
import org.springframework.security.oauth2.config.annotation.web.configuration.AuthorizationServerConfigurerAdapter;
import org.springframework.security.oauth2.config.annotation.web.configuration.EnableAuthorizationServer;
import org.springframework.security.oauth2.config.annotation.web.configurers.AuthorizationServerEndpointsConfigurer;
import org.springframework.security.oauth2.config.annotation.web.configurers.AuthorizationServerSecurityConfigurer;
import org.springframework.security.oauth2.provider.token.TokenStore;
import org.springframework.security.oauth2.provider.token.store.JwtAccessTokenConverter;
import org.springframework.security.oauth2.provider.token.store.JwtTokenStore;

@Configuration
@EnableAuthorizationServer
public class AuthServerConfig extends AuthorizationServerConfigurerAdapter {


    @Autowired
    private PasswordEncoder passwordEncoder;

    @Autowired
    private UserService service;

    @Autowired
    private AuthenticationManager authenticationManager;

    @Autowired
    @Qualifier("redisTokenStore")
    private TokenStore tokenStore;
//    @Autowired
//    @Qualifier("jwtTokenStore")
//    private TokenStore tokenStore;

//    @Autowired
//    private JwtAccessTokenConverter jwtAccessTokenConverter;


    @Override
    public void configure(ClientDetailsServiceConfigurer clients) throws Exception {


        clients.inMemory()
                .withClient("admin")
                .secret(passwordEncoder.encode("admin123"))
                .accessTokenValiditySeconds(3600)
                .refreshTokenValiditySeconds(86400)
                .redirectUris("/oauth/getToken")
                .scopes("all")
                .authorizedGrantTypes("authorization_code", "password");
    }

    /**
     *  @author: ynzhang
     *  @Date: 2021/2/22 11:42 上午
     *  @Description: 密码的配置
     */
    @Override
    public void configure(AuthorizationServerEndpointsConfigurer endpoints) throws Exception {


        endpoints.authenticationManager(authenticationManager)
                .userDetailsService(service)
                .tokenStore(tokenStore);
//                .accessTokenConverter(jwtAccessTokenConverter);
//        endpoints.authenticationManager(authenticationManager)
//                .userDetailsService(service);
    }
}
Jwt存放token
增加配置类:
package com.macro.authdemo.config;

import org.springframework.context.annotation.Bean;
import org.springframework.context.annotation.Configuration;
import org.springframework.context.annotation.Primary;
import org.springframework.security.oauth2.provider.token.TokenStore;
import org.springframework.security.oauth2.provider.token.store.JwtAccessTokenConverter;
import org.springframework.security.oauth2.provider.token.store.JwtTokenStore;

@Configuration
public class JwtTokenStoreConfig {


    @Bean
    @Primary
    public TokenStore jwtTokenStore() {


        return new JwtTokenStore(jwtAccessTokenConverter());
    }

    @Bean
    public JwtAccessTokenConverter jwtAccessTokenConverter() {


        final JwtAccessTokenConverter jwtAccessTokenConverter = new JwtAccessTokenConverter();
        jwtAccessTokenConverter.setSigningKey("test_key");//这里使用的是对称加密,其实可以使用非对称加密
        return jwtAccessTokenConverter;
    }
}
修改认证服务:
```java
package com.macro.authdemo.config;import com.macro.authdemo.service.UserService;
import org.springframework.beans.factory.annotation.Autowired;
import org.springframework.beans.factory.annotation.Qualifier;
import org.springframework.context.annotation.Configuration;
import org.springframework.security.authentication.AuthenticationManager;
import org.springframework.security.crypto.password.PasswordEncoder;
import org.springframework.security.oauth2.config.annotation.configurers.ClientDetailsServiceConfigurer;
import org.springframework.security.oauth2.config.annotation.web.configuration.AuthorizationServerConfigurerAdapter;
import org.springframework.security.oauth2.config.annotation.web.configuration.EnableAuthorizationServer;
import org.springframework.security.oauth2.config.annotation.web.configurers.AuthorizationServerEndpointsConfigurer;
import org.springframework.security.oauth2.config.annotation.web.configurers.AuthorizationServerSecurityConfigurer;
import org.springframework.security.oauth2.provider.token.TokenStore;
import org.springframework.security.oauth2.provider.token.store.JwtAccessTokenConverter;
import org.springframework.security.oauth2.provider.token.store.JwtTokenStore;@Configuration
@EnableAuthorizationServer
public class AuthServerConfig extends AuthorizationServerConfigurerAdapter {@Autowired private PasswordEncoder passwordEncoder; @Autowired private UserService service; @Autowired private AuthenticationManager authenticationManager;// @Autowired
// @Qualifier("redisTokenStore")
// private TokenStore tokenStore;@Autowired @Qualifier("jwtTokenStore") private TokenStore tokenStore; @Autowired private JwtAccessTokenConverter jwtAccessTokenConverter;
   @Override
   public void configure(ClientDetailsServiceConfigurer clients) throws Exception {
       clients.inMemory()
               .withClient("admin")
               .secret(passwordEncoder.encode("admin123"))
               .accessTokenValiditySeconds(3600)
               .refreshTokenValiditySeconds(86400)
               .redirectUris("/oauth/getToken")
               .scopes("all")
               .authorizedGrantTypes("authorization_code", "password");
   }

   /**
    *  @author: ynzhang
    *  @Date: 2021/2/22 11:42 上午
    *  @Description: 密码的配置
    */
   @Override
   public void configure(AuthorizationServerEndpointsConfigurer endpoints) throws Exception {
       endpoints.authenticationManager(authenticationManager)
               .userDetailsService(service)
               .tokenStore(tokenStore)
               .accessTokenConverter(jwtAccessTokenConverter);
// endpoints.authenticationManager(authenticationManager)
// .userDetailsService(service);
}
}
   上面代码中提到了对称加密和非对称加密的问题

   对称加密,就像上面的程序一样,`jwtAccessTokenConverter.setSigningKey("test_key")`加密的时候使用的是这个字符串,等从客户端传过来的时候解码用的也是这个字符串,这种模式就是对称加密的模式。

   而相对的非对称加密的模式,就是采用使用公钥进行加密,解密的时候采用私钥,这种就称为非对称加密

   具体的设置如下:

   Jwt的配置类:

   ```java
   package com.macro.authdemo.config;

   import org.springframework.context.annotation.Bean;
   import org.springframework.context.annotation.Configuration;
   import org.springframework.context.annotation.Primary;
   import org.springframework.security.oauth2.provider.token.TokenStore;
   import org.springframework.security.oauth2.provider.token.store.JwtAccessTokenConverter;
   import org.springframework.security.oauth2.provider.token.store.JwtTokenStore;

   @Configuration
   public class JwtTokenStoreConfig {

       @Bean
       @Primary
       public TokenStore jwtTokenStore() {
           return new JwtTokenStore(jwtAccessTokenConverter());
       }

       @Bean
       public JwtAccessTokenConverter jwtAccessTokenConverter() {
           final JwtAccessTokenConverter jwtAccessTokenConverter = new JwtAccessTokenConverter();
           jwtAccessTokenConverter.setKeyPair(keyPair());;//这里使用的是非对称加密,其实可以使用非对称加密
           return jwtAccessTokenConverter;
       }

      @Bean
       public KeyPair keyPair() {
           //从classpath下的证书中获取秘钥对
           KeyStoreKeyFactory keyStoreKeyFactory = new KeyStoreKeyFactory(new ClassPathResource("jwt.jks"), "123456".toCharArray());
           return keyStoreKeyFactory.getKeyPair("jwt", "123456".toCharArray());
       }
   }
