目录
一:未来数据定时刷新
1.redis key值匹配
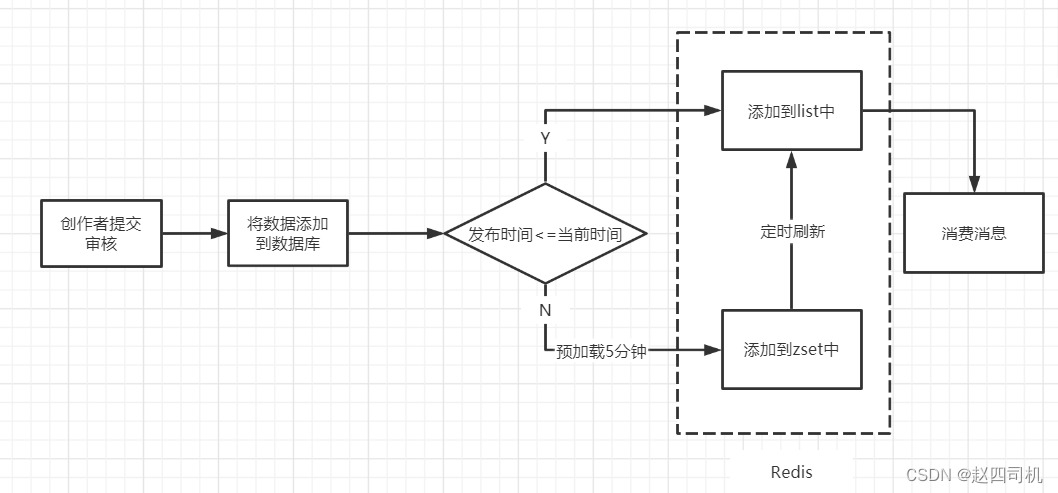
将未来5分钟之内要发布的文章加入到redis之后,我们需要定时对这部分数据(也就是zset中的数据)进行扫描,以便将zset中时间到了文章存入list中准备发布,但是这时候扫描zset中的数据有两种选择,见下面分析:
方案一:keys模糊匹配
keys的模糊匹配功能很方便也很强大,但是在生产环境需要慎用!开发中使用keys的模糊匹配却发现redis的CPU使用率极高,所以公司的redis生产环境将keys命令禁用了!redis是单线程,会被堵塞

 编辑
编辑
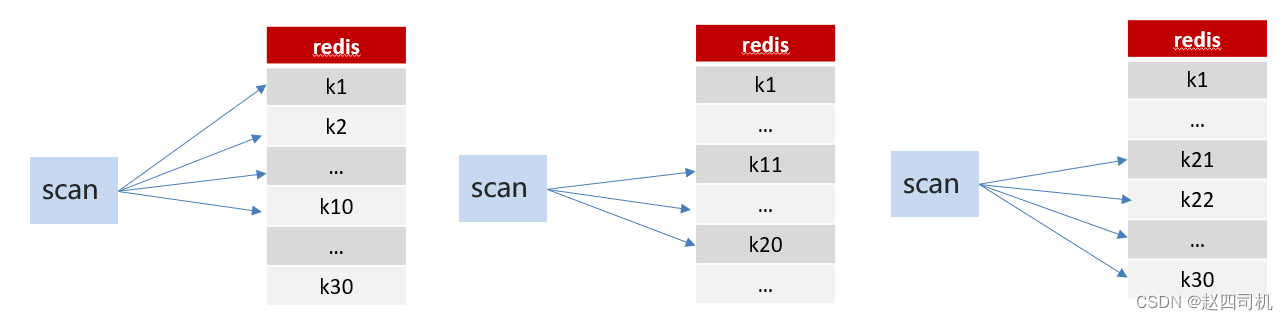
方案二:scan
SCAN 命令是一个基于游标的迭代器,SCAN命令每次被调用之后, 都会向用户返回一个新的游标, 用户在下次迭代时需要使用这个新游标作为SCAN命令的游标参数, 以此来延续之前的迭代过程。
 编辑
编辑
2.redis管道
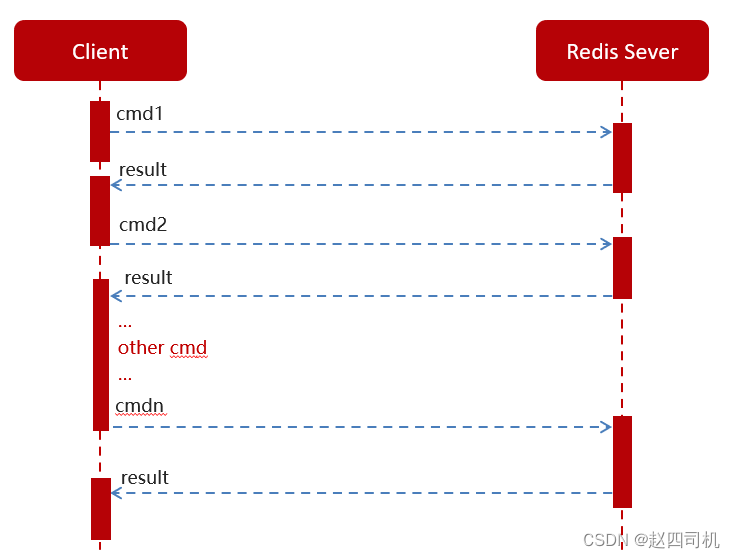
普通redis客户端和服务器交互模式
 编辑
编辑
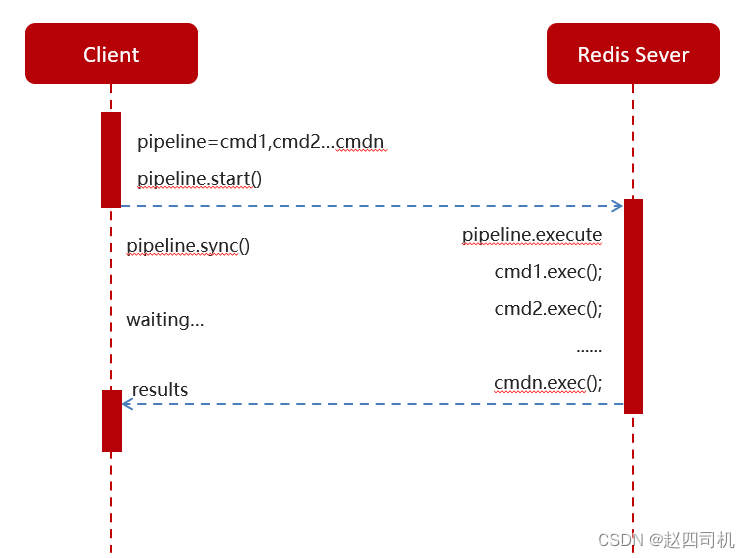
Pipeline请求模型
 编辑
编辑
两者的区别从图中就可以看出来,第一种方式对每一个命令都需要向服务端发送一次请求,假如命令过多会不断创建连接,降低执行效率;而第二种方式则是将一批命令积攒到一起再开启通道一次性执行,大大减少了连接数。
3.定时刷新功能实现
在taskserviceImpl中添加如下方法,并且引导类中开启任务调度注解@EnableScheduling
@Scheduled(cron = "0 */1 * * * ?")
public void refresh() {
    // 获取所有未来数据集合的key值
    Set<String> futureKeys = cacheService.scan(ScheduleConstants.FUTURE + "*");// future_*
    for (String futureKey : futureKeys) { // future_250_250
        String topicKey = ScheduleConstants.TOPIC + futureKey.split(ScheduleConstants.FUTURE)[1];
        //获取该组key下当前需要消费的任务数据
        Set<String> tasks = cacheService.zRangeByScore(futureKey, 0, System.currentTimeMillis());
        if (!tasks.isEmpty()) {
            //将这些任务数据添加到消费者队列中
            cacheService.refreshWithPipeline(futureKey, topicKey, tasks);
            log.info("成功将{}下的当前需要执行的任务添加到{}",futureKey,topicKey);
        }
    }
}

二:分布式锁解决集群下的方法抢占执行
1.问题描述
假如启动两台tbug-headlines-schedule服务,这时候两者都会去执行refresh方法,但是我们只需要其中一台去执行扫描任务即可,这时候就需要加入分布式锁来进行控制。
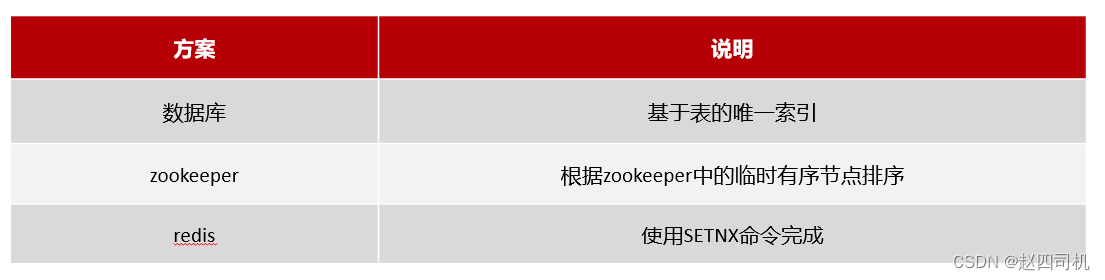
2.分布式锁
分布式锁:控制分布式系统有序的去对共享资源进行操作,通过互斥来保证数据的一致性。
解决方案:
 编辑
编辑
3.redis分布式锁
setnx (Set if Not Exists) 命令在指定的 key 不存在时,为 key 设置指定的值。

 编辑
编辑
这种加锁的思路是,如果 key 不存在则为 key 设置 value,如果 key 已存在则 SETNX 命令不做任何操作
- 客户端A请求服务器设置key的值,如果设置成功就表示加锁成功
- 客户端B也去请求服务器设置key的值,如果返回失败,那么就代表加锁失败
- 客户端A执行代码完成,删除锁
- 客户端B在等待一段时间后再去请求设置key的值,设置成功
- 客户端B执行代码完成,删除锁
4.实现
(1)方法添加
在工具类CacheService中添加如下方法:
/**
 * 加锁
 *
 * @param name
 * @param expire
 * @return
 */
public String tryLock(String name, long expire) {
    name = name + "_lock";
    String token = UUID.randomUUID().toString();
    RedisConnectionFactory factory = stringRedisTemplate.getConnectionFactory();
    RedisConnection conn = factory.getConnection();
    try {
        //参考redis命令:
        //set key value [EX seconds] [PX milliseconds] [NX|XX]
        Boolean result = conn.set(
                name.getBytes(),
                token.getBytes(),
                Expiration.from(expire, TimeUnit.MILLISECONDS),
                RedisStringCommands.SetOption.SET_IF_ABSENT //NX
        );
        if (result != null && result)
            return token;
    } finally {
        RedisConnectionUtils.releaseConnection(conn, factory,false);
    }
    return null;
}

参数name表示锁的名称,expire表示锁的过期时间,最重要的是set方法中最后一个参数RedisStringCommands.SetOption.SET_IF_ABSENT,这表示当有一个请求过来之后就会设置key值进行加锁,这样再有请求过来就获取不到了。
(2) 代码修改
/**
 * 定时器任务,每分钟扫描redis一次
 */
@Scheduled(cron = "0 */1 * * * ?")
public void refresh() {
    String token = cacheService.tryLock("FUTURE_TASK_SYNC", 1000 * 30);//加锁,30秒过期
    if(StringUtils.isNotBlank(token)) {
        log.info("开始执行定时扫描redis任务...");
        //获取所有未来数据集合的key值
        Set<String> futureKeys = cacheService.scan(ScheduleConstants.FUTURE + "*");
        for (String futureKey : futureKeys) {
            //截取后半部分 future_200_100 --> _200_100
            String topicKey = ScheduleConstants.TOPIC + futureKey.split(ScheduleConstants.FUTURE)[1];
            //获取该组key下当前需要清理的任务数据
            Set<String> tasks = cacheService.zRangeByScore(futureKey,0,System.currentTimeMillis());
            if(!tasks.isEmpty()) {
                //将这些数据添加到消费队列中
                cacheService.refreshWithPipeline(futureKey,topicKey,tasks);
                log.info("成功将{}下的当前需要执行的任务添加到{}",futureKey,topicKey);
            }
        }
    }
}

5.数据库同步
在完成上述操作之后,我们需要知道的是redis中只是存放现在就需要发布和5分钟之内需要发布的文章,而那些超过5分钟之后才需要发布的文章(比如一天之后发布)我们是不将其存入redis中的,它们只是存放在数据库中,这时候就需要定时去扫描数据库查看哪些文章需要被放入redis进行处理,流程图还可以参考上一篇文章的:
 编辑
编辑
/**
 * 数据库同步任务,每五分钟执行一次
 */
@PostConstruct  //表示服务一启动便执行一次
@Scheduled(cron = "0 */5 * * * ?")
public void reloadData() {
    log.info("开始同步数据库任务到redis...");
    //1.清理缓存任务,避免重复
    clearCache();
    //2.获取5分钟之后的时间
    Calendar calendar = Calendar.getInstance();
    calendar.add(Calendar.MINUTE,5);
    //3.查看未来所有小于5分钟的任务
    List<Taskinfo> tasks = taskInfoMapper.selectList
            (Wrappers.<Taskinfo>lambdaQuery().lt(Taskinfo::getExecuteTime, calendar.getTime()));
    if(tasks != null && tasks.size() > 0) {
        for (Taskinfo taskinfo : tasks) {
            Task task = new Task();
            BeanUtils.copyProperties(taskinfo,task);
            task.setExecuteTime(taskinfo.getExecuteTime().getTime());
            addTaskToCache(task);
        }
    }
}
/**
 * 清理缓存任务
 */
private void clearCache() {
    log.info("开始清理缓存任务...");
    //获取任务集
    Set<String> futureKeys = cacheService.scan(ScheduleConstants.FUTURE + "*");
    Set<String> topicKeys = cacheService.scan(ScheduleConstants.TOPIC + "*");
    cacheService.delete(futureKeys);
    cacheService.delete(topicKeys);
}

三:延迟队列实现定时发布
1.提供对外接口
提供远程的feign接口,在tbug-headlines-feign-api编写类如下:
package com.my.apis.schedule;
import com.my.model.common.dtos.ResponseResult;
import com.my.model.schedule.dtos.Task;
import org.springframework.cloud.openfeign.FeignClient;
import org.springframework.web.bind.annotation.GetMapping;
import org.springframework.web.bind.annotation.PathVariable;
import org.springframework.web.bind.annotation.PostMapping;
import org.springframework.web.bind.annotation.RequestBody;
@FeignClient(value = "headlines-schedule")
public interface IScheduleClient {
    /**
     * 添加任务
     * @param task   任务对象
     * @return       任务id
     */
    @PostMapping("/api/v1/task/add")
    ResponseResult addTask(@RequestBody Task task);
    /**
     * 取消任务
     * @param taskId        任务id
     * @return              取消结果
     */
    @GetMapping("/api/v1/task/cancel/{taskId}")
    ResponseResult cancelTask(@PathVariable("taskId") long taskId);
    /**
     * 按照类型和优先级来拉取任务
     * @param type
     * @param priority
     * @return
     */
    @GetMapping("/api/v1/task/poll/{type}/{priority}")
    ResponseResult poll(@PathVariable("type") int type, @PathVariable("priority")  int priority);
}

在tbug-headlines-schedule微服务下提供对应的实现
package com.my.schedule.feign;
import com.my.apis.schedule.IScheduleClient;
import com.my.model.common.dtos.ResponseResult;
import com.my.model.schedule.dtos.Task;
import com.my.schedule.service.TaskService;
import org.springframework.beans.factory.annotation.Autowired;
import org.springframework.web.bind.annotation.*;
@RestController
public class ScheduleClient implements IScheduleClient {
    @Autowired
    private TaskService taskService;
    /**
     * 添加任务
     * @param task   任务对象
     * @return       任务id
     */
    @Override
    @PostMapping("/api/v1/task/add")
    public ResponseResult addTask(@RequestBody Task task) {
        return ResponseResult.okResult(taskService.addTask(task));
    }
    /**
     * 取消任务
     * @param taskId        任务id
     * @return              取消结果
     */
    @Override
    @GetMapping("/api/v1/task/cancel/{taskId}")
    public ResponseResult cancelTask(@PathVariable long taskId) {
        return ResponseResult.okResult(taskService.cancelTask(taskId));
    }
    /**
     * 按照类型和优先级来拉取任务
     * @param type
     * @param priority
     * @return
     */
    @Override
    @GetMapping("/api/v1/task/poll/{type}/{priority}")
    public ResponseResult poll(@PathVariable("type") int type,@PathVariable("priority") int priority) {
        return ResponseResult.okResult(taskService.poll(type,priority));
    }
}

2.具体实现
(1)前期准备
①枚举类
package com.my.model.common.enums;
import lombok.AllArgsConstructor;
import lombok.Getter;
@Getter
@AllArgsConstructor
public enum TaskTypeEnum {
    NEWS_SCAN_TIME(1001, 1,"文章定时审核"),
    REMOTEERROR(1002, 2,"第三方接口调用失败,重试");
    private final int taskType; //对应具体业务
    private final int priority; //业务不同级别
    private final String desc; //描述信息
}

②序列化工具
在添加任务到延迟队列的方法中,我们需要用到序列化工具进行序列化操作,而在任务消费时候又需要进行反序列化操作。java内置的序列化能将实现了Serilazable接口的对象进行序列化和反序列化,但是这里我选用的是效率更高的Protostuff。Protostuff是google开源的,其采用更为紧凑的二进制数组,表现更加优异。
将ProtostuffUtil拷贝到tbug-headlines-utils中,然后导入如下依赖
<dependency>
    <groupId>io.protostuff</groupId>
    <artifactId>protostuff-core</artifactId>
    <version>1.6.0</version>
</dependency>
<dependency>
    <groupId>io.protostuff</groupId>
    <artifactId>protostuff-runtime</artifactId>
    <version>1.6.0</version>
</dependency>

(2)添加任务到延迟队列
创建WmNewsTaskService
package com.my.wemedia.service;
import java.util.Date;
public interface WmNewsTaskService {
    /**
     * 添加任务到延迟队列中
     * @param id 文章id
     * @param publishTime  文章发布时间
     */
    void addNewsToTask(Integer id, Date publishTime);
    /**
     * 消费延迟队列数据
     */
    void scanNewsByTask();
}

实现类
package com.my.wemedia.service.impl;
import com.alibaba.fastjson.JSON;
import com.my.apis.schedule.IScheduleClient;
import com.my.common.constans.ScheduleConstants;
import com.my.common.redis.CacheService;
import com.my.model.common.dtos.ResponseResult;
import com.my.model.common.enums.TaskTypeEnum;
import com.my.model.schedule.dtos.Task;
import com.my.model.wemedia.pojos.WmNews;
import com.my.utils.common.ProtostuffUtil;
import com.my.wemedia.service.WmAutoScanService;
import com.my.wemedia.service.WmNewsTaskService;
import lombok.extern.slf4j.Slf4j;
import org.springframework.beans.factory.annotation.Autowired;
import org.springframework.scheduling.annotation.Async;
import org.springframework.scheduling.annotation.Scheduled;
import org.springframework.stereotype.Service;
import java.util.Calendar;
import java.util.Date;
@Slf4j
@Service
public class WmNewsTaskServiceImpl implements WmNewsTaskService {
    @Autowired
    private IScheduleClient scheduleClient;
    /**
     * 添加任务到延迟队列
     * @param id 文章id
     * @param publishTime  文章发布时间
     */
    @Override
    @Async
    public void addNewsToTask(Integer id, Date publishTime) {
        log.info("添加任务到延迟服务中---begin");
        Task task = new Task();
        task.setExecuteTime(publishTime.getTime());
        task.setTaskType(TaskTypeEnum.NEWS_SCAN_TIME.getTaskType());
        task.setPriority(TaskTypeEnum.NEWS_SCAN_TIME.getPriority());
        WmNews wmNews = new WmNews();
        wmNews.setId(id);
        task.setParameters(ProtostuffUtil.serialize(wmNews));
        scheduleClient.addTask(task);
        log.info("添加任务到延迟服务中---end");
    }
}

(3)修改发布文章代码
将之前的异步调用审核文章修改为将文章数据加入延迟队列
@Autowired
    private WmAutoScanService wmAutoScanService;
    @Autowired
    private WmNewsTaskService wmNewsTaskService;
    /**
     * 提交文章
     * @param dto
     * @return
     */
    @Override
    public ResponseResult submitNews(WmNewsDto dto) throws Exception {
        //1.参数校验
        if(dto == null || dto.getContent().length() == 0) {
            return ResponseResult.errorResult(AppHttpCodeEnum.PARAM_INVALID);
        }
        //2.保存或修改文章
        //2.1属性拷贝
        WmNews wmNews = new WmNews();
        BeanUtils.copyProperties(dto,wmNews);
        //2.2设置封面图片
        if(dto.getImages() != null && dto.getImages().size() != 0) {
            String images = StringUtils.join(dto.getImages(), ",");
            wmNews.setImages(images);
        }
        //2.3封面类型为自动
        if(dto.getType().equals(WemediaConstants.WM_NEWS_TYPE_AUTO)) {
            wmNews.setType(null);
        }
        saveOrUpdateWmNews(wmNews);
        //3.判断是否为草稿
        if(dto.getStatus().equals(WmNews.Status.NORMAL.getCode())) {
            //直接保存结束
            return ResponseResult.okResult(AppHttpCodeEnum.SUCCESS);
        }
        //4.不是草稿
        //4.1保存文章图片素材与文章关系
        //4.1.1提取图片素材列表
        List<String> imagesList = getImagesList(dto);
        //4.1.2保存
        saveRelatedImages(imagesList,wmNews.getId(),WemediaConstants.WM_CONTENT_REFERENCE);
        //4.2保存封面图片和文章关系
        saveRelatedCover(dto,imagesList,wmNews);
        //5.审核文章(异步调用)
        // wmAutoScanService.AutoScanTextAndImage(wmNews.getId());
        //5.将任务添加到延迟服务
        wmNewsTaskService.addNewsToTask(wmNews.getId(),wmNews.getPublishTime());
        return ResponseResult.okResult(AppHttpCodeEnum.SUCCESS);
    }

(4)消费任务进行文章审核
在WmNewsTaskServiceImpl中添加如下方法:
@Autowired
private WmNewsAutoScanServiceImpl wmNewsAutoScanService;
/**
     * 消费延迟队列数据
     */
@Scheduled(fixedRate = 1000)
@Override
@SneakyThrows
public void scanNewsByTask() {
    ResponseResult responseResult = scheduleClient.poll(TaskTypeEnum.NEWS_SCAN_TIME.getTaskType(), TaskTypeEnum.NEWS_SCAN_TIME.getPriority());
    if(responseResult.getCode().equals(200) && responseResult.getData() != null){
        log.info("文章审核---消费任务执行---begin---");
        String json_str = JSON.toJSONString(responseResult.getData());
        Task task = JSON.parseObject(json_str, Task.class);
        byte[] parameters = task.getParameters();
        WmNews wmNews = ProtostuffUtil.deserialize(parameters, WmNews.class);
        System.out.println(wmNews.getId()+"-----------");
        wmNewsAutoScanService.autoScanWmNews(wmNews.getId());
        log.info("文章审核---消费任务执行---end---");
    }
}

下篇预告:定时发布文章优化策略