一:前言
做项目时候经常会使用到登录模块,登录模块可以有多种验证方式,可以使用密码验证,还可以使用验证码验证,其中验证码验证还可以分为短信验证码和邮箱验证码,由于短信验证码服务需要收费,我学生党为了省吃俭用,就选用了邮箱验证功能,这个是免费的。至于如何开启邮箱发送验证码功能可以自己在CSDN上面搜索一下,我这里仅提供登录功能的逻辑部分。
二:登录流程
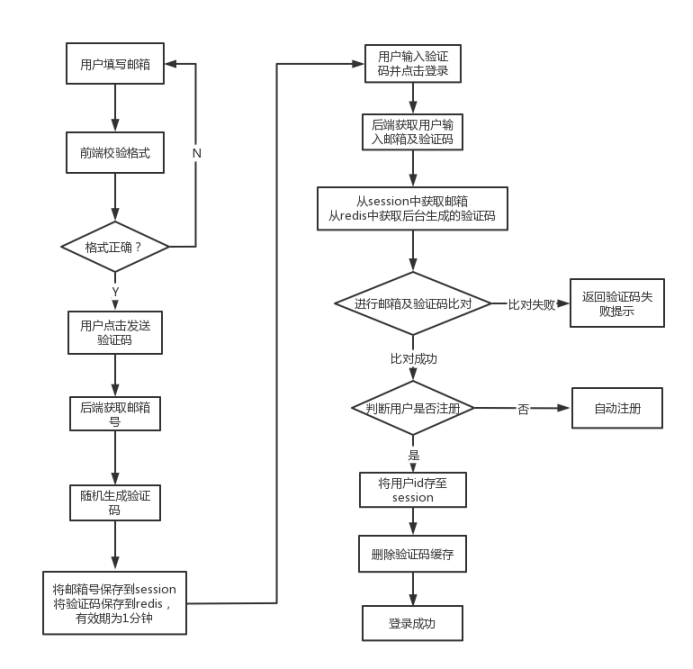
登录流程可以看上面的流程图,这里不再赘述。
三:代码实现
- 前端部分
<!DOCTYPE html>
<html lang="en">
    <head>
        <meta charset="utf-8">
        <meta http-equiv="X-UA-Compatible" content="IE=edge">
        <!-- 上述3个meta标签*必须*放在最前面,任何其他内容都*必须*跟随其后! -->
        <meta name="viewport" content="width=device-width, initial-scale=1.0, maximum-scale=1.0,user-scalable=no,minimal-ui">
        <title>馅饼研究所</title>
        <link rel="icon" href="../images/favico.ico">
        <!--不同屏幕尺寸根字体设置-->
        <script src="../js/base.js"></script>
        <!--element-ui的样式-->
        <link rel="stylesheet" href="../../backend/plugins/element-ui/index.css" />
        <!--引入vant样式-->
        <link rel="stylesheet" href="../styles/vant.min.css"/>
        <!-- 引入样式  -->
        <link rel="stylesheet" href="../styles/index.css" />
        <!--本页面内容的样式-->
        <link rel="stylesheet" href="../styles/login.css" />
      </head>
    <body>
        <div id="login" v-loading="loading">
            <div class="divHead">登录</div>
            <div class="divContainer">
                <el-input placeholder=" 请输入邮箱" v-model="form.phone"  maxlength='30'/></el-input>
                <div class="divSplit"></div>
                <el-input placeholder=" 请输入验证码" v-model="form.code"  maxlength='20'/></el-input>
                <span @click='getCode' :disabled="canClick">{{ verifyCode }}</span>
            </div>
            <div class="divMsg" v-if="msgFlag">邮箱格式输入不正确,请重新输入</div>
            <el-button type="primary" :class="{btnSubmit:1===1,btnNoPhone:!form.phone,btnPhone:form.phone}" @click="btnLogin">登录</el-button>
        </div>
        <!-- 开发环境版本,包含了有帮助的命令行警告 -->
        <script src="../../backend/plugins/vue/vue.js"></script>
        <!-- 引入组件库 -->
        <script src="../../backend/plugins/element-ui/index.js"></script>
        <!-- 引入vant样式 -->
        <script src="../js/vant.min.js"></script>
        <!-- 引入axios -->
        <script src="../../backend/plugins/axios/axios.min.js"></script>
        <script src="../js/request.js"></script>
        <script src="../api/login.js"></script>
    </body>
    <script>
        new Vue({
            el:"#login",
            data(){
                return {
                    form:{
                        phone:'',
                        code:''
                    },
                    msgFlag:false,
                    loading:false,
                    verifyCode : '发送验证码',
                    totalTime: 60,
                    canClick: false
                }
            },
            computed:{},
            created(){},
            mounted(){},
            methods:{
                getCode(){
                    if (this.canClick) return
                    this.form.code = ''
                    //验证手机号
                    // const regex = /^(13[0-9]{9})|(15[0-9]{9})|(17[0-9]{9})|(18[0-9]{9})|(19[0-9]{9})$/;
                    //验证邮箱
                    const regex = /^(\w|-|_)+@\w+\.([a-zA-Z]{2,4})$/;
                    if (regex.test(this.form.phone)) {
                        this.msgFlag = false
                        //this.form.code = (Math.random()*1000000).toFixed(0)
                        sendMsgApi({phone:this.form.phone})
                    }else{
                        this.msgFlag = true
                    }
                    this.canClick = true
                    this.verifyCode = this.totalTime + 's后重新发送'
                    let clock = window.setInterval(() => {
                      //倒计时功能
                        this.totalTime--
                        this.verifyCode = this.totalTime + 's后重新发送'
                        if (this.totalTime < 0) {
                            window.clearInterval(clock)
                            this.verifyCode = '重新获取验证码'
                            this.totalTime = 60
                            this.canClick = false
                        }
                    }, 1000)
                },
                async btnLogin(){
                    if(this.form.phone && this.form.code){
                        this.loading = true
                        const res = await loginApi(this.form)
                        this.loading = false
                        if(res.code === 1){
                            sessionStorage.setItem("userPhone",this.form.phone)
                            window.requestAnimationFrame(()=>{
                                window.location.href= '/front/index.html'
                            })
                        }else{
                            this.$notify({ type:'warning', message:res.msg});
                        }
                    }else{
                        this.$notify({ type:'warning', message:'请输入手机号码'});
                    }
                }
            }
        })
    </script>
</html>
前端部分实现并不难,一开始我使用的是手机号作为登录验证,后来才改回的邮箱,所以变量名才是phone,我这里就不再改了,不影响使用。为了交互友好性,我这里引入了一个简单的倒计时功能,让用户在60秒之后才能第二次获取验证码,以防止用户恶意点击造成验证码频繁发送。
- 后端部分
2.1:工具类
package com.my.reggie.util;
import org.apache.commons.mail.HtmlEmail;
/**
 * 发送邮箱验证码工具类
 */
public class SendEmailUtils {
    /**
     * 发送验证码
     * @param email  接收邮箱
     * @param code   验证码
     * @return  void
     */
    public static void sendAuthCodeEmail(String email,String code) {
        try {
            HtmlEmail mail = new HtmlEmail();
            /*发送邮件的服务器 126邮箱为smtp.126.com,163邮箱为163.smtp.com,QQ为smtp.qq.com*/
            mail.setHostName("smtp.qq.com");
            /*不设置发送的消息有可能是乱码*/
            mail.setCharset("UTF-8");
            /*IMAP/SMTP服务的密码 username为你开启发送验证码功能的邮箱号 password为你在qq邮箱获取到的一串字符串*/
            mail.setAuthentication("666@qq.com", "rtyhushbaeg");
            /*发送邮件的邮箱和发件人*/
            mail.setFrom("666@qq.com", "馅饼研究所");
            /*使用安全链接*/
            mail.setSSLOnConnect(true);
            /*接收的邮箱*/
            mail.addTo(email);
            /*设置邮件的主题*/
            mail.setSubject("登录验证码");
            /*设置邮件的内容*/
            mail.setMsg("尊敬的用户:你好! 登录验证码为:" + code + "(有效期为一分钟)");
            mail.send();//发送
        } catch (Exception e) {
            e.printStackTrace();
        }
    }
}
2.2:UserController
package com.my.reggie.controller;
import com.baomidou.mybatisplus.core.conditions.query.LambdaQueryWrapper;
import com.my.reggie.common.R;
import com.my.reggie.pojo.User;
import com.my.reggie.service.UserService;
import com.my.reggie.util.ValidateCodeUtils;
import lombok.extern.slf4j.Slf4j;
import org.springframework.beans.factory.annotation.Autowired;
import org.springframework.data.redis.core.StringRedisTemplate;
import org.springframework.web.bind.annotation.PostMapping;
import org.springframework.web.bind.annotation.RequestBody;
import org.springframework.web.bind.annotation.RequestMapping;
import org.springframework.web.bind.annotation.RestController;
import javax.annotation.Resource;
import javax.servlet.http.HttpServletRequest;
import javax.servlet.http.HttpSession;
import java.util.Map;
import java.util.concurrent.TimeUnit;
@Slf4j
@RestController
@RequestMapping("/user")
public class UserController {
    @Autowired
    private UserService userService;
    @Resource
    private StringRedisTemplate stringRedisTemplate;
    /**
     * 发送验证码
     *
     * @param user
     * @return
     */
    @PostMapping("/sendMsg")
    public R<String> sendMsg(@RequestBody User user, HttpSession session) {
        // 获取邮箱号
        String phone = user.getPhone();
        if (phone == null) {
            return R.error("邮箱号为空!");
        }
        // 随机生成4位验证码
        String code = String.valueOf(ValidateCodeUtils.generateValidateCode(4));
        log.info("验证码为:{}", code);
        //发送验证码到邮箱
        // SendEmailUtils.sendAuthCodeEmail(phone,code);
        // 将验证码保存到session
        // session.setAttribute("code", code);
        //将验证码缓存到Redis(有效时间为1分钟)
        stringRedisTemplate.opsForValue().set("code",code,1, TimeUnit.MINUTES);
        //将手机号保存到session
        session.setAttribute("phone",phone);
        return R.success("验证码发送成功!");
    }
    /**
     * 登录功能
     * @param map
     * @param session
     * @return
     */
    @PostMapping("/login")
    public R<User> login(@RequestBody Map<String, String> map, HttpSession session) {
        // 获取手机号
        String phone = map.get("phone");
        // 获取验证码
        String code = map.get("code");
        // 从session中获取验证码
        // String codeInSession = (String) session.getAttribute("code");
        // 从缓存中获取验证码
        String codeInRedis = stringRedisTemplate.opsForValue().get("code");
        //从session中获取请求验证码的手机号
        String phoneInSession = (String) session.getAttribute("phone");
        // 进行验证码比对
        if (codeInRedis == null || phoneInSession == null || !codeInRedis.equals(code) || !phoneInSession.equals(phone)) {
            return R.error("验证码错误");
        }
        // 判断该用户是否注册
        LambdaQueryWrapper<User> lqw = new LambdaQueryWrapper<>();
        lqw.eq(User::getPhone, phone);
        User user = userService.getOne(lqw);
        if (user == null) {
            // 用户还未注册,自动注册
            user = new User();
            user.setPhone(phone);
            userService.save(user);
        }
        //设置session
        session.setAttribute("user", user.getId());
        session.setMaxInactiveInterval(6*60*60);
        //删除验证码缓存
        stringRedisTemplate.delete("code");
        return R.success(user);
    }
    /**
     * 退出登录
     * @return
     */
    @PostMapping("/loginout")
    public R<String> logout(HttpServletRequest request){
        //清除session
        request.getSession().removeAttribute("user");
        request.getSession().removeAttribute("phone");
        // request.getSession().removeAttribute("code");
        return R.success("退出登录成功");
    }
}
后端的实现也不复杂,主要是如何保存和获取数据的问题,我这里保存验证码一开始是保存在session中,后开改进方案是将它保存到redis中,因为这样就可以实现验证码自动过期功能。这里由一个小细节需要注意,当用户登录成功之后需要删除redis中的验证码,因为假如不删除的话当用户登录成功之后立马点击退出登录,这时候用户再使用上次的验证码还是可以登录成功,因为这时候redis中的验证码还未过期。对于这个细节你们可以尝试一下,找一个app用验证码登录,登录成功之后点击退出登录,然后再次输入上一次获取到的验证码,这时候你会发现验证码是失效的。我也是通过这样的尝试才知道这一细节,虽然这不影响使用,因为很少会有用户闲着没事干去测试这个,只不过是为了严谨一点才加入这个。当然,我们也可以通过当用户点击退出登录时删除redis缓存来实现,只是我感觉上者比较好。除此之外,当用户退出登录之后也要删除session中的缓存。补充说明一下,session中的"user"是用户检测用户是否登录的,因为项目中设置了过滤器功能用于检测用户是否登录以防止用户非法访问,当然,也可以使用拦截器来实现,用拦截器来实现代码量会少一点,但是过滤器的话会更明了,各有利弊,这里就留给你们去实现了。
补充:
3.过滤器代码
package com.my.reggie.filter;
import com.alibaba.fastjson.JSON;
import com.my.reggie.common.BaseContext;
import com.my.reggie.common.R;
import lombok.extern.slf4j.Slf4j;
import org.springframework.util.AntPathMatcher;
import javax.servlet.*;
import javax.servlet.annotation.WebFilter;
import javax.servlet.http.HttpServletRequest;
import javax.servlet.http.HttpServletResponse;
import java.io.IOException;
@Slf4j
@WebFilter(filterName = "loginFilter", urlPatterns = "/*")
public class loginFilter implements Filter {
    // 路径匹配其,支持通配符
    public static final AntPathMatcher PATH_MATCHER = new AntPathMatcher();
    @Override
    public void doFilter(ServletRequest servletRequest, ServletResponse servletResponse, FilterChain filterChain) throws IOException, ServletException {
        HttpServletRequest request = (HttpServletRequest) servletRequest;
        HttpServletResponse response = (HttpServletResponse) servletResponse;
        // log.info("拦截到请求:{}",request.getRequestURI());
        // 1.获取本次请求的URI
        String requestURI = request.getRequestURI();
        // log.info("拦截到请求:{}",requestURI);
        // 2.定义不需要处理的请求路径
        String[] urls = new String[]{
                "/employee/login",
                "/employee/logout",
                "/backend/**",
                "/front/**",
                "/user/sendMsg",  //移动端发送短信
                "/user/login",    //移动端登录
                "/user/logout",
        };
        // 3.判断本次请求是否需要处理
        if (check(urls, requestURI)) {
            // log.info("本次请求不需要处理{}",requestURI);
            filterChain.doFilter(request, response);
            return;
        }
        // 4.2判断移动端是否已经登录
        if (request.getSession().getAttribute("user") != null) {
            // log.info("用户已登录");
            // 设置当前登录用户id
            Long userId = (Long) request.getSession().getAttribute("user");
            BaseContext.setCurrentId(userId);
            // 放行
            filterChain.doFilter(request, response);
            return;
        }
        // 5.拦截
        log.info("用户未登录");
        response.getWriter().write(JSON.toJSONString(R.error("NOTLOGIN")));
    }
    /**
     * 路径匹配判断
     * @param urls
     * @param URI
     * @return
     */
    public boolean check(String[] urls, String URI) {
        for (String url : urls) {
            boolean match = PATH_MATCHER.match(url, URI);
            if (match) {
                return true;
            }
        }
        return false;
    }
}
4.随机验证码生成器
package com.my.reggie.util;
import java.util.Random;
/**
 * 随机生成验证码工具类
 */
public class ValidateCodeUtils {
    /**
     * 随机生成验证码
     * @param length 长度为4位或者6位
     * @return
     */
    public static Integer generateValidateCode(int length){
        Integer code =null;
        if(length == 4){
            code = new Random().nextInt(9999);//生成随机数,最大为9999
            if(code < 1000){
                code = code + 1000;//保证随机数为4位数字
            }
        }else if(length == 6){
            code = new Random().nextInt(999999);//生成随机数,最大为999999
            if(code < 100000){
                code = code + 100000;//保证随机数为6位数字
            }
        }else{
            throw new RuntimeException("只能生成4位或6位数字验证码");
        }
        return code;
    }
    /**
     * 随机生成指定长度字符串验证码
     * @param length 长度
     * @return
     */
    public static String generateValidateCode4String(int length){
        Random rdm = new Random();
        String hash1 = Integer.toHexString(rdm.nextInt());
        String capstr = hash1.substring(0, length);
        return capstr;
    }
}