1.Thymeleaf中的标准变量表达式(掌握)
标准变量表达式用于访问容器(tomcat)上下文环境中的变量,功能和 EL 中的 ${} 相同。Thymeleaf 中的变量表达式使用 ${变量名} 的方式获取 Controller 中 model 其中的数据。
语法:${...}
2.Thymeleaf中的选择变量表达式(了解,不推荐使用)
选择变量表达式,也叫星号变量表达式,使用 th:object 属性来绑定对象。
选择表达式首先使用 th:object 来绑定后台传来的 User 对象,然后使用 * 来代表这个对象,后面 {} 中的值是此对象中的属性。
选择变量表达式 *{...} 是另一种类似于标准变量表达式 ${...} 表示变量的方法。
选择变量表达式在执行时是在选择的对象上求解,而${...}是在上下文的变量Model上求解,这种写法比标准变量表达式繁琐,只需要大家了解即可。
语法:*{...}
3.案例演示
首先写一个model。
package com.songzihao.springboot.model;
/**
 *
 */
public class User {
    private Integer id;
    private String name;
    private Integer age;
    //getter and setter
}
然后是我们的控制层,UserController。
package com.songzihao.springboot.controller;
import com.songzihao.springboot.model.User;
import org.springframework.stereotype.Controller;
import org.springframework.ui.Model;
import org.springframework.web.bind.annotation.RequestMapping;
import org.springframework.web.bind.annotation.ResponseBody;
import org.springframework.web.servlet.ModelAndView;
/**
 *
 */
@Controller
public class UserController {
    @RequestMapping(value = "/user/detail")
    public ModelAndView userDetail() {
        ModelAndView mv=new ModelAndView();
        User user=new User();
        user.setId(1001);
        user.setName("张起灵");
        user.setAge(21);
        mv.addObject("user",user);
        mv.setViewName("userDetail");
        return mv;
    }
}
下来写这个 /user/detail 请求对应的html页面。
<!DOCTYPE html>
<html lang="en" xmlns:th="http://www.thymeleaf.org">
<head>
    <meta charset="UTF-8">
    <title>Title</title>
</head>
<body>
    <h2>使用标准变量表达式 ${} 展示User用户信息:</h2>
    用户编号:<span th:text="${user.id}"></span><br />
    用户姓名:<span th:text="${user.name}"></span><br />
    用户年龄:<span th:text="${user.age}"></span><br />
    <hr />
    <h2>使用选择变量表达式 *{} 展示User用户信息(星号表达式,仅在 div 范围内有效)</h2>
    <div th:object="${user}">
        用户编号:<span th:text="*{id}"></span><br />
        用户姓名:<span th:text="*{name}"></span><br />
        用户年龄:<span th:text="*{age}"></span><br />
    </div>
</body>
</html>
最后在核心配置文件中,添加以下内容。
#关闭Thymeleaf缓存
spring.thymeleaf.cache=false
#thymeleaf 模版前缀,默认值,可选项
spring.thymeleaf.prefix=classpath:/templates/
#thymeleaf 模版后缀,默认值,可选项
spring.thymeleaf.suffix=.html
最后启动项目入口类进行测试。
package com.songzihao.springboot;
import org.springframework.boot.SpringApplication;
import org.springframework.boot.autoconfigure.SpringBootApplication;
@SpringBootApplication
public class Application {
    public static void main(String[] args) {
        SpringApplication.run(Application.class, args);
    }
}
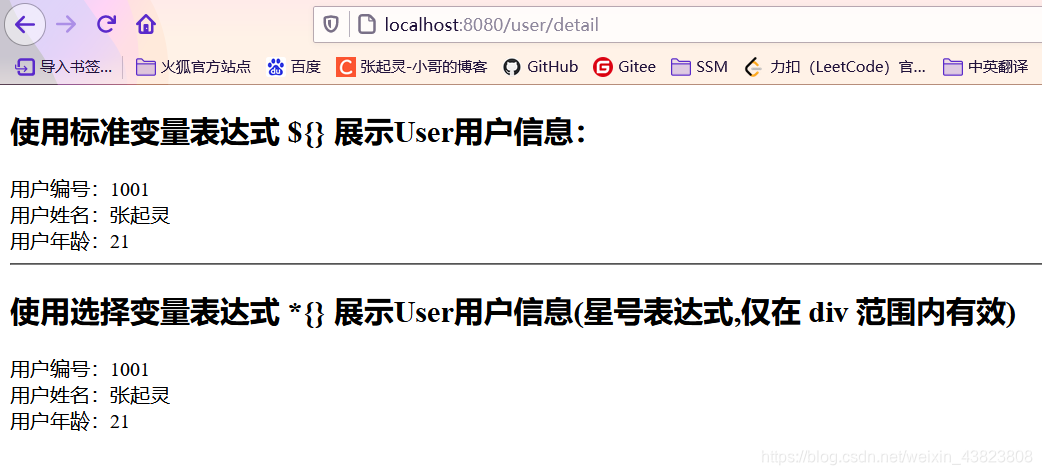
可以看到我们在这里成功的通过Thymeleaf模板引擎中的变量表达式获取到了后台的数据。
4.Thymeleaf中的URL表达式
主要用于链接、地址的展示,可用于<script src="...">、<link href="...">、<a href="...">、<form action="...">、<img src="">等,可以
在 URL 路径中动态获取数据。语法:@{...}
4.1 案例演示
首先写一个Controller控制层,里面定义几个请求方法。
package com.songzihao.springboot.controller;
import com.songzihao.springboot.model.User;
import org.springframework.stereotype.Controller;
import org.springframework.ui.Model;
import org.springframework.web.bind.annotation.RequestMapping;
import org.springframework.web.bind.annotation.ResponseBody;
import org.springframework.web.servlet.ModelAndView;
/**
 *
 */
@Controller
public class UserController {
    @RequestMapping(value = "/url")
    public String urlExpression(Model model) {
        model.addAttribute("name","张起灵");
        model.addAttribute("id",1001);
        model.addAttribute("age",21);
        return "url";
    }
    @RequestMapping(value = "/test")
    public @ResponseBody String test(Integer id,String name,Integer age) {
        return "请求路径/test,获取到的数据中 id = " + id + ", name = " + name + ", age = " + age;
    }
}
然后对应的是我们的html页面。
注意URL表达式中,分别用到了绝对路径和相对路径。(这里推荐使用相对路径)
<!DOCTYPE html>
<html lang="en" xmlns:th="http://www.thymeleaf.org">
<head>
    <meta charset="UTF-8">
    <title>URL路径表达式</title>
</head>
<body>
    <h2>URL路径表达式:@{......}</h2>
    <h4>a标签中的绝对路径(没有参数)</h4><br/>
    <a th:href="@{http://www.tencent.com}">跳转到腾讯</a><br/><br/>
    <a th:href="@{http://localhost:8080/user/detail}">跳转到/user/detail</a><br/><br/>
    <hr/>
    <h4>a标签中的相对路径(没有参数)</h4><br/>
    <a th:href="@{/user/detail}">跳转到/user/detail</a><br/><br/>
    <hr/>
    <h4>a标签中的绝对路径(带参数)</h4><br/>
    <a th:href="@{'http://localhost:8080/test?name=' + ${name}}">查看用户姓名</a><br/><br/>
    <hr/>
    <h4>a标签中的相对路径(带参数)</h4><br/>
    <a th:href="@{'/test?id=' + ${id} + '&name=' + ${name} + '&age=' + ${age}}">复杂写法:查看用户姓名</a><br/><br/>
    <a th:href="@{/test(id=${id},name=${name},age=${age})}">简练写法:查看用户姓名</a>
</body>
</html>
下面是核心配置文件中的内容、以及启动入口类测试。
#关闭Thymeleaf缓存
spring.thymeleaf.cache=false
#thymeleaf 模版前缀,默认值,可选项
spring.thymeleaf.prefix=classpath:/templates/
#thymeleaf 模版后缀,默认值,可选项
spring.thymeleaf.suffix=.html
package com.songzihao.springboot;
import org.springframework.boot.SpringApplication;
import org.springframework.boot.autoconfigure.SpringBootApplication;
@SpringBootApplication
public class Application {
    public static void main(String[] args) {
        SpringApplication.run(Application.class, args);
    }
}
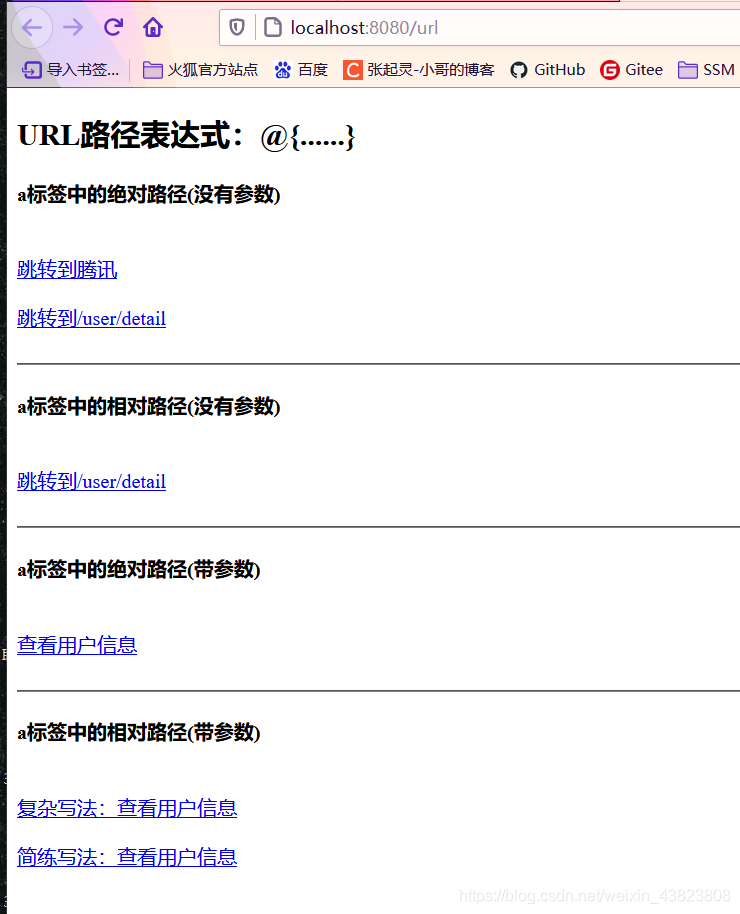
点击第一个链接,会跳转至腾讯官网首页。
点击第二、三个链接,会跳转至userDetail.html 这个页面展示从后台获取到的数据。
点击最后三个链接,会将获取到的用户信息内容进行展示。(这里展示结果我就不再给出截图了)