
一,JUnit5常用注解
https://junit.org/junit5/docs/current/user-guide/#writing-tests-annotations
1.@DisplayName
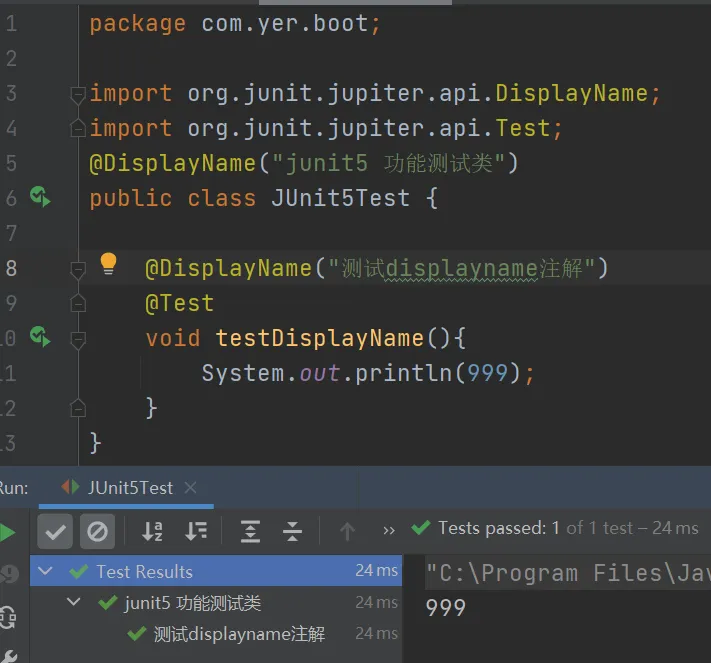
package com.yer.boot;
import org.junit.jupiter.api.DisplayName;
import org.junit.jupiter.api.Test;
@DisplayName("junit5 功能测试类")
public class JUnit5Test {
    @DisplayName("测试displayname注解")
    @Test
    void testDisplayName(){
        System.out.println(999);
    }
}
2.@BeforeEach
@AfterEach
@BeforeAll
@AfterAll
package com.yer.boot;
import org.junit.jupiter.api.*;
@DisplayName("junit5 功能测试类")
public class JUnit5Test {
    @DisplayName("测试displayname注解")
    @Test
    void testDisplayName() {
        System.out.println(999);
    }
    @DisplayName("测试displayname注解2")
    @Test
    void testDisplayName2() {
        System.out.println(9992);
    }
    @BeforeEach
        //每个单元测试之前都要执行
    void testBeforeEach() {
        System.out.println("测试要开始了!");
    }
    @AfterEach
        //每个单元测试之后都要执行
    void testAfterEach() {
        System.out.println("测试结束了");
    }
    @BeforeAll
    static void testBeforeAll() {
        System.out.println("要测试所有测试了");
    }
    @AfterAll
    static void testAfterAll() {
        System.out.println("所有测试测试完了");
    }
}
3.@Tag 表示单元测试类别,类似于JUni4中的@Categories
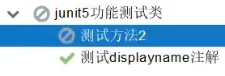
4.@Disable 不用执行
5.@Timeout
/**
*
* 规定方法的超时时间
* 超出时间测试异常
* @throws InterruptedException
*/
@Timeout(value = 500,unit = TimeUnit.MILLISECONDS)
    @Test
    void testTimeout() throws InterruptedException {
        Thread.sleep(1000);
    }
6.@ExtendWIth:为测试类或测试方法提供扩展类引用 (类似于junit4@RunWith)
@SpringBootTest 复合注解中有@ExtendWIth(SpringExtension.class)
7.@RepeatTest(8) 重复测试
二,断言assertions
断言是测试方法中的核心部分,用来对测试需要满足的条件进行验证
这些断言方法都是org.junit.jupiter.api.Assertions中的静态方法
JUnit5 内置的断言可以分成以下几个类别:检查业务逻辑返回的数据是否合理
得益于断言机制,所有的测试结束之后会有一个详细报告
1.简单断言
对单个值进行简单验证
 @DisplayName("测试简单断言")
    @Test
    void testSimpleAssertions(){
        int cal = cal(3,3);
        assertEquals(6,cal);
    }
    int cal(int i,int j){
        return i+j;
    }
//成功
=======================================
    /**
     *
     * 断言
     * 前面断言失败,后面代码不会执行
     */
    @DisplayName("测试简单断言")
    @Test
    void testSimpleAssertions(){
        int cal = cal(2,3);
        assertEquals(6,cal,"业务逻辑计算失败");
        Object o1 = new Object();
        Object o2 = new Object();
        assertEquals(o1,o2,"两个对象不一样");
    }
    int cal(int i,int j){
        return i+j;
    }
2.数组断言
来判断两个对象或者原始类型的数组是否相等
@Test
@DisplayName("array assertion")
public void array(){
    assertArrayEquals(new int[]{1,2},new int{1,2});
}
3.组合断言
assertAll方法接收多个org.junit.jupiter.api.Executable函数式接口的实例作为要验证的断言,可以通过lambda表达式 很容易的提供这些断言
 @Test
 @DisplayName("组合断言")
  void all(){
    assertAll("test",
              ()->assertTrue(true&&true,"结果不为true"),
              ()->assertEquals(1,1,"结果不为1"));
    system.out.println("两个断言都成功才可以输出")
  }
4.异常断言
在junit4时期 ,想要检测方法异常情况时,需要用注解@Rule注解的@ExpectedException变量还是比较麻烦的。相对于现在的Junit5提供了一种新的断言方式Assertions.assertThrows(),配合函数式编程就可以进行使用
断定业务逻辑一定出现异常
@Test
    @DisplayName("异常断言")
    void testException(){
        assertThrows(ArithmeticException.class,
                ()-> { int i = 1/0;},"业务逻辑竟然能正常运行,不是吧");
    }
5.超时断言
还提供了Assertions.assertTimout()为测试方法设置了超时时间
@Test
@DisplayName("超时断言")
public void timeOut(){
    //如果测试方法时间超过1s
    Assertions.assertTimeout(Duration.ofMillis(1000),
                             ()->Thread.sleep(500));
}
6.快速失败
通过fail方法直接使得测试失败
    @Test
    @DisplayName("快速失败")
    void testFai(){
        if (2 == 2 ){
            fail("测试失败");
        }
    }
三,前置条件(assumptions)
JUnit5中的前置条件(assunption假设)类似于断言,不同之处在于不满足的断言会使得测试方法失败,而不满足的前置条件只会使得测试方法执行终止。
前置条件爱你可以堪称是测试方法执行的前提,当该前提不满足时,就没有继续执行的必要l
    @DisplayName("测试前置条件")
    @Test
    void testAsummptions(){
        Assumptions.assumeTrue(false,"结果不是true");
        System.out.println("为true");
    }
disable 跳过
假设失败跳过
四,嵌套测试
-----------可参考官方文档
junit可以通过加入了嵌套测试
嵌套测试情况下
外层的Test不能驱动内层的Before(After)Each/All主类的方法提前/之后运行
内层的可以驱动外层的
package com.yer.boot;
import org.junit.jupiter.api.BeforeEach;
import org.junit.jupiter.api.DisplayName;
import org.junit.jupiter.api.Nested;
import org.junit.jupiter.api.Test;
import java.util.EmptyStackException;
import java.util.Stack;
import static org.junit.jupiter.api.Assertions.*;
@DisplayName("嵌套测试")
public class TestAStackDemo {
    Stack<Object> stack;
    @Test
    @DisplayName("new Stack()")
    void isInstantiatedWithNew() {
        new Stack<>();
    }
    @Nested
    @DisplayName("when new")
    class WhenNew {
        @BeforeEach
        void createNewStack() {
            stack = new Stack<>();
        }
        @Test
        @DisplayName("is empty")
        void isEmpty() {
            assertTrue(stack.isEmpty());
        }
        @Test
        @DisplayName("throws EmptyStackException when popped")
        void throwsExceptionWhenPopped() {
            assertThrows(EmptyStackException.class, stack::pop);
        }
        @Test
        @DisplayName("throws EmptyStackException when peeked")
        void throwsExceptionWhenPeeked() {
            assertThrows(EmptyStackException.class, stack::peek);
        }
        @Nested
        @DisplayName("after pushing an element")
        class AfterPushing {
            String anElement = "an element";
            @BeforeEach
            void pushAnElement() {
                stack.push(anElement);
            }
            @Test
            @DisplayName("it is no longer empty")
            void isNotEmpty() {
                assertFalse(stack.isEmpty());
            }
            @Test
            @DisplayName("returns the element when popped and is empty")
            void returnElementWhenPopped() {
                assertEquals(anElement, stack.pop());
                assertTrue(stack.isEmpty());
            }
            @Test
            @DisplayName("returns the element when peeked but remains not empty")
            void returnElementWhenPeeked() {
                assertEquals(anElement, stack.peek());
                assertFalse(stack.isEmpty());
            }
        }
    }
}
五,参数化测试
可参考官方文档
参数化测试是Junit5 很重要的一个新特性
它使得用不同的参数多次运行测试成为了可能,也为我们的单元测试带来许多便利。
利用**@ValueSource**等注解,指定入参,我们将可以使用不同的参数进行多次单元测试,而不需要每新增一个参数就新增一个单元测试,省去了很多冗余代码。
- @ValueSource:为参数化测试指定入参来源,支持八大基础类 以及String类型Class类型
- @NullSource表示为参数化测试提供一个null的入参@EnumSource表示为参数化测试提供一个枚举入参
- @CsvFileSource:表示读取指定CSV文件内容作为参数化测试入参
- @MethodSource:表示读取指定方法的返回值作为参数化测试入参(注意方法返回需要是一个流)
parameterized
 @ParameterizedTest
    @DisplayName("参数化测试")
    @ValueSource(ints = {1,2,3,4,5})
    void  testParameterized(int i){
        System.out.println(i);
    }
    //五个参数同时传进来的效果  把所有要测的统一测一遍
@ParameterizedTest
    @DisplayName("参数化测试")
    @MethodSource("stringProvider")
    void  testParameterized2(String i){
        System.out.println(i);
    }
    static Stream<String> stringProvider() {
        return Stream.of("apple", "banana","我最喜欢的大樱桃");
    }
junit4中的一些不可用了当你在junit4迁移过来的时候记得要看啊!
https://junit.org/junit5/docs/current/user-guide/#migrating-from-junit4
- Annotations reside in the org.junit.jupiter.api package.
- Assertions reside in org.junit.jupiter.api.Assertions.
- Note that you may continue to use assertion methods from org.junit.Assert or any other assertion library such as AssertJ, Hamcrest, Truth, etc.
- Assumptions reside in org.junit.jupiter.api.Assumptions.
- Note that JUnit Jupiter 5.4 and later versions support methods from JUnit 4’s org.junit.Assume class for assumptions. Specifically, JUnit Jupiter supports JUnit 4’s AssumptionViolatedException to signal that a test should be aborted instead of marked as a failure.
- @Before and @After no longer exist; use @BeforeEach and @AfterEach instead.
- @BeforeClass and @AfterClass no longer exist; use @BeforeAll and @AfterAll instead.
- @Ignore no longer exists: use @Disabled or one of the other built-in execution conditions instead
- @Category no longer exists; use @Tag instead.
- @RunWith no longer exists; superseded by @ExtendWith.
- @Rule and @ClassRule no longer exist; superseded by @ExtendWith and @RegisterExtension
stead.
- @BeforeClass and @AfterClass no longer exist; use @BeforeAll and @AfterAll instead.
- @Ignore no longer exists: use @Disabled or one of the other built-in execution conditions instead
- @Category no longer exists; use @Tag instead.
- @RunWith no longer exists; superseded by @ExtendWith.
- @Rule and @ClassRule no longer exist; superseded by @ExtendWith and @RegisterExtension
