
目录
Spring练习
用户和角色的关系
角色列表
用户列表
Spring练习
①创建工程(Project&Module)
②导入静态页面(见资料jsp页面)
③导入需要坐标(见资料中的pom.xml)
④创建包结构(controller、service、dao、domain、utils)
⑤导入数据库脚本((见资料test.sql)
⑥创建POJO类(见资料User.java和Role.java)
⑦创建配置文件(applicationContext.xml、spring-mvc.xml、jdbc.properties、log4j.properties
用户和角色的关系
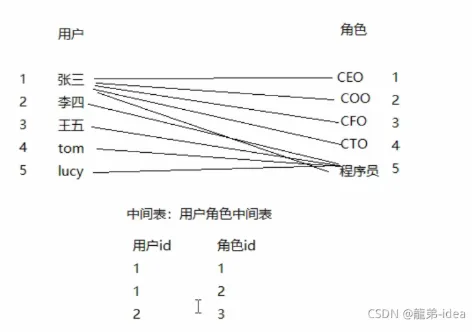
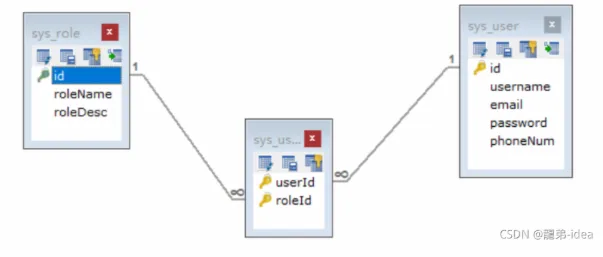
角色列表
角色列表的展示效果
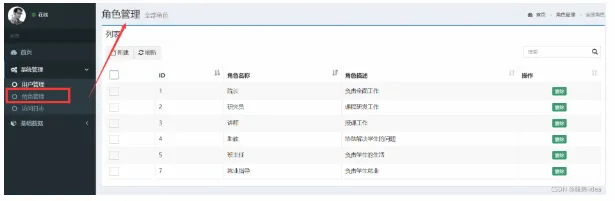
角色列表的展示步骤分析
①点击角色管理菜单发送请求到服务器端(修改角色管理菜单的url地址) 在aside.jsp中修改

②创建RoleController和showList()方法
③创建RoleService和showList()方法
④创建RoleDao和findAll()方法
⑤使用JdbcTemplate完成查询操作
⑥将查询数据存储到Model中
⑦转发到role-list.jsp页面进行展示
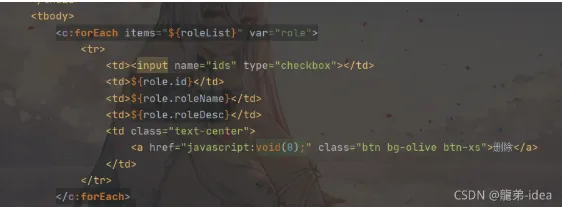
角色添加的效果

角色添加的步骤分析
①点击列表页面新建按钮跳转到角色添加页面 在role-list.jsp中修改

②输入角色信息,点击保存按钮,表单数据提交服务器 在role-add.jsp中
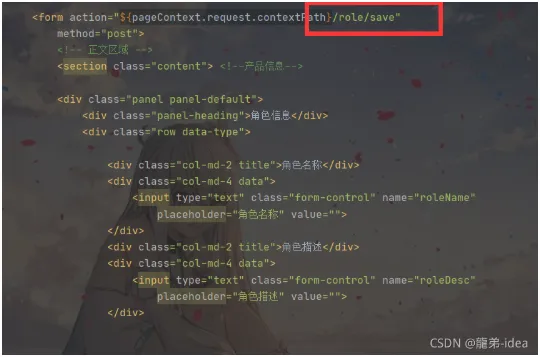
③编写RoleController的save()方法
④编写RoleService的save()方法编写
⑤RoleDao的save()方法
⑥使用JdbcTemplate保存Role数据到sys_role
⑦跳转回角色列表页面
RoleController
@RequestMapping("/role")
@Controller
public class RoleController {
    @Autowired
    private RoleService roleService;
    @RequestMapping("/save")
    public String save(Role role){
        roleService.save(role);
        return "redirect:/role/list";
    }
    @RequestMapping("/list")
    public ModelAndView list(){
        ModelAndView modelAndView = new ModelAndView();
        List<Role> roleList = roleService.list();
        //设置模型
        modelAndView.addObject("roleList",roleList);
        //设置视图
        modelAndView.setViewName("role-list");
        System.out.println(roleList);
        return modelAndView;
    }
}
RoleService接口
public interface RoleService {
    public List<Role> list() ;
    void save(Role role);
}
RoleServiceImpl:
public class RoleServiceImpl implements RoleService {
    private RoleDao roleDao;
    public void setRoleDao(RoleDao roleDao) {
        this.roleDao = roleDao;
    }
    public List<Role> list() {
        List<Role> roleList = roleDao.findAll();
        return roleList;
    }
    public void save(Role role) {
        roleDao.save(role);
    }
}
RoleDao
public interface RoleDao {
    List<Role> findAll();
    void save(Role role);
    List<Role> findRoleByUserId(Long id);
}
RoleDaoImpl
public class RoleDaoImpl implements RoleDao {
    private JdbcTemplate jdbcTemplate;
    public void setJdbcTemplate(JdbcTemplate jdbcTemplate) {
        this.jdbcTemplate = jdbcTemplate;
    }
    public List<Role> findAll() {
        List<Role> roleList = jdbcTemplate.query("select * from sys_role", new BeanPropertyRowMapper<Role>(Role.class));
        return roleList;
    }
    public void save(Role role) {
        jdbcTemplate.update("insert into sys_role values(?,?,?)",null,role.getRoleName(),role.getRoleDesc());
    }
    public List<Role> findRoleByUserId(Long id) {
        List<Role> roles = jdbcTemplate.query("select * from sys_user_role ur,sys_role r where ur.roleId=r.id and ur.userId=?", new BeanPropertyRowMapper<Role>(Role.class), id);
        return roles;
    }
}
用户列表
用户列表的展示结果
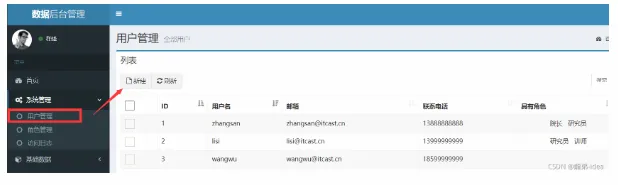
用户列表的展示步骤分析
①点击用户管理菜单发送请求到服务器端(修改用户管理菜单的url地址) 在aside.jsp中修改

②创建RoleController和showList()方法
③创建RoleService和showList()方法
④创建RoleDao和findAll()方法
⑤使用JdbcTemplate完成查询操作
⑥将查询数据存储到Model中
⑦转发到user-list.jsp页面进行展示
用户添加的展示效果
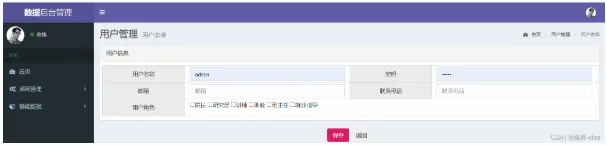
用户添加的步骤分析
①点击列表页面新建按钮跳转到角色添加页面 在user-add.jsp中

②输入角色信息,点击保存按钮,表单数据提交服务器
③编写RoleController的save()方法
④编写RoleService的save()方法
⑤编写RoleDao的save()方法
⑥使用JdbcTemplate保存Role数据到sys_role
⑦跳转回角色列表页面
删除用户的效果
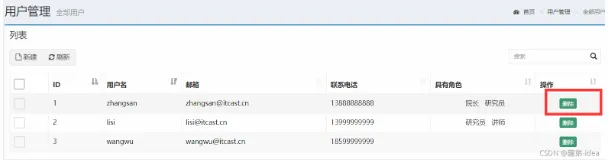
①点击用户列表的删除按钮,发送请求到服务器端
②编写UserController的deleteByld()方法
③编写UserService的deleteByld()方法
④编写UserDao的deleteByld()方法
⑤编写UserDao的deleteRelByUid()方法
⑥跳回当前用户列表页面
在返回的user-list.jsp中展示
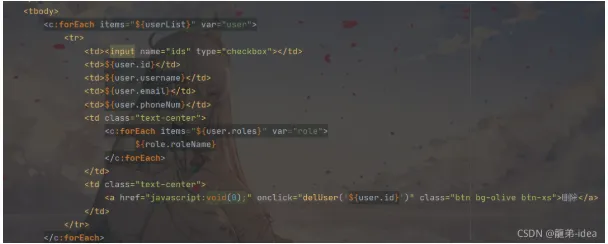
controller:
@Controller
@RequestMapping("/user")
public class UserController {
    @Autowired
    private UserService userService;
    @Autowired
    private RoleService roleService;
    @RequestMapping("/del/{userId}")
    public String del(@PathVariable("userId") Long userId){
        userService.del(userId);
        return "redirect:/user/list";
    }
    @RequestMapping("/save")
    public String save(User user, Long[] roleIds){
        userService.save(user,roleIds);
        return "redirect:/user/list";
    }
    @RequestMapping("/saveUI")
    public ModelAndView saveUI(){
        ModelAndView modelAndView = new ModelAndView();
        List<Role> roleList = roleService.list();
        modelAndView.addObject("roleList",roleList);
        modelAndView.setViewName("user-add");
        return modelAndView;
    }
    @RequestMapping("/list")
    public ModelAndView list(){
        List<User> userList = userService.list();
        ModelAndView modelAndView = new ModelAndView();
        modelAndView.addObject("userList",userList);
        modelAndView.setViewName("user-list");
        return modelAndView;
    }
}
UserService;
public interface UserService {
    List<User> list();
    void save(User user, Long[] roleIds);
    void del(Long userId);
}
UserServiceImpl:
public class UserServiceImpl implements UserService {
    private UserDao userDao;
    public void setUserDao(UserDao userDao) {
        this.userDao = userDao;
    }
    private RoleDao roleDao;
    public void setRoleDao(RoleDao roleDao) {
        this.roleDao = roleDao;
    }
    public List<User> list() {
        List<User> userList = userDao.findAll();
        //封装userList中的每一个User的roles数据
        for (User user : userList) {
            //获得user的id
            Long id = user.getId();
            //将id作为参数 查询当前userId对应的Role集合数据
            List<Role> roles = roleDao.findRoleByUserId(id);
            user.setRoles(roles);
        }
        return userList;
    }
    public void save(User user, Long[] roleIds) {
        //第一步 向sys_user表中存储数据
        Long userId = userDao.save(user);
        //第二步 向sys_user_role 关系表中存储多条数据
        userDao.saveUserRoleRel(userId,roleIds);
    }
    public void del(Long userId) {
        //1、删除sys_user_role关系表
        userDao.delUserRoleRel(userId);
        //2、删除sys_user表
        userDao.del(userId);
    }
}
UserDao:
public interface UserDao {
    List<User> findAll();
    Long save(User user);
    void saveUserRoleRel(Long id, Long[] roleIds);
    void delUserRoleRel(Long userId);
    void del(Long userId);
}
UserDaoImpl
public class UserDaoImpl implements UserDao {
    private JdbcTemplate jdbcTemplate;
    public void setJdbcTemplate(JdbcTemplate jdbcTemplate) {
        this.jdbcTemplate = jdbcTemplate;
    }
    public List<User> findAll() {
        List<User> userList = jdbcTemplate.query("select * from sys_user", new BeanPropertyRowMapper<User>(User.class));
        return userList;
    }
    public Long save(final User user) {
        //创建PreparedStatementCreator
        PreparedStatementCreator creator = new PreparedStatementCreator() {
            public PreparedStatement createPreparedStatement(Connection connection) throws SQLException {
                //使用原始jdbc完成有个PreparedStatement的组建
                PreparedStatement preparedStatement = connection.prepareStatement("insert into sys_user values(?,?,?,?,?)", PreparedStatement.RETURN_GENERATED_KEYS);
                preparedStatement.setObject(1,null);
                preparedStatement.setString(2,user.getUsername());
                preparedStatement.setString(3,user.getEmail());
                preparedStatement.setString(4,user.getPassword());
                preparedStatement.setString(5,user.getPhoneNum());
                return preparedStatement;
            }
        };
        //创建keyHolder
        GeneratedKeyHolder keyHolder = new GeneratedKeyHolder();
        jdbcTemplate.update(creator,keyHolder);
        //获得生成的主键
        long userId = keyHolder.getKey().longValue();
        return userId; //返回当前保存用户的id 该id是数据库自动生成的
    }
    public void saveUserRoleRel(Long userId, Long[] roleIds) {
        for (Long roleId : roleIds) {
            jdbcTemplate.update("insert into sys_user_role values(?,?)",userId,roleId);
        }
    }
    public void delUserRoleRel(Long userId) {
        jdbcTemplate.update("delete from sys_user_role where userId=?",userId);
    }
    public void del(Long userId) {
        jdbcTemplate.update("delete from sys_user where id=?",userId);
    }
}
Role:
public class Role {
    private Long id;
    private String roleName;
    private String roleDesc;
    public Long getId() {
        return id;
    }
    public void setId(Long id) {
        this.id = id;
    }
    public String getRoleName() {
        return roleName;
    }
    public void setRoleName(String roleName) {
        this.roleName = roleName;
    }
    public String getRoleDesc() {
        return roleDesc;
    }
    public void setRoleDesc(String roleDesc) {
        this.roleDesc = roleDesc;
    }
    @Override
    public String toString() {
        return "Role{" +
                "id=" + id +
                ", roleName='" + roleName + '\'' +
                ", roleDesc='" + roleDesc + '\'' +
                '}';
    }
}
User:
public class User {
    private Long id;
    private String username;
    private String email;
    private String password;
    private String phoneNum;
    //当前用户具备哪些角色
    private List<Role> roles;
    public List<Role> getRoles() {
        return roles;
    }
    public void setRoles(List<Role> roles) {
        this.roles = roles;
    }
    public Long getId() {
        return id;
    }
    public void setId(Long id) {
        this.id = id;
    }
    public String getUsername() {
        return username;
    }
    public void setUsername(String username) {
        this.username = username;
    }
    public String getEmail() {
        return email;
    }
    public void setEmail(String email) {
        this.email = email;
    }
    public String getPassword() {
        return password;
    }
    public void setPassword(String password) {
        this.password = password;
    }
    public String getPhoneNum() {
        return phoneNum;
    }
    public void setPhoneNum(String phoneNum) {
        this.phoneNum = phoneNum;
    }
    @Override
    public String toString() {
        return "User{" +
                "id=" + id +
                ", username='" + username + '\'' +
                ", email='" + email + '\'' +
                ", password='" + password + '\'' +
                ", phoneNum='" + phoneNum + '\'' +
                '}';
    }
}
application.xml文件:
<?xml version="1.0" encoding="UTF-8"?>
<beans xmlns="http://www.springframework.org/schema/beans"
       xmlns:xsi="http://www.w3.org/2001/XMLSchema-instance"
       xmlns:context="http://www.springframework.org/schema/context"
       xsi:schemaLocation="
       http://www.springframework.org/schema/beans http://www.springframework.org/schema/beans/spring-beans.xsd
       http://www.springframework.org/schema/context http://www.springframework.org/schema/context/spring-context.xsd
">
    <!--1、加载jdbc.properties-->
    <context:property-placeholder location="classpath:jdbc.properties"/>
    <!--2、配置数据源对象-->
    <bean id="dataSource" class="com.mchange.v2.c3p0.ComboPooledDataSource">
        <property name="driverClass" value="${jdbc.driver}"/>
        <property name="jdbcUrl" value="${jdbc.url}"/>
        <property name="user" value="${jdbc.username}"/>
        <property name="password" value="${jdbc.password}"/>
    </bean>
    <!--3、配置JdbcTemplate对象-->
    <bean id="jdbcTemplate" class="org.springframework.jdbc.core.JdbcTemplate">
        <property name="dataSource" ref="dataSource"></property>
    </bean>
    <!--配置RoleService-->
    <bean id="roleService" class="com.longdi.service.impl.RoleServiceImpl">
        <property name="roleDao" ref="roleDao"/>
    </bean>
    <!--配置RoleDao-->
    <bean id="roleDao" class="com.longdi.dao.impl.RoleDaoImpl">
        <property name="jdbcTemplate" ref="jdbcTemplate"/>
    </bean>
    <!--配置UserService-->
    <bean id="userService" class="com.longdi.service.impl.UserServiceImpl">
        <property name="userDao" ref="userDao"/>
        <property name="roleDao" ref="roleDao"/>
    </bean>
    <!--配置UserDao-->
    <bean id="userDao" class="com.longdi.dao.impl.UserDaoImpl">
        <property name="jdbcTemplate" ref="jdbcTemplate"/>
    </bean>
</beans>
jdbc.properties
jdbc.driver=com.mysql.jdbc.Driver
jdbc.url=jdbc:mysql://localhost:3306/test
jdbc.username=root
jdbc.password=123456
spring-mvc.xml:
<?xml version="1.0" encoding="UTF-8"?>
<beans xmlns="http://www.springframework.org/schema/beans"
       xmlns:xsi="http://www.w3.org/2001/XMLSchema-instance"
       xmlns:mvc="http://www.springframework.org/schema/mvc"
       xmlns:context="http://www.springframework.org/schema/context"
       xsi:schemaLocation="
       http://www.springframework.org/schema/beans http://www.springframework.org/schema/beans/spring-beans.xsd
       http://www.springframework.org/schema/mvc http://www.springframework.org/schema/mvc/spring-mvc.xsd
       http://www.springframework.org/schema/context http://www.springframework.org/schema/context/spring-context.xsd
">
    <!--1、mvc注解驱动-->
    <mvc:annotation-driven/>
    <!--2、配置视图解析器-->
    <bean class="org.springframework.web.servlet.view.InternalResourceViewResolver">
        <property name="prefix" value="/pages/"/>
        <property name="suffix" value=".jsp"/>
    </bean>
    <!--3、静态资源权限开放-->
    <mvc:default-servlet-handler/>
    <!--4、组件扫描  扫描Controller-->
    <context:component-scan base-package="com.longdi.controller"/>
</beans>

