简单使用epel源来安装NTOP和chkrootkit
首先来说一下epel源是什么:
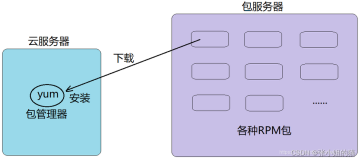
如果既想获得 RHEL 的高质量、高性能、高可靠性,又需要方便易用(关键是免费)的软件包更新功能,那么 Fedora Project 推出的 EPEL(Extra Packages for Enterprise Linux)正好适合你。EPEL(http://fedoraproject.org/wiki/EPEL) 是由 Fedora 社区打造,为 RHEL 及衍生发行版如 CentOS、Scientific Linux 等提供高质量软件包的项目。
下面来配置一下epel源
所使用的系统是Centos 6.3 x86_64 ip 192.168.112.129
在安装之前要事先安装yum-priorities
- # yum install -y yum-priorities
安装完成后,便可以配置epel源了
由于使用的是64位的系统,所以选择安装相对应的rpm包
可以在http://dl.fedoraproject.org/pub/epel/6/x86_64/这里面到找,执行下面的命令安装
- [root@www yum.repos.d]# rpm -ivh http://dl.fedoraproject.org/pub/epel/6/x86_64/epel-release-6-8.noarch.rpm
- Retrieving http://dl.fedoraproject.org/pub/epel/6/x86_64/epel-release-6-8.noarch.rpm
- warning: /var/tmp/rpm-tmp.KQrxb7: Header V3 RSA/SHA256 Signature, key ID 0608b895: NOKEY
- Preparing... ########################################### [100%]
- 1:epel-release ########################################### [100%]
对于32位的系统则需要执行下面的命令:
- rpm -ivh http://dl.fedoraproject.org/pub/epel/6/i386/epel-release-6-8.noarch.rpm
安装完成后导入DAG的PGP Key
- [root@www yum.repos.d]# rpm --import /etc/pki/rpm-gpg/RPM-GPG-KEY-EPEL-6
然后再来设置/etc/yum.repos.d/epel.repo文件中源的级别,添加priority=11 (将其级别设置为较低级别,这样系统安装软件时会首先选择官方yum源,如果实在找不到它会选择epel源)/etc/yum.repos.d/epel.repo文件内容如下:
- [root@www yum.repos.d]# cat epel.repo
- [epel]
- name=Extra Packages for Enterprise Linux 6 - $basearch
- #baseurl=http://download.fedoraproject.org/pub/epel/6/$basearch
- mirrorlist=https://mirrors.fedoraproject.org/metalink?repo=epel-6&arch=$basearch
- failovermethod=priority
- enabled=1
- gpgcheck=1
- gpgkey=file:///etc/pki/rpm-gpg/RPM-GPG-KEY-EPEL-6
- priority=11 \\设置优先级
- [epel-debuginfo]
- name=Extra Packages for Enterprise Linux 6 - $basearch - Debug
- #baseurl=http://download.fedoraproject.org/pub/epel/6/$basearch/debug
- mirrorlist=https://mirrors.fedoraproject.org/metalink?repo=epel-debug-6&arch=$basearch
- failovermethod=priority
- enabled=0
- gpgkey=file:///etc/pki/rpm-gpg/RPM-GPG-KEY-EPEL-6
- gpgcheck=1
- [epel-source]
- name=Extra Packages for Enterprise Linux 6 - $basearch - Source
- #baseurl=http://download.fedoraproject.org/pub/epel/6/SRPMS
- mirrorlist=https://mirrors.fedoraproject.org/metalink?repo=epel-source-6&arch=$basearch
- failovermethod=priority
- enabled=0
- gpgkey=file:///etc/pki/rpm-gpg/RPM-GPG-KEY-EPEL-6
- gpgcheck=1
设置安装完成后就可以直接用yum安装NTOP了
- [root@www yum.repos.d]# yum install ntop
- Loaded plugins: fastestmirror, priorities
- Loading mirror speeds from cached hostfile
- epel/metalink | 4.0 kB 00:00
- * base: centos.ustc.edu.cn
- * epel: ftp.cuhk.edu.hk
- * extras: centos.ustc.edu.cn
- * updates: centos.ustc.edu.cn
- epel | 4.2 kB 00:00
- http://ftp.cuhk.edu.hk/pub/linux/fedora-epel/6/x86_64/repodata/e7f018b8041d9c4926b9587c3e1f50111f7d76a57335cc72a7106fb703eca514-primary.sqlite.bz2: [Errno 14] PYCURL ERROR 7 - "couldn't connect to host"
- Trying other mirror.
- epel/primary_db | 5.0 MB 00:05
- 73 packages excluded due to repository priority protections
- Setting up Install Process
- Resolving Dependencies
- --> Running transaction check
- ---> Package ntop.x86_64 0:5.0-5.el6 will be installed
- --> Processing Dependency: graphviz for package: ntop-5.0-5.el6.x86_64
- --> Processing Dependency: libpcap.so.1()(64bit) for package: ntop-5.0-5.el6.x86_64
- --> Processing Dependency: libGeoIP.so.1()(64bit) for package: ntop-5.0-5.el6.x86_64
- --> Running transaction check
- ---> Package GeoIP.x86_64 0:1.4.8-1.el6 will be installed
- ---> Package graphviz.x86_64 0:2.26.0-10.el6 will be installed
- --> Processing Dependency: urw-fonts for package: graphviz-2.26.0-10.el6.x86_64
- --> Processing Dependency: libXmu.so.6()(64bit) for package: graphviz-2.26.0-10.el6.x86_64
- --> Processing Dependency: libXaw.so.7()(64bit) for package: graphviz-2.26.0-10.el6.x86_64
- ---> Package libpcap.x86_64 14:1.0.0-6.20091201git117cb5.el6 will be installed
- --> Running transaction check
- ---> Package libXaw.x86_64 0:1.0.11-2.el6 will be installed
- ---> Package libXmu.x86_64 0:1.1.1-2.el6 will be installed
- ---> Package urw-fonts.noarch 0:2.4-10.el6 will be installed
- --> Finished Dependency Resolution
- Dependencies Resolved
- =======================================================================================================================================================================
- Package Arch Version Repository Size
- =======================================================================================================================================================================
- Installing:
- ntop x86_64 5.0-5.el6 epel 12 M
- Installing for dependencies:
- GeoIP x86_64 1.4.8-1.el6 epel 620 k
- graphviz x86_64 2.26.0-10.el6 base 1.0 M
- libXaw x86_64 1.0.11-2.el6 base 178 k
- libXmu x86_64 1.1.1-2.el6 base 66 k
- libpcap x86_64 14:1.0.0-6.20091201git117cb5.el6 base 126 k
- urw-fonts noarch 2.4-10.el6 base 3.1 M
- Transaction Summary
- =======================================================================================================================================================================
安装完成后就可以启动NTOP了,启动过程会提示调置admin用户的密码。
- [root@www yum.repos.d]# ntop
- Sun Mar 24 04:09:27 2013 Initializing gdbm databases
- Sun Mar 24 04:09:27 2013 ntop will be started as user ntop
- Sun Mar 24 04:09:27 2013 ntop v.5.0 Fedora RPM (64 bit)
- Sun Mar 24 04:09:27 2013 Configured on Nov 26 2012 2:27:02, built on Nov 26 2012 02:27:07.
- ……
- ……
- ……
- ntop startup - waiting for user response!
- Please enter the password for the admin user:
最后就可以在浏览器中访问了 http://192.168.112.129:3000
如图所示工作界面:

到此 使用epel源安装NTOP就完成了,具体关于NTOP的使用,还在熟悉过程中。
下面来说一下chkrootkit的安装
先来认识一下chkrootkit。Rootkit检测工具Chkrootkit
Rootkit是单个或一组软件,它针对一个或者多个弱点进行获取正式权限的攻击,或者对目标主机进行其他任何类型的攻击。很多Rootkit不仅仅是发起一个攻击以获得root权限,其同时还试图掩藏和清除攻击的行为。为了达到掩盖的目的,它们删除日志文件、安装特洛伊木马或采取其他的掩盖方法。就像网络中别的攻击一样,Rootkit通常也具有特征并且会留下一些蛛丝马迹,这些都是可以用来识别出它们。我们这里有专门的软件可对Rootkit的踪迹和特征进行查找,其中之一就是chkrootkit
Chkrootkit的安装
Chkrootkit目前的最新版本是0.49,而epel源中的Chkrootkit正好的就是最新版本。由于前面已经配置好了epel源就可以直接安装了:
- # yum install -y chkrootkit
成功安装后,再用rpm命令来检查一下,如下所示:
- [root@www ~]# rpm -ql chkrootkit
- /etc/pam.d/chkrootkit
- /etc/security/console.apps/chkrootkit
- /usr/bin/chkrootkit
- /usr/bin/chkrootkitX
- /usr/lib64/chkrootkit-0.49
- /usr/lib64/chkrootkit-0.49/check_wtmpx
- /usr/lib64/chkrootkit-0.49/chkdirs
- /usr/lib64/chkrootkit-0.49/chklastlog
- /usr/lib64/chkrootkit-0.49/chkproc
- /usr/lib64/chkrootkit-0.49/chkrootkit
- /usr/lib64/chkrootkit-0.49/chkutmp
- /usr/lib64/chkrootkit-0.49/chkwtmp
- /usr/lib64/chkrootkit-0.49/ifpromisc
- /usr/lib64/chkrootkit-0.49/strings
- /usr/lib64/chkrootkit-0.49/strings-static
- /usr/sbin/chkrootkit
- /usr/share/applications/fedora-chkrootkit.desktop
- /usr/share/doc/chkrootkit-0.49
- /usr/share/doc/chkrootkit-0.49/ACKNOWLEDGMENTS
- /usr/share/doc/chkrootkit-0.49/COPYRIGHT
- /usr/share/doc/chkrootkit-0.49/README
- /usr/share/doc/chkrootkit-0.49/README.chklastlog
- /usr/share/doc/chkrootkit-0.49/README.chkwtmp
- /usr/share/doc/chkrootkit-0.49/README.false_positives
- /usr/share/doc/chkrootkit-0.49/chkrootkit.lsm
- /usr/share/pixmaps/chkrootkit.png
这里显示的是成功安装后Chkrootkit后的相关文件。运行相关命令可以查看版本号:
- [root@www ~]# chkrootkit -V
- chkrootkit version 0.49
安装后就可以运行了
- [root@www ~]# chkrootkit -V
- chkrootkit version 0.49
- [root@www ~]# chkrootkit
- ROOTDIR is `/'
- Checking `amd'... not found
- Checking `basename'... not infected
- Checking `biff'... not found
- Checking `chfn'... not infected
- Checking `chsh'... not infected
- Checking `cron'... not infected
- Checking `crontab'... not infected
- Checking `date'... not infected
- Checking `du'... not infected
- Checking `dirname'... not infected
- Checking `echo'... not infected
- Checking `egrep'... not infected
- Checking `env'... not infected
- Checking `find'... not infected
- Checking `fingerd'... not found
- Checking `gpm'... not found
- Checking `grep'... not infected
- Checking `hdparm'... not found
- Checking `su'... not infected
- Checking `ifconfig'... not infected
- Checking `inetd'... not found
- Checking `inetdconf'... not found
- Checking `identd'... not found
- Checking `init'... not infected
- Checking `killall'... not infected
- Checking `ldsopreload'... not infected
- Checking `login'... not infected
- Checking `ls'... not infected
- Checking `lsof'... not found
- Checking `mail'... not found
- Checking `mingetty'... not infected
- Checking `netstat'... not infected
- Checking `named'... not found
- Checking `passwd'... not infected
- Checking `pidof'... not infected
- Checking `pop2'... not found
- Checking `pop3'... not found
- Checking `ps'... not infected
- Checking `pstree'... not infected
- Checking `rpcinfo'... not found
- Checking `rlogind'... not found
- Checking `rshd'... not found
- Checking `slogin'... not found
- Checking `sendmail'... not infected
- Checking `sshd'... not infected
- Checking `syslogd'... not tested
- Checking `tar'... not infected
- Checking `tcpd'... not infected
- Checking `tcpdump'... not infected
- Checking `top'... not infected
- Checking `telnetd'... not found
- Checking `timed'... not found
- Checking `traceroute'... not found
- Checking `vdir'... not infected
- Checking `w'... not infected
- Checking `write'... not infected
- Checking `aliens'... no suspect files
- Searching for sniffer's logs, it may take a while... nothing found
- Searching for HiDrootkit's default dir... nothing found
- Searching for t0rn's default files and dirs... nothing found
- Searching for t0rn's v8 defaults... nothing found
- Searching for Lion Worm default files and dirs... nothing found
- Searching for RSHA's default files and dir... nothing found
- Searching for RH-Sharpe's default files... nothing found
- Searching for Ambient's rootkit (ark) default files and dirs... nothing found
- Searching for suspicious files and dirs, it may take a while... nothing found
- Searching for LPD Worm files and dirs... nothing found
- Searching for Ramen Worm files and dirs... nothing found
- Searching for Maniac files and dirs... nothing found
- Searching for RK17 files and dirs... nothing found
- Searching for Ducoci rootkit... nothing found
- Searching for Adore Worm... nothing found
- Searching for ShitC Worm... nothing found
- Searching for Omega Worm... nothing found
- Searching for Sadmind/IIS Worm... nothing found
- Searching for MonKit... nothing found
- Searching for Showtee... nothing found
- Searching for OpticKit... nothing found
- Searching for T.R.K... nothing found
- Searching for Mithra... nothing found
- Searching for LOC rootkit... nothing found
- Searching for Romanian rootkit... nothing found
- Searching for HKRK rootkit... nothing found
- Searching for Suckit rootkit... nothing found
- Searching for Volc rootkit... nothing found
- Searching for Gold2 rootkit... nothing found
- Searching for TC2 Worm default files and dirs... nothing found
- Searching for Anonoying rootkit default files and dirs... nothing found
- Searching for ZK rootkit default files and dirs... nothing found
- Searching for ShKit rootkit default files and dirs... nothing found
- Searching for AjaKit rootkit default files and dirs... nothing found
- Searching for zaRwT rootkit default files and dirs... nothing found
- Searching for Madalin rootkit default files... nothing found
- Searching for Fu rootkit default files... nothing found
- Searching for ESRK rootkit default files... nothing found
- Searching for rootedoor... nothing found
- Searching for ENYELKM rootkit default files... nothing found
- Searching for common ssh-scanners default files... nothing found
- Searching for anomalies in shell history files... nothing found
- Checking `asp'... not infected
- Checking `bindshell'... not infected
- Checking `lkm'... chkproc: nothing detected
- chkdirs: nothing detected
- Checking `rexedcs'... not found
- Checking `sniffer'... eth0: PF_PACKET(/sbin/dhclient, /usr/sbin/ntop)
- Checking `w55808'... not infected
- Checking `wted'... chkwtmp: nothing deleted
- Checking `scalper'... not infected
- Checking `slapper'... not infected
- Checking `z2'... chklastlog: nothing deleted
- Checking `chkutmp'... chkutmp: nothing deleted
- Checking `OSX_RSPLUG'... not infected
Chkrootkit会对系统上的重要文件进行扫描,以上结果显示是正常的,一般是没有文件感染,如果Chkrootkit显示有文件感染,请认真查看是否是误报,如果有文件感染了Rootkit,请立即从网络上断开你的服务,同时采取措施进行Rootkit的清理。
好了,到此关于epel源的配置和使用epel源安装软件介绍完毕。
不对之处请大家指出,谢谢关注。
本文转自 ZhouLS 51CTO博客,原文链接:http://blog.51cto.com/zhou123/1181062