承接上一章节的内容。
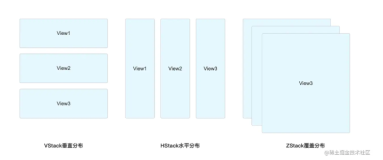
我们看到3个定价方案是横向排列的,最简单的编程方式将定价方案包裹在HStack里,然后再在里面按照第一个定价方案复制2个。
鼠标移动到定价方案VStack的位置,键盘按住command键,单击鼠标,选择Embed in HStack,那么我们在之前VStack外面会再包裹一层HStack。

在HStack里面,我们复制多2个定价方案,修改文字、颜色。
备注:记得要写注释哦~
// 定价方案
HStack {
    //连续包月
    VStack {
        Text("连续包月")
            .fontWeight(.bold)
            .font(.system(size: 17))
            .foregroundColor(Color(red: 190 / 255, green: 188 / 255, blue: 184 / 255))
        Text("¥18")
            .fontWeight(.bold)
            .font(.system(size: 30))
            .foregroundColor(Color(red: 239 / 255, green: 129 / 255, blue: 112 / 255))
        }
        .padding(20)
        .background(Color("faf7f3"))
        .overlay(RoundedRectangle(cornerRadius: 6)
        .stroke(Color(red: 202 / 255, green: 169 / 255, blue: 106 / 255), lineWidth: 2))
    //1个月
    VStack {
        Text("1个月")
            .fontWeight(.bold)
            .font(.system(size: 17))
            .foregroundColor(Color(red: 190 / 255, green: 188 / 255, blue: 184 / 255))
        Text("¥30")
            .fontWeight(.bold)
            .font(.system(size: 30))
            .foregroundColor(Color(red: 239 / 255, green: 129 / 255, blue: 112 / 255))
        }
        .padding(20)
        .background(Color(red: 244 / 255, green: 244 / 255, blue: 245 / 255))
        .cornerRadius(10)
    //12个月
    VStack {
        Text("12个月")
            .fontWeight(.bold)
            .font(.system(size: 17))
            .foregroundColor(Color(red: 190 / 255, green: 188 / 255, blue: 184 / 255))
        Text("¥228")
            .fontWeight(.bold)
            .font(.system(size: 30))
            .foregroundColor(Color(red: 239 / 255, green: 129 / 255, blue: 112 / 255))
        Text("¥19.00/月")
            .fontWeight(.bold)
            .font(.system(size: 17))
            .foregroundColor(Color(red: 190 / 255, green: 188 / 255, blue: 184 / 255))
        }
        .padding(20)
        .background(Color(red: 244 / 255, green: 244 / 255, blue: 245 / 255))
        .cornerRadius(10)
    }

编程后可以发现,三个定价方案的大小都不一样。
这是因为我们的View取决于我们内部元素,视图的大小会自定义内部的内容。
如果我们需要让三个定价方案同样的大小,我们需要引入.frame()修饰符。
.frame()修饰符允许用户定义视图的大小,无论内部元素怎么变化,视图都可以维持固定的大小。
// 定价方案
HStack {
    //连续包月
    VStack {
        Text("连续包月")
            .fontWeight(.bold)
            .font(.system(size: 17))
            .foregroundColor(Color(red: 190 / 255, green: 188 / 255, blue: 184 / 255))
        Text("¥18")
            .fontWeight(.bold)
            .font(.system(size: 30))
            .foregroundColor(Color(red: 239 / 255, green: 129 / 255, blue: 112 / 255))
        }
        .frame(minWidth: 0, maxWidth: .infinity, minHeight: 90)
        .padding(20)
        .background(Color("faf7f3"))
        .overlay(RoundedRectangle(cornerRadius: 6)
        .stroke(Color(red: 202 / 255, green: 169 / 255, blue: 106 / 255), lineWidth: 2))
    //1个月
    VStack {
        Text("1个月")
            .fontWeight(.bold)
            .font(.system(size: 17))
            .foregroundColor(Color(red: 190 / 255, green: 188 / 255, blue: 184 / 255))
        Text("¥30")
            .fontWeight(.bold)
            .font(.system(size: 30))
            .foregroundColor(Color(red: 239 / 255, green: 129 / 255, blue: 112 / 255))
        }
        .frame(minWidth: 0, maxWidth: .infinity, minHeight: 90)
        .padding(20)
        .background(Color(red: 244 / 255, green: 244 / 255, blue: 245 / 255))
        .cornerRadius(10)
    //12个月
    VStack {
        Text("12个月")
            .fontWeight(.bold)
            .font(.system(size: 17))
            .foregroundColor(Color(red: 190 / 255, green: 188 / 255, blue: 184 / 255))
        Text("¥228")
            .fontWeight(.bold)
            .font(.system(size: 30))
            .foregroundColor(Color(red: 239 / 255, green: 129 / 255, blue: 112 / 255))
        Text("¥19.00/月")
            .fontWeight(.bold)
            .font(.system(size: 17))
            .foregroundColor(Color(red: 190 / 255, green: 188 / 255, blue: 184 / 255))
        }
        .frame(minWidth: 0, maxWidth: .infinity, minHeight: 90)
        .padding(20)
        .background(Color(red: 244 / 255, green: 244 / 255, blue: 245 / 255))
        .cornerRadius(10)
    }

我们在每个视图后都加上了.frame(minWidth: 0, maxWidth: .infinity, minHeight: 90)修饰符。
我们解释下这句代码的意思,最小宽度为0,最大宽度为自适应,最小高度为90。
如果我们设置了最小的高度,那么它的最小高度是固定的,而最大宽度会跟随系统自适应。
像我们有三个定价方案,最小高度固定都是90,最小宽度为0,最大宽度就按照屏幕宽度平均分了。
我们看到三个定价方案两边紧贴着屏幕,需要留点空间,那么需要对整个HStack设置.padding。
// 定价方案
HStack {
    //连续包月
    VStack {
        Text("连续包月")
            .fontWeight(.bold)
            .font(.system(size: 17))
            .foregroundColor(Color(red: 190 / 255, green: 188 / 255, blue: 184 / 255))
        Text("¥18")
            .fontWeight(.bold)
            .font(.system(size: 30))
            .foregroundColor(Color(red: 239 / 255, green: 129 / 255, blue: 112 / 255))
        }
        .frame(minWidth: 0, maxWidth: .infinity, minHeight: 90)
        .padding(20)
        .background(Color("faf7f3"))
        .overlay(RoundedRectangle(cornerRadius: 6)
        .stroke(Color(red: 202 / 255, green: 169 / 255, blue: 106 / 255), lineWidth: 2))
    //1个月
    VStack {
        Text("1个月")
            .fontWeight(.bold)
            .font(.system(size: 17))
            .foregroundColor(Color(red: 190 / 255, green: 188 / 255, blue: 184 / 255))
        Text("¥30")
            .fontWeight(.bold)
            .font(.system(size: 30))
            .foregroundColor(Color(red: 239 / 255, green: 129 / 255, blue: 112 / 255))
        }
        .frame(minWidth: 0, maxWidth: .infinity, minHeight: 90)
        .padding(20)
        .background(Color(red: 244 / 255, green: 244 / 255, blue: 245 / 255))
        .cornerRadius(10)
    //12个月
    VStack {
        Text("12个月")
            .fontWeight(.bold)
            .font(.system(size: 17))
            .foregroundColor(Color(red: 190 / 255, green: 188 / 255, blue: 184 / 255))
        Text("¥228")
            .fontWeight(.bold)
            .font(.system(size: 30))
            .foregroundColor(Color(red: 239 / 255, green: 129 / 255, blue: 112 / 255))
        Text("¥19.00/月")
            .fontWeight(.bold)
            .font(.system(size: 17))
            .foregroundColor(Color(red: 190 / 255, green: 188 / 255, blue: 184 / 255))
        }
        .frame(minWidth: 0, maxWidth: .infinity, minHeight: 90)
        .padding(20)
        .background(Color(red: 244 / 255, green: 244 / 255, blue: 245 / 255))
        .cornerRadius(10)
    }
    .padding(.horizontal)

根据上面内容,我们学习了VStack、HStack,我们看一个第一个定价方案。
第一个定价方案的顶部有个“首月特惠”,它是覆盖在视图上面的,而且是覆盖了一半。
这时候我们就需要用到ZStack。

我们先找到第一个定价方案的视图。
鼠标移动到定价方案VStack的位置,键盘按住command键,单击鼠标,选择Embed in ZStack,那么我们在之前VStack外面会再包裹一层ZStack。

我们在两个视图分割点写上注释,便于我们区分代码内容。
在连续包月的VStack下补充“首月特惠”的代码,其实就是简单的Text("首月特惠”),再加上一些修饰符美化。
编码完可以看到Text视图将覆盖在定价视图上面。
// 连续包月
ZStack {
    VStack {
        Text("连续包月")
            .fontWeight(.bold)
            .font(.system(size: 17))
            .foregroundColor(Color(red: 190 / 255, green: 188 / 255, blue: 184 / 255))
        Text("¥18")
            .fontWeight(.bold)
            .font(.system(size: 30))
            .foregroundColor(Color(red: 239 / 255, green: 129 / 255, blue: 112 / 255))
        }
        .frame(minWidth: 0, maxWidth: .infinity, minHeight: 90)
        .padding(20)
        .background(Color("faf7f3"))
        .overlay(RoundedRectangle(cornerRadius: 6).stroke(Color(red: 202 / 255, green: 169 / 255, blue: 106 / 255), lineWidth: 2))
    // 首月特惠
    Text("首月特惠")
        .font(.system(size: 14))
        .fontWeight(.bold)
        .foregroundColor(.white)
        .padding(5)
        .background(Color(red: 202 / 255, green: 169 / 255, blue: 106 / 255))
        .cornerRadius(4)
    }

要调整文本的位置,我们可以使用.offset修饰符,它是设置偏移量的。
简单来说,就是修饰被选定的视图,应该移动到哪里。
X,Y分别对应坐标轴位置,X轴正数为右移,负数为左移,Y轴正数下移,负数上移。
// 首月特惠
    Text("首月特惠")
        .font(.system(size: 14))
        .fontWeight(.bold)
        .foregroundColor(.white)
        .padding(5)
        .background(Color(red: 202 / 255, green: 169 / 255, blue: 106 / 255))
        .cornerRadius(4)
        .offset(x: 0, y: -65)

恭喜你!页面完成度有80%啦!
我们看到标题“会员套餐”和“解锁高级功能”是左对齐,但标题和定价方案目前是还是居中对齐。
我们希望整个文字和定价方案是左对齐,这时候我们引入一个新的参数,叫做Spacer()。
Spacer()相当于空白视图,什么都没有,但可以在Stack中充当“挤开”其他视图的作用。

我们可以看到标题部分和Spacer()是横向分布的关系,那么我们先把整个标题包裹在一个HStack里。
鼠标移动到定价方案VStack的位置,键盘按住command键,单击鼠标,选择Embed in HStack,那么我们在之前标题VStack外面会再包裹一层HStack。

我们在标题HStack内,标题VStack内增加Spacer(),得到的效果就是标题被挤开到左边了。
// 标题
    HStack {
        VStack(alignment: .leading, spacing: 10) {
            Text("会员套餐")
                .fontWeight(.bold)
                .font(.system(.title))
            Text("解锁高级功能")
                .fontWeight(.bold)
                .font(.system(.title))
            }
            //间隔符
            Spacer()
        }

最后,我们再在整个标题HStack外增加一个.padding,保持屏幕两边的边距,就得到了我们想要的效果。
// 标题
    HStack {
        VStack(alignment: .leading, spacing: 10) {
            Text("会员套餐")
                .fontWeight(.bold)
                .font(.system(.title))
            Text("解锁高级功能")
                .fontWeight(.bold)
                .font(.system(.title))
            }
            //间隔符
            Spacer()
        }
        .padding

如果最后我们还想把整个视图“挤”到上面一点的位置。
不妨把标题和定价的组合外面再包裹一个VStack,再用Spacer()试试吧!