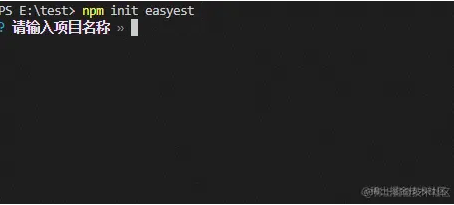
本篇文章将实现一个名为create-easyest脚手架的开发,只需一个命令npm init easyest就可以将整个组件库开发框架拉到本地。
创建 Cli 包
首先,我们在 packages 目录下新建 cli 目录,同执行pnpm init进行初始化,然后将包名改为create-easyest
这里需要知道的是当我们执行
npm init xxx或者npm create xxx的时候,实际上是执行npx create-xxx,所以当我们执行npm init easyest的时候实际上就是执行npx create-easyest
当我们执行create-easyest时会执行 package.json 下的 bin 对应的路径,因此我们将package.json修改为
{
  "name": "create-easyest",
  "version": "1.0.0",
  "description": "",
  "bin": "index.js",
  "keywords": [],
  "author": "",
  "license": "MIT"
}
同时新建 index.js 作为入口文件,注意开头要加上#! /usr/bin/env node
#! /usr/bin/env node
使用 command-line-args 处理用户输入命令
其实处理用户输入参数的插件有很多,比如 CAC,Yargs,Commander.js,command-line-args 等,但是就我看来 command-line-args 使用起来是最简单的,所以这里使用 command-line-args 进行用户参数解析
pnpm add command-line-args
新建一个 cli.js 用于处理我们脚手架的逻辑,这里简单写一个-v 版本命令
import commandLineArgs from "command-line-args";
import { readFile } from "fs/promises";
const pkg = JSON.parse(
  await readFile(new URL("./package.json", import.meta.url))
);
//配置命令参数
const optionDefinitions = [{ name: "version", alias: "v", type: Boolean }];
const options = commandLineArgs(optionDefinitions);
if (options.version) {
  console.log(`v${pkg.version}`);
}
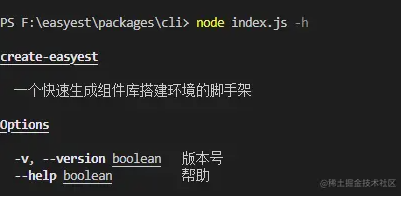
我们还可以使用 command-line-usage 插件让它为我们提供帮助命令
pnpm add command-line-usage
这里只贴了相关代码
import commandLineArgs from "command-line-args"
import commandLineUsage from "command-line-usage"
...
//帮助命令
const helpSections = [
  {
    header: 'create-easyest',
    content: '一个快速生成组件库搭建环境的脚手架',
  },
  {
    header: 'Options',
    optionList: [
      {
        name: 'version',
        alias: 'v',
        typeLabel: '{underline boolean}',
        description: '版本号',
      },
      {
        name: 'help',
        alias: 'h',
        typeLabel: '{underline boolean}',
        description: '帮助',
      }
    ],
  },
];
if (options.help) {
  console.log(commandLineUsage(helpSections))
  return
}
交互式命令
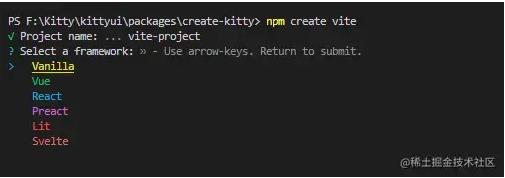
当我们使用一些脚手架的时候,比如 create-vite,它会让我们一些选项让我们选择
所以我们的脚手架也要有这个功能,但是这个应该怎么实现呢?
其实很简单,我们只需要 prompts 插件即可,它可以配置用户输入哪些东西以及单选还是多选等,首先安装 prompts
pnpm add prompts
然后在 cli.js 中
import prompts from "prompts";
const promptsOptions = [
  {
    type: "text",
    name: "user",
    message: "用户",
  },
  {
    type: "password",
    name: "password",
    message: "密码",
  },
  {
    type: "select", //单选
    name: "gender",
    message: "性别",
    choices: [
      { title: "男", value: 0 },
      { title: "女", value: 1 },
    ],
  },
  {
    type: "multiselect", //多选
    name: "study",
    message: "选择学习框架",
    choices: [
      { title: "Vue", value: 0 },
      { title: "React", value: 1 },
      { title: "Angular", value: 2 },
    ],
  },
];
const getUserInfo = async () => {
  const res = await prompts(promptsOptions);
  console.log(res);
};
getUserInfo();
然后我们就可以根据对应的值处理不同的逻辑了,当然我们的脚手架不需要这么多参数,我们改成下面选项即可
const promptsOptions = [
  {
    type: "text",
    name: "project-name",
    message: "请输入项目名称",
  },
  {
    type: "select", //单选
    name: "template",
    message: "请选择一个模板",
    choices: [
      { title: "kitty-ui", value: 0 },
      { title: "easyest", value: 1 },
    ],
  },
];
然后我们就可以根据用户的选择来拉取不同的仓库了
拉取远程仓库模板
拉取远程仓库我们可以使用 download-git-repo 工具,然后使用它的 clone 方法即可,同时我们需要安装一个 loading 插件 ora 以及 log 颜色插件 chalk
pnpm add download-git-repo ora chalk
//gitClone.js
import download from "download-git-repo";
import chalk from "chalk";
import ora from "ora";
export default (remote, name, option) => {
  const downSpinner = ora("正在下载模板...").start();
  return new Promise((resolve, reject) => {
    download(remote, name, option, (err) => {
      if (err) {
        downSpinner.fail();
        console.log("err", chalk.red(err));
        reject(err);
        return;
      }
      downSpinner.succeed(chalk.green("模板下载成功!"));
      resolve();
    });
  });
};
//cli.js
const remoteList = {
  1: "https://gitee.com/geeksdidi/kittyui.git",
  2: "https://github.com/qddidi/easyest.git",
};
const getUserInfo = async () => {
  const res = await prompts(promptsOptions);
  if (!res.name || !res.template) return;
  gitClone(`direct:${remoteList[res.template]}`, res.name, {
    clone: true,
  });
};
然后执行完成后目录下就有我们的模板啦
最后将我们的create-easyest发布即可,发布这里前面已经介绍过,就不多赘述了。这里我已经发布过了,我们随便找个文件夹执行npm create easyest试一下
同时我们发现了easyest项目也被克隆了下来
本篇文章代码地址:如何搭建一个 Cli 脚手架,欢迎star一下🤗


