目录

一、ContentProvider 简介
(一)引入
数据库在 Android 当中是私有的,不能将数据库设为 WORLD_READABLE,每个数据库都只能允许创建它的包访问。这意味着只有创建这个数据库的应用程序才可访问它。也就是说不能跨越进程和包的边界,直接访问别的应用程序的数据库。那么如何在应用程序间交换数据呢? 如果需要在进程间传递数据,可以使用 ContentProvider 来实现。
(二)ContentProvider 的功能和意义
为了在应用程序之间交换数据,Android 提供了 ContentProvider,ContentProvider 是不同应用程序之间进行数据交换的标准 API。当一个应用程序需要把自己的数据暴露给其他应用程序使用时,该应用程序可以通过提供 ContentProvider 来实现;而其他应用程序需要使用这些数据时,可以通过 ContentResolver 来操作 ContentProvider 暴露的数据。
(三)核心类
1.ContentProvider(A 应用暴露数据)
一个程序可以通过实现一个 ContentProvider 的抽象接口将自己的数据暴露出去。外界根本看不到,也不用看到这个应用暴露的数据在应用当中是如何存储的,是用数据库存储还是用文件存储,还是通过网上获得,这些一切都不重要,重要的是外界可以通过这一套标准及统一的接口和程序里的数据打交道,可以读取程序的数据,也可以修改程序的数据。
2.ContentResolver(操作 A 应用所暴露的数据)
外界的程序通过 ContentResolver 接口可以访问 ContentProvider 提供的数据。ContentResolver 可以理解成是 HttpClient 的作用。
3.Uri Uri 是 ContentResolver 和 ContentProvider 进行数据交换的标识。每个 ContentProvider 提供公共的 Uri 来唯一标识其数据集。管理多个数据集的(多个表)的 ContentProvider 为每个数据集提供了单独的 Uri。所以 Uri 包含了两部分信息,一个是需要操作的 ContentProvider ,二是对 ContentProvider 中的哪个表进行操作。对于 ContentProvider 来说,一个 Uri 由以下几个部分组成:
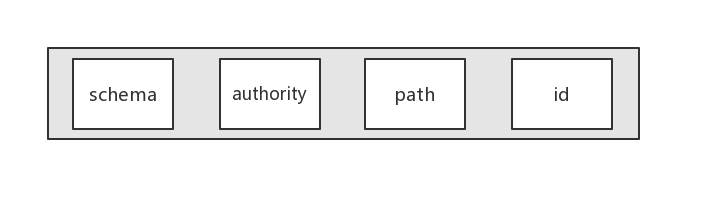
schema已经由 Android 固定为 content://authority用于唯一标识这个 ContentProvider ,外部调用者可以根据这个标识找到它path就是要操作的数据库表idid关键字是一个可选字段,例如,我们要操作特定的数据项时就会指定一个查询条件,如所有联系人的 Uri:content://contacts/people,某个联系人的 Uri:content://contacts/people/7,这个 7 就是联系人的 id 。为了将一个字符串转换成 Uri ,Android 中提供了 Uri 的 parse() 静态方法来实现:
Uri uri = Uri.parse("content://contacts/people");
二、自定义 ContentProvider
下面我们通过一个从其他 App 中获取单词的例子来说明一下如何自定义 ContentProvider。
step1:新建一个项目,我们叫它进程 1,在进程 1 编写一个类,必须继承自 ContentProvider 类。实现 ContentProvider 类中所有的抽象方法:onCreate()、getType() 、query() 、insert() 、update()、delete()等方法。
public class MyWordsProvider extends ContentProvider {
    @Override
    public boolean onCreate() {
        return false;
    }

    @Nullable
    @Override
    public Cursor query(@NonNull Uri uri, @Nullable String[] projection, @Nullable String selection, @Nullable String[] selectionArgs, @Nullable String sortOrder) {
        return null;
    }

    @Nullable
    @Override
    public String getType(@NonNull Uri uri) {
        return null;
    }

    @Nullable
    @Override
    public Uri insert(@NonNull Uri uri, @Nullable ContentValues values) {
        return null;
    }

    @Override
    public int delete(@NonNull Uri uri, @Nullable String selection, @Nullable String[] selectionArgs) {
        return 0;
    }

    @Override
    public int update(@NonNull Uri uri, @Nullable ContentValues values, @Nullable String selection, @Nullable String[] selectionArgs) {
        return 0;
    }
}
参数说明:
Cursor query(Uri uri, String[] projection, String where, String[] whereArgs, String sortOrder)
Uri insert(Uri uri, ContentValues values)
int delete(Uri uri, String where, String[] whereArgs)
int update(Uri uri, ContentValues values, String where, String[] whereArgs)
| 参数 | 含义 |
|---|---|
| String[] projection | 表示 select 语句中需要查询的所有的字段组成的字符串数组 |
| String where | 表示带有占位符的 where 子句组成的字符串 |
| String[] whereArgs | 表示替换 where 参数中占位符后的数据组成的字符串数组 |
| String sortOrder | 表示 select 语句中的 order by 子句组成的字符串 |
| ContentValues values | 是由数据库中表字段和往该字段中放置的数据所组成的键值对对象 |
我们采用数据库来存储数据,具体的实现方法如下:
public class MyWordsProvider extends ContentProvider {
    private MySQLiteOpenHelper dbHelper = null;
    private SQLiteDatabase dbConn = null;

    private static final String TABLE = "tb_words";
    private static final String AUTHORITY = "com.cyy.provider.wordsprovider";
    private static final int URI_CODE_1 = 1;
    private static UriMatcher uriMatcher = null;

    static {
        //初始化UriMatcher对象
        uriMatcher = new UriMatcher(UriMatcher.NO_MATCH);
        //在ContentProvider 中注册URI:addURI(authority,path,code)
        uriMatcher.addURI(AUTHORITY, TABLE, URI_CODE_1);
        //若URI资源路径 = content://com.cyy.provider.wordsprovider/tb_words ,则返回注册码URI_CODE_1
    }

    @Override
    public boolean onCreate() {
        //初始化数据库
        dbHelper = new MySQLiteOpenHelper(getContext());
        //获取数据库对象
        dbConn = dbHelper.dbConn;
        return false;
    }

    @Nullable
    @Override
    public Cursor query(@NonNull Uri uri, @Nullable String[] projection, @Nullable String selection, @Nullable String[] selectionArgs, @Nullable String sortOrder) {
        Cursor cursor = null;

        switch (uriMatcher.match(uri)) {
            case URI_CODE_1:
                cursor = dbConn.query(TABLE, projection, selection, selectionArgs, null, null, sortOrder);
                break;
            default:
                break;
        }
        return cursor;
    }

    @Nullable
    @Override
    public Uri insert(@NonNull Uri uri, @Nullable ContentValues values) {
        long id = 0;
        switch (uriMatcher.match(uri)) {
            case URI_CODE_1:
                id = dbConn.insert(TABLE, null, values);
                break;
            default:
                break;
        }
        return ContentUris.withAppendedId(uri, id);
    }

    @Override
    public int delete(@NonNull Uri uri, @Nullable String selection, @Nullable String[] selectionArgs) {
        int count = 0;
        switch (uriMatcher.match(uri)) {
            case 0:
                count = dbConn.delete(TABLE, selection, selectionArgs);
                break;
            default:
                break;
        }
        return count;
    }

    @Override
    public int update(@NonNull Uri uri, @Nullable ContentValues values, @Nullable String selection, @Nullable String[] selectionArgs) {
        int count = 0;
        switch (uriMatcher.match(uri)) {
            case 0:
                count = dbConn.update(TABLE, values, selection, selectionArgs);
                break;
            default:
                break;
        }
        return count;
    }


    @Nullable
    @Override
    public String getType(@NonNull Uri uri) {
        return null;
    }
}
创建数据库时用到了一个工具类,具体代码如下:
public class MySQLiteOpenHelper extends SQLiteOpenHelper {
    private static final String DB_NAME = "db_words";
    private static final int VERSION = 1;
    public SQLiteDatabase dbConn = null;

    public MySQLiteOpenHelper(Context context) {
        super(context, DB_NAME, null, VERSION);
        //获取可读写的数据库
        dbConn = getReadableDatabase();
    }

    /**
     * 创建数据库
     *
     * @param db
     */
    @Override
    public void onCreate(SQLiteDatabase db) {
        db.execSQL("create table if not exists tb_words (id integer  primary key autoincrement ," +
                " word , detail)");
    }

    /**
     * 更新数据库
     *
     * @param db
     */
    @Override
    public void onUpgrade(SQLiteDatabase db, int oldVersion, int newVersion) {
        if (newVersion > oldVersion) {
            db.execSQL("drop table if exists tb_words");
            onCreate(db);
        }
    }
}
为了方便添加数据,我们增加一个添加单词的功能:
MainActivity
public class MainActivity extends AppCompatActivity implements View.OnClickListener {

    private EditText mEtWord;
    private EditText mEtDetail;
    private Button mBtnAdd;
    private RecyclerView mRvWords;

    private MySQLiteOpenHelper mDBHelper = null;
    private SQLiteDatabase mDBConn = null;
    private WordAdapter mAdapter;
    private Cursor mCursor = null;

    @Override
    protected void onCreate(Bundle savedInstanceState) {
        super.onCreate(savedInstanceState);
        setContentView(R.layout.activity_main);

        initDB();
        initView();

    }

    @Override
    protected void onResume() {
        super.onResume();
        reloadListView();
    }

    private void initDB() {
        mDBHelper = new MySQLiteOpenHelper(MainActivity.this);
        mDBConn = mDBHelper.dbConn;
    }

    private void initView() {
        mEtWord = findViewById(R.id.et_word);
        mEtDetail = findViewById(R.id.et_detail);
        mBtnAdd = findViewById(R.id.btn_add);
        mRvWords = findViewById(R.id.rv_words);
        mRvWords.setLayoutManager(new LinearLayoutManager(MainActivity.this));
        mRvWords.setHasFixedSize(true);
        mBtnAdd.setOnClickListener(this);
    }

    @Override
    public void onClick(View v) {
        switch (v.getId()) {
            case R.id.btn_add:
                if (!TextUtils.isEmpty(mEtWord.getText().toString()) && !TextUtils.isEmpty(mEtDetail.getText().toString())) {
                    insertWord();
                }
                break;
            default:
                break;
        }
    }

    /**
     * 添加单词
     */
    private void insertWord() {
        String word = mEtWord.getText().toString();
        String detail = mEtDetail.getText().toString();
        ContentValues values = new ContentValues();
        values.put("word", word);
        values.put("detail", detail);
        //执行insert添加新数据
        long id = mDBConn.insert(MyWordsProvider.TABLE, null, values);
        Toast.makeText(MainActivity.this, "添加完成", Toast.LENGTH_SHORT).show();
        mEtWord.setText("");
        mEtDetail.setText("");
        //刷新列表
        reloadListView();
    }

    /**
     * 刷新列表
     */
    private void reloadListView() {
        mCursor = mDBConn.query(MyWordsProvider.TABLE, null, null, null, null, null, "id asc", null);

        if (mCursor == null) {
            return;
        }

        List<Map<String, String>> lists = cursorToList(mCursor);
        if (lists.size() > 0) {
            mAdapter = new WordAdapter(MainActivity.this, lists);
            mRvWords.setAdapter(mAdapter);
            mCursor.close();
        }
    }

    /**
     * Cursor转集合
     *
     * @param cursor
     * @return
     */
    public List<Map<String, String>> cursorToList(Cursor cursor) {
        List<Map<String, String>> list = new ArrayList<>();
        while (cursor.moveToNext()) {
            // 对于每一行数据进行操作
            Map<String, String> map = new HashMap<>();
            // 对于每行数据的每列进行操作
            for (int i = 0; i < cursor.getColumnCount(); i++) {
                map.put(cursor.getColumnName(i), cursor.getString(i));
            }
            list.add(map);
        }
        return list;
    }
}
activity_main
<?xml version="1.0" encoding="utf-8"?>
<RelativeLayout xmlns:android="http://schemas.android.com/apk/res/android"
    xmlns:tools="http://schemas.android.com/tools"
    android:layout_width="match_parent"
    android:layout_height="match_parent"
    tools:context=".MainActivity">

    <LinearLayout
        android:id="@+id/ll_input"
        android:layout_width="wrap_content"
        android:layout_height="wrap_content"
        android:orientation="vertical">

        <EditText
            android:id="@+id/et_word"
            android:layout_width="200dp"
            android:layout_height="wrap_content"
            android:hint="单词" />

        <EditText
            android:id="@+id/et_detail"
            android:layout_width="200dp"
            android:layout_height="wrap_content"
            android:hint="含义" />
    </LinearLayout>

    <Button
        android:id="@+id/btn_add"
        android:layout_width="wrap_content"
        android:layout_height="wrap_content"
        android:layout_marginLeft="30dp"
        android:layout_marginTop="30dp"
        android:layout_toRightOf="@+id/ll_input"
        android:text="添加" />

    <android.support.v7.widget.RecyclerView
        android:id="@+id/rv_words"
        android:layout_width="match_parent"
        android:layout_height="wrap_content"
        android:layout_below="@+id/ll_input"
        android:layout_margin="20dp" />
</RelativeLayout>
WordAdapter
public class WordAdapter extends RecyclerView.Adapter {
    private Context context = null;
    private List<Map<String, String>> list = null;
    private LayoutInflater inflater = null;

    public WordAdapter(Context context, List<Map<String, String>> list) {
        this.context = context;
        this.list = list;
        inflater = (LayoutInflater) context.getSystemService(Context.LAYOUT_INFLATER_SERVICE);
    }

    @Override
    public RecyclerView.ViewHolder onCreateViewHolder(ViewGroup parent, int viewType) {
        View view = inflater.inflate(R.layout.app_recycle_item_words, parent, false);
        return new MyViewHolder(view);
    }

    @Override
    public void onBindViewHolder(RecyclerView.ViewHolder holder, int position) {

        if (holder instanceof MyViewHolder) {
            ((MyViewHolder) holder).tv_word.setText(list.get(position).get("word"));
            ((MyViewHolder) holder).tv_detail.setText(list.get(position).get("detail"));
        }
    }

    @Override
    public int getItemCount() {
        return list.size();
    }

    class MyViewHolder extends RecyclerView.ViewHolder {
        private TextView tv_word;
        private TextView tv_detail;

        public MyViewHolder(View itemView) {
            super(itemView);
            tv_word = itemView.findViewById(R.id.tv_word);
            tv_detail = itemView.findViewById(R.id.tv_detail);
        }
    }
}
app_recycle_item_words
<?xml version="1.0" encoding="utf-8"?>
<LinearLayout xmlns:android="http://schemas.android.com/apk/res/android"
    xmlns:tools="http://schemas.android.com/tools"
    android:layout_width="wrap_content"
    android:layout_height="wrap_content"
    android:layout_margin="10dp"
    android:orientation="horizontal">

    <TextView
        android:id="@+id/tv_word"
        android:layout_width="wrap_content"
        android:layout_height="wrap_content"
        android:textColor="@android:color/black"
        android:textSize="20dp"
        tools:text="hello" />

    <TextView
        android:id="@+id/tv_detail"
        android:layout_width="wrap_content"
        android:layout_height="wrap_content"
        android:layout_marginLeft="10dp"
        android:textSize="20dp"
        tools:text="你好" />
</LinearLayout>
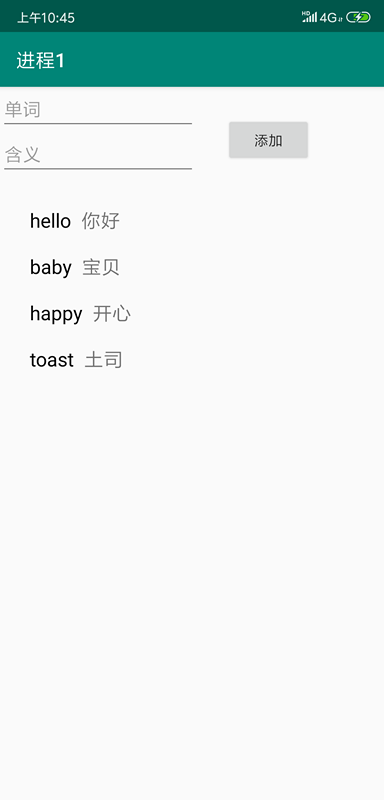
运行效果:
step2:在 AndroidMainfest.xml 中使用 标签注册 ContentProvider
<?xml version="1.0" encoding="utf-8"?>
<manifest xmlns:android="http://schemas.android.com/apk/res/android"
    package="com.chenyouyu.contentproviderdemo">
    //自定义的权限
    <permission android:name="com.cyy.PROVIDER" android:protectionLevel="normal"/>

    <application
        android:allowBackup="true"
        android:icon="@mipmap/ic_launcher"
        android:label="@string/app_name"
        android:roundIcon="@mipmap/ic_launcher_round"
        android:supportsRtl="true"
        android:theme="@style/AppTheme">
        <activity android:name=".MainActivity">
            <intent-filter>
                <action android:name="android.intent.action.MAIN" />

                <category android:name="android.intent.category.LAUNCHER" />
            </intent-filter>
        </activity>

        <provider
            android:name=".MyWordsProvider"
            android:authorities="com.cyy.provider.wordsprovider"
            android:exported="true"
            android:permission="com.cyy.PROVIDER" />
    </application>

</manifest>
关于权限的设置,大家可以参考这篇文章:
启航:ContentProvider数据库共享之——读写权限与数据监听
step3:新建一个项目,我们叫它进程 2,在进程 2 中我们通过 ContentResolver 去访问进程 1 的数据:
进程 2 的 MainActivity
public class MainActivity extends AppCompatActivity implements View.OnClickListener {
    private EditText mEtWord;
    private EditText mEtDetail;
    private Button mBtnAdd;
    private RecyclerView mRvWords;

    private ContentResolver mResolver = null;
    private WordAdapter mAdapter;
    //访问进程一需要的唯一标识Uri
    private static final String URI_WORD = "content://com.cyy.provider.wordsprovider/tb_words";

    @Override
    protected void onCreate(Bundle savedInstanceState) {
        super.onCreate(savedInstanceState);
        setContentView(R.layout.activity_main);
        initView();
    }

    @Override
    protected void onResume() {
        super.onResume();
        query();
    }

    private void initView() {
        mResolver = getContentResolver();
        mEtWord = findViewById(R.id.et_word);
        mEtDetail = findViewById(R.id.et_detail);
        mBtnAdd = findViewById(R.id.btn_add);
        mBtnAdd.setOnClickListener(this);
        mRvWords = findViewById(R.id.rv_words);
        mRvWords.setLayoutManager(new LinearLayoutManager(MainActivity.this));
        mRvWords.setHasFixedSize(true);
    }

    @Override
    public void onClick(View v) {
        switch (v.getId()) {
            case R.id.btn_add:
                if (!TextUtils.isEmpty(mEtWord.getText().toString()) && !TextUtils.isEmpty(mEtDetail.getText().toString())) {
                    insert();
                }
                break;
            default:
                break;
        }
    }

    private void query() {
        Cursor cursor = mResolver.query(Uri.parse(URI_WORD), null, null, null, null);

        if (cursor == null) {
            return;
        }

        List<Map<String, String>> list = cursorToList(cursor);
        if (list.size() > 0) {
            mAdapter = new WordAdapter(MainActivity.this, list);
            mRvWords.setAdapter(mAdapter);
            cursor.close();
        }
    }

    private void insert() {
        String word = mEtWord.getText().toString();
        String detail = mEtDetail.getText().toString();
        ContentValues values = new ContentValues();
        values.put("word", word);
        values.put("detail", detail);
        //执行insert添加新数据
        mResolver.insert(Uri.parse(URI_WORD), values);
        Toast.makeText(MainActivity.this, "添加完成", Toast.LENGTH_SHORT).show();
        mEtWord.setText("");
        mEtDetail.setText("");
        query();
    }

    /**
     * Cursor转集合
     *
     * @param cursor
     * @return
     */
    public List<Map<String, String>> cursorToList(Cursor cursor) {
        List<Map<String, String>> list = new ArrayList<>();
        while (cursor.moveToNext()) {
            // 对于每一行数据进行操作
            Map<String, String> map = new HashMap<>();
            // 对于每行数据的每列进行操作
            for (int i = 0; i < cursor.getColumnCount(); i++) {
                map.put(cursor.getColumnName(i), cursor.getString(i));
            }
            list.add(map);
        }
        return list;
    }
}
进程 2 的 activity_main
<?xml version="1.0" encoding="utf-8"?>
<LinearLayout xmlns:android="http://schemas.android.com/apk/res/android"
    xmlns:tools="http://schemas.android.com/tools"
    android:layout_width="match_parent"
    android:layout_height="match_parent"
    android:orientation="vertical"
    tools:context=".MainActivity">

    <RelativeLayout
        android:id="@+id/ll_input"
        android:layout_width="wrap_content"
        android:layout_height="wrap_content"
        android:orientation="vertical">

        <EditText
            android:id="@+id/et_word"
            android:layout_width="200dp"
            android:layout_height="wrap_content"
            android:hint="单词" />

        <EditText
            android:id="@+id/et_detail"
            android:layout_width="200dp"
            android:layout_height="wrap_content"
            android:layout_below="@+id/et_word"
            android:hint="含义" />

        <Button
            android:id="@+id/btn_add"
            android:layout_width="wrap_content"
            android:layout_height="wrap_content"
            android:layout_gravity="center_horizontal"
            android:layout_marginLeft="30dp"
            android:layout_marginTop="30dp"
            android:layout_toRightOf="@+id/et_word"
            android:text="添加" />
    </RelativeLayout>

    <TextView
        android:layout_width="wrap_content"
        android:layout_height="wrap_content"
        android:layout_marginLeft="20dp"
        android:layout_marginTop="20dp"
        android:text="进程1中的所有单词数据:"
        android:textColor="@android:color/holo_blue_light"
        android:textSize="20dp"
        android:textStyle="bold" />

    <android.support.v7.widget.RecyclerView
        android:id="@+id/rv_words"
        android:layout_width="wrap_content"
        android:layout_height="wrap_content"
        android:layout_margin="20dp" />

</LinearLayout>
在进程 2 的 AndroidMainfest.xml 中添加访问权限
<uses-permission android:name="com.cyy.PROVIDER" />
我们运行进程 2,看看效果:
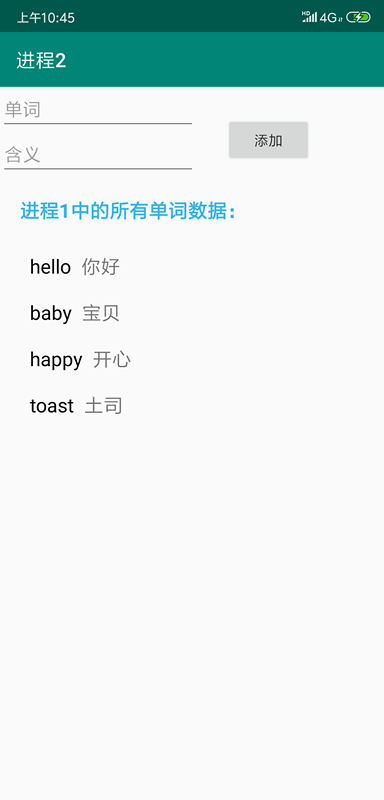
我们可以看到在进程 2 中已经通过 ContentResolver 查询到了进程 1 中存储的单词数据。下面我们在进程 2 中插入一条数据:

可以看到,我们成功的通过进程 2 添加了一条数据。关于删除和修改的操作,读者可以自行去尝试一下。关于 ContentProvider 的知识我们就介绍到这里。


