## 一、信息须知:
> 1:malloc()函数,头文件为cstdlib。
> 用法: `node *p=(node *)malloc(sizeof(node))。`
> 作用:分配一个node类型大小的内存空间, 并把其赋值给node 型的指针p。 `node *p=new node`也可实现此作用。
> 2:`typedef char datatype` 为char起别名datatype,方便链表data数据类型修改。
## 二、思路分析:
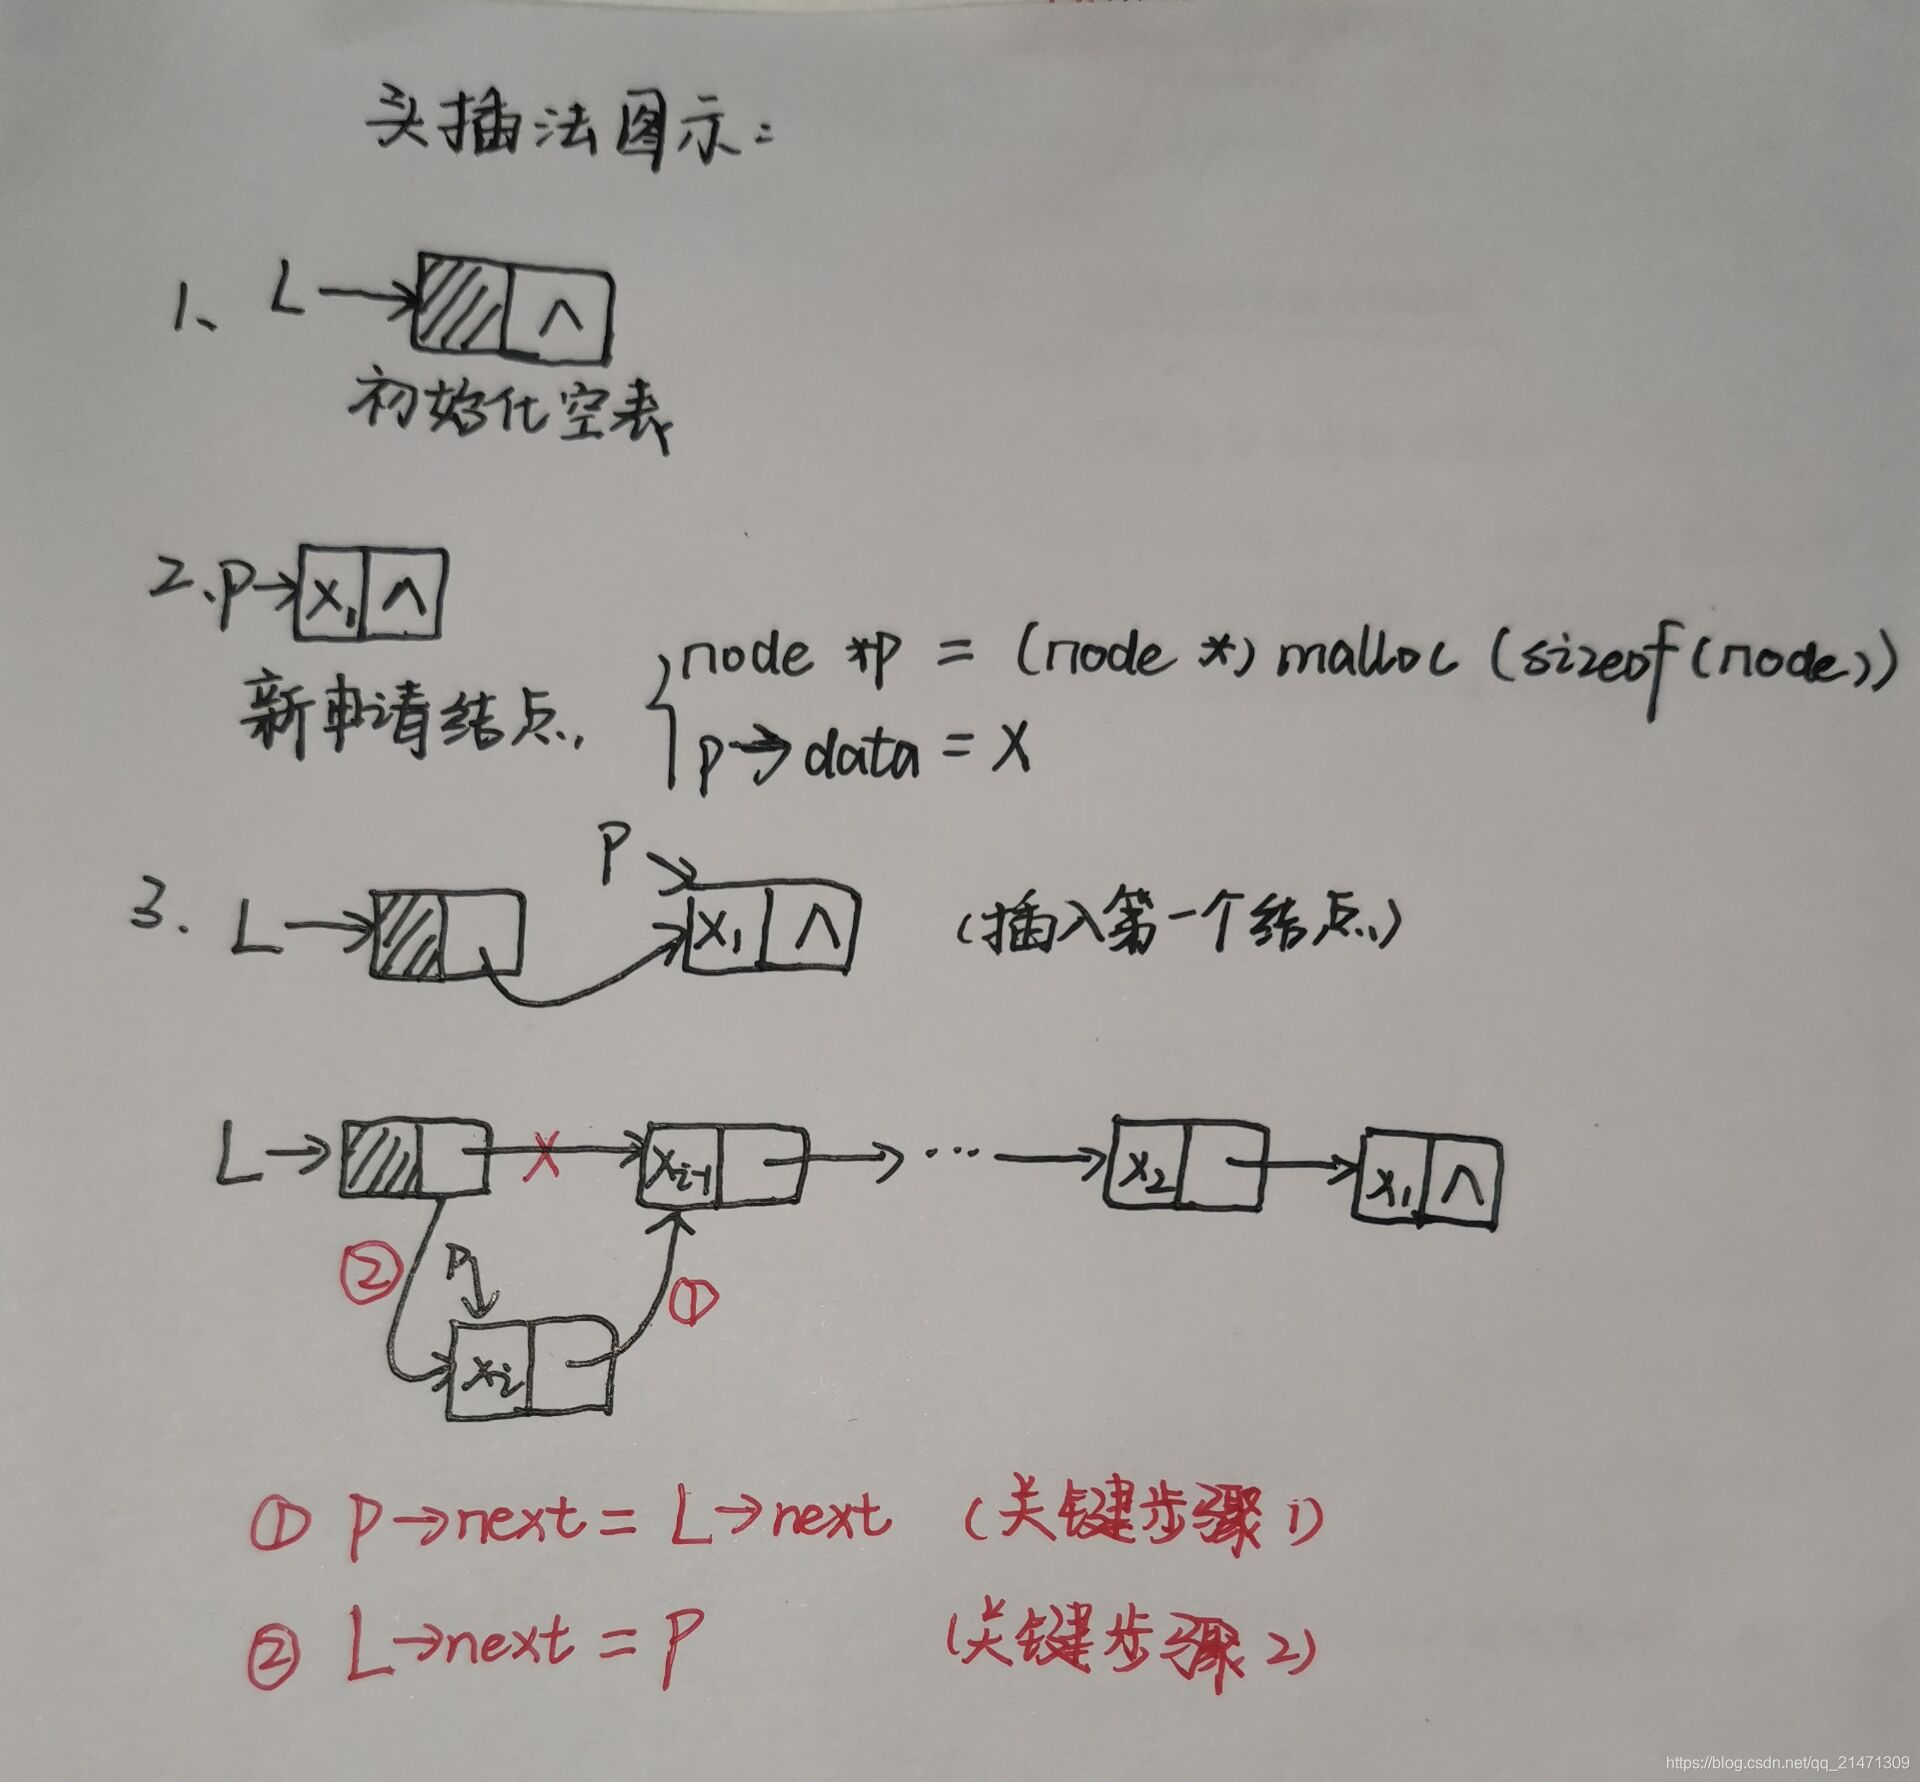
1、头插法思路图示分析
2、尾插法思路图示分析

## 三、代码展示:
```cpp
//以" & "结尾分别以头插法、尾插法创建单链表
#include <iostream>
#include <cstdlib> //malloc()函数头文件,作用:动态开辟空间。
using namespace std;
typedef char datatype; //为char起别名,方便建立链表data数据类型修改。
//此示例代码链表数据类型为char,若建立链表存储data数据类型为int,仅将此处改为 typedef int datatype即可。
typedef struct node{//建立node结构体
datatype data;
node *next;
}node;
node *InitList(node *L){//初始化单链表;
L=(node *)malloc(sizeof(node));
L->next=NULL;
return L;
}
node *HeadCreatList(node *L){ //头插法,含头结点
node *p; int flag=1; datatype x;
while(flag){
cin>>x;
if(x!='&'){
p=(node *)malloc(sizeof(node));
p->data=x;
p->next=L->next; //头插法关键步骤1
L->next=p; //头插法关键步骤2
}
else flag=0;
}
return L;
}
node *RearCreatList(node *L){ //尾插法,含头结点
node *p;node *r=L; //指针r存储链表当前的尾结点
int flag=1;datatype x;
while(flag){
cin>>x;
if(x!='&'){
p=(node *)malloc(sizeof(node));
p->data=x;
p->next=NULL;
r->next=p; //尾插法关键步骤1:将新建节点p插入链表当前尾结点r后
r=p; //尾插法关键步骤2:由于上一操作将p插入链表尾部,此操作更新链表尾部为p。r一直存储链表当前尾结点
}
else flag=0;
}
return L;
}
void PrintList(node *L){ //输出单链表
node *q=L->next;
while(q!=NULL){
cout<<q->data<<" ";
q=q->next;
}
cout<<endl;
}
int main(){
node *L1,*L2;
L1=InitList(L1);cout<<"头插法输入: ";L1=HeadCreatList(L1);
L2=InitList(L2);cout<<"尾插法输入: ";L2=RearCreatList(L2);
cout<<"头插法:";PrintList(L1);
cout<<"尾插法:";PrintList(L2);
return 0;
}
```
演示结果:
```cpp
头插法输入: a b c d e &
尾插法输入: a b c d e &
头插法:e d c b a
尾插法:a b c d e
```
## 四、补充函数说明
> 此补充说明上示例代码中初始化函数为`node *InitList(node *L)`,返回值为头指针L ,而不是无返回值 `void Iiinlist (node *L)`。建表函数`node *HeadCreatList(node *L)`同理。
1、无效操作:void InitList(node *L)
示例代码:
```cpp
//此示例代码为了说明 应该用node *InitList(node *L) 而不是void *InitList(node *L)
#include <iostream>
#include <cstdlib>
using namespace std;
typedef char datatype;
typedef struct node{
datatype data;
node *next;
}node;
void InitList(node *L){
L=(node *)malloc(sizeof(node));
L->next=NULL;
cout<<L<<endl;
}
int main()
{
node *L1; cout<<L1<<endl;
InitList(L1);
cout<<L1<<endl;
}
```
演示结果:
```cpp
0x10
0xfd1730
0x10
```
上述结果即显示,`node IintList(node *L)`操作无效。L1经此操作,并未改变。
2、正确有效操作:node *IintList(node *L)
示例代码:
```cpp
//此示例代码为了说明 应该用node *InitList(node *L) 而不是void *InitList1(node *L)
#include <iostream>
#include <cstdlib>
using namespace std;
typedef char datatype;
typedef struct node{
datatype data;
node *next;
}node;
node *InitList(node *L){
L=(node *)malloc(sizeof(node));
L->next=NULL;
return L;
}
int main()
{
node *L2; cout<<L2<<endl;
L2=InitList(L2); cout<<L2<<endl;
return 0;
}
```
演示结果:
```cpp
0x10
0xdc1730
```
# 故事的开头总是极尽温柔,故事会一直温柔…💜
>此博文的分享就到此啦。
>✨你好啊,我是<font color='purple' >“ 怪& ”</font>,是一名在校大学生哦。
>🌍主页链接:[怪&的个人博客主页](https://blog.csdn.net/qq_21471309?type=blog)
>☀️博文主更方向为:<font color='red'>课程学习知识、作业题解、期末备考。</font>随着专业的深入会越来越广哦…一起期待。
>❤️一个“不想让我曾没有做好的也成为你的遗憾”的博主。
>💪很高兴与你相遇,一起加油!

