仔细看看下面这张 Android 体系图,找一下 Zygote 在什么地方。
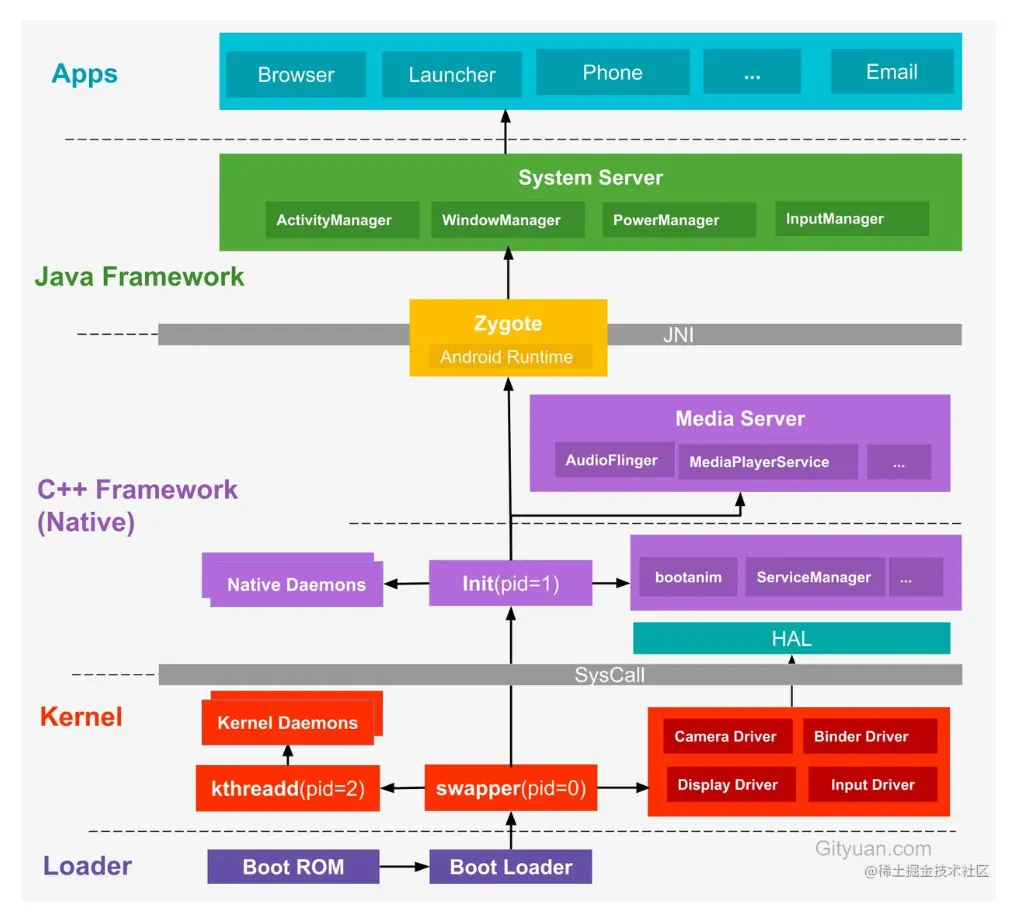
上图来自 Gityuan 博客 。
纵观整个 Android 体系结构,底层内核空间以 Linux Kernel 为核心,上层用户空间以 C++/Java 组成的 Framework 层组成,通过系统调用来连接用户空间和内核空间。而用户空间又分为 Native 世界和 Java 世界,通过 JNI 技术进行连接。Native 世界的 init 进程是所有用户进程的祖先,其 pid 为 1 。init 进程通过解析 init.rc 文件创建出 Zygote 进程,Zygote 进程人如其名,翻译成中文就是 受精卵 的意思。它是 Java 世界的中的第一个进程,也是 Android 系统中的第一个 Java 进程,颇有盘古开天辟地之势。
Zygote 创建的第一个进程就是 System Server,System Server 负责管理和启动整个 Java Framework 层。创建完 System Server 之后,Zygote 就会完全进入受精卵的角色,等待进行无性繁殖,创建应用进程。所有的应用进程都是由 Zygote 进程 fork 而来的,称之为 Java 世界的女娲也不足为过。
Zygote 的启动过程是从 Native 层开始的,这里不会 Native 层作过多分析,直接进入其在 Java 世界的入口 ZygoteInit.main() :
public static void main(String argv[]) {
    ZygoteServer zygoteServer = new ZygoteServer();
    // Mark zygote start. This ensures that thread creation will throw
    // an error.
    ZygoteHooks.startZygoteNoThreadCreation();
    // Zygote goes into its own process group.
    // 设置进程组 ID
    // pid 为 0 表示设置当前进程的进程组 ID
    // gid 为 0 表示使用当前进程的 PID 作为进程组 ID
    try {
        Os.setpgid(0, 0);
    } catch (ErrnoException ex) {
        throw new RuntimeException("Failed to setpgid(0,0)", ex);
    }
    final Runnable caller;
    try {
        ......
        RuntimeInit.enableDdms(); // 启用 DDMS
        boolean startSystemServer = false;
        String socketName = "zygote";
        String abiList = null;
        boolean enableLazyPreload = false;
        for (int i = 1; i < argv.length; i++) { // 参数解析
            if ("start-system-server".equals(argv[i])) {
                startSystemServer = true;
            } else if ("--enable-lazy-preload".equals(argv[i])) {
                enableLazyPreload = true;
            } else if (argv[i].startsWith(ABI_LIST_ARG)) {
                abiList = argv[i].substring(ABI_LIST_ARG.length());
            } else if (argv[i].startsWith(SOCKET_NAME_ARG)) {
                socketName = argv[i].substring(SOCKET_NAME_ARG.length());
            } else {
                throw new RuntimeException("Unknown command line argument: " + argv[i]);
            }
        }
        if (abiList == null) {
            throw new RuntimeException("No ABI list supplied.");
        }
        // 1. 注册服务端 socket,这里的 IPC 不是 Binder 通信
        zygoteServer.registerServerSocketFromEnv(socketName);
        // In some configurations, we avoid preloading resources and classes eagerly.
        // In such cases, we will preload things prior to our first fork.
        if (!enableLazyPreload) {
            bootTimingsTraceLog.traceBegin("ZygotePreload");
            EventLog.writeEvent(LOG_BOOT_PROGRESS_PRELOAD_START,
                SystemClock.uptimeMillis());
            preload(bootTimingsTraceLog); // 2. 预加载操作
            EventLog.writeEvent(LOG_BOOT_PROGRESS_PRELOAD_END,
                SystemClock.uptimeMillis());
            bootTimingsTraceLog.traceEnd(); // ZygotePreload
        } else {
            Zygote.resetNicePriority(); // 设置线程优先级为 NORM_PRIORITY (5)
        }
        // Do an initial gc to clean up after startup
        gcAndFinalize(); // 3. 强制进行一次垃圾收集
        Zygote.nativeSecurityInit();
        // Zygote process unmounts root storage spaces.
        Zygote.nativeUnmountStorageOnInit();
        ZygoteHooks.stopZygoteNoThreadCreation();
        if (startSystemServer) {
            // 4. 启动SystemServer 进程
            Runnable r = forkSystemServer(abiList, socketName, zygoteServer);
            // {@code r == null} in the parent (zygote) process, and {@code r != null} in the
            // child (system_server) process.
            if (r != null) {
                r.run(); // 由 RuntimeInit.java 中的 MethodAndArgsCaller 反射调用SystemServer 的 main() 方法
                return;
            }
        }
        Log.i(TAG, "Accepting command socket connections");
        // The select loop returns early in the child process after a fork and
        // loops forever in the zygote.
        // 5. 循环等待处理客户端请求
        caller = zygoteServer.runSelectLoop(abiList);
    } catch (Throwable ex) {
        Log.e(TAG, "System zygote died with exception", ex);
        throw ex;
    } finally {
        zygoteServer.closeServerSocket(); // 关闭并释放 socket 连接
    }
    // We're in the child process and have exited the select loop. Proceed to execute the
    // command.
    if (caller != null) {
        caller.run();
    }
}
复制代码
省去部分不是那么重要的代码,ZygoteInit.main() 方法大致可以分为以下五个步骤:
registerServerSocketFromEnv, 注册服务端 socket,用于跨进程通信,这里并没有使用 Binder 通信。preload(),进行预加载操作gcAndFinalize(),在 forkSystemServer 之前主动进行一次垃圾回收forkSystemServer(),创建 SystemServer 进程runSelectLoop(),循环等待处理客户端发来的 socket 请求
上面基本上就是 Zygote 的全部使命了,下面按照这个流程来详细分析。
registerServerSocketFromEnv
> ZygoteServer.java
void registerServerSocketFromEnv(String socketName) {
    if (mServerSocket == null) {
        int fileDesc;
        final String fullSocketName = ANDROID_SOCKET_PREFIX + socketName;
        try {
            // 从环境变量中获取 socket 的 fd
            String env = System.getenv(fullSocketName);
            fileDesc = Integer.parseInt(env);
        } catch (RuntimeException ex) {
            throw new RuntimeException(fullSocketName + " unset or invalid", ex);
        }
        try {
            FileDescriptor fd = new FileDescriptor();
            fd.setInt$(fileDesc); // 设置文件描述符
            mServerSocket = new LocalServerSocket(fd); // 创建服务端 socket
            mCloseSocketFd = true;
        } catch (IOException ex) {
            throw new RuntimeException(
                    "Error binding to local socket '" + fileDesc + "'", ex);
        }
    }
}
复制代码
首先从环境变量中获取 socket 的文件描述符 fd,然后根据 fd 创建服务端 LocalServerSocket,用于 IPC 通信。这里的环境变量是在 init 进程创建 Zygote 进程时设置的。
preload()
> ZygoteInit.java
static void preload(TimingsTraceLog bootTimingsTraceLog) {
        ......
        preloadClasses(); // 预加载并初始化 /system/etc/preloaded-classes 中的类
        ......
        preloadResources(); // 预加载系统资源
        ......
        nativePreloadAppProcessHALs(); // HAL?
        ......
        preloadOpenGL(); // 预加载 OpenGL
        ......
        preloadSharedLibraries(); // 预加载 共享库,包括 android、compiler_rt、jnigraphics 这三个库
        preloadTextResources(); // 预加载文字资源
        // Ask the WebViewFactory to do any initialization that must run in the zygote process,
        // for memory sharing purposes.
        // WebViewFactory 中一些必须在 zygote 进程中进行的初始化工作,用于共享内存
        WebViewFactory.prepareWebViewInZygote();
        warmUpJcaProviders();
        sPreloadComplete = true;
    }
复制代码
preload() 方法主要进行一些类,资源,共享库的预加载工作,以提升运行时效率。下面依次来看一下都预加载了哪些内容。
preloadClasses()
> ZygoteInit.java
private static void preloadClasses() {
    ......
    InputStream is;
    try {
        // /system/etc/preloaded-classes
        is = new FileInputStream(PRELOADED_CLASSES);
    } catch (FileNotFoundException e) {
        Log.e(TAG, "Couldn't find " + PRELOADED_CLASSES + ".");
        return;
    }
    try {
        BufferedReader br
            = new BufferedReader(new InputStreamReader(is), 256);
        int count = 0;
        String line;
        while ((line = br.readLine()) != null) {
            // Skip comments and blank lines.
            line = line.trim();
            if (line.startsWith("#") || line.equals("")) {
                continue;
            }
            try {
                // Load and explicitly initialize the given class. Use
                // Class.forName(String, boolean, ClassLoader) to avoid repeated stack lookups
                // (to derive the caller's class-loader). Use true to force initialization, and
                // null for the boot classpath class-loader (could as well cache the
                // class-loader of this class in a variable).
                Class.forName(line, true, null);
                count++;
            } catch (ClassNotFoundException e) {
                Log.w(TAG, "Class not found for preloading: " + line);
            } catch (UnsatisfiedLinkError e) {
                Log.w(TAG, "Problem preloading " + line + ": " + e);
            } catch (Throwable t) {
                ......
            }
        }
    } catch (IOException e) {
        Log.e(TAG, "Error reading " + PRELOADED_CLASSES + ".", e);
    } finally {
        IoUtils.closeQuietly(is);
        ......
    }
}
复制代码
只保留了核心逻辑代码。读取 /system/etc/preloaded-classes 文件,并通过 Class.forName() 方法逐行加载文件中声明的类。提前预加载系统常用的类无疑可以提升运行时效率,但是这个预加载常用类的工作通常都会很重。搜索整个源码库,在 /frameworks/base/config 目录下发现一份 preloaded-classes 文件,打开这个文件,一共 6558 行,这就意味着要提前加载数千个类,这无疑会消耗很长时间,以增加 Android 系统启动时间的代价提升了运行时的效率。
preloadResources()
> ZygoteInit.java
private static void preloadResources() {
    final VMRuntime runtime = VMRuntime.getRuntime();
    try {
        mResources = Resources.getSystem();
        mResources.startPreloading();
        if (PRELOAD_RESOURCES) {
            TypedArray ar = mResources.obtainTypedArray(
                    com.android.internal.R.array.preloaded_drawables);
            int N = preloadDrawables(ar);
            ar.recycle();
            ......
            ar = mResources.obtainTypedArray(
                    com.android.internal.R.array.preloaded_color_state_lists);
            N = preloadColorStateLists(ar);
            ar.recycle();
            if (mResources.getBoolean(
                    com.android.internal.R.bool.config_freeformWindowManagement)) {
                ar = mResources.obtainTypedArray(
                    com.android.internal.R.array.preloaded_freeform_multi_window_drawables);
                N = preloadDrawables(ar);
                ar.recycle();
            }
        }
        mResources.finishPreloading();
    } catch (RuntimeException e) {
        Log.w(TAG, "Failure preloading resources", e);
    }
}
复制代码
从源码中可知,主要加载的资源有:
com.android.internal.R.array.preloaded_drawables
com.android.internal.R.array.preloaded_color_state_lists
com.android.internal.R.array.preloaded_freeform_multi_window_drawables
preloadSharedLibraries()
> ZygoteInit.java
private static void preloadSharedLibraries() {
    Log.i(TAG, "Preloading shared libraries...");
    System.loadLibrary("android");
    System.loadLibrary("compiler_rt");
    System.loadLibrary("jnigraphics");
}
复制代码
预加载了三个共享库,libandroid.so 、libcompiler_rt.so 和 libjnigraphics.so 。
gcAndFinalize()
> ZygoteInit.java
static void gcAndFinalize() {
    final VMRuntime runtime = VMRuntime.getRuntime();
    /* runFinalizationSync() lets finalizers be called in Zygote,
     * which doesn't have a HeapWorker thread.
     */
    System.gc();
    runtime.runFinalizationSync();
    System.gc();
}
复制代码
在 forkSystemServer() 之前会主动进行一次 GC 操作。
forkSystemServer()
主动调用 GC 之后,Zygote 就要去做它的大事 —— fork SystemServer 进程了。
> ZygoteInit.java
private static Runnable forkSystemServer(String abiList, String socketName,
    ......
    /* Hardcoded command line to start the system server */
    // 启动参数
    String args[] = {
        "--setuid=1000",
        "--setgid=1000",
        "--setgroups=1001,1002,1003,1004,1005,1006,1007,1008,1009,1010,1018,1021,1023,1024,1032,1065,3001,3002,3003,3006,3007,3009,3010",
        "--capabilities=" + capabilities + "," + capabilities,
        "--nice-name=system_server", // 进程名
        "--runtime-args",
        "--target-sdk-version=" + VMRuntime.SDK_VERSION_CUR_DEVELOPMENT,
        "com.android.server.SystemServer", // 加载类名
    };
    ZygoteConnection.Arguments parsedArgs = null;
    int pid;
    try {
        parsedArgs = new ZygoteConnection.Arguments(args);
        ZygoteConnection.applyDebuggerSystemProperty(parsedArgs);
        ZygoteConnection.applyInvokeWithSystemProperty(parsedArgs);
        boolean profileSystemServer = SystemProperties.getBoolean(
                "dalvik.vm.profilesystemserver", false);
        if (profileSystemServer) {
            parsedArgs.runtimeFlags |= Zygote.PROFILE_SYSTEM_SERVER;
        }
        /* Request to fork the system server process
         * fork system_server 进程
         */
        pid = Zygote.forkSystemServer(
                parsedArgs.uid, parsedArgs.gid,
                parsedArgs.gids,
                parsedArgs.runtimeFlags,
                null,
                parsedArgs.permittedCapabilities,
                parsedArgs.effectiveCapabilities);
    } catch (IllegalArgumentException ex) {
        throw new RuntimeException(ex);
    }
    /* For child process */
    // pid == 0 表示子进程,从这里开始进入 system_server 进程
    if (pid == 0) {
        if (hasSecondZygote(abiList)) { // 如果有第二个 Zygote
            waitForSecondaryZygote(socketName);
        }
        zygoteServer.closeServerSocket(); // 关闭并释放从 Zygote copy 过来的 socket
        return handleSystemServerProcess(parsedArgs); // 完成新创建的 system_server 进程的剩余工作
    }
    /**
     * 注意 fork() 函数式一次执行,两次返回(两个进程对同一程序的两次执行)。
     * pid > 0  说明还是父进程。pid = 0 说明进入了子进程
     * 所以这里的 return null 依旧会执行
     */
    return null;
}
复制代码
从上面的启动参数可以看到,SystemServer 进程的 uid 和 gid 都是 1000,进程名是 system_server ,其最后要加载的类名是 com.android.server.SystemServer 。准备好一系列参数之后通过 ZygoteConnection.Arguments() 拼接,接着调用 Zygote.forkSystemServer() 方法真正的 fork 出子进程 system_server。
> Zygote.java
public static int forkSystemServer(int uid, int gid, int[] gids, int runtimeFlags,
        int[][] rlimits, long permittedCapabilities, long effectiveCapabilities) {
    VM_HOOKS.preFork();
    // Resets nice priority for zygote process.
    resetNicePriority();
    int pid = nativeForkSystemServer(
            uid, gid, gids, runtimeFlags, rlimits, permittedCapabilities, effectiveCapabilities);
    // Enable tracing as soon as we enter the system_server.
    if (pid == 0) {
        Trace.setTracingEnabled(true, runtimeFlags);
    }
    VM_HOOKS.postForkCommon();
    return pid;
}
native private static int nativeForkSystemServer(int uid, int gid, int[] gids, int runtimeFlags,
        int[][] rlimits, long permittedCapabilities, long effectiveCapabilities);
复制代码
最后的 fork() 操作是在 native 层完成的。再回到 ZygoteInit.forkSystemServer() 中执行 fork() 之后的逻辑处理:
if(pid == 0){
    ......
    return handleSystemServerProcess(parsedArgs);
}
return null;
复制代码
按正常逻辑思维,这两处 return 只会执行一次,其实不然。fork() 函数是一次执行,两次返回。说的更严谨一点是 两个进程对用一个程序的两次执行。当 pid == 0 时,说明现在处于子进程,当 pid > 0 时,说明处于父进程。在刚 fork 出子进程的时候,父子进程的数据结构基本是一样的,但是之后就分道扬镳了,各自执行各自的逻辑。所以上面的代码段中会有两次返回值,子进程 (system_server) 中会返回执行 handleSystemServerProcess(parsedArgs) 的结果,父进程 (zygote) 会返回 null。对于两个不同的返回值又会分别做什么处理呢?我们回到 ZygoteInit.main() 中:
if (startSystemServer) {
        Runnable r = forkSystemServer(abiList, socketName, zygoteServer);
        // {@code r == null} in the parent (zygote) process, and {@code r != null} in the
        // child (system_server) process.
        // r == null 说明是在 zygote 进程
        // r != null 说明是在 system_server 进程
        if (r != null) {
            r.run();
            return;
        }
    }
    // 循环等待处理客户端请求
    caller = zygoteServer.runSelectLoop(abiList);
复制代码
子进程 system_server 返回的是一个 Runnable,执行 r.run(),然后就直接 return 了。而父进程 zygote 返回的是 null,所以不满足 if 的判断条件,继续往下执行 runSelectLoop 。父子进程就此分道扬镳,各干各的事。
下面就来分析 runSelectLoop() 和 handleSystemServerProcess() 这两个方法,看看 Zygote 和 SystemServer 这对父子进程继续做了些什么工作。
handleSystemServerProcess
到这里其实已经脱离 Zygote 的范畴了,本准备放在下一篇 SystemServer 源码解析中再介绍,可是这里不写又觉得 Zygote 介绍的不完整,索性就一并说了。
> ZygoteInit.java
private static Runnable handleSystemServerProcess(ZygoteConnection.Arguments parsedArgs) {
    // set umask to 0077 so new files and directories will default to owner-only permissions.
    // umask一般是用在你初始创建一个目录或者文件的时候赋予他们的权限
    Os.umask(S_IRWXG | S_IRWXO);
    // 设置当前进程名为 "system_server"
    if (parsedArgs.niceName != null) {
        Process.setArgV0(parsedArgs.niceName);
    }
    final String systemServerClasspath = Os.getenv("SYSTEMSERVERCLASSPATH");
    if (systemServerClasspath != null) {
        // dex 优化操作
        performSystemServerDexOpt(systemServerClasspath);
        // Capturing profiles is only supported for debug or eng builds since selinux normally
        // prevents it.
        boolean profileSystemServer = SystemProperties.getBoolean(
                "dalvik.vm.profilesystemserver", false);
        if (profileSystemServer && (Build.IS_USERDEBUG || Build.IS_ENG)) {
            try {
                prepareSystemServerProfile(systemServerClasspath);
            } catch (Exception e) {
                Log.wtf(TAG, "Failed to set up system server profile", e);
            }
        }
    }
    if (parsedArgs.invokeWith != null) { // invokeWith 一般为空
        String[] args = parsedArgs.remainingArgs;
        // If we have a non-null system server class path, we'll have to duplicate the
        // existing arguments and append the classpath to it. ART will handle the classpath
        // correctly when we exec a new process.
        if (systemServerClasspath != null) {
            String[] amendedArgs = new String[args.length + 2];
            amendedArgs[0] = "-cp";
            amendedArgs[1] = systemServerClasspath;
            System.arraycopy(args, 0, amendedArgs, 2, args.length);
            args = amendedArgs;
        }
        WrapperInit.execApplication(parsedArgs.invokeWith,
                parsedArgs.niceName, parsedArgs.targetSdkVersion,
                VMRuntime.getCurrentInstructionSet(), null, args);
        throw new IllegalStateException("Unexpected return from WrapperInit.execApplication");
    } else {
        ClassLoader cl = null;
        if (systemServerClasspath != null) {
            // 创建类加载器,并赋给当前线程
            cl = createPathClassLoader(systemServerClasspath, parsedArgs.targetSdkVersion);
            Thread.currentThread().setContextClassLoader(cl);
        }
        /*
         * Pass the remaining arguments to SystemServer.
         */
        return ZygoteInit.zygoteInit(parsedArgs.targetSdkVersion, parsedArgs.remainingArgs, cl);
    }
    /* should never reach here */
}
复制代码
设置进程名为 system_server,执行 dex 优化,给当前线程设置类加载器,最后调用 ZygoteInit.zygoteInit() 继续处理剩余参数。
public static final Runnable zygoteInit(int targetSdkVersion, String[] argv, ClassLoader classLoader) {
    ......
    // Redirect System.out and System.err to the Android log.
    // 重定向 System.out 和 System.err 到 Android log
    RuntimeInit.redirectLogStreams();
    RuntimeInit.commonInit(); // 一些初始化工作
    ZygoteInit.nativeZygoteInit(); // native 层初始化
    return RuntimeInit.applicationInit(targetSdkVersion, argv, classLoader); // 调用入口函数
}
复制代码
重定向 Log,进行一些初始化工作。这部分不细说了,点击文章开头给出的源码链接,大部分都做了注释。最后调用 RuntimeInit.applicationInit() ,继续追进去看看。
> RuntimeInit.java
protected static Runnable applicationInit(int targetSdkVersion, String[] argv,
        ClassLoader classLoader) {
    ......
    final Arguments args = new Arguments(argv); // 解析参数
    ......
    // 寻找 startClass 的 main() 方法。这里的 startClass 是 com.android.server.SystemServer
    return findStaticMain(args.startClass, args.startArgs, classLoader);
}
复制代码
这里的 startClass 参数是 com.android.server.SystemServer。findStaticMain() 方法看名字就能知道它的作用是找到 main() 函数,这里是要找到 com.android.server.SystemServer 类的 main() 方法。
protected static Runnable findStaticMain(String className, String[] argv,
        ClassLoader classLoader) {
    Class<?> cl;
    try {
        cl = Class.forName(className, true, classLoader);
    } catch (ClassNotFoundException ex) {
        throw new RuntimeException(
                "Missing class when invoking static main " + className,
                ex);
    }
    Method m;
    try {
        // 寻找 main() 方法
        m = cl.getMethod("main", new Class[] { String[].class });
    } catch (NoSuchMethodException ex) {
        throw new RuntimeException(
                "Missing static main on " + className, ex);
    } catch (SecurityException ex) {
        throw new RuntimeException(
                "Problem getting static main on " + className, ex);
    }
    int modifiers = m.getModifiers();
    if (! (Modifier.isStatic(modifiers) && Modifier.isPublic(modifiers))) {
        throw new RuntimeException(
                "Main method is not public and static on " + className);
    }
    /*
     * This throw gets caught in ZygoteInit.main(), which responds
     * by invoking the exception's run() method. This arrangement
     * clears up all the stack frames that were required in setting
     * up the process.
     * 返回一个 Runnable,在 Zygote 的 main() 方法中执行器 run() 方法
     * 之前的版本是抛出一个异常,在 main() 方法中捕获
     */
    return new MethodAndArgsCaller(m, argv);
}
复制代码
找到 main() 方法并构建一个 Runnable 对象 MethodAndArgsCaller 。这里返回的 Runnable 对象会在哪里执行呢?又要回到文章开头的 ZygoteInit.main() 函数了,在 forkSystemServer() 之后,子进程执行 handleSystemServerProcess() 并返回一个 Runnable 对象,在 ZygoteInit.main() 中会执行其 run() 方法。
再来看看 MethodAndArgsCaller 的 run() 方法吧!
static class MethodAndArgsCaller implements Runnable {
    /** method to call */
    private final Method mMethod;
    /** argument array */
    private final String[] mArgs;
    public MethodAndArgsCaller(Method method, String[] args) {
        mMethod = method;
        mArgs = args;
    }
    public void run() {
        try {
            mMethod.invoke(null, new Object[] { mArgs });
        } catch (IllegalAccessException ex) {
            throw new RuntimeException(ex);
        } catch (InvocationTargetException ex) {
            Throwable cause = ex.getCause();
            if (cause instanceof RuntimeException) {
                throw (RuntimeException) cause;
            } else if (cause instanceof Error) {
                throw (Error) cause;
            }
            throw new RuntimeException(ex);
        }
    }
}
复制代码
就一件事,执行参数中的 method。这里的 method 就是 com.android.server.SystemServer 的 main() 方法。到这里,SystemServer 就要正式工作了。
其实在老版本的 Android 源码中,并不是通过这种方法执行 SystemServer.main() 的。老版本的 MethodAndArgsCaller 是 Exception 的子类,在这里会直接抛出异常,然后在 ZygoteInit.main() 方法中进行捕获,捕获之后执行其 run() 方法。
SystemServer 的具体分析就放到下篇文章吧,本篇的主角还是 Zygote !
看到这里,Zygote 已经完成了一件人生大事,孵化出了 SystemServer 进程。但是作为 “女娲” ,造人的任务还是停不下来,任何一个应用进程的创建还是离不开它的。ZygoteServer.runSlectLoop() 给它搭好了和客户端之前的桥梁。
runSelectLoop
> ZygoteServer.java
Runnable runSelectLoop(String abiList) {
    ArrayList<FileDescriptor> fds = new ArrayList<FileDescriptor>();
    ArrayList<ZygoteConnection> peers = new ArrayList<ZygoteConnection>();
    // mServerSocket 是之前在 Zygote 中创建的
    fds.add(mServerSocket.getFileDescriptor());
    peers.add(null);
    while (true) {
        StructPollfd[] pollFds = new StructPollfd[fds.size()];
        for (int i = 0; i < pollFds.length; ++i) {
            pollFds[i] = new StructPollfd();
            pollFds[i].fd = fds.get(i);
            pollFds[i].events = (short) POLLIN;
        }
        try {
            // 有事件来时往下执行,没有时就阻塞
            Os.poll(pollFds, -1);
        } catch (ErrnoException ex) {
            throw new RuntimeException("poll failed", ex);
        }
        for (int i = pollFds.length - 1; i >= 0; --i) {
            if ((pollFds[i].revents & POLLIN) == 0) {
                continue;
            }
            if (i == 0) { // 有新客户端连接
                ZygoteConnection newPeer = acceptCommandPeer(abiList);
                peers.add(newPeer);
                fds.add(newPeer.getFileDesciptor());
            } else { // 处理客户端请求
                try {
                    ZygoteConnection connection = peers.get(i);
                    final Runnable command = connection.processOneCommand(this);
                    ......
                } catch (Exception e) {
                   ......
            }
        }
    }
}
复制代码
mServerSocket 是 ZygoteInit.main() 中一开始就建立的服务端 socket,用于处理客户端请求。一看到 while(true) 就肯定会有阻塞操作。Os.poll() 在有事件来时往下执行,否则就阻塞。当有客户端请求过来时,调用 ZygoteConnection.processOneCommand() 方法来处理。
processOneCommand() 源码很长,这里就贴一下关键部分:
......
pid = Zygote.forkAndSpecialize(parsedArgs.uid, parsedArgs.gid, parsedArgs.gids,
        parsedArgs.runtimeFlags, rlimits, parsedArgs.mountExternal, parsedArgs.seInfo,
        parsedArgs.niceName, fdsToClose, fdsToIgnore, parsedArgs.startChildZygote,
        parsedArgs.instructionSet, parsedArgs.appDataDir);
try {
    if (pid == 0) {
        // in child 进入子进程
        zygoteServer.setForkChild();
        zygoteServer.closeServerSocket();
        IoUtils.closeQuietly(serverPipeFd);
        serverPipeFd = null;
        return handleChildProc(parsedArgs, descriptors, childPipeFd,
                parsedArgs.startChildZygote);
    } else {
        // In the parent. A pid < 0 indicates a failure and will be handled in
        // handleParentProc.
        IoUtils.closeQuietly(childPipeFd);
        childPipeFd = null;
        handleParentProc(pid, descriptors, serverPipeFd);
        return null;
    }
} finally {
            IoUtils.closeQuietly(childPipeFd);
            IoUtils.closeQuietly(serverPipeFd);
}
复制代码
乍一看是不是感觉有点眼熟?没错,这一块的逻辑和 forkSystemServer() 很相似,只是这里 fork 的是普通应用进程,调用的是 forkAndSpecialize() 方法。中间的代码调用就不在这详细分析了,最后还是会调用到 findStaticMain() 执行应用进程的对应 main() 方法,感兴趣的同学可以到我的源码项目 android_9.0.0_r45 阅读相关文件,注释还是比较多的。
还有一个问题,上面只分析了 Zygote 接收到客户端请求并响应,那么这个客户端可能是谁呢?具体又是如何与 Zygote 通信的呢?关于这个问题,后续文章中肯定会写到,关注我的 Github 仓库 android_9.0.0_r45,所有文章都会第一时间同步过去。
总结
来一张时序图总结全文 :
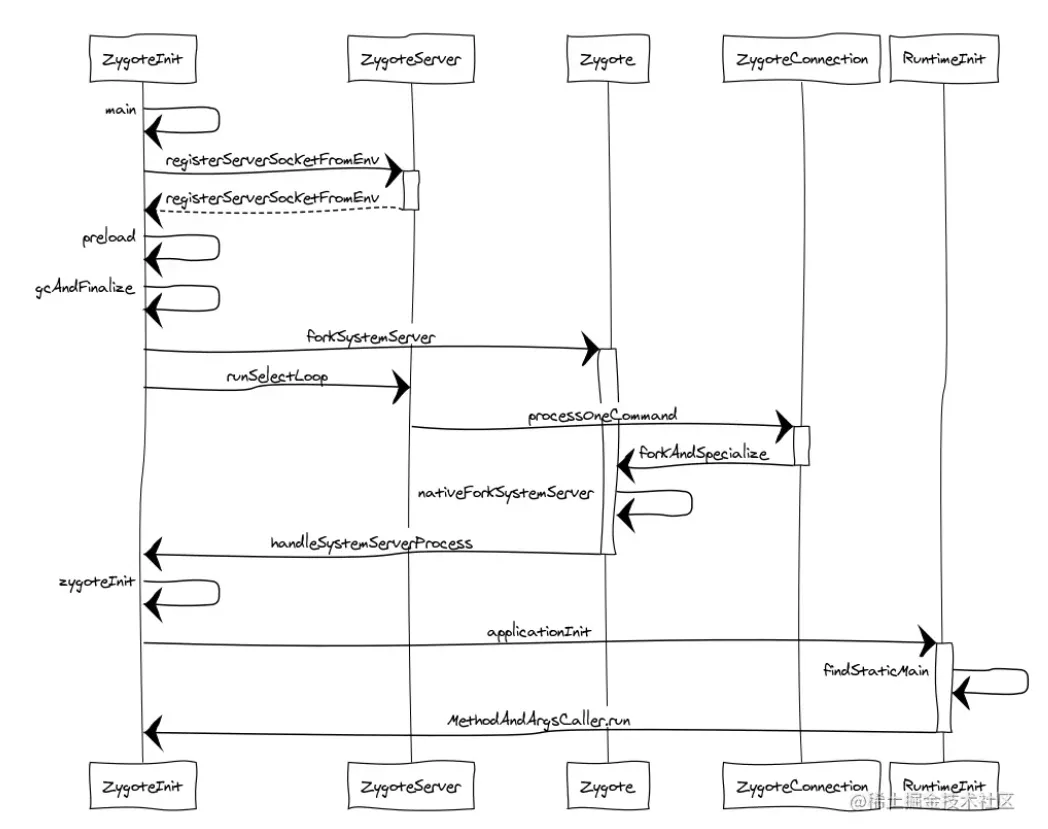
最后想说说如何阅读 AOSP 源码和开源项目源码。我的看法是,不要上来就拼命死磕,一行一行的非要全部看懂。首先要理清脉络,能大致的理出来一个时序图,然后再分层细读。这个细读的过程中碰到不懂的知识点就得自己去挖掘,比如文中遇到的 forkSystemServer() 为什么会返回两次?当然,对于实在超出自己知识范畴的内容,也可以选择性的暂时跳过,日后再战。最后的最后,来篇技术博客吧!理清,看懂,表达,都会逐步加深你对源码的了解程度,还能分享知识,反馈社区,何乐而不为呢?
下篇文章会具体说说 SystemServer 进程具体都干了些什么。