本文转载自「好未来技术」公众号,以 Flink SQL 案例来介绍 Flink CDC 2.0 的使用,并解读 CDC 中的核心设计。主要内容为:
- 案例
- 核心设计
- 代码详解
GitHub 地址
https://github.com/apache/flink
欢迎大家给 Flink 点赞送 star~
8 月份 Flink CDC 发布 2.0.0 版本,相较于 1.0 版本,在全量读取阶段支持分布式读取、支持 checkpoint,且在全量 + 增量读取的过程在不锁表的情况下保障数据一致性。 详细介绍参考 Flink CDC 2.0 正式发布,详解核心改进。
Flink CDC 2.0 数据读取逻辑并不复杂,复杂的是 FLIP-27: Refactor Source Interface 的设计及对 Debezium Api 的不了解。本文重点对 Flink CDC 的处理逻辑进行介绍, FLIP-27 的设计及 Debezium 的 API 调用不做过多讲解。
本文使用 CDC 2.0.0 版本,先以 Flink SQL 案例来介绍 Flink CDC 2.0 的使用,接着介绍 CDC 中的核心设计包含切片划分、切分读取、增量读取,最后对数据处理过程中涉及 flink-mysql-cdc 接口的调用及实现进行代码讲解。
一、案例
全量读取 + 增量读取 Mysql 表数据,以changelog-json 格式写入 kafka,观察 RowKind 类型及影响的数据条数。
public static void main(String[] args) {
        StreamExecutionEnvironment env = StreamExecutionEnvironment.getExecutionEnvironment();
        EnvironmentSettings envSettings = EnvironmentSettings.newInstance()
                .useBlinkPlanner()
                .inStreamingMode()
                .build();
        env.setParallelism(3);
        // note: 增量同步需要开启CK
        env.enableCheckpointing(10000);
        StreamTableEnvironment tableEnvironment = StreamTableEnvironment.create(env, envSettings);

        tableEnvironment.executeSql(" CREATE TABLE demoOrders (\n" +
                "         `order_id` INTEGER ,\n" +
                "          `order_date` DATE ,\n" +
                "          `order_time` TIMESTAMP(3),\n" +
                "          `quantity` INT ,\n" +
                "          `product_id` INT ,\n" +
                "          `purchaser` STRING,\n" +
                "           primary key(order_id)  NOT ENFORCED" +
                "         ) WITH (\n" +
                "          'connector' = 'mysql-cdc',\n" +
                "          'hostname' = 'localhost',\n" +
                "          'port' = '3306',\n" +
                "          'username' = 'cdc',\n" +
                "          'password' = '123456',\n" +
                "          'database-name' = 'test',\n" +
                "          'table-name' = 'demo_orders'," +
                            //  全量 + 增量同步
                "          'scan.startup.mode' = 'initial'      " +
                " )");

              tableEnvironment.executeSql("CREATE TABLE sink (\n" +
                "         `order_id` INTEGER ,\n" +
                "          `order_date` DATE ,\n" +
                "          `order_time` TIMESTAMP(3),\n" +
                "          `quantity` INT ,\n" +
                "          `product_id` INT ,\n" +
                "          `purchaser` STRING,\n" +
                "          primary key (order_id)  NOT ENFORCED " +
                ") WITH (\n" +
                "    'connector' = 'kafka',\n" +
                "    'properties.bootstrap.servers' = 'localhost:9092',\n" +
                "    'topic' = 'mqTest02',\n" +
                "    'format' = 'changelog-json' "+
                ")");

             tableEnvironment.executeSql("insert into sink select * from demoOrders");}
全量数据输出:
{"data":{"order_id":1010,"order_date":"2021-09-17","order_time":"2021-09-22 10:52:12.189","quantity":53,"product_id":502,"purchaser":"flink"},"op":"+I"}
{"data":{"order_id":1009,"order_date":"2021-09-17","order_time":"2021-09-22 10:52:09.709","quantity":31,"product_id":500,"purchaser":"flink"},"op":"+I"}
{"data":{"order_id":1008,"order_date":"2021-09-17","order_time":"2021-09-22 10:52:06.637","quantity":69,"product_id":503,"purchaser":"flink"},"op":"+I"}
{"data":{"order_id":1007,"order_date":"2021-09-17","order_time":"2021-09-22 10:52:03.535","quantity":52,"product_id":502,"purchaser":"flink"},"op":"+I"}
{"data":{"order_id":1002,"order_date":"2021-09-17","order_time":"2021-09-22 10:51:51.347","quantity":69,"product_id":503,"purchaser":"flink"},"op":"+I"}
{"data":{"order_id":1001,"order_date":"2021-09-17","order_time":"2021-09-22 10:51:48.783","quantity":50,"product_id":502,"purchaser":"flink"},"op":"+I"}
{"data":{"order_id":1000,"order_date":"2021-09-17","order_time":"2021-09-17 17:40:32.354","quantity":30,"product_id":500,"purchaser":"flink"},"op":"+I"}
{"data":{"order_id":1006,"order_date":"2021-09-17","order_time":"2021-09-22 10:52:01.249","quantity":31,"product_id":500,"purchaser":"flink"},"op":"+I"}
{"data":{"order_id":1005,"order_date":"2021-09-17","order_time":"2021-09-22 10:51:58.813","quantity":69,"product_id":503,"purchaser":"flink"},"op":"+I"}
{"data":{"order_id":1004,"order_date":"2021-09-17","order_time":"2021-09-22 10:51:56.153","quantity":50,"product_id":502,"purchaser":"flink"},"op":"+I"}
{"data":{"order_id":1003,"order_date":"2021-09-17","order_time":"2021-09-22 10:51:53.727","quantity":30,"product_id":500,"purchaser":"flink"},"op":"+I"}
修改表数据,增量捕获:
## 更新 1005 的值
{"data":{"order_id":1005,"order_date":"2021-09-17","order_time":"2021-09-22 02:51:58.813","quantity":69,"product_id":503,"purchaser":"flink"},"op":"-U"}
{"data":{"order_id":1005,"order_date":"2021-09-17","order_time":"2021-09-22 02:55:43.627","quantity":80,"product_id":503,"purchaser":"flink"},"op":"+U"}

## 删除 1000
{"data":{"order_id":1000,"order_date":"2021-09-17","order_time":"2021-09-17 09:40:32.354","quantity":30,"product_id":500,"purchaser":"flink"},"op":"-D"}
二、核心设计
1. 切片划分
全量阶段数据读取方式为分布式读取,会先对当前表数据按主键划分成多个Chunk,后续子任务读取Chunk 区间内的数据。根据主键列是否为自增整数类型,对表数据划分为均匀分布的Chunk及非均匀分布的Chunk。
1.1 均匀分布
主键列自增且类型为整数类型(int,bigint,decimal)。查询出主键列的最小值,最大值,按 chunkSize 大小将数据均匀划分,因为主键为整数类型,根据当前chunk 起始位置、chunkSize 大小,直接计算 chunk 的结束位置。
注意:最新版本均匀分布的触发条件不再依赖主键列是否自增,要求主键列卫整数类型且根据 max(id) - min(id)/rowcount 计算出数据分布系数,只有分布系数 <= 配置的分布系数 (evenly-distribution.factor 默认为 1000.0d) 才会进行数据均匀划分。
//  计算主键列数据区间
select min(`order_id`), max(`order_id`) from demo_orders;

//  将数据划分为 chunkSize 大小的切片
chunk-0: [min,start + chunkSize)
chunk-1: [start + chunkSize, start + 2chunkSize)
.......
chunk-last: [max,null)
1.2 非均匀分布
主键列非自增或者类型为非整数类型。主键为非数值类型,每次划分需要对未划分的数据按主键进行升序排列,取出前 chunkSize 的最大值为当前 chunk 的结束位置。
注意:最新版本非均匀分布触发条件为主键列为非整数类型,或者计算出的分布系数 (distributionFactor) > 配置的分布系数 (evenly-distribution.factor)。
// 未拆分的数据排序后,取 chunkSize 条数据取最大值,作为切片的终止位置。
chunkend = SELECT MAX(`order_id`) FROM (
        SELECT `order_id`  FROM `demo_orders`
        WHERE `order_id` >= [前一个切片的起始位置]
        ORDER BY `order_id` ASC
        LIMIT   [chunkSize]
    ) AS T
2. 全量切片数据读取
Flink 将表数据划分为多个 Chunk,子任务在不加锁的情况下,并行读取 Chunk 数据。因为全程无锁在数据分片读取过程中,可能有其他事务对切片范围内的数据进行修改,此时无法保证数据一致性。因此,在全量阶段 Flink 使用快照记录读取 + Binlog 数据修正的方式来保证数据的一致性。
2.1 快照读取
通过 JDBC 执行 SQL 查询切片范围的数据记录。
## 快照记录数据读取SQL
SELECT * FROM `test`.`demo_orders`
WHERE order_id >= [chunkStart]
AND NOT (order_id = [chunkEnd])
AND order_id <= [chunkEnd]
2.2 数据修正
在快照读取操作前、后执行 SHOW MASTER STATUS 查询 binlog 文件的当前偏移量,在快照读取完毕后,查询区间内的 binlog 数据并对读取的快照记录进行修正。
快照读取 + Binlog 数据读取时的数据组织结构:

BinlogEvents 修正 SnapshotEvents 规则。
- 未读取到 binlog 数据,即在执行 select 阶段没有其他事务进行操作,直接下发所有快照记录。
- 读取到 binlog 数据,且变更的数据记录不属于当前切片,下发快照记录。
- 读取到 binlog 数据,且数据记录的变更属于当前切片。delete 操作从快照内存中移除该数据,insert 操作向快照内存添加新的数据,update 操作向快照内存中添加变更记录,最终会输出更新前后的两条记录到下游。
修正后的数据组织结构:

以读取切片 [1,11] 范围的数据为例,描述切片数据的处理过程。c、d、u 代表 Debezium 捕获到的新增、删除、更新操作。
修正前数据及结构:

修正后数据及结构:

单个切片数据处理完毕后会向 SplitEnumerator 发送已完成切片数据的起始位置(ChunkStart, ChunkStartEnd)、Binlog 的最大偏移量(High watermark),用来为增量读取指定起始偏移量。
3. 增量切片数据读取
全量阶段切片数据读取完成后,SplitEnumerator 会下发一个 BinlogSplit 进行增量数据读取。BinlogSplit 读取最重要的属性就是起始偏移量,偏移量如果设置过小下游可能会有重复数据,偏移量如果设置过大下游可能是已超期的脏数据。而 Flink CDC 增量读取的起始偏移量为所有已完成的全量切片最小的Binlog 偏移量,只有满足条件的数据才被下发到下游。数据下发条件:
- 捕获的 Binlog 数据的偏移量 > 数据所属分片的 Binlog 的最大偏移量。
例如,SplitEnumerator 保留的已完成切片信息为:
| 切片索引 | Chunk 数据范围 | 切片读取的最大Binlog |
|---|---|---|
| 0 | [1,100] | 1000 |
| 1 | [101,200] | 800 |
| 2 | [201,300] | 1500 |
增量读取时,从偏移量 800 开始读取 Binlog 数据 ,当捕获到数据 <data:123, offset:1500> 时,先找到 123 所属快照分片,并找到对应的最大 Binlog 偏移量 800。 当前偏移量大于快照读的最大偏移量,则下发数据,否则直接丢弃。
三、代码详解
关于 FLIP-27: Refactor Source Interface 设计不做详细介绍,本文侧重对 flink-mysql-cdc 接口调用及实现进行讲解。
1. MySqlSourceEnumerator 初始化
SourceCoordinator 作为 OperatorCoordinator 对 Source 的实现,运行在 Master 节点,在启动时通过调用 MySqlParallelSource#createEnumerator 创建 MySqlSourceEnumerator 并调用 start 方法,做一些初始化工作。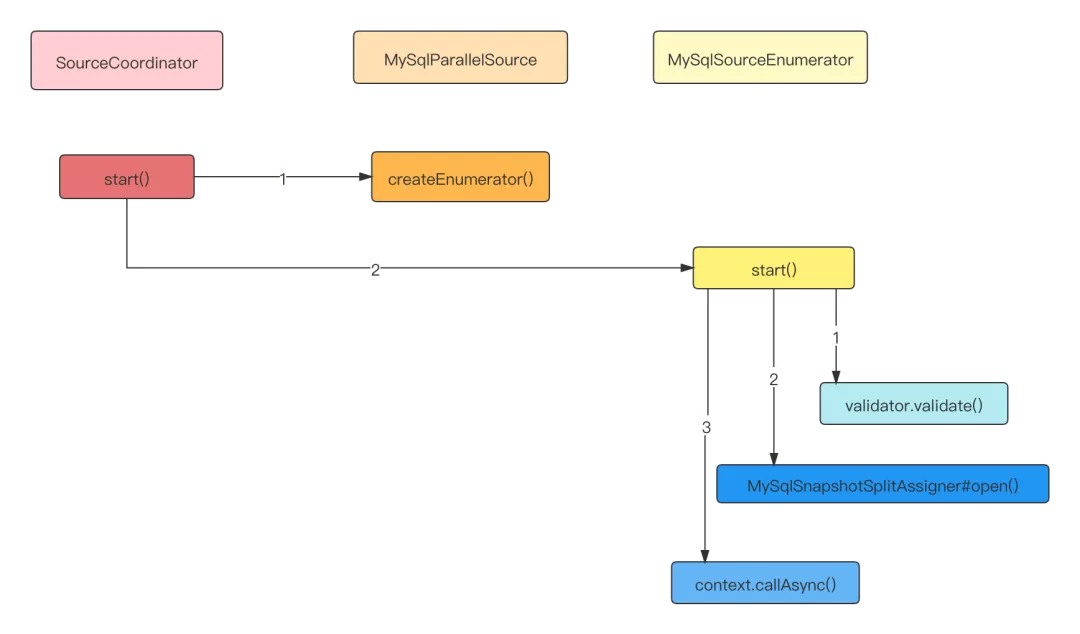
- 创建 MySqlSourceEnumerator,使用 MySqlHybridSplitAssigner 对全量+增量数据进行切片,使用 MySqlValidator 对 mysql 版本、配置进行校验。
MySqlValidator 校验:
- mysql 版本必须大于等于 5.7。
- binlog_format 配置必须为 ROW。
- binlog_row_image 配置必须为 FULL。
MySqlSplitAssigner 初始化:
- 创建 ChunkSplitter 用来划分切片。
- 筛选出要读的表名称。
- 启动周期调度线程,要求 SourceReader 向 SourceEnumerator 发送已完成但未发送 ACK 事件的切片信息。
private void syncWithReaders(int[] subtaskIds, Throwable t) {
    if (t != null) {
        throw new FlinkRuntimeException("Failed to list obtain registered readers due to:", t);
    }
    // when the SourceEnumerator restores or the communication failed between
    // SourceEnumerator and SourceReader, it may missed some notification event.
    // tell all SourceReader(s) to report there finished but unacked splits.
    if (splitAssigner.waitingForFinishedSplits()) {
        for (int subtaskId : subtaskIds) {
            // note: 发送 FinishedSnapshotSplitsRequestEvent
            context.sendEventToSourceReader(
                    subtaskId, new FinishedSnapshotSplitsRequestEvent());
        }
    }
}
2. MySqlSourceReader 初始化
SourceOperator 集成了 SourceReader,通过OperatorEventGateway 和 SourceCoordinator 进行交互。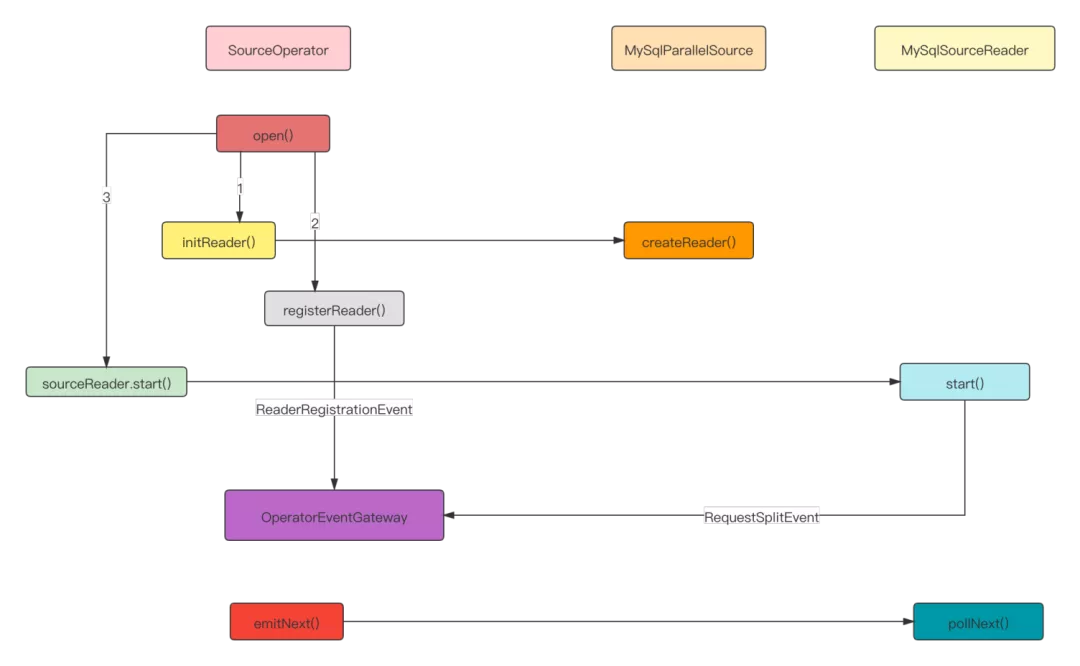
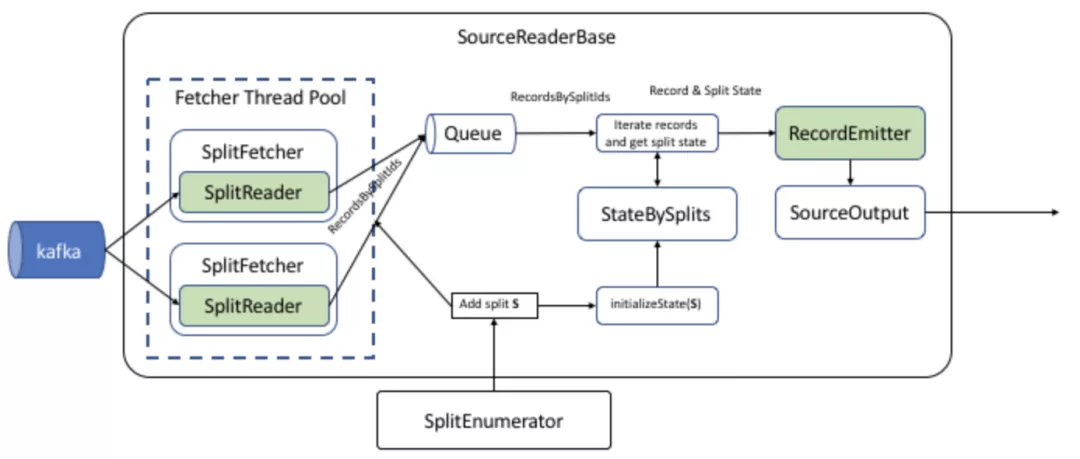
- SourceOperator 在初始化时,通过 MySqlParallelSource 创建 MySqlSourceReader。MySqlSourceReader 通过 SingleThreadFetcherManager 创建 Fetcher 拉取分片数据,数据以 MySqlRecords 格式写入到 elementsQueue。
MySqlParallelSource#createReader

public SourceReader<T, MySqlSplit> createReader(SourceReaderContext readerContext) throws Exception {
    // note:  数据存储队列
FutureCompletingBlockingQueue<RecordsWithSplitIds<SourceRecord>> elementsQueue =
        new FutureCompletingBlockingQueue<>();
final Configuration readerConfiguration = getReaderConfig(readerContext);

    // note: Split Reader 工厂类
Supplier<MySqlSplitReader> splitReaderSupplier =
        () -> new MySqlSplitReader(readerConfiguration, readerContext.getIndexOfSubtask());

return new MySqlSourceReader<>(
        elementsQueue,
        splitReaderSupplier,
        new MySqlRecordEmitter<>(deserializationSchema),
        readerConfiguration,
        readerContext);
}- 将创建的 MySqlSourceReader 以事件的形式传递给 SourceCoordinator 进行注册。SourceCoordinator 接收到注册事件后,将 reader 地址及索引进行保存。
SourceCoordinator#handleReaderRegistrationEvent
// note: SourceCoordinator 处理Reader 注册事件
private void handleReaderRegistrationEvent(ReaderRegistrationEvent event) {
    context.registerSourceReader(new ReaderInfo(event.subtaskId(), event.location()));
    enumerator.addReader(event.subtaskId());
}- MySqlSourceReader 启动后会向 MySqlSourceEnumerator 发送请求分片事件,从而收集分配的切片数据。
- SourceOperator 初始化完毕后,调用 emitNext 由 SourceReaderBase 从 elementsQueue 获取数据集合并下发给 MySqlRecordEmitter。接口调用示意图:
3. MySqlSourceEnumerator 处理分片请求
MySqlSourceReader 启动时会向 MySqlSourceEnumerator 发送请求 RequestSplitEvent 事件,根据返回的切片范围读取区间数据。MySqlSourceEnumerator 全量读取阶段分片请求处理逻辑,最终返回一个 MySqlSnapshotSplit。 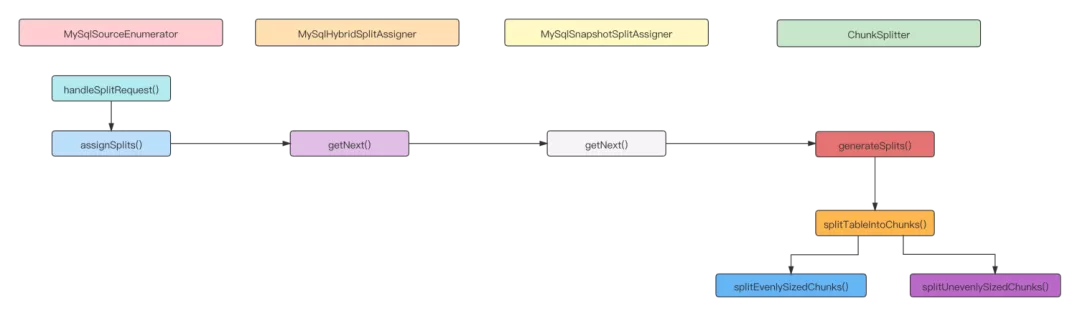
- 处理切片请求事件,为请求的 Reader 分配切片,通过发送 AddSplitEvent 时间传递 MySqlSplit (全量阶段MySqlSnapshotSplit、增量阶段 MySqlBinlogSplit)。
MySqlSourceEnumerator#handleSplitRequest
public void handleSplitRequest(int subtaskId, @Nullable String requesterHostname) {
    if (!context.registeredReaders().containsKey(subtaskId)) {
        // reader failed between sending the request and now. skip this request.
        return;
    }
    // note:  将reader所属的subtaskId存储到TreeSet, 在处理binlog split时优先分配个task-0
    readersAwaitingSplit.add(subtaskId);

    assignSplits();
}

// note: 分配切片
private void assignSplits() {
    final Iterator<Integer> awaitingReader = readersAwaitingSplit.iterator();
    while (awaitingReader.hasNext()) {
        int nextAwaiting = awaitingReader.next();
        // if the reader that requested another split has failed in the meantime, remove
        // it from the list of waiting readers
        if (!context.registeredReaders().containsKey(nextAwaiting)) {
            awaitingReader.remove();
            continue;
        }

        //note: 由 MySqlSplitAssigner 分配切片
        Optional<MySqlSplit> split = splitAssigner.getNext();
        if (split.isPresent()) {
            final MySqlSplit mySqlSplit = split.get();
            //  note: 发送AddSplitEvent, 为 Reader 返回切片信息
            context.assignSplit(mySqlSplit, nextAwaiting);
            awaitingReader.remove();

            LOG.info("Assign split {} to subtask {}", mySqlSplit, nextAwaiting);
        } else {
            // there is no available splits by now, skip assigning
            break;
        }
    }
}
MySqlHybridSplitAssigner 处理全量切片、增量切片的逻辑。
- 任务刚启动时,remainingTables 不为空,noMoreSplits 返回值为false,创建 SnapshotSplit。
- 全量阶段分片读取完成后,noMoreSplits 返回值为true, 创建 BinlogSplit。
MySqlHybridSplitAssigner#getNext
@Override
public Optional<MySqlSplit> getNext() {
    if (snapshotSplitAssigner.noMoreSplits()) {
        // binlog split assigning
        if (isBinlogSplitAssigned) {
            // no more splits for the assigner
            return Optional.empty();
        } else if (snapshotSplitAssigner.isFinished()) {
            // we need to wait snapshot-assigner to be finished before
            // assigning the binlog split. Otherwise, records emitted from binlog split
            // might be out-of-order in terms of same primary key with snapshot splits.
            isBinlogSplitAssigned = true;

            //note: snapshot split 切片完成后,创建BinlogSplit。
            return Optional.of(createBinlogSplit());
        } else {
            // binlog split is not ready by now
            return Optional.empty();
        }
    } else {
        // note: 由MySqlSnapshotSplitAssigner 创建 SnapshotSplit
        // snapshot assigner still have remaining splits, assign split from it
        return snapshotSplitAssigner.getNext();
    }
}
- MySqlSnapshotSplitAssigner 处理全量切片逻辑,通过 ChunkSplitter 生成切片,并存储到 Iterator 中。
@Override
public Optional<MySqlSplit> getNext() {
    if (!remainingSplits.isEmpty()) {
        // return remaining splits firstly
        Iterator<MySqlSnapshotSplit> iterator = remainingSplits.iterator();
        MySqlSnapshotSplit split = iterator.next();
        iterator.remove();

        //note: 已分配的切片存储到 assignedSplits 集合
        assignedSplits.put(split.splitId(), split);

        return Optional.of(split);
    } else {
        // note: 初始化阶段 remainingTables 存储了要读取的表名
        TableId nextTable = remainingTables.pollFirst();
        if (nextTable != null) {
            // split the given table into chunks (snapshot splits)
            //  note: 初始化阶段创建了 ChunkSplitter,调用generateSplits 进行切片划分
            Collection<MySqlSnapshotSplit> splits = chunkSplitter.generateSplits(nextTable);
            //  note: 保留所有切片信息
            remainingSplits.addAll(splits);
            //  note: 已经完成分片的 Table
            alreadyProcessedTables.add(nextTable);
            //  note: 递归调用该该方法
            return getNext();
        } else {
            return Optional.empty();
        }
    }
}- ChunkSplitter 将表划分为均匀分布 or 不均匀分布切片的逻辑。读取的表必须包含物理主键。
public Collection<MySqlSnapshotSplit> generateSplits(TableId tableId) {

    Table schema = mySqlSchema.getTableSchema(tableId).getTable();
    List<Column> primaryKeys = schema.primaryKeyColumns();
    // note: 必须有主键
    if (primaryKeys.isEmpty()) {
        throw new ValidationException(
                String.format(
                        "Incremental snapshot for tables requires primary key,"
                                + " but table %s doesn't have primary key.",
                        tableId));
    }
    // use first field in primary key as the split key
    Column splitColumn = primaryKeys.get(0);

    final List<ChunkRange> chunks;
    try {
         // note: 按主键列将数据划分成多个切片
        chunks = splitTableIntoChunks(tableId, splitColumn);
    } catch (SQLException e) {
        throw new FlinkRuntimeException("Failed to split chunks for table " + tableId, e);
    }
    //note: 主键数据类型转换、ChunkRange 包装成MySqlSnapshotSplit。
    // convert chunks into splits
    List<MySqlSnapshotSplit> splits = new ArrayList<>();
    RowType splitType = splitType(splitColumn);

    for (int i = 0; i < chunks.size(); i++) {
        ChunkRange chunk = chunks.get(i);
        MySqlSnapshotSplit split =
                createSnapshotSplit(
                        tableId, i, splitType, chunk.getChunkStart(), chunk.getChunkEnd());
        splits.add(split);
    }
    return splits;
}- splitTableIntoChunks 根据物理主键划分切片。
private List<ChunkRange> splitTableIntoChunks(TableId tableId, Column splitColumn)
        throws SQLException {
    final String splitColumnName = splitColumn.name();
    //  select min, max
    final Object[] minMaxOfSplitColumn = queryMinMax(jdbc, tableId, splitColumnName);
    final Object min = minMaxOfSplitColumn[0];
    final Object max = minMaxOfSplitColumn[1];
    if (min == null || max == null || min.equals(max)) {
        // empty table, or only one row, return full table scan as a chunk
        return Collections.singletonList(ChunkRange.all());
    }

    final List<ChunkRange> chunks;
    if (splitColumnEvenlyDistributed(splitColumn)) {
        // use evenly-sized chunks which is much efficient
        // note: 按主键均匀划分
        chunks = splitEvenlySizedChunks(min, max);
    } else {
        // note: 按主键非均匀划分
        // use unevenly-sized chunks which will request many queries and is not efficient.
        chunks = splitUnevenlySizedChunks(tableId, splitColumnName, min, max);
    }

    return chunks;
}

/** Checks whether split column is evenly distributed across its range. */
private static boolean splitColumnEvenlyDistributed(Column splitColumn) {
    // only column is auto-incremental are recognized as evenly distributed.
    // TODO: we may use MAX,MIN,COUNT to calculate the distribution in the future.
    if (splitColumn.isAutoIncremented()) {
        DataType flinkType = MySqlTypeUtils.fromDbzColumn(splitColumn);
        LogicalTypeRoot typeRoot = flinkType.getLogicalType().getTypeRoot();
        // currently, we only support split column with type BIGINT, INT, DECIMAL
        return typeRoot == LogicalTypeRoot.BIGINT
                || typeRoot == LogicalTypeRoot.INTEGER
                || typeRoot == LogicalTypeRoot.DECIMAL;
    } else {
        return false;
    }
}


/**
 *  根据拆分列的最小值和最大值将表拆分为大小均匀的块,并以 {@link #chunkSize} 步长滚动块。
 * Split table into evenly sized chunks based on the numeric min and max value of split column,
 * and tumble chunks in {@link #chunkSize} step size.
 */
private List<ChunkRange> splitEvenlySizedChunks(Object min, Object max) {
    if (ObjectUtils.compare(ObjectUtils.plus(min, chunkSize), max) > 0) {
        // there is no more than one chunk, return full table as a chunk
        return Collections.singletonList(ChunkRange.all());
    }

    final List<ChunkRange> splits = new ArrayList<>();
    Object chunkStart = null;
    Object chunkEnd = ObjectUtils.plus(min, chunkSize);
    //  chunkEnd <= max
    while (ObjectUtils.compare(chunkEnd, max) <= 0) {
        splits.add(ChunkRange.of(chunkStart, chunkEnd));
        chunkStart = chunkEnd;
        chunkEnd = ObjectUtils.plus(chunkEnd, chunkSize);
    }
    // add the ending split
    splits.add(ChunkRange.of(chunkStart, null));
    return splits;
}

/**   通过连续计算下一个块最大值,将表拆分为大小不均匀的块。
 * Split table into unevenly sized chunks by continuously calculating next chunk max value. */
private List<ChunkRange> splitUnevenlySizedChunks(
        TableId tableId, String splitColumnName, Object min, Object max) throws SQLException {
    final List<ChunkRange> splits = new ArrayList<>();
    Object chunkStart = null;

    Object chunkEnd = nextChunkEnd(min, tableId, splitColumnName, max);
    int count = 0;
    while (chunkEnd != null && ObjectUtils.compare(chunkEnd, max) <= 0) {
        // we start from [null, min + chunk_size) and avoid [null, min)
        splits.add(ChunkRange.of(chunkStart, chunkEnd));
        // may sleep a while to avoid DDOS on MySQL server
        maySleep(count++);
        chunkStart = chunkEnd;
        chunkEnd = nextChunkEnd(chunkEnd, tableId, splitColumnName, max);
    }
    // add the ending split
    splits.add(ChunkRange.of(chunkStart, null));
    return splits;
}

private Object nextChunkEnd(
        Object previousChunkEnd, TableId tableId, String splitColumnName, Object max)
        throws SQLException {
    // chunk end might be null when max values are removed
    Object chunkEnd =
            queryNextChunkMax(jdbc, tableId, splitColumnName, chunkSize, previousChunkEnd);
    if (Objects.equals(previousChunkEnd, chunkEnd)) {
        // we don't allow equal chunk start and end,
        // should query the next one larger than chunkEnd
        chunkEnd = queryMin(jdbc, tableId, splitColumnName, chunkEnd);
    }
    if (ObjectUtils.compare(chunkEnd, max) >= 0) {
        return null;
    } else {
        return chunkEnd;
    }
}
4. MySqlSourceReader 处理切片分配请求
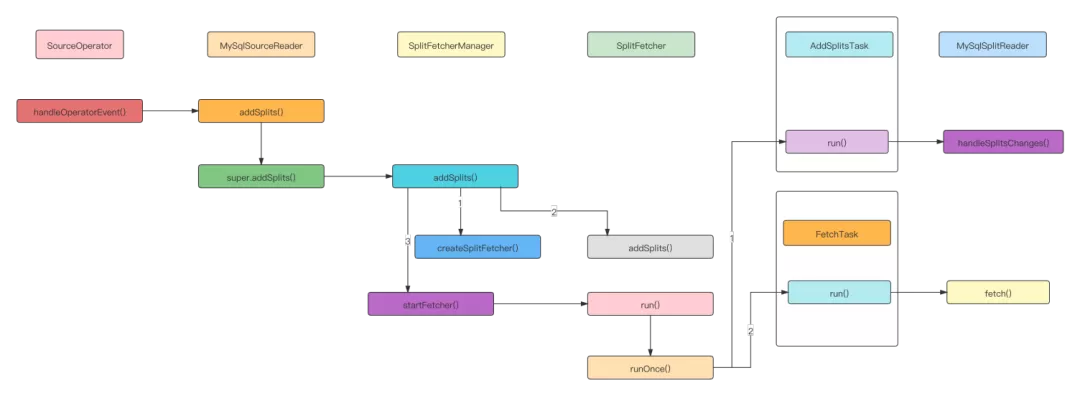
MySqlSourceReader 接收到切片分配请求后,会为先创建一个 SplitFetcher 线程,向 taskQueue 添加、执行 AddSplitsTask 任务用来处理添加分片任务,接着执行 FetchTask 使用 Debezium API 进行读取数据,读取的数据存储到 elementsQueue 中,SourceReaderBase 会从该队列中获取数据,并下发给 MySqlRecordEmitter。
- 处理切片分配事件时,创建 SplitFetcher 向 taskQueue 添加 AddSplitsTask。
SingleThreadFetcherManager#addSplits
public void addSplits(List<SplitT> splitsToAdd) {
    SplitFetcher<E, SplitT> fetcher = getRunningFetcher();
    if (fetcher == null) {
        fetcher = createSplitFetcher();
        // Add the splits to the fetchers.
        fetcher.addSplits(splitsToAdd);
        startFetcher(fetcher);
    } else {
        fetcher.addSplits(splitsToAdd);
    }
}

// 创建 SplitFetcher
protected synchronized SplitFetcher<E, SplitT> createSplitFetcher() {
    if (closed) {
        throw new IllegalStateException("The split fetcher manager has closed.");
    }
    // Create SplitReader.
    SplitReader<E, SplitT> splitReader = splitReaderFactory.get();

    int fetcherId = fetcherIdGenerator.getAndIncrement();
    SplitFetcher<E, SplitT> splitFetcher =
            new SplitFetcher<>(
                    fetcherId,
                    elementsQueue,
                    splitReader,
                    errorHandler,
                    () -> {
                        fetchers.remove(fetcherId);
                        elementsQueue.notifyAvailable();
                    });
    fetchers.put(fetcherId, splitFetcher);
    return splitFetcher;
}

public void addSplits(List<SplitT> splitsToAdd) {
    enqueueTask(new AddSplitsTask<>(splitReader, splitsToAdd, assignedSplits));
    wakeUp(true);
}
- 执行 SplitFetcher线程,首次执行 AddSplitsTask 线程添加分片,以后执行 FetchTask 线程拉取数据。
SplitFetcher#runOnce
void runOnce() {
    try {
        if (shouldRunFetchTask()) {
            runningTask = fetchTask;
        } else {
            runningTask = taskQueue.take();
        }

        if (!wakeUp.get() && runningTask.run()) {
            LOG.debug("Finished running task {}", runningTask);
            runningTask = null;
            checkAndSetIdle();
        }
    } catch (Exception e) {
        throw new RuntimeException(
                String.format(
                        "SplitFetcher thread %d received unexpected exception while polling the records",
                        id),
                e);
    }

    maybeEnqueueTask(runningTask);
    synchronized (wakeUp) {
        // Set the running task to null. It is necessary for the shutdown method to avoid
        // unnecessarily interrupt the running task.
        runningTask = null;
        // Set the wakeUp flag to false.
        wakeUp.set(false);
        LOG.debug("Cleaned wakeup flag.");
    }
}- AddSplitsTask 调用 MySqlSplitReader 的 handleSplitsChanges 方法,向切片队列中添加已分配的切片信息。在下一次 fetch() 调用时,从队列中获取切片并读取切片数据。
AddSplitsTask#run
public boolean run() {
    for (SplitT s : splitsToAdd) {
        assignedSplits.put(s.splitId(), s);
    }
    splitReader.handleSplitsChanges(new SplitsAddition<>(splitsToAdd));
    return true;
}
MySqlSplitReader#handleSplitsChanges
public void handleSplitsChanges(SplitsChange<MySqlSplit> splitsChanges) {
    if (!(splitsChanges instanceof SplitsAddition)) {
        throw new UnsupportedOperationException(
                String.format(
                        "The SplitChange type of %s is not supported.",
                        splitsChanges.getClass()));
    }

    //note: 添加切片 到队列。
    splits.addAll(splitsChanges.splits());
}- MySqlSplitReader 执行 fetch(),由 DebeziumReader 读取数据到事件队列,在对数据修正后以 MySqlRecords 格式返回。
MySqlSplitReader#fetch
@Override
public RecordsWithSplitIds<SourceRecord> fetch() throws IOException {
    // note: 创建Reader 并读取数据
    checkSplitOrStartNext();

    Iterator<SourceRecord> dataIt = null;
    try {
        // note:  对读取的数据进行修正
        dataIt = currentReader.pollSplitRecords();
    } catch (InterruptedException e) {
        LOG.warn("fetch data failed.", e);
        throw new IOException(e);
    }

    //  note: 返回的数据被封装为 MySqlRecords 进行传输
    return dataIt == null
            ? finishedSnapshotSplit()
            : MySqlRecords.forRecords(currentSplitId, dataIt);
}

private void checkSplitOrStartNext() throws IOException {
    // the binlog reader should keep alive
    if (currentReader instanceof BinlogSplitReader) {
        return;
    }

    if (canAssignNextSplit()) {
        // note:  从切片队列读取MySqlSplit
        final MySqlSplit nextSplit = splits.poll();
        if (nextSplit == null) {
            throw new IOException("Cannot fetch from another split - no split remaining");
        }

        currentSplitId = nextSplit.splitId();
        // note:  区分全量切片读取还是增量切片读取
        if (nextSplit.isSnapshotSplit()) {
            if (currentReader == null) {
                final MySqlConnection jdbcConnection = getConnection(config);
                final BinaryLogClient binaryLogClient = getBinaryClient(config);

                final StatefulTaskContext statefulTaskContext =
                        new StatefulTaskContext(config, binaryLogClient, jdbcConnection);
                // note: 创建SnapshotSplitReader,使用Debezium Api读取分配数据及区间Binlog值
                currentReader = new SnapshotSplitReader(statefulTaskContext, subtaskId);
            }

        } else {
            // point from snapshot split to binlog split
            if (currentReader != null) {
                LOG.info("It's turn to read binlog split, close current snapshot reader");
                currentReader.close();
            }

            final MySqlConnection jdbcConnection = getConnection(config);
            final BinaryLogClient binaryLogClient = getBinaryClient(config);
            final StatefulTaskContext statefulTaskContext =
                    new StatefulTaskContext(config, binaryLogClient, jdbcConnection);
            LOG.info("Create binlog reader");
            // note: 创建BinlogSplitReader,使用Debezium API进行增量读取
            currentReader = new BinlogSplitReader(statefulTaskContext, subtaskId);
        }
        // note: 执行Reader进行数据读取
        currentReader.submitSplit(nextSplit);
    }
}
5. DebeziumReader 数据处理
DebeziumReader 包含全量切片读取、增量切片读取两个阶段,数据读取后存储到 ChangeEventQueue,执行pollSplitRecords 时对数据进行修正。
- SnapshotSplitReader 全量切片读取。全量阶段的数据读取通过执行 Select 语句查询出切片范围内的表数据,在写入队列前后执行 SHOW MASTER STATUS 时,写入当前偏移量。
public void submitSplit(MySqlSplit mySqlSplit) {
    ......
    executor.submit(
            () -> {
                try {
                    currentTaskRunning = true;
                    // note: 数据读取,在数据前后插入Binlog当前偏移量
                    // 1. execute snapshot read task。
                    final SnapshotSplitChangeEventSourceContextImpl sourceContext =
                            new SnapshotSplitChangeEventSourceContextImpl();
                    SnapshotResult snapshotResult =
                            splitSnapshotReadTask.execute(sourceContext);

                    //  note: 为增量读取做准备,包含了起始偏移量
                    final MySqlBinlogSplit appendBinlogSplit = createBinlogSplit(sourceContext);
                    final MySqlOffsetContext mySqlOffsetContext =
                            statefulTaskContext.getOffsetContext();
                    mySqlOffsetContext.setBinlogStartPoint(
                            appendBinlogSplit.getStartingOffset().getFilename(),
                            appendBinlogSplit.getStartingOffset().getPosition());

                    //  note: 从起始偏移量开始读取
                    // 2. execute binlog read task
                    if (snapshotResult.isCompletedOrSkipped()) {
                        // we should only capture events for the current table,
                        Configuration dezConf =
                                statefulTaskContext
                                        .getDezConf()
                                        .edit()
                                        .with(
                                                "table.whitelist",
                                                currentSnapshotSplit.getTableId())
                                        .build();

                        // task to read binlog for current split
                        MySqlBinlogSplitReadTask splitBinlogReadTask =
                                new MySqlBinlogSplitReadTask(
                                        new MySqlConnectorConfig(dezConf),
                                        mySqlOffsetContext,
                                        statefulTaskContext.getConnection(),
                                        statefulTaskContext.getDispatcher(),
                                        statefulTaskContext.getErrorHandler(),
                                        StatefulTaskContext.getClock(),
                                        statefulTaskContext.getTaskContext(),
                                        (MySqlStreamingChangeEventSourceMetrics)
                                                statefulTaskContext
                                                        .getStreamingChangeEventSourceMetrics(),
                                        statefulTaskContext
                                                .getTopicSelector()
                                                .getPrimaryTopic(),
                                        appendBinlogSplit);

                        splitBinlogReadTask.execute(
                                new SnapshotBinlogSplitChangeEventSourceContextImpl());
                    } else {
                        readException =
                                new IllegalStateException(
                                        String.format(
                                                "Read snapshot for mysql split %s fail",
                                                currentSnapshotSplit));
                    }
                } catch (Exception e) {
                    currentTaskRunning = false;
                    LOG.error(
                            String.format(
                                    "Execute snapshot read task for mysql split %s fail",
                                    currentSnapshotSplit),
                            e);
                    readException = e;
                }
            });
}- SnapshotSplitReader 增量切片读取。增量阶段切片读取重点是判断 BinlogSplitReadTask 什么时候停止,在读取到分片阶段的结束时的偏移量即终止。
MySqlBinlogSplitReadTask#handleEvent
protected void handleEvent(Event event) {
    // note: 事件下发 队列
    super.handleEvent(event);
    // note: 全量读取阶段需要终止Binlog读取
    // check do we need to stop for read binlog for snapshot split.
    if (isBoundedRead()) {
        final BinlogOffset currentBinlogOffset =
                new BinlogOffset(
                        offsetContext.getOffset().get(BINLOG_FILENAME_OFFSET_KEY).toString(),
                        Long.parseLong(
                                offsetContext
                                        .getOffset()
                                        .get(BINLOG_POSITION_OFFSET_KEY)
                                        .toString()));
        // note: currentBinlogOffset > HW 停止读取
        // reach the high watermark, the binlog reader should finished
        if (currentBinlogOffset.isAtOrBefore(binlogSplit.getEndingOffset())) {
            // send binlog end event
            try {
                signalEventDispatcher.dispatchWatermarkEvent(
                        binlogSplit,
                        currentBinlogOffset,
                        SignalEventDispatcher.WatermarkKind.BINLOG_END);
            } catch (InterruptedException e) {
                logger.error("Send signal event error.", e);
                errorHandler.setProducerThrowable(
                        new DebeziumException("Error processing binlog signal event", e));
            }
            //  终止binlog读取
            // tell reader the binlog task finished
            ((SnapshotBinlogSplitChangeEventSourceContextImpl) context).finished();
        }
    }
}- SnapshotSplitReader 执行 pollSplitRecords 时对队列中的原始数据进行修正。 具体处理逻辑查看 RecordUtils#normalizedSplitRecords。
public Iterator<SourceRecord> pollSplitRecords() throws InterruptedException {
    if (hasNextElement.get()) {
        // data input: [low watermark event][snapshot events][high watermark event][binlogevents][binlog-end event]
        // data output: [low watermark event][normalized events][high watermark event]
        boolean reachBinlogEnd = false;
        final List<SourceRecord> sourceRecords = new ArrayList<>();
        while (!reachBinlogEnd) {
            // note: 处理队列中写入的 DataChangeEvent 事件
            List<DataChangeEvent> batch = queue.poll();
            for (DataChangeEvent event : batch) {
                sourceRecords.add(event.getRecord());
                if (RecordUtils.isEndWatermarkEvent(event.getRecord())) {
                    reachBinlogEnd = true;
                    break;
                }
            }
        }
        // snapshot split return its data once
        hasNextElement.set(false);
        //  ************   修正数据  ***********
        return normalizedSplitRecords(currentSnapshotSplit, sourceRecords, nameAdjuster)
                .iterator();
    }
    // the data has been polled, no more data
    reachEnd.compareAndSet(false, true);
    return null;
}- BinlogSplitReader 数据读取。读取逻辑比较简单,重点是起始偏移量的设置,起始偏移量为所有切片的 HW。
- BinlogSplitReader 执行 pollSplitRecords 时对队列中的原始数据进行修正,保障数据一致性。 增量阶段的Binlog读取是无界的,数据会全部下发到事件队列,BinlogSplitReader 通过 shouldEmit() 判断数据是否下发。
BinlogSplitReader#pollSplitRecords
public Iterator<SourceRecord> pollSplitRecords() throws InterruptedException {
    checkReadException();
    final List<SourceRecord> sourceRecords = new ArrayList<>();
    if (currentTaskRunning) {
        List<DataChangeEvent> batch = queue.poll();
        for (DataChangeEvent event : batch) {
            if (shouldEmit(event.getRecord())) {
                sourceRecords.add(event.getRecord());
            }
        }
    }
    return sourceRecords.iterator();
}
事件下发条件:
- 新收到的 event post 大于 maxwm;
- 当前 data 值所属某个 snapshot spilt & 偏移量大于 HWM,下发数据。
/**
 *
 * Returns the record should emit or not.
 *
 * <p>The watermark signal algorithm is the binlog split reader only sends the binlog event that
 * belongs to its finished snapshot splits. For each snapshot split, the binlog event is valid
 * since the offset is after its high watermark.
 *
 * <pre> E.g: the data input is :
 *    snapshot-split-0 info : [0,    1024) highWatermark0
 *    snapshot-split-1 info : [1024, 2048) highWatermark1
 *  the data output is:
 *  only the binlog event belong to [0,    1024) and offset is after highWatermark0 should send,
 *  only the binlog event belong to [1024, 2048) and offset is after highWatermark1 should send.
 * </pre>
 */
private boolean shouldEmit(SourceRecord sourceRecord) {
    if (isDataChangeRecord(sourceRecord)) {
        TableId tableId = getTableId(sourceRecord);
        BinlogOffset position = getBinlogPosition(sourceRecord);
        // aligned, all snapshot splits of the table has reached max highWatermark

        // note:  新收到的event post 大于 maxwm ,直接下发
        if (position.isAtOrBefore(maxSplitHighWatermarkMap.get(tableId))) {
            return true;
        }
        Object[] key =
                getSplitKey(
                        currentBinlogSplit.getSplitKeyType(),
                        sourceRecord,
                        statefulTaskContext.getSchemaNameAdjuster());

        for (FinishedSnapshotSplitInfo splitInfo : finishedSplitsInfo.get(tableId)) {
            /**
             *  note: 当前 data值所属某个snapshot spilt &  偏移量大于 HWM,下发数据
             */
            if (RecordUtils.splitKeyRangeContains(
                            key, splitInfo.getSplitStart(), splitInfo.getSplitEnd())
                    && position.isAtOrBefore(splitInfo.getHighWatermark())) {
                return true;
            }
        }
        // not in the monitored splits scope, do not emit
        return false;
    }

    // always send the schema change event and signal event
    // we need record them to state of Flink
    return true;
}
6. MySqlRecordEmitter 数据下发
SourceReaderBase 从队列中获取切片读取的 DataChangeEvent 数据集合,将数据类型由 Debezium 的 DataChangeEvent 转换为 Flink 的 RowData 类型。
- SourceReaderBase 处理切片数据流程。
org.apache.flink.connector.base.source.reader.SourceReaderBase#pollNextpublic InputStatus pollNext(ReaderOutput<T> output) throws Exception { // make sure we have a fetch we are working on, or move to the next RecordsWithSplitIds<E> recordsWithSplitId = this.currentFetch; if (recordsWithSplitId == null) { recordsWithSplitId = getNextFetch(output); if (recordsWithSplitId == null) { return trace(finishedOrAvailableLater()); } } // we need to loop here, because we may have to go across splits while (true) { // Process one record. // note: 通过MySqlRecords从迭代器中读取单条数据 final E record = recordsWithSplitId.nextRecordFromSplit(); if (record != null) { // emit the record. recordEmitter.emitRecord(record, currentSplitOutput, currentSplitContext.state); LOG.trace("Emitted record: {}", record); // We always emit MORE_AVAILABLE here, even though we do not strictly know whether // more is available. If nothing more is available, the next invocation will find // this out and return the correct status. // That means we emit the occasional 'false positive' for availability, but this // saves us doing checks for every record. Ultimately, this is cheaper. return trace(InputStatus.MORE_AVAILABLE); } else if (!moveToNextSplit(recordsWithSplitId, output)) { // The fetch is done and we just discovered that and have not emitted anything, yet. // We need to move to the next fetch. As a shortcut, we call pollNext() here again, // rather than emitting nothing and waiting for the caller to call us again. return pollNext(output); } // else fall through the loop }}private RecordsWithSplitIds<E> getNextFetch(final ReaderOutput<T> output) { splitFetcherManager.checkErrors(); LOG.trace("Getting next source data batch from queue"); // note: 从elementsQueue 获取数据 final RecordsWithSplitIds<E> recordsWithSplitId = elementsQueue.poll(); if (recordsWithSplitId == null || !moveToNextSplit(recordsWithSplitId, output)) { return null; } currentFetch = recordsWithSplitId; return recordsWithSplitId;}- MySqlRecords 返回单条数据集合。
com.ververica.cdc.connectors.mysql.source.split.MySqlRecords#nextRecordFromSplitpublic SourceRecord nextRecordFromSplit() { final Iterator<SourceRecord> recordsForSplit = this.recordsForCurrentSplit; if (recordsForSplit != null) { if (recordsForSplit.hasNext()) { return recordsForSplit.next(); } else { return null; } } else { throw new IllegalStateException(); }}- MySqlRecordEmitter 通过 RowDataDebeziumDeserializeSchema 将数据转换为Rowdata。
com.ververica.cdc.connectors.mysql.source.reader.MySqlRecordEmitter#emitRecordpublic void emitRecord(SourceRecord element, SourceOutput<T> output, MySqlSplitState splitState) throws Exception {if (isWatermarkEvent(element)) { BinlogOffset watermark = getWatermark(element); if (isHighWatermarkEvent(element) && splitState.isSnapshotSplitState()) { splitState.asSnapshotSplitState().setHighWatermark(watermark); }} else if (isSchemaChangeEvent(element) && splitState.isBinlogSplitState()) { HistoryRecord historyRecord = getHistoryRecord(element); Array tableChanges = historyRecord.document().getArray(HistoryRecord.Fields.TABLE_CHANGES); TableChanges changes = TABLE_CHANGE_SERIALIZER.deserialize(tableChanges, true); for (TableChanges.TableChange tableChange : changes) { splitState.asBinlogSplitState().recordSchema(tableChange.getId(), tableChange); }} else if (isDataChangeRecord(element)) { // note: 数据的处理 if (splitState.isBinlogSplitState()) { BinlogOffset position = getBinlogPosition(element); splitState.asBinlogSplitState().setStartingOffset(position); } debeziumDeserializationSchema.deserialize( element, new Collector<T>() { @Override public void collect(final T t) { output.collect(t); } @Override public void close() { // do nothing } });} else { // unknown element LOG.info("Meet unknown element {}, just skip.", element);}}RowDataDebeziumDeserializeSchema 序列化过程。
com.ververica.cdc.debezium.table.RowDataDebeziumDeserializeSchema#deserializepublic void deserialize(SourceRecord record, Collector<RowData> out) throws Exception { Envelope.Operation op = Envelope.operationFor(record); Struct value = (Struct) record.value(); Schema valueSchema = record.valueSchema(); if (op == Envelope.Operation.CREATE || op == Envelope.Operation.READ) { GenericRowData insert = extractAfterRow(value, valueSchema); validator.validate(insert, RowKind.INSERT); insert.setRowKind(RowKind.INSERT); out.collect(insert); } else if (op == Envelope.Operation.DELETE) { GenericRowData delete = extractBeforeRow(value, valueSchema); validator.validate(delete, RowKind.DELETE); delete.setRowKind(RowKind.DELETE); out.collect(delete); } else { GenericRowData before = extractBeforeRow(value, valueSchema); validator.validate(before, RowKind.UPDATE_BEFORE); before.setRowKind(RowKind.UPDATE_BEFORE); out.collect(before); GenericRowData after = extractAfterRow(value, valueSchema); validator.validate(after, RowKind.UPDATE_AFTER); after.setRowKind(RowKind.UPDATE_AFTER); out.collect(after); }}7. MySqlSourceReader 汇报切片读取完成事件
MySqlSourceReader 处理完一个全量切片后,会向 MySqlSourceEnumerator 发送已完成的切片信息,包含切片 ID、HighWatermar ,然后继续发送切片请求。
com.ververica.cdc.connectors.mysql.source.reader.MySqlSourceReader#onSplitFinishedprotected void onSplitFinished(Map<String, MySqlSplitState> finishedSplitIds) {for (MySqlSplitState mySqlSplitState : finishedSplitIds.values()) { MySqlSplit mySqlSplit = mySqlSplitState.toMySqlSplit(); finishedUnackedSplits.put(mySqlSplit.splitId(), mySqlSplit.asSnapshotSplit());}/** * note: 发送切片完成事件 */reportFinishedSnapshotSplitsIfNeed();// 上一个spilt处理完成后继续发送切片请求context.sendSplitRequest();}private void reportFinishedSnapshotSplitsIfNeed() { if (!finishedUnackedSplits.isEmpty()) { final Map<String, BinlogOffset> finishedOffsets = new HashMap<>(); for (MySqlSnapshotSplit split : finishedUnackedSplits.values()) { // note: 发送切片ID,及最大偏移量 finishedOffsets.put(split.splitId(), split.getHighWatermark()); } FinishedSnapshotSplitsReportEvent reportEvent = new FinishedSnapshotSplitsReportEvent(finishedOffsets); context.sendSourceEventToCoordinator(reportEvent); LOG.debug( "The subtask {} reports offsets of finished snapshot splits {}.", subtaskId, finishedOffsets); }}8. MySqlSourceEnumerator 分配增量切片
全量阶段所有分片读取完毕后,MySqlHybridSplitAssigner 会创建 BinlogSplit 进行后续增量读取,在创建 BinlogSplit 会从全部已完成的全量切片中筛选最小 BinlogOffset。注意:2.0.0 分支 createBinlogSplit 最小偏移量总是从 0 开始,最新 master 分支已经修复这个 BUG。
private MySqlBinlogSplit createBinlogSplit() { final List<MySqlSnapshotSplit> assignedSnapshotSplit = snapshotSplitAssigner.getAssignedSplits().values().stream() .sorted(Comparator.comparing(MySqlSplit::splitId)) .collect(Collectors.toList()); Map<String, BinlogOffset> splitFinishedOffsets = snapshotSplitAssigner.getSplitFinishedOffsets(); final List<FinishedSnapshotSplitInfo> finishedSnapshotSplitInfos = new ArrayList<>(); final Map<TableId, TableChanges.TableChange> tableSchemas = new HashMap<>(); BinlogOffset minBinlogOffset = null; // note: 从所有assignedSnapshotSplit中筛选最小偏移量 for (MySqlSnapshotSplit split : assignedSnapshotSplit) { // find the min binlog offset BinlogOffset binlogOffset = splitFinishedOffsets.get(split.splitId()); if (minBinlogOffset == null || binlogOffset.compareTo(minBinlogOffset) < 0) { minBinlogOffset = binlogOffset; } finishedSnapshotSplitInfos.add( new FinishedSnapshotSplitInfo( split.getTableId(), split.splitId(), split.getSplitStart(), split.getSplitEnd(), binlogOffset)); tableSchemas.putAll(split.getTableSchemas()); } final MySqlSnapshotSplit lastSnapshotSplit = assignedSnapshotSplit.get(assignedSnapshotSplit.size() - 1).asSnapshotSplit(); return new MySqlBinlogSplit( BINLOG_SPLIT_ID, lastSnapshotSplit.getSplitKeyType(), minBinlogOffset == null ? BinlogOffset.INITIAL_OFFSET : minBinlogOffset, BinlogOffset.NO_STOPPING_OFFSET, finishedSnapshotSplitInfos, tableSchemas);}12 月 4-5 日,Flink Forward Asia 2021 重磅开启,全球 40+ 多行业一线厂商,80+ 干货议题,带来专属于开发者的技术盛宴。
https://flink-forward.org.cn/
另有首届 Flink Forward Asia Hackathon 正式启动,10W 奖金等你来!
https://www.aliyun.com/page-source//tianchi/promotion/FlinkForwardAsiaHackathon
更多 Flink 相关技术问题,可扫码加入社区钉钉交流群
第一时间获取最新技术文章和社区动态,请关注公众号~

活动推荐
阿里云基于 Apache Flink 构建的企业级产品-实时计算Flink版现开启活动:
99 元试用 实时计算Flink版(包年包月、10CU)即有机会获得 Flink 独家定制卫衣;另包 3 个月及以上还有 85 折优惠!
了解活动详情:https://www.aliyun.com/product/bigdata/sc