通用对话弹窗CommonDialog
Version 1.0
Created by chenchangjun on 18/1/12.
- 抽离普通基类见
BaseNormalDialog - 优化扩展方式 见
3.1 基本扩展 - 添加必要注释
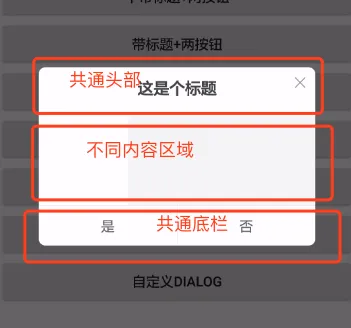
image.png
项目中,迭代了快8年了,对话框,种类繁多, 难以维护, 有的继承popwindow, 有的继承dialog, 有的继承dialogFragment....而且写法 各不相同.
所以,急需一次版本迭代, 来 优化 系统所有的弹窗. 本着有轮子就不会去 造轮子的原则~ 但是,逛了一圈,开源的 对话弹窗,都不能满足项目需求,
这就是要 造这个了轮子的初衷.
项目目前,有点粗糙,没有做精简优化,如果想引用,可以直接download然后,作为lib应用.
后期,我会随着项目迭代,进行优化.
项目地址
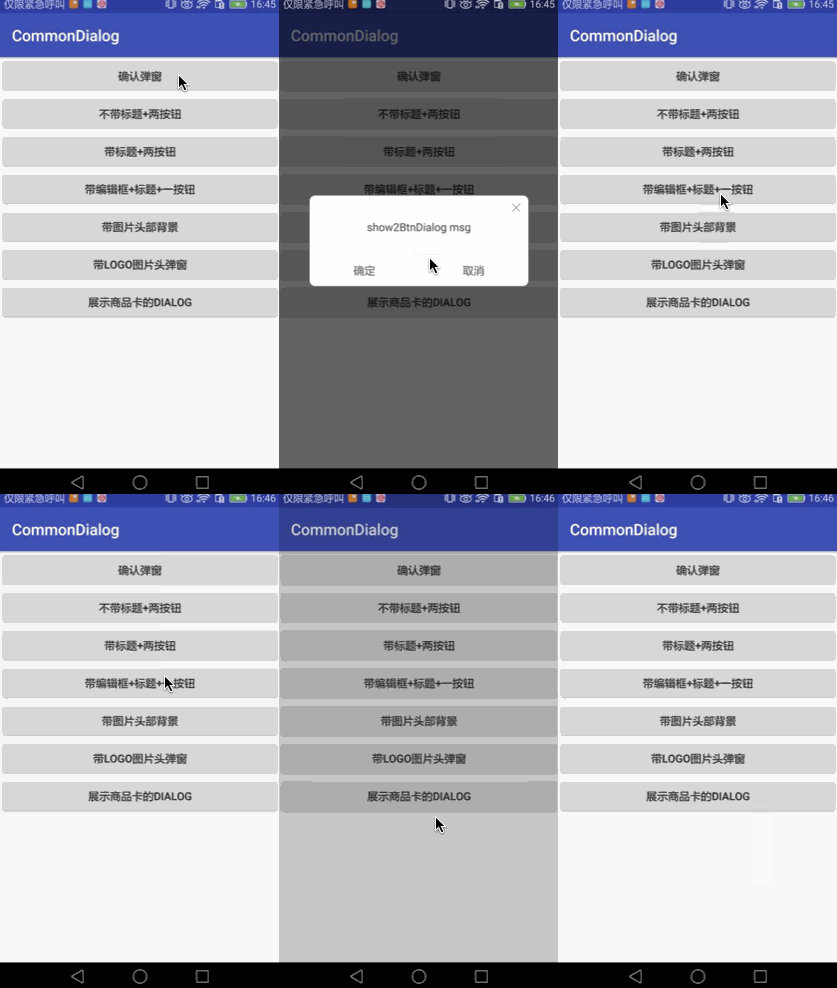
效果图
common_dialog.gif
调用
//通用弹框 生产类
public class DialogCreator {
    /**
     * 无标题,单btn弹窗
     *
     * @param mActivity
     * @param msg
     * @param strLeft
     * @param leftListener
     */
    public static BaseDialog showConfirmDialog(Context mActivity, String msg, String strLeft, OnLeftListener leftListener) {
        CommonNormalDialog confrimDialog = new CommonNormalDialog(mActivity);
        confrimDialog.setDialogType(DialogConfig.TYPE_HAS_NO_HEADER)
                .setContent(msg)
                .setContentGravity(DialogConfig.TYPE_GRIVITY_CENTER)
                .setConfirmBtn(strLeft, leftListener)
                .start();
        return confrimDialog;
    }


    /**
     * 无标题,单btn弹窗
     *
     * @param mActivity
     * @param msg
     * @param strLeft
     * @param leftListener
     */
    public static BaseDialog showTitleConfirmDialog(Context mActivity, String title, String msg, String strLeft, OnLeftListener leftListener) {
        CommonNormalDialog confrimDialog = new CommonNormalDialog(mActivity);
        confrimDialog.setDialogType(DialogConfig.TYPE_HAS_HEADER)
                .setTitle(title)
                .setContent(msg)
                .setContentGravity(DialogConfig.TYPE_GRIVITY_CENTER)
                .setConfirmBtn(strLeft, leftListener)
                .start();
        return confrimDialog;
    }
....
}
思路
1.定义顶级抽象类 BaseDialog,
装饰AlertDialog, 统一dialog样式, 并且用 模板方法模式 进行抽象约束 子类型为.
为了达到 易扩展,代码复用的角度, 将整体dialog,根据 功能区域 布局和加载分为3部分----
- 头部header: 扩展头部区域,像图片logo头部,带背景,大标题.
- 中间content: 主内容显示区域,比如输入框,内容详情等等.
- 底部footer:底部扩展区,主要用来放置 确认按钮等等.
    /**
     * 子类必须实现该方法用于显示在界面上的Dialog的Title部分
     *
     * @return title部分的显示的View,返回的titleView为null的话,Dialog将不显示title部分
     */
    protected abstract View initHeader();

    /**
     * 子类必须实现该方法用于显示在界面上的正文部分控件
     * @return content部分显示的内容,如果返回null,将会抛出异常
     */
    protected abstract View initContent();

    /**
     * 子类实现该方法用于显示底部的view
     *
     * @return bottom部分显示的view,如果返回null,bottom部分将不显示
     */
    protected abstract View initBottom();


    /**
     * 模板方法
     */
    protected abstract void loadHeader();

    protected abstract void loadContent();

    protected abstract void loadBottom();


    public   void start(){
        loadHeader();
        loadContent();
        loadBottom();
    };
2. 新建子类,CommonNormalDialog CommonImgHeaderDialog CommonLogoHeaderDialog等
子类 分别对模板方法进行实现, 以CommonNormalDialog为例
/**
     * 普通样式无头部
     * @return
     */
    @Override
    protected View initHeader() {
        return null;
    }

    /**
     * 创建内容布局
     * @return 内容布局
     */
    @Override
    protected View initContent() {

        View content = View.inflate(context, R.layout.common_dialog_content, null);


        tv_title = (TextView) content.findViewById(R.id.tv_title);
        tv_content = (TextView) content.findViewById(R.id.tv_content);

        etv_content = (EditText) content.findViewById(R.id.etv_content);

        v_vertical_line = content.findViewById(R.id.v_vertical_line);
        tv_left = (TextView) content.findViewById(R.id.tv_left);
        tv_right = (TextView) content.findViewById(R.id.tv_right);

        iv_cancel = (ImageView) content.findViewById(R.id.iv_content_cancel);

        iv_cancel.setOnClickListener(this);
        return content;
    }

    /**
     * 创建 底部 按钮布局
     * @return
     */
    @Override
    protected View initBottom() {
        View footer = View.inflate(context, R.layout.common_dialog_footer_btn, null);

        v_vertical_line = footer.findViewById(R.id.v_vertical_line);
        tv_left = (TextView) footer.findViewById(R.id.tv_left);
        tv_right = (TextView) footer.findViewById(R.id.tv_right);

        return footer;
3.扩展
3.1 普通扩展
如果想要 用如下的 弹窗样式. 那么只需要简单几步就可以实现.
image.png
3.1.1 学习并继承 NormalBaseDialog,并实现其中的三个抽象方法 即可.
    /*************************构造子类的内容布局***********************/


    /**
     * 构造 实现类 内容布局
     * @return
     */
    public abstract View createContentView();


    /**
     * 处理 实现类的 view数据
     * @param parents view 的ViewGroup容器
     * @param v view本身
     */
    public abstract void handleContentView(ViewGroup parents, View v);

    /**
     * 子类view 监听器
     * @param v  事件分发 view
     */
    public abstract void onContentClick(View v);
3.1.2 举例说明 在app module中, 有MyDialogDialog ,清爽的代码~ .
/**
 * 自定义样式
 * Created by chenchangjun on 17/10/11.
 */

public class MyDialogDialog extends NormalBaseDialog implements View.OnClickListener {


    private ImageView card_pic;
    private TextView card_price;
    private TextView card_title;

    /**
     * 构造 实现类 内容布局
     *
     * @return
     */
    @Override
    public View createContentView() {
        View myView = View.inflate(context, R.layout.dialog_content_focus_dialog_v1, null);


        card_pic= (ImageView) myView.findViewById(R.id.card_pic);

        card_price= (TextView) myView.findViewById(R.id.card_price);
        card_title= (TextView) myView.findViewById(R.id.card_title);
        card_pic.setOnClickListener(this);
        return myView;
    }

    /**
     * 处理 实现类的 view数据
     *
     * @param parents view 的ViewGroup容器
     * @param v       view本身
     */
    @Override
    public void handleContentView(ViewGroup parents, View v) {
        card_pic.setImageResource(R.mipmap.ic_launcher_round);

    }

    /**
     * 子类view 监听器
     *
     * @param v 事件分发 view
     */
    @Override
    public void onContentClick(View v) {

        int i = v.getId();
        if (i == R.id.card_pic) {
            Toast.makeText(context,"hello MyDialog!!!!",Toast.LENGTH_SHORT).show();
        }
    }


    public MyDialogDialog setMyView(String st) {
        card_title.setText(st);
        return this;
    }

    public MyDialogDialog(Context context) {
        super(context);
    }

}
3.2 其他扩展
如果想要扩展, 根据需求相互扩展即可.
比如 CommonImgHeaderDialog 可以选择继承CommonNormalDialog.共用CommonNormalDialog的 内容布局和 底部布局. 所以,只需要加载header布局即可.
/**
 * 通用 带头部背景 样式
 * Created by chenchangjun on 17/10/11.
 */

public class CommonImgHeaderDialog extends CommonNormalDialog implements View.OnClickListener {

    private String url_header;
    private ImageView iv_header_cancel;
    private SimpleDraweeView iv_header;


    @Override
    protected void loadHeader() {


        if (type== DialogConfig.TYPE_HAS_HEADER){
            iv_header.setVisibility(View.VISIBLE);
            iv_header_cancel.setVisibility(View.VISIBLE);


            if (TextUtils.isEmpty(url_header)) {
                iv_header.setVisibility(View.GONE);
            } else {
                //iv_header.setImageURI(url_header);
                iv_header.setBackgroundResource(R.drawable.common_dialog_header_bg);
                Uri uri = Uri.parse(url_header);
                iv_header.setImageURI(uri);
            }

        }
    }

    public CommonImgHeaderDialog setHeaderUrl(String str) {
        url_header = str;
        return this;
    }

    public CommonImgHeaderDialog(Context context) {
        super(context);
    }

    @Override
    protected View initHeader() {
        View header=null;
        if (type==DialogConfig.TYPE_HAS_NO_HEADER){
            return null;
        }
        header = View.inflate(context, R.layout.common_dialog_pic_header, null);
        iv_header_cancel = (ImageView) header.findViewById(R.id.iv_header_cancel);
        iv_header = (SimpleDraweeView) header.findViewById(R.id.iv_header);
        iv_header_cancel.setOnClickListener(this);

        return header;
    }

}
4. 后期优化
1.优化为一个组件库 发布到 JCenter来使用
2.兼容更多的样式处理
3.精简lib中依赖的处理第三方库......