iOS界面布局之三——纯代码的autoLayout及布局动画
一、引言
关于界面布局,apple的策略已经趋于成熟,autolayout的优势在开发中也已经展现的淋漓尽致。除了使用storyBoard进行布局约束的拖拽,有时我们也需要在代码中进行autolayout的布局设置,Masonry库可以方便的创建约束属性,实际上,我们也没有必要再使用系统原生的代码来创建和设置约束,这篇博客只作为使用的方法备忘。前几篇布局介绍的链接如下:
使用autoresizing进行界面布局:http://my.oschina.net/u/2340880/blog/423357
初识autolayout布局模型:http://my.oschina.net/u/2340880/blog/423500
二、了解一个类
用代码来做视图间的相关约束,那么就一定要将“约束”也进行对象化,在iOS6之后,引入了autolayout这个概念,相应的也增加了NSLayoutConstraint这个对象,这个对象就是专门用来进行约束布局的设置对象。通过这个对象,我们可以设置类似视图对象之间的间距,约束的宽高,比例等属性。创建NSLayoutConstraint对象的方法有两种,下面我们分别介绍:
1、使用Objective-C风格的方法创建约束对象
所谓Objective-C风格的方法,就是通过原生枚举和一些属性设置来创建NSLayoutConstraint对象。使用NSLayoutConstraint类的如下方法:
|
1
|
+(instancetype)constraintWithItem:(id)view1 attribute:(NSLayoutAttribute)attr1 relatedBy:(NSLayoutRelation)relation toItem:(nullable id)view2 attribute:(NSLayoutAttribute)attr2 multiplier:(CGFloat)multiplier constant:(CGFloat)c;
|
先来介绍下方法中的参数都是什么意义,我们应该怎么用他们:
view1:要添加约束的视图对象。
attr1:要约束的对象属性,这个就是一些枚举,如下:
|
1
2
3
4
5
6
7
8
9
10
11
12
13
14
15
16
17
18
19
20
21
22
23
24
25
26
27
|
typedef
NS_ENUM(NSInteger, NSLayoutAttribute) {
NSLayoutAttributeLeft = 1,
//左
NSLayoutAttributeRight,
//右
NSLayoutAttributeTop,
//上
NSLayoutAttributeBottom,
//下
NSLayoutAttributeLeading,
//起始边,类似左,只在某些从右向左排列的语言中和NSLayoutAttributeLeft有大区别
NSLayoutAttributeTrailing,
//结束边
NSLayoutAttributeWidth,
//宽度
NSLayoutAttributeHeight,
//高度
NSLayoutAttributeCenterX,
//x中心
NSLayoutAttributeCenterY,
//y中心
NSLayoutAttributeBaseline,
//基线
NSLayoutAttributeLastBaseline = NSLayoutAttributeBaseline,
NSLayoutAttributeFirstBaseline NS_ENUM_AVAILABLE_IOS(8_0),
//下面的属性是设置的边距 意义和上面类似 对应左,右等边距
NSLayoutAttributeLeftMargin NS_ENUM_AVAILABLE_IOS(8_0),
NSLayoutAttributeRightMargin NS_ENUM_AVAILABLE_IOS(8_0),
NSLayoutAttributeTopMargin NS_ENUM_AVAILABLE_IOS(8_0),
NSLayoutAttributeBottomMargin NS_ENUM_AVAILABLE_IOS(8_0),
NSLayoutAttributeLeadingMargin NS_ENUM_AVAILABLE_IOS(8_0),
NSLayoutAttributeTrailingMargin NS_ENUM_AVAILABLE_IOS(8_0),
NSLayoutAttributeCenterXWithinMargins NS_ENUM_AVAILABLE_IOS(8_0),
NSLayoutAttributeCenterYWithinMargins NS_ENUM_AVAILABLE_IOS(8_0),
//无,后面会说应用场景
NSLayoutAttributeNotAnAttribute = 0
};
|
relation:约束的选项,对应<=,==,>=这些,枚举如下:
|
1
2
3
4
5
|
typedef
NS_ENUM(NSInteger, NSLayoutRelation) {
NSLayoutRelationLessThanOrEqual = -1,
//<=
NSLayoutRelationEqual = 0,
//==
NSLayoutRelationGreaterThanOrEqual = 1,
//>=
};
|
view2:与之对应添加约束的视图对象,例如,如过我要设置view1的上边距离父视图的上边一定间距,这个view2就是view1的父视图,如果我要设置view1与另一个视图一定距离,这个view2就是另一个视图。
attr2:view2的要约束的属性,和attr1含义一样。
multiplie:约束的比例,比如view1的宽是view2的宽的两倍,这个multiplie就是2.
C:这是具体的约束值
对于这些属性,文档上有这样的解释:view1.attr1 = view2.attr2 * multiplier + constant
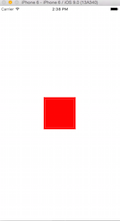
例如,我们创建一个label,将它的宽高固定为100*100,位置放在屏幕的中央,我们可以使用如下的约束代码:
|
1
2
3
4
5
6
7
8
9
10
11
12
13
14
15
16
|
UILabel * label = [[UILabel alloc]init];
label.numberOfLines = 0;
//使用代码布局 需要将这个属性设置为NO
label.translatesAutoresizingMaskIntoConstraints = NO;
label.backgroundColor = [UIColor redColor];
//创建x居中的约束
NSLayoutConstraint * constraintx = [NSLayoutConstraint constraintWithItem:label attribute:NSLayoutAttributeCenterX relatedBy:NSLayoutRelationEqual toItem:self.view attribute:NSLayoutAttributeCenterX multiplier:1 constant:0];
//创建y居中的约束
NSLayoutConstraint * constrainty = [NSLayoutConstraint constraintWithItem:label attribute:NSLayoutAttributeCenterY relatedBy:NSLayoutRelationEqual toItem:self.view attribute:NSLayoutAttributeCenterY multiplier:1 constant:0];
//创建宽度约束
NSLayoutConstraint * constraintw = [NSLayoutConstraint constraintWithItem:label attribute:NSLayoutAttributeWidth relatedBy:NSLayoutRelationEqual toItem:nil attribute:NSLayoutAttributeNotAnAttribute multiplier:1 constant:100];
//创建高度约束
NSLayoutConstraint * constrainth = [NSLayoutConstraint constraintWithItem:label attribute:NSLayoutAttributeHeight relatedBy:NSLayoutRelationEqual toItem:nil attribute:NSLayoutAttributeNotAnAttribute multiplier:1 constant:100];
//添加约束之前,必须将视图加在父视图上
[self.view addSubview:label];
[self.view addConstraints:@[constraintx,constrainty,constrainth,constraintw]];
|
效果如下:
可以发现,一个如此简单的约束方式,我们用这样的代码要写这么一大坨,麻烦而且不直观。于是,apple又提供给我们下面一种方式。
2.使用ASCLL字符创造艺术般的格式化字符串约束
看到这个小标题是不是眼前一亮,这个标题不是我凭空想象出来的,apple的文档上就是这么写的。十分可爱,对吧。相对于NSLayoutConstraint中的创建方法如下:
|
1
|
+ (NSArray<__kindof NSLayoutConstraint *> *)constraintsWithVisualFormat:(NSString *)format options:(NSLayoutFormatOptions)opts metrics:(nullable NSDictionary<NSString *,id> *)metrics views:(NSDictionary<NSString *, id> *)views;
|
那么我们先来看,什么是格式化的字符串约束。
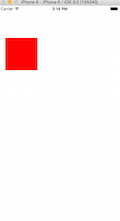
说到格式化的字符串约束,要先提一个东西VFL:visual format language——格式化约束语言,这又是什么鬼?确实,这个东西写出来第一眼看上去真的不知道是什么鬼,就比如要设置一个label,距离上边100,左边20,宽高都为100,代码如下:
|
1
2
3
4
5
6
7
8
9
10
|
label.numberOfLines = 0;
label.translatesAutoresizingMaskIntoConstraints = NO;
label.backgroundColor = [UIColor redColor];
//label.text=@"12332322132131233213213";
[self.view addSubview:label];
NSArray * constraintArray = [NSLayoutConstraint constraintsWithVisualFormat:@
"H:|-20-[label(100@1000)]"
options:0 metrics:nil views:NSDictionaryOfVariableBindings(label)];
NSArray * constraintArray2 = [NSLayoutConstraint constraintsWithVisualFormat:@
"V:|-100-[label(100)]"
options:0 metrics:nil views:NSDictionaryOfVariableBindings(label)];
[self.view addConstraints:constraintArray];
[self.view addConstraints:constraintArray2];
|
效果如下:
代码少了很多,对吧,但是中间那部分字符串什么玩意?下面我们来解释一下。
VFL语言我个人而言,他很类似于古代的象形文字(不知道是否apple的工程师从其中得到灵感),对布局的约束设置是直观的用符号表达出来的,例如:
|
1
|
H:|-20-[label(100@1000)]
|
前面的H代表是水平的布局还是垂直的布局,H代表水平,V表示垂直,|表示父视图的边沿,-20-表示距离20px,[]内是要布局摆放的视图对象名,()中是约束的尺寸,H下则为宽度,V下则为高度,@后面的数字代表优先级。
创建方法中的options参数,用来设置对齐模式,不需要可以写0:
|
1
2
3
4
5
6
7
8
9
10
11
12
13
14
15
16
17
18
19
20
21
22
23
|
typedef
NS_OPTIONS(NSUInteger, NSLayoutFormatOptions) {
NSLayoutFormatAlignAllLeft = (1 << NSLayoutAttributeLeft),
NSLayoutFormatAlignAllRight = (1 << NSLayoutAttributeRight),
NSLayoutFormatAlignAllTop = (1 << NSLayoutAttributeTop),
NSLayoutFormatAlignAllBottom = (1 << NSLayoutAttributeBottom),
NSLayoutFormatAlignAllLeading = (1 << NSLayoutAttributeLeading),
NSLayoutFormatAlignAllTrailing = (1 << NSLayoutAttributeTrailing),
NSLayoutFormatAlignAllCenterX = (1 << NSLayoutAttributeCenterX),
NSLayoutFormatAlignAllCenterY = (1 << NSLayoutAttributeCenterY),
NSLayoutFormatAlignAllBaseline = (1 << NSLayoutAttributeBaseline),
NSLayoutFormatAlignAllLastBaseline = NSLayoutFormatAlignAllBaseline,
NSLayoutFormatAlignAllFirstBaseline NS_ENUM_AVAILABLE_IOS(8_0) = (1 << NSLayoutAttributeFirstBaseline),
NSLayoutFormatAlignmentMask = 0xFFFF,
/* choose only one of these three
*/
NSLayoutFormatDirectionLeadingToTrailing = 0 << 16,
// default
NSLayoutFormatDirectionLeftToRight = 1 << 16,
NSLayoutFormatDirectionRightToLeft = 2 << 16,
NSLayoutFormatDirectionMask = 0x3 << 16,
};
|
metrics参数是属性替换字典,例如我们上边用到的距离左边界20,如果这个20是一个变量width,我们可以将20的地方换成width,然后配置这个字典:@{@"width":@20},这样,在布局时,系统会把width换成20。
views是对象的映射字典,原理也是将字符串中的对象名label映射成真实的对象,NSDictionaryOfVariableBindings会帮我们生成这样的字典,我们只需要想对象传进去即可,如果要手动创建这字典,格式如下:@{@"label":label}.
三、使用aotulayout设计一个聊天界面的输入框
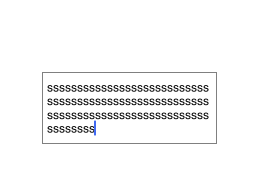
仔细观察QQ或者其他聊天工具的app上的输入框,会发现他非常智能,宽度会随着我们输入文字的行数进行自适应,并且这个宽度不是无限增大的,当我们文字多到一定行数,宽度会保持不变,文本框可以进行内容滑动,如果不用autolayout,这个功能会比较棘手一些,但是使用它,会发现这是如此的容易:
|
1
2
3
4
5
6
7
8
9
10
11
12
13
14
15
16
17
18
19
20
21
22
23
24
25
26
27
28
29
30
31
32
33
34
35
36
37
38
39
40
41
42
43
44
|
@interface ViewController ()<UITextViewDelegate>
{
UITextView * textView ;
NSArray * array1;
NSArray * array2;
}
@end
@implementation ViewController
- (
void
)viewDidLoad {
[super viewDidLoad];
// Do any additional setup after loading the view, typically from a nib.
textView = [[UITextView alloc]init];
textView.layer.borderColor = [[UIColor grayColor]CGColor];
textView.layer.borderWidth = 1;
textView.translatesAutoresizingMaskIntoConstraints = NO;
textView.delegate=self;
[self.view addSubview:textView];
array1 = [NSLayoutConstraint constraintsWithVisualFormat:@
"H:|-100-[textView]-100-|"
options:0 metrics:nil views:NSDictionaryOfVariableBindings(textView)];
array2 = [NSLayoutConstraint constraintsWithVisualFormat:@
"V:|-150-[textView(30)]"
options:0 metrics:nil views:NSDictionaryOfVariableBindings(textView)];
[self.view addConstraints:array1];
[self.view addConstraints:array2];
}
-(
BOOL
)textView:(UITextView *)textView shouldChangeTextInRange:(NSRange)range replacementText:(NSString *)text{
//当文本高度大于textView的高度并且小于100时,更新约束
if
(textView.contentSize.height>textView.frame.size.height&&textView.contentSize.height<100) {
float
hight =textView.contentSize.height;
//将以前的移除掉
[self.view removeConstraints:array1];
[self.view removeConstraints:array2];
array1 = [NSLayoutConstraint constraintsWithVisualFormat:@
"H:|-100-[textView]-100-|"
options:0 metrics:nil views:NSDictionaryOfVariableBindings(textView)];
array2 = [NSLayoutConstraint constraintsWithVisualFormat:@
"V:|-150-[textView(hight)]"
options:0 metrics:@{@
"hight"
:[NSNumber numberWithFloat:hight]} views:NSDictionaryOfVariableBindings(textView)];
[self.view addConstraints:array1];
[self.view addConstraints:array2];
}
//更新约束
[self.view updateConstraintsIfNeeded];
return
YES;
}
|
现在,当我们进行输入的时候,textView的高度可以自适应文字行数了。
四、通过动画改善更新约束时的效果
这一点非常coll,上面我们已经实现了textView随文本的行数高度进行自适应,但是变化的效果十分生硬,还要apple的动画框架支持autolayout,把刚才调用更新约束的地方进行如下修改:
|
1
2
3
|
[UIView animateWithDuration:1 animations:^{
[self.view layoutIfNeeded];
}];
|
试试看,变换的效果已经非常平滑了。