Windows Phone 7对3D的支持还是不错的,据说是用OpenGL/ES做的,使用起来倒是也有点那种感觉。本文就不讲XNA 4.0的游戏框架了,直接上一段代码,该代码使用VertexPositionColor渲染了一个三角形,程序运行一切正常。
2 .
运行结果如下:

在确认了3D开发的这种代码结构以后,用VertexPositionTexture渲染同样的三角形,只是这次采用纹理贴图,代码如下:
2 . view plaincopy to clipboardprint ?
3 . VertexPositionTexture[] trangleTexture;
4 .
5 . protected override void LoadContent()
6 . {
7 . spriteBatch = new SpriteBatch(GraphicsDevice);
8 .
9 . image = Content.Load < Texture2D > (@ " Images/Tulips " );
10 . trangleTexture = new VertexPositionTexture[]{
11 . new VertexPositionTexture( new Vector3( 0 , 1 , 0 ), new Vector2( 0.5f , 0 ) ),
12 . new VertexPositionTexture( new Vector3( 1 , - 1 , 0 ), new Vector2( 1 ,1f) ),
13 . new VertexPositionTexture( new Vector3( - 1 , - 1 , 0 ), new Vector2( 0 ,1f) )
14 . };
15 .
16 . vertexBuffer = new VertexBuffer(GraphicsDevice, typeof(VertexPositionTexture), trangleTexture.Length, BufferUsage.None);
17 . vertexBuffer.SetData < VertexPositionTexture > (trangleTexture);
18 .
19 . basicEffect = new BasicEffect(GraphicsDevice);
20 .
21 . GraphicsDevice.SetVertexBuffer(vertexBuffer);
22 . }
23 .
24 . protected override void Draw(GameTime gameTime)
25 . {
26 . GraphicsDevice.Clear(Color.CornflowerBlue);
27 .
28 . basicEffect.World = world;
29 . basicEffect.View = camera.view;
30 . basicEffect.Projection = camera.projection;
31 . basicEffect.Texture = image;
32 . basicEffect.TextureEnabled = true ;
33 .
34 . foreach (EffectPass pass in basicEffect.CurrentTechnique.Passes)
35 . {
36 . pass.Apply();
37 . GraphicsDevice.DrawUserPrimitives < VertexPositionTexture > (PrimitiveType.TriangleStrip, trangleTexture, 0 , 1 );
38 . }
39 . base.Draw(gameTime);
40 . }
啰嗦一句,在此代码中VertexPositionTexture的第二个Vetex2代表的是UV坐标,对应的含义是(0,0)点对应了纹理图片的左上角,(1,1)点对应了纹理图片的右下角。
上述代码在运行的时候会在VS2010的输出窗口中显示:
| A first chance exception of type 'System.NotSupportedException' occurred in Microsoft.Xna.Framework.Graphics.dll A first chance exception of type 'System.Threading.ThreadAbortException' occurred in Microsoft.Xna.Framework.dll |
同时模拟器里的程序直接退出,看不到结果。原因是什么呢?疑惑并仔细检视代码中……
与前一个彩色三角形对比,顶点顺序没变,摄像机位置没变,投影矩阵没变,按说是不可能出现这种问题的,而且程序直接崩了,没有信息抛出,真是很郁闷。
经过不断的试错,在宣布放弃之前,忽然想起来关于纹理方面的一个注意事项。有过3D开发经验的朋友都知道,纹理是要求符合2的整数次方对齐的,而我所加载的来自于外部任意图片的纹理不符合这一要求,所以程序挂了。
又查了一些资料,找到了准确的原因。原来是Windows Phone 7 的XNA中默认的纹理寻址模式使用了Wrap,造成了与GPU的不兼容,如果改成Clamp就好了。
看来在这个地方微软得要有文档说明才好,否则还真是难找问题所在。修改后的代码如下:
2 . protected override void LoadContent()
3 . {
4 . // Create a new SpriteBatch, which can be used to draw textures.
5 . spriteBatch = new SpriteBatch(GraphicsDevice);
6 .
7 . image = Content.Load < Texture2D > (@ " Images/Tulips " );
8 .
9 . trangleTexture = new VertexPositionTexture[]{
10 . new VertexPositionTexture( new Vector3( 0 , 1 , 0 ), new Vector2( 0.5f , 0 ) ),
11 . new VertexPositionTexture( new Vector3( 1 , - 1 , 0 ), new Vector2( 1 ,1f) ),
12 . new VertexPositionTexture( new Vector3( - 1 , - 1 , 0 ), new Vector2( 0 ,1f) )
13 . };
14 .
15 . vertexBuffer = new VertexBuffer(GraphicsDevice, typeof(VertexPositionTexture), trangleTexture.Length, BufferUsage.None);
16 . vertexBuffer.SetData < VertexPositionTexture > (trangleTexture);
17 .
18 . basicEffect = new BasicEffect(GraphicsDevice);
19 .
20 . GraphicsDevice.SetVertexBuffer(vertexBuffer);
21 . GraphicsDevice.SamplerStates[ 0 ] = SamplerState.PointClamp;
22 . }
23 .
最终的模拟器结果是:
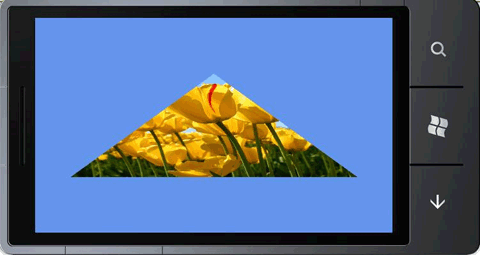
不管怎么说,Windows Phone 7的XNA游戏开发框架以及3D方面的开发接口还是很出色的,顶一下微软,并希望这个平台能尽快发展起来。
附Camera的代码:
2 . using System;
3 . using System.Collections.Generic;
4 . using System.Linq;
5 . using Microsoft.Xna.Framework;
6 . using Microsoft.Xna.Framework.Audio;
7 . using Microsoft.Xna.Framework.Content;
8 . using Microsoft.Xna.Framework.GamerServices;
9 . using Microsoft.Xna.Framework.Graphics;
10 . using Microsoft.Xna.Framework.Input;
11 . using Microsoft.Xna.Framework.Media;
12 .
13 .
14 . namespace WindowsPhoneGame1
15 . {
16 . public class Camera : Microsoft.Xna.Framework.GameComponent
17 . {
18 . public Matrix view{get; protected set;}
19 . public Matrix projection { get; protected set; }
20 .
21 . public Camera(Game game,Vector3 pos,Vector3 target,Vector3 up)
22 . : base(game)
23 . {
24 . view = Matrix.CreateLookAt(pos, target, up);
25 . projection = Matrix.CreatePerspectiveFieldOfView(MathHelper.PiOver4, ( float )game.Window.ClientBounds.Width / ( float )game.Window.ClientBounds.Height, 1 , 100 );
26 . }
27 .
28 . public override void Initialize()
29 . {
30 . base.Initialize();
31 . }
32 .
33 . public override void Update(GameTime gameTime)
34 . {
35 . base.Update(gameTime);
36 . }
37 . }
38 . }
39 .