一、 系统架构设计:从想法到蓝图
在开始编码之前,我们先勾勒出系统的核心组成部分,这就像建筑师的蓝图。
- 信息采集层(爬虫模块):负责从目标新闻网站抓取结构化数据(如标题、链接、发布时间)。
- 数据存储层(数据库):用于持久化存储爬取到的新闻数据,避免重复,并支持历史查询。
- 任务调度层(定时器):作为系统的大脑,定期触发爬虫任务,实现自动化更新。
- 简报生成层(邮件服务):将新增的新闻内容整理成优雅的HTML格式,并通过电子邮件发送给用户。
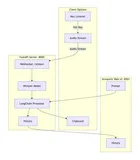
整个系统的工作流可以概括为:定时器在预设时间(如每天上午9点)启动爬虫 -> 爬虫抓取新闻并去重后存入数据库 -> 从数据库中提取当日新增新闻 -> 生成HTML简报 -> 通过SMTP服务发送到指定邮箱。
二、 技术选型:为什么是这些工具?
● 爬虫库: requests + BeautifulSoup
○ requests:简单优雅的HTTP库,用于获取网页源代码。
○ BeautifulSoup:强大的HTML/XML解析库,能从杂乱的网页中精准提取我们需要的数据。
○ 选择原因:组合灵活,学习曲线平缓,足以应对大多数静态新闻网站。
● 数据库: SQLite
○ 轻量级、无服务器的文件数据库,无需安装和配置。
○ 选择原因:完美适合个人项目,Python标准库原生支持,简化部署。
● 任务调度: APScheduler
○ 功能强大且易用的Python定时任务库。
○ 选择原因:比crontab更贴合Python生态,可以方便地在Python程序中嵌入和管理任务。
● 邮件服务: smtplib + email
○ Python标准库中的模块,用于构建和发送电子邮件。
○ 选择原因:无需额外安装,功能完备。
三、 实现步骤与核心代码
让我们一步步将蓝图变为现实。
步骤1:创建数据库模型
我们首先需要设计一张表来存储新闻。这里,link字段作为唯一标识,是实现去重的关键。db_manager.py
import sqlite3
from datetime import datetime
class DatabaseManager:
def init(self, db_path='news.db'):
self.db_path = db_path
self._create_table()
def _create_table(self):
    """创建新闻表"""
    conn = sqlite3.connect(self.db_path)
    cursor = conn.cursor()
    cursor.execute('''
        CREATE TABLE IF NOT EXISTS news (
            id INTEGER PRIMARY KEY AUTOINCREMENT,
            title TEXT NOT NULL,
            link TEXT UNIQUE NOT NULL,
            published_at TEXT,
            created_at TEXT DEFAULT CURRENT_TIMESTAMP
        )
    ''')
    conn.commit()
    conn.close()

def insert_news(self, title, link, published_at):
    """插入新闻,基于link去重"""
    conn = sqlite3.connect(self.db_path)
    cursor = conn.cursor()
    try:
        cursor.execute('''
            INSERT OR IGNORE INTO news (title, link, published_at)
            VALUES (?, ?, ?)
        ''', (title, link, published_at))
        conn.commit()
        inserted = cursor.rowcount > 0
    except sqlite3.Error as e:
        print(f"数据库错误: {e}")
        inserted = False
    finally:
        conn.close()
    return inserted

def get_latest_news(self, hours=24):
    """获取最近指定小时内的新闻"""
    conn = sqlite3.connect(self.db_path)
    cursor = conn.cursor()
    # 计算时间点
    time_threshold = datetime.now().timestamp() - hours * 3600
    cursor.execute('''
        SELECT title, link, published_at FROM news
        WHERE datetime(created_at) > datetime(?, 'unixepoch')
        ORDER BY created_at DESC
    ''', (time_threshold,))
    news = cursor.fetchall()
    conn.close()
    return news
步骤2:构建新闻爬虫
我们以抓取“澎湃新闻”的科技板块为例。在实际应用中,你可以为每个目标网站编写一个类似的爬虫函数。
crawler.py
import requests
from bs4 import BeautifulSoup
from db_manager import DatabaseManager
import time
import random
from datetime import datetime
代理配置
proxyHost = "www.16yun.cn"
proxyPort = "5445"
proxyUser = "16QMSOML"
proxyPass = "280651"
构建代理字典,支持HTTP和HTTPS
PROXIES = {
'http': f'http://{proxyUser}:{proxyPass}@{proxyHost}:{proxyPort}',
'https': f'https://{proxyUser}:{proxyPass}@{proxyHost}:{proxyPort}'
}
HEADERS = {
'User-Agent': 'Mozilla/5.0 (Windows NT 10.0; Win64; x64) AppleWebKit/537.36 (KHTML, like Gecko) Chrome/91.0.4472.124 Safari/537.36'
}
def get_with_proxy(url, headers=HEADERS, timeout=10, retries=3):
"""
使用代理发送请求,支持重试机制
"""
for attempt in range(retries):
try:
response = requests.get(
url,
headers=headers,
proxies=PROXIES,
timeout=timeout,
verify=False # 如果代理使用自签名证书,可能需要这个选项
)
response.raise_for_status()
return response
except requests.exceptions.ProxyError as e:
print(f"代理连接失败 (尝试 {attempt + 1}/{retries}): {e}")
if attempt < retries - 1:
time.sleep(2) # 等待后重试
except requests.exceptions.ConnectTimeout as e:
print(f"连接超时 (尝试 {attempt + 1}/{retries}): {e}")
if attempt < retries - 1:
time.sleep(2)
except requests.exceptions.RequestException as e:
print(f"请求异常 (尝试 {attempt + 1}/{retries}): {e}")
if attempt < retries - 1:
time.sleep(2)
# 所有重试都失败后,尝试不使用代理
print("代理请求失败,尝试直连...")
try:
    response = requests.get(url, headers=headers, timeout=timeout)
    response.raise_for_status()
    return response
except requests.RequestException as e:
    print(f"直连请求也失败: {e}")
    raise
def crawl_thepaper_news():
"""爬取澎湃新闻科技频道"""
db = DatabaseManager()
url = "https://www.thepaper.cn/channel_25951"
try:
    # 使用代理发送请求
    response = get_with_proxy(url)

    soup = BeautifulSoup(response.text, 'html.parser')
    news_items = soup.find_all('h2') # 根据实际网页结构调整选择器

    new_news_count = 0
    for item in news_items:
        a_tag = item.find('a')
        if a_tag and a_tag.get('href'):
            title = a_tag.get_text().strip()
            # 处理相对链接
            link = a_tag['href']
            if link.startswith('//'):
                link = 'https:' + link
            elif link.startswith('/'):
                link = 'https://www.thepaper.cn' + link

            # 模拟一个发布时间(实际网站可能需要从其他标签解析)
            published_at = datetime.now().strftime('%Y-%m-%d %H:%M:%S')

            # 存入数据库,并计数
            if db.insert_news(title, link, published_at):
                new_news_count += 1

        # 礼貌性爬取,添加短暂延迟
        time.sleep(random.uniform(0.5, 1.5))

    print(f"[澎湃新闻] 爬取完成,新增 {new_news_count} 条新闻。")
    return new_news_count

except requests.RequestException as e:
    print(f"爬取澎湃新闻时发生错误: {e}")
    return 0
def crawl_sina_news():
"""示例:爬取新浪新闻(使用代理)"""
db = DatabaseManager()
url = "https://news.sina.com.cn/tech/"
try:
    response = get_with_proxy(url)
    soup = BeautifulSoup(response.text, 'html.parser')

    # 这里需要根据新浪新闻的实际HTML结构调整选择器
    news_items = soup.find_all('a', class_='news-item')  # 示例选择器

    new_news_count = 0
    for item in news_items:
        title = item.get_text().strip()
        link = item.get('href')

        if link and title:
            # 处理相对链接
            if link.startswith('//'):
                link = 'https:' + link
            elif link.startswith('/'):
                link = 'https://news.sina.com.cn' + link

            published_at = datetime.now().strftime('%Y-%m-%d %H:%M:%S')

            if db.insert_news(title, link, published_at):
                new_news_count += 1

        time.sleep(random.uniform(0.5, 1.5))

    print(f"[新浪新闻] 爬取完成,新增 {new_news_count} 条新闻。")
    return new_news_count

except requests.RequestException as e:
    print(f"爬取新浪新闻时发生错误: {e}")
    return 0
def run_all_crawlers():
"""运行所有爬虫"""
print("开始执行爬虫任务...")
print(f"使用代理: {proxyHost}:{proxyPort}")
total_new_news = 0
total_new_news += crawl_thepaper_news()
# total_new_news += crawl_sina_news()  # 取消注释以启用新浪新闻爬虫

print(f"所有爬虫执行完毕,共新增 {total_new_news} 条新闻。")
return total_new_news
测试函数
def test_proxy_connection():
"""测试代理连接是否正常"""
test_url = "http://httpbin.org/ip"
try:
print("测试代理连接...")
response = get_with_proxy(test_url)
print(f"代理测试成功,当前IP: {response.json()}")
return True
except Exception as e:
print(f"代理测试失败: {e}")
return False
if name == "main":
# 运行代理测试
test_proxy_connection()

# 运行爬虫
run_all_crawlers()
步骤3:生成并发送HTML简报
将数据库中的最新新闻渲染成美观的HTML格式,并通过邮件发送。
email_sender.py
import smtplib
from email.mime.text import MIMEText
from email.mime.multipart import MIMEMultipart
from db_manager import DatabaseManager
from datetime import datetime
def generate_html_report(news_list):
"""生成HTML格式的简报"""
if not news_list:
return "
今日暂无新增新闻
"html_content = """
<html>
<head>
<style>
body { font-family: Arial, sans-serif; margin: 20px; }
.news-item { margin-bottom: 20px; padding-bottom: 15px; border-bottom: 1px solid #eee; }
.news-title { font-size: 18px; font-weight: bold; margin-bottom: 5px; }
.news-link a { color: #1a0dab; text-decoration: none; }
.news-link a:hover { text-decoration: underline; }
.news-time { color: #666; font-size: 14px; }
.header { color: #2c3e50; border-bottom: 2px solid #3498db; padding-bottom: 10px; }
</style>
</head>
<body>
<div class="header">
<h1>📰 您的个性化新闻简报</h1>
<p>更新日期: {date}</p>
</div>
""".format(date=datetime.now().strftime('%Y-%m-%d %H:%M'))
for title, link, published_at in news_list:
html_content += f"""
<div class="news-item">
<div class="news-title">{title}</div>
<div class="news-link"><a href="{link}" target="_blank">阅读原文</a></div>
<div class="news-time">发布时间: {published_at}</div>
</div>
"""
html_content += """
</body>
</html>
"""
return html_content
def send_email_report(smtp_config, news_list):
"""发送邮件简报"""
# 1. 生成HTML内容
html_content = generate_html_report(news_list)

# 2. 构建邮件
msg = MIMEMultipart('alternative')
msg['Subject'] = f"每日新闻简报 - {datetime.now().strftime('%Y-%m-%d')}"
msg['From'] = smtp_config['from_email']
msg['To'] = smtp_config['to_email']

# 附加HTML部分
html_part = MIMEText(html_content, 'html')
msg.attach(html_part)

try:
    # 3. 连接服务器并发送
    with smtplib.SMTP_SSL(smtp_config['smtp_server'], smtp_config['smtp_port']) as server:
        server.login(smtp_config['from_email'], smtp_config['password'])
        server.send_message(msg)
    print("新闻简报邮件发送成功!")
except Exception as e:
    print(f"发送邮件时发生错误: {e}")
def create_and_send_report(smtp_config):
"""创建并发送简报的主函数"""
db = DatabaseManager()
# 获取过去24小时的新闻
latest_news = db.get_latest_news(hours=24)
if latest_news:
    send_email_report(smtp_config, latest_news)
else:
    print("今日无新新闻,不发送简报。")
步骤4:整合与定时调度
最后,我们使用APScheduler将以上所有模块整合起来,并设置定时任务。
main.py
from apscheduler.schedulers.blocking import BlockingScheduler
from crawler import run_all_crawlers
from email_sender import create_and_send_report
邮箱配置 (请替换为你的真实信息)
SMTP_CONFIG = {
'smtp_server': 'smtp.qq.com', # 例如QQ邮箱SMTP服务器
'smtp_port': 465,
'from_email': 'your_email@qq.com',
'password': 'your_authorization_code', # 注意是SMTP授权码,不是登录密码
'to_email': 'recipient@email.com'
}
def scheduled_job():
"""定时执行的任务"""
print("\n" + "="*50)
print(f"开始执行定时任务: {datetime.now()}")
# 1. 运行爬虫
run_all_crawlers()
# 2. 生成并发送简报
create_and_send_report(SMTP_CONFIG)
print(f"定时任务执行完毕: {datetime.now()}")
print("="*50)
if name == 'main':
# 创建调度器
scheduler = BlockingScheduler()

# 添加定时任务
# 方式一:间隔时间执行,例如每6小时执行一次
# scheduler.add_job(scheduled_job, 'interval', hours=6)

# 方式二:每天固定时间执行,例如每天上午9点
scheduler.add_job(scheduled_job, 'cron', hour=9, minute=0)

print("新闻简报系统已启动,等待执行...")
try:
    scheduler.start()
except KeyboardInterrupt:
    print("\n程序被用户中断")
四、 部署与优化建议
- 部署:你可以将此系统部署到云服务器(如阿里云、腾讯云ECS)或树莓派上,并使用nohup或systemd服务让其在后端持续运行。
- 处理反爬:
○ 轮换User-Agent。
○ 使用代理IP池。
○ 在爬虫中增加更随机的延迟。
○ 考虑使用Selenium或Playwright应对JavaScript渲染的页面。 - 功能扩展:
○ 关键词过滤:在数据库查询或邮件生成阶段加入关键词筛选,只接收自己关心的主题。
○ 多格式输出:除了邮件,还可以集成钉钉、企业微信、Telegram等机器人API进行推送。
○ 数据可视化:定期生成新闻热点词云图,附在简报中。
○ 错误监控:为爬虫添加更完善的日志和报警机制,当爬虫连续失败时通知你。
结语
通过这个项目,我们不仅构建了一个实用的自动化工具,更串联起了现代软件开发中的多个核心环节:数据采集、数据处理、任务调度和系统集成。这个系统是一个强大的基石,你可以基于它无限扩展,打造一个真正懂你的、专属的智能信息中枢。