按住说话

定义是否正在说话的变量
// 按住说话 录音模态
  @State
  showTalkContainer: boolean = false
注册触摸事件 Touch
长按 按住说话时触发, Touch事件是会持续触发的,通过判断 event.type 来获知 触摸状态
- down 按下
- move 移动
- up 松开
Button("按住说话")
    .layoutWeight(1)
    .type(ButtonType.Normal)
    .borderRadius(5)
    .backgroundColor("#fff")
    .fontColor("#000")
    .onTouch(this.onPressTalk)
定义 this.onPressTalk
// 按住说话 持续触发
  onPressTalk = async (event: TouchEvent) => {
    if (event.type === TouchType.Down) {
      // 按下
      this.showTalkContainer = true
    } else if (event.type === TouchType.Up) {
      // 松开手
      this.showTalkContainer = false
    }
  }
实现全屏遮罩效果
该效果利用鸿蒙应用中的全模态实现 bindContentCover
给组件绑定全屏模态页面,点击后显示模态页面。模态页面内容自定义,显示方式可设置无动画过渡,上下切换过渡以及透明渐变过渡方式。
this.talkContainerBuilder 为全模态出现时对应的内容布局,它是一个自定义构建函数
Button("按住说话")
    .layoutWeight(1)
    .type(ButtonType.Normal)
    .borderRadius(5)
    .backgroundColor("#fff")
    .fontColor("#000")
    .bindContentCover($$this.showTalkContainer, this.talkContainerBuilder,
      { modalTransition: ModalTransition.NONE })
    .onTouch(this.onPressTalk)
定义this.talkContainerBuilder
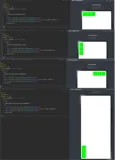
// 正在说话 页面布局
  @Builder
  talkContainerBuilder() {
    Column() {
      //   1 中心的提示
      Row() {
        Text()
          .width(10)
          .height(10)
          .backgroundColor("#95EC6A")
          .position({
            bottom: -5,
            left: "50%"
          })
          .translate({
            x: "-50%"
          })
          .rotate({
            angle: 45
          })
      }
      .width("50%")
      .height(80)
      .backgroundColor("#95EC6A")
      .position({
        top: "40%",
        left: "50%"
      })
      .translate({
        x: "-50%"
      })
      .borderRadius(10)
      .justifyContent(FlexAlign.Center)
      .alignItems(VerticalAlign.Center)
      //   2 取消和转文字
      Row() {
        Row() {
          Text("X")
            .fontSize(20)
            .width(60)
            .height(60)
            .borderRadius(30)
            .fontColor("#000")
            .backgroundColor("#fff")
            .textAlign(TextAlign.Center)
            .align(Alignment.Center)
            .fontColor("#ccc")
            .id("aabb")
            .rotate({ angle: -20 })
        }
        Row() {
          Text("文")
            .fontSize(20)
            .width(60)
            .height(60)
            .borderRadius(30)
            .fontColor("#ccc")
            .backgroundColor("#333")
            .textAlign(TextAlign.Center)
            .align(Alignment.Center)
            .id("ddee")
            .rotate({ angle: 20 })
        }
        // 3  松开发送
        Text("松开发送")
          .fontColor("#fff")
          .width("100%")
          .position({
            bottom: 0,
            left: 0
          })
          .textAlign(TextAlign.Center)
      }
      .width("100%")
      .position({
        bottom: "23%"
      })
      .justifyContent(FlexAlign.SpaceBetween)
      .padding({
        left: 60, right: 60
      })
      //   4 底部白色大球
      Row() {
      }
      .width(600)
      .height(600)
      .backgroundColor("#fff")
      .position({
        bottom: 0,
        left: "50%"
      })
      .translate({
        x: "-50%",
        y: "70%"
      })
      .borderRadius("50%")
    }
    .width("100%")
    .height("100%")
    .backgroundColor("rgba(0,0,0,0.5)")
  }
说话声纹

这个绿色容器中的波纹,是通过canva来描述的,真正的逻辑应该是监听或者获取当前声音音量的大小,然后根据它转换对应的波纹。但是没有在鸿蒙中直接找到api,查阅资料发现需要自己分析音频文件数据,自己转化才可以,时间关系就没有继续往下实现。使用随机数简单模拟了下。
配置 CanvasRenderingContext2D 对象的参数
//用来配置 CanvasRenderingContext2D 对象的参数,包括是否开启抗锯齿,true表明开启抗锯齿。
  settings: RenderingContextSettings = new RenderingContextSettings(true)
用来创建CanvasRenderingContext2D对象
//用来创建CanvasRenderingContext2D对象,通过在canvas中调用CanvasRenderingContext2D对象来绘制。
  context: CanvasRenderingContext2D = new CanvasRenderingContext2D(this.settings)
定义声纹自定义构建函数
这里使用canvas画布技术,在onReady 生命周期函数中 通过开启一个定时器,在定时器中不断重复以下过程
- 通过clearRect 清空上一次描绘的波纹
- 通过 fillRect 随机描绘这一次的波纹
最后,如果此组件被销毁了,可以在 onDisAppear 中停止定时器
/**
   * 录音中的 动态声纹波浪
   */
  @Builder
  vocalPrint() {
    Canvas(this.context)
      .onDisAppear(() => {
        clearInterval(this.voiceTimeId)
      })
      .width('80%')
      .height('80%')
      .onReady(() => {
        //可以在这里绘制内容。
        clearInterval(this.voiceTimeId)
        this.voiceTimeId = setInterval(() => {
          this.context.clearRect(0, 0, 1000, 1000)
          for (let index = 0; index < 35; index++) {
            const random = Math.floor(Math.random() * 10)
            let height = 20 + random
            this.context.fillRect(0 + index * 5, 32 - height / 2, 2, height);
          }
        }, 100)
      })
  }
使用声纹构造函数

发送信息-取消发送

这部分的UI交互相对来说比较复杂,当按住 按住说话 时:
- 手指移动到 X, 表示取消发送
- 手指移动到文,表示转换文字
- 手指直接松开时,发送录音
这部分功能的核心思想时,检测手指是否移动到了相应的元素,触发对应的业务逻辑即可。但是现实的问题是,找不到合适的事件,比如元素引入事件,所以后期采取的是检测手指在整个屏幕的坐标是否触及到了 X 和 文 来实现。
定义长按状态的枚举
- 没有长按
- 长按
- 长按-X
- 长按-文
enum PressCancelVoicePostText {
  // 没有长按
  none = 0,
  //   长按 没有选中“取消发送”或者"转语音"
  presssing = 1,
  //   取消发送
  cancelVoice = 2,
  //   转文字
  postText = 3
}
定义手指坐标类型
/**
 * 长按时,手指的坐标
 */
interface ScreenOffset {
  x: number
  y: number
  width: number
  height: number
}
定义长按状态
// 长按状态
@State
pressCancelVoicePostText: PressCancelVoicePostText = PressCancelVoicePostText.none
定义 X 和 文的坐标状态
// “x ”的坐标
  xScreenOffset: ScreenOffset = {
    x: 0,
    y: 0,
    width: 0,
    height: 0
  }
  TextScreenOffset: ScreenOffset = {
    x: 0,
    y: 0,
    width: 0,
    height: 0
  }
实时获取 X 和 文 的坐标
在组件中监听 onAppear 事件,根据组件的唯一标识id来获取坐标数据

X
Text("X")
            .fontSize(20)
            .width(60)
            .height(60)
            .borderRadius(30)
            .fontColor(this.pressCancelVoicePostText === PressCancelVoicePostText.cancelVoice ? "#000" : "#ccc")
            .backgroundColor(this.pressCancelVoicePostText === PressCancelVoicePostText.cancelVoice ? "#fff" : "#333")
            .textAlign(TextAlign.Center)
            .align(Alignment.Center)
            .fontColor("#ccc")
            .id("aabb")
            .rotate({ angle: -20 })
            .onAppear(() => {
              let modePosition: componentUtils.ComponentInfo = componentUtils.getRectangleById("aabb");
              this.xScreenOffset.x = px2vp(modePosition.screenOffset.x)
              this.xScreenOffset.y = px2vp(modePosition.screenOffset.y)
              this.xScreenOffset.width = px2vp(modePosition.size.width)
              this.xScreenOffset.height = px2vp(modePosition.size.height)
            })
文
Text("文")
            .fontSize(20)
            .width(60)
            .height(60)
            .borderRadius(30)
            .fontColor(this.pressCancelVoicePostText === PressCancelVoicePostText.postText ? "#000" : "#ccc")
            .backgroundColor(this.pressCancelVoicePostText === PressCancelVoicePostText.postText ? "#fff" : "#333")
            .textAlign(TextAlign.Center)
            .align(Alignment.Center)
            .id("ddee")
            .rotate({ angle: 20 })
            .onAppear(() => {
              let modePosition: componentUtils.ComponentInfo = componentUtils.getRectangleById("ddee");
              // px单位
              this.TextScreenOffset.x = px2vp(modePosition.screenOffset.x)
              this.TextScreenOffset.y = px2vp(modePosition.screenOffset.y)
              this.TextScreenOffset.width = px2vp(modePosition.size.width)
              this.TextScreenOffset.height = px2vp(modePosition.size.height)
            })
调整touch事件onPressTalk的逻辑
该函数的调整逻辑是 判断当前手指的坐标是否触碰到了 X 或者 文 , 然后设置对应的状态
// 按住说话 持续触发
  onPressTalk = async (event: TouchEvent) => {
    if (event.type === TouchType.Down) {
      // 手指按下时触发
      this.pressCancelVoicePostText = PressCancelVoicePostText.presssing
      // 按下
      this.showTalkContainer = true
    } else if (event.type === TouchType.Move) {
      // 手指移动时持续触发
      this.pressCancelVoicePostText = PressCancelVoicePostText.presssing
      // 获取当前手指的坐标
      const x = event.touches[0].displayX
      const y = event.touches[0].displayY
      // 判断是否碰到了 “X”
      let isTouchX = this.xScreenOffset.x <= x && this.xScreenOffset.x + this.xScreenOffset.width >= x &&
        this.xScreenOffset.y <= y && this.xScreenOffset.y + this.xScreenOffset.width >= y
      // 判断是否碰到了 "文"
      let isTouchText = this.TextScreenOffset.x <= x && this.TextScreenOffset.x + this.TextScreenOffset.width >= x &&
        this.TextScreenOffset.y <= y && this.TextScreenOffset.y + this.TextScreenOffset.width >= y
      if (isTouchX) {
        // 取消发送
        this.pressCancelVoicePostText = PressCancelVoicePostText.cancelVoice
      } else if (isTouchText) {
        // 转换文字
        this.pressCancelVoicePostText = PressCancelVoicePostText.postText
      }
    } else if (event.type === TouchType.Up) {
      // 松开手
      this.showTalkContainer = false
      if (this.pressCancelVoicePostText === PressCancelVoicePostText.postText) {
        // 转换文字
      } else if (this.pressCancelVoicePostText === PressCancelVoicePostText.cancelVoice) {
        // 取消发送
      } else {
        // 发送录音
      }
    }
  }
添加 X 和 文字的 样式

当 this.pressCancelVoicePostText 状态发生改变时,需要调整 对应的组件的样式


调整声纹容器的样式

- 如果当前正在录音,显示正常绿色的声纹
- 如果当前取消发送,显示取消红色的声纹
- 如果当前转换文字,显示绿色的空的内容-后期存放实时的语音转换的文字
//   1 中心的提示   显示波浪线
      Row() {
        if (this.pressCancelVoicePostText !== PressCancelVoicePostText.postText) {
          // 声纹
          this.vocalPrint()
        } else {
          Scroll() {
            // 显示录音的文字
            Text("")
              .fontSize(12)
              .fontColor("#666")
          }
          .width("100%")
          .height("100%")
        }
        Text()
          .width(10)
          .height(10)
          .backgroundColor(this.pressCancelVoicePostText === PressCancelVoicePostText.cancelVoice ? Color.Red :
            "#95EC6A")
          .position({
            bottom: -5,
            left: "50%"
          })
          .translate({
            x: "-50%"
          })
          .rotate({
            angle: 45
          })
      }
      .width("50%")
      .height(80)
      .backgroundColor(this.pressCancelVoicePostText === PressCancelVoicePostText.cancelVoice ? Color.Red : "#95EC6A")
      .position({
        top: "40%",
        left: "50%"
      })
      .translate({
        x: "-50%"
      })
      .borderRadius(10)
      .justifyContent(FlexAlign.Center)
      .alignItems(VerticalAlign.Center)
完整代码
/**
 * 当前输入状态 语音或者文本
 */
import { componentUtils } from '@kit.ArkUI'
enum WXInputType {
  /**
   * 语音输入
   */
  voice = 0,
  /**
   * 文本输入
   */
  text = 1
}
enum MessageType {
  /**
   * 声音
   */
  voice = 0,
  /**
   * 文本
   */
  text = 1
}
// 消息
class ChatMessage {
  /**
   * 消息类型:【录音、文本】
   */
  type: MessageType
  /**
   * 内容 [录音-文件路径,文本-内容]
   */
  content: string
  /**
   * 消息时间
   */
  time: string
  /**
   * 声音的持续时间 单位毫秒
   */
  duration?: number
  /**
   * 录音转的文字
   */
  translateText?: string
  /**
   * 是否显示转好的文字
   */
  isShowTranslateText: boolean = false
  constructor(type: MessageType, content: string, duration?: number, translateText?: string) {
    this.type = type
    this.content = content
    const date = new Date()
    this.time = `${date.getHours().toString().padStart(2, '0')}:${date.getMinutes().toString().padStart(2, '0')}`
    this.duration = duration
    this.translateText = translateText
  }
}
enum PressCancelVoicePostText {
  // 没有长按
  none = 0,
  //   长按 没有选中“取消发送”或者"转语音"
  presssing = 1,
  //   取消发送
  cancelVoice = 2,
  //   转文字
  postText = 3
}
/**
 * 长按时,手指的坐标
 */
interface ScreenOffset {
  x: number
  y: number
  width: number
  height: number
}
@Entry
@Component
struct Index {
  // 状态栏高度
  @StorageProp("vpHeight")
  vpHeight: number = 0
  // 输入框内容
  @State
  textValue: string = ""
  // 输入状态 语音或者文字
  @State
  inputType: WXInputType = WXInputType.voice
  // 消息
  @State
  chatList: ChatMessage[] = []
  // 按住说话 录音模态
  @State
  showTalkContainer: boolean = false
  // 长按状态
  @State
  pressCancelVoicePostText: PressCancelVoicePostText = PressCancelVoicePostText.none
  //用来配置 CanvasRenderingContext2D 对象的参数,包括是否开启抗锯齿,true表明开启抗锯齿。
  settings: RenderingContextSettings = new RenderingContextSettings(true)
  //用来创建CanvasRenderingContext2D对象,通过在canvas中调用CanvasRenderingContext2D对象来绘制。
  context: CanvasRenderingContext2D = new CanvasRenderingContext2D(this.settings)
  // 声明波纹定时器id
  voiceTimeId: number = -1
  // “x ”的坐标
  xScreenOffset: ScreenOffset = {
    x: 0,
    y: 0,
    width: 0,
    height: 0
  }
  TextScreenOffset: ScreenOffset = {
    x: 0,
    y: 0,
    width: 0,
    height: 0
  }
  // 发送文本消息
  sendTextMessage = () => {
    if (!this.textValue.trim()) {
      return
    }
    const chat = new ChatMessage(MessageType.text, this.textValue.trim())
    this.chatList.push(chat)
    this.textValue = ""
  }
  // 按住说话 持续触发
  onPressTalk = async (event: TouchEvent) => {
    if (event.type === TouchType.Down) {
      // 手指按下时触发
      this.pressCancelVoicePostText = PressCancelVoicePostText.presssing
      // 按下
      this.showTalkContainer = true
    } else if (event.type === TouchType.Move) {
      // 手指移动时持续触发
      this.pressCancelVoicePostText = PressCancelVoicePostText.presssing
      // 获取当前手指的坐标
      const x = event.touches[0].displayX
      const y = event.touches[0].displayY
      // 判断是否碰到了 “X”
      let isTouchX = this.xScreenOffset.x <= x && this.xScreenOffset.x + this.xScreenOffset.width >= x &&
        this.xScreenOffset.y <= y && this.xScreenOffset.y + this.xScreenOffset.width >= y
      // 判断是否碰到了 "文"
      let isTouchText = this.TextScreenOffset.x <= x && this.TextScreenOffset.x + this.TextScreenOffset.width >= x &&
        this.TextScreenOffset.y <= y && this.TextScreenOffset.y + this.TextScreenOffset.width >= y
      if (isTouchX) {
        // 取消发送
        this.pressCancelVoicePostText = PressCancelVoicePostText.cancelVoice
      } else if (isTouchText) {
        // 转换文字
        this.pressCancelVoicePostText = PressCancelVoicePostText.postText
      }
    } else if (event.type === TouchType.Up) {
      // 松开手
      this.showTalkContainer = false
      if (this.pressCancelVoicePostText === PressCancelVoicePostText.postText) {
        // 转换文字
      } else if (this.pressCancelVoicePostText === PressCancelVoicePostText.cancelVoice) {
        // 取消发送
      } else {
        // 发送录音
      }
    }
  }
  build() {
    Column() {
      // 1 顶部标题栏
      Row() {
        Image($r("app.media.left"))
          .width(25)
        Text("kto卋讓硪玩孫悟空")
        Image($r("app.media.more"))
          .width(25)
      }
      .width("100%")
      .justifyContent(FlexAlign.SpaceBetween)
      .border({
        width: {
          bottom: 1
        },
        color: "#ddd"
      })
      .padding(10)
      .expandSafeArea([SafeAreaType.KEYBOARD], [SafeAreaEdge.BOTTOM])
      //   2 聊天滚动容器
      Scroll() {
        Column({ space: 10 }) {
          ForEach(this.chatList, (item: ChatMessage, index: number) => {
            if (item.type === MessageType.text) {
              this.chatTextBuilder(item.content, item.time)
            }
          })
        }.width("100%")
        .padding(10)
        .justifyContent(FlexAlign.Start)
      }
      .layoutWeight(1)
      .align(Alignment.Top)
      .expandSafeArea([SafeAreaType.KEYBOARD], [SafeAreaEdge.BOTTOM])
      //   3 底部聊天发送框
      Row({ space: 5 }) {
        if (WXInputType.text === this.inputType) {
          Image($r("app.media.voice"))
            .width(40)
            .fillColor("#333")
            .borderRadius(20)
            .border({ width: 2 })
            .onClick(() => {
              this.inputType = WXInputType.voice
            })
          TextInput({ text: $$this.textValue })
            .onAppear(() => {
              // 自动显示焦点
              this.getUIContext().getFocusController().requestFocus("textinput1")
            })
            .layoutWeight(1)
            .backgroundColor("#fff")
            .borderRadius(3)
            .defaultFocus(true)
            .id("textinput1")
        } else if (WXInputType.voice === this.inputType) {
          Image($r("app.media.keyboard"))
            .width(40)
            .fillColor("#333")
            .borderRadius(20)
            .border({ width: 2 })
            .onClick(() => {
              this.inputType = WXInputType.text
            })
          Button("按住说话")
            .layoutWeight(1)
            .type(ButtonType.Normal)
            .borderRadius(5)
            .backgroundColor("#fff")
            .fontColor("#000")
            .bindContentCover($$this.showTalkContainer, this.talkContainerBuilder,
              { modalTransition: ModalTransition.NONE })
            .onTouch(this.onPressTalk)
        }
        Image($r("app.media.smile"))
          .width(40)
          .fillColor("#333")
        if (this.textValue.length) {
          Button("发送")
            .backgroundColor("#08C060")
            .type(ButtonType.Normal)
            .fontColor("#fff")
            .borderRadius(5)
            .onClick(this.sendTextMessage)
        } else {
          Image($r("app.media.plus"))
            .width(48)
            .fillColor("#333")
        }
      }
      .width("100%")
      .padding(10)
      .backgroundColor("#F7F7F7")
    }
    .height('100%')
    .width('100%')
    .backgroundColor("#EDEDED")
    .backgroundImageSize(ImageSize.Cover)
    .padding({
      top: this.vpHeight + 20
    })
  }
  // 文字消息
  @Builder
  chatTextBuilder(text: string, time: string) {
    Column({ space: 5 }) {
      Text(time)
        .width("100%")
        .textAlign(TextAlign.Center)
        .fontColor("#666")
        .fontSize(14)
      Row() {
        Flex({ justifyContent: FlexAlign.End }) {
          Row() {
            Text(text)
              .padding(11);
            Text()
              .width(10)
              .height(10)
              .backgroundColor("#93EC6C")
              .position({
                right: 0,
                top: 15
              })
              .translate({
                x: 5,
              })
              .rotate({
                angle: 45
              });
          }
          .backgroundColor("#93EC6C")
          .margin({ right: 15 })
          .borderRadius(5);
          Image($r("app.media.avatar"))
            .width(40)
            .aspectRatio(1);
        }
        .width("100%");
      }
      .width("100%")
      .padding({
        left: 40
      })
      .justifyContent(FlexAlign.End)
    }
    .width("100%")
  }
  // 正在说话 页面布局
  @Builder
  talkContainerBuilder() {
    Column() {
      //   1 中心的提示   显示波浪线
      Row() {
        if (this.pressCancelVoicePostText !== PressCancelVoicePostText.postText) {
          // 声纹
          this.vocalPrint()
        } else {
          Scroll() {
            // 显示录音的文字
            Text("")
              .fontSize(12)
              .fontColor("#666")
          }
          .width("100%")
          .height("100%")
        }
        Text()
          .width(10)
          .height(10)
          .backgroundColor(this.pressCancelVoicePostText === PressCancelVoicePostText.cancelVoice ? Color.Red :
            "#95EC6A")
          .position({
            bottom: -5,
            left: "50%"
          })
          .translate({
            x: "-50%"
          })
          .rotate({
            angle: 45
          })
      }
      .width("50%")
      .height(80)
      .backgroundColor(this.pressCancelVoicePostText === PressCancelVoicePostText.cancelVoice ? Color.Red : "#95EC6A")
      .position({
        top: "40%",
        left: "50%"
      })
      .translate({
        x: "-50%"
      })
      .borderRadius(10)
      .justifyContent(FlexAlign.Center)
      .alignItems(VerticalAlign.Center)
      //   2 取消和转文字
      Row() {
        Row() {
          Text("X")
            .fontSize(20)
            .width(60)
            .height(60)
            .borderRadius(30)
            .fontColor(this.pressCancelVoicePostText === PressCancelVoicePostText.cancelVoice ? "#000" : "#ccc")
            .backgroundColor(this.pressCancelVoicePostText === PressCancelVoicePostText.cancelVoice ? "#fff" : "#333")
            .textAlign(TextAlign.Center)
            .align(Alignment.Center)
            .fontColor("#ccc")
            .id("aabb")
            .rotate({ angle: -20 })
            .onAppear(() => {
              let modePosition: componentUtils.ComponentInfo = componentUtils.getRectangleById("aabb");
              this.xScreenOffset.x = px2vp(modePosition.screenOffset.x)
              this.xScreenOffset.y = px2vp(modePosition.screenOffset.y)
              this.xScreenOffset.width = px2vp(modePosition.size.width)
              this.xScreenOffset.height = px2vp(modePosition.size.height)
            })
        }
        Row() {
          Text("文")
            .fontSize(20)
            .width(60)
            .height(60)
            .borderRadius(30)
            .fontColor(this.pressCancelVoicePostText === PressCancelVoicePostText.postText ? "#000" : "#ccc")
            .backgroundColor(this.pressCancelVoicePostText === PressCancelVoicePostText.postText ? "#fff" : "#333")
            .textAlign(TextAlign.Center)
            .align(Alignment.Center)
            .id("ddee")
            .rotate({ angle: 20 })
            .onAppear(() => {
              let modePosition: componentUtils.ComponentInfo = componentUtils.getRectangleById("ddee");
              // px单位
              this.TextScreenOffset.x = px2vp(modePosition.screenOffset.x)
              this.TextScreenOffset.y = px2vp(modePosition.screenOffset.y)
              this.TextScreenOffset.width = px2vp(modePosition.size.width)
              this.TextScreenOffset.height = px2vp(modePosition.size.height)
            })
        }
        // 3  松开发送
        Text(this.pressCancelVoicePostText === PressCancelVoicePostText.cancelVoice ? '取消发送' :
          (this.pressCancelVoicePostText === PressCancelVoicePostText.postText ? '转换文字' : "松开发送"))
          .fontColor("#fff")
          .width("100%")
          .position({
            bottom: 0,
            left: 0
          })
          .textAlign(TextAlign.Center)
      }
      .width("100%")
      .position({
        bottom: "23%"
      })
      .justifyContent(FlexAlign.SpaceBetween)
      .padding({
        left: 60, right: 60
      })
      //   4 底部白色大球
      Row() {
      }
      .width(600)
      .height(600)
      .backgroundColor("#fff")
      .position({
        bottom: 0,
        left: "50%"
      })
      .translate({
        x: "-50%",
        y: "70%"
      })
      .borderRadius("50%")
    }
    .width("100%")
    .height("100%")
    .backgroundColor("rgba(0,0,0,0.5)")
  }
  /**
   * 录音中的 动态声纹波浪
   */
  @Builder
  vocalPrint() {
    Canvas(this.context)
      .onDisAppear(() => {
        clearInterval(this.voiceTimeId)
      })
      .width('80%')
      .height('80%')
      .onReady(() => {
        //可以在这里绘制内容。
        clearInterval(this.voiceTimeId)
        this.voiceTimeId = setInterval(() => {
          this.context.clearRect(0, 0, 1000, 1000)
          for (let index = 0; index < 35; index++) {
            const random = Math.floor(Math.random() * 10)
            let height = 20 + random
            this.context.fillRect(0 + index * 5, 32 - height / 2, 2, height);
          }
        }, 100)
      })
  }
}
总结
一、清晰的枚举定义
代码中使用枚举类型WXInputType和MessageType分别明确了当前输入状态(语音或文本)以及消息类型,使得代码的可读性和可维护性大大增强。这种方式可以避免使用魔法数字,让开发者更容易理解代码的意图。
二、面向对象的消息类设计
定义了ChatMessage类来表示消息,清晰地封装了消息的各种属性,如消息类型、内容、时间、持续时间、录音转文字结果以及是否显示转好的文字等。这种面向对象的设计方式使得消息的处理更加模块化,方便在不同的地方进行复用和管理。
三、丰富的交互处理
- 通过对触摸事件的处理,实现了按住说话的功能。在手指按下、移动和抬起时分别进行不同的状态判断和操作,包括判断是否碰到 “取消发送” 或 “转文字” 的区域,并根据不同状态进行相应的处理。
- 底部聊天发送框根据输入状态动态切换显示内容,当输入类型为文本时显示文本输入相关的组件,当为语音时显示按住说话的按钮等,为用户提供了灵活的输入方式选择。
四、强大的页面构建和布局
- 使用
build方法构建页面结构,清晰地划分了顶部标题栏、聊天滚动容器和底部聊天发送框等部分,通过Column和Row的组合以及各种属性设置,实现了美观且合理的页面布局。 - 在消息显示部分,通过
chatTextBuilder方法构建文字消息的布局,包括时间显示、文本内容、背景颜色和图标等,使得消息展示更加清晰美观。 talkContainerBuilder方法构建了按住说话时的页面布局,包括声纹显示、取消和转文字按钮以及底部白色大球等元素,为用户提供了直观的交互界面。
五、动态声纹效果实现
通过vocalPrint方法利用Canvas绘制动态声纹波浪,在录音过程中通过定时器不断更新画布内容,实现了生动的声纹效果,增强了用户体验。